
Renovating My 50 Year Old Workshop Part 1 : Demolition & Waterproofing
I'm renovating a 50 year old woodworking shop to transform it into my dream workshop. Welcome to part 1, where I cover some of the demolition work plus doing some waterproofing on the concrete block walls.
🛠 Global Industrial Tools :
📦 Materials Used :
🛠 Tools Used :
In case you guys missed it, I bought my dream shop over the summer, which is super exciting, but there’s also a ton of work to be done to get this place renovated. Since I published my shop tour video back in October, I’ve been working on things in the background and I’ll have a bunch of videos coming up showing you the work I’ve done.

Removing Old Insulation
The first thing I tackled after filming the shop tour video was having the old, ratty insulation removed. Getting this stuff out of the way was step one, since I knew I’d need access to those floor joists for all of the framing and electrical work I’ll be doing here.
I paid an insulation company to remove and dispose of the old insulation and honestly didn’t get much footage of the removal process because of the insane amount of dust that came down while the insulation was doing removed.
This building was a cabinet shop for many years prior to me purchasing it and evidently the dust generated by the shop worked its way into every nook and cranny of the insulation.
After the insulation was removed, there was a solid 1/4 to 1/2 inch layer of dust on every surface in the shop and I had my work cut out for me cleaning everything up. I spent a few hours with a shop vac getting up the bulk of the material, and my buddy Seth from Berk Peak also let me borrow his Makita robotic vacuum to help continue the cleanup process.
Remove Previous Tenants Junk
The next step in the clean up process was getting rid of all of the junk the previous owner had left behind, including this very questionable wall in the middle of the spray booth. I’m pretty sure there was a very specific horticultural purpose for building this wall as evidenced by some of the specialty light bulbs left behind, if you catch my drift, but I wanted the space back so I demoed the wall and got rid of the materials.
Move Drop Ceiling Tiles and Unboxing New Tools
I had also received a big delivery of all of the drop ceiling tiles and grid from Armstrong Ceilings, which I had to hand unload into the shop, and I wanted to move these tiles into the spray booth to get them out of the way for the time being.
Unfortunately, I didn’t have a way to move the pallets but thankfully the folks from Global Industrial, who are the sponsor of this week’s video, came to my rescue by sending me one of their amazing electric pallet jacks.

Unboxing this thing kind of felt like Christmas morning for me and, after getting the crate disassembled, it fired right up, with a full charge nonetheless, and I could roll it off the pallet.
I of course had to play around with the pallet jack a little first, and decided to move the shipping crate around a bit, which it of course had no trouble with, as this thing has a 3300 pound capacity.
After getting the hang of the controls, I decided to go for it and moved the ceiling tiles into the spray booth and man, this pallet jack was already paying for itself in the time it saved me.
I got all three pallets moved into the spray booth in a matter of minutes and then I could unbox some more goodies from Global Industrial, starting with this utility cart.
Since this new shop is obviously a lot larger than my old shop, carts and dollies are going to be constantly used for moving materials and tools around the shop and I figured a utility cart would be incredibly handy for keeping things organized.

I also got this monster of a fan from Global Industrial and this thing moves a serious amount of air and will be great for pushing dust and fumes out of the shop.
Last but certainly not least, and one of the things I was most excited about, was this power scissor lift table. My buddy Mike Farrington has one of these in his shop and, ever since I saw it, I knew I wanted one in my shop.

I’ll be building a workbench top for this in a future video and can’t wait to have a height adjustable workbench for when I’m working on larger or smaller projects.
Removing Old Shelving and How to Neutralize Mold
Continuing the demolition process, I jumped over to the addition, the leftmost kind of hallway looking section of my new shop, and demoed the sagging particleboard shelving and plywood platform. This revealed some mold buildup, probably from some water leaking in under this plywood platform over the years, as I know this area sees water infiltration if it rains hard enough.

To help neutralize the mold, I sprayed on a heavy coat of this mold removal spray and this seems to have done the trick as there is no visible mold now.

The insulation was then removed in this area, and evidently I had a little friend living up in the ceiling of this addition at some point, as evidenced by this snake skin. Just another thing to look forward to I guess!
How To Install New Lighting and a Remote Switch
I decided to go ahead and spruce up this hallway area a little bit while I was at it, since I knew I’d be storing a lot of stuff in here during the shop renovation process, and the first thing on the agenda was to get some better lighting installed.
I went with my favorite shop lighting, these American Green Lights LED shop lights, and I’ve installed these LEDs in all three of my past and current shops now. American Green Lights LEDs have a super high CRI, or color rendering index, meaning they’re great for filming but also for seeing accurate color vs fluorescents.
LEDs also obviously use a lot less power than fluorescents and last much longer, so I won’t have to change bulbs or ballasts in the future.
My initial plan was to attach these American Green Lights fixtures directly to the old fluorescent fixtures, but I quickly scrapped this idea as I really wanted to do the install the right way.
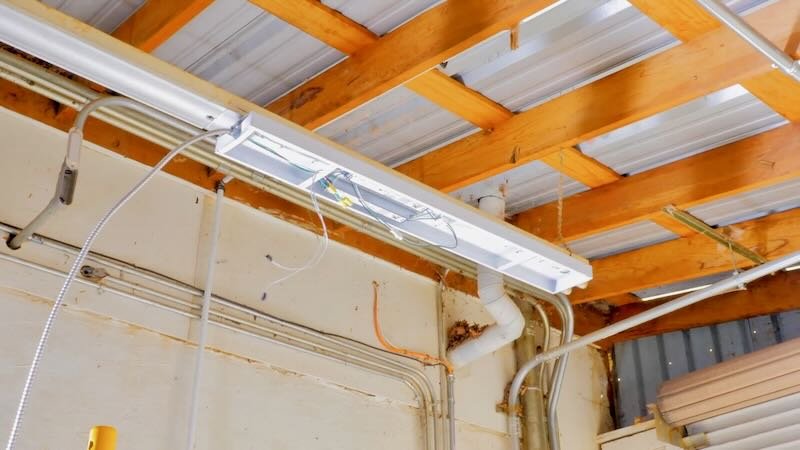
Instead, I ran a line of 2x4s perpendicular to the ceiling joists, so I could attach the lights anywhere along the line, and then came back and installed the fixtures.

Also, my buddy Alex from the Singletrack Sampler was staying at the shop at this point, and having a second set of hands during this process was super helpful.
I connected the fixtures to each other with MC cable, which is a metal jacketed wire suitable for this type of commercial environment, and I went over this installation process in detail in my previous shop build series if you want to check it out.
After getting everything wired up, I could turn the power back on to the lights and thankfully, they fired right up.
Next, I needed a way to control these lights more easily, as there wasn’t a switch wired on this circuit for some reason. To make this easy, I added a Lutron switch to the existing junction box and could then pair a Lutron Pico remote to the switch to control it remotely.
These Pico remotes are amazingly useful and can be installed anywhere and, with the addition of a wall plate, they look just like a wired switch. The batteries also last forever in experience, and I’ll link to the exact switch I used in the video description below.

Once that was done, I got the old fluorescent lights removed and also cleaned out the cavities between the joists while I was at it, since they were pretty nasty.
Prep and Painting Addition with Airless Sprayer
With the lighting handled, I got prepped to paint this big wall in this hallway by vacuuming up the floor and the walls themselves. Since I was going to be using a paint sprayer, anything on the floor could be blown onto the walls, so I made sure to be thorough here.
Next, I masked off the floor in the area I’d be painting and then I could get the sprayer set up. I’m still getting the hang of the setup process but, once I got things dialed in, the painting process went insanely quickly.
I used a Graco Magnum X7 airless sprayer and I will never go back to rolling paint on walls. I was able to get a coat on this roughly 500 square feet wall in less than 15 minutes, which is just insane.

After getting two coats on the area, I removed the masking material and then I could start getting some stuff loaded into the addition.
How to Assemble a Storage Rack
I wanted to get some storage going in this addition. As I mentioned in the shop tour, I had gotten these awesome industrial racks and storage totes from CRAFTSMAN to use in this space.
I started by getting the racks assembled, which was a pretty simple process. The biggest difficulty was figuring out how I wanted to space the shelves to best fit these totes and deciding how high to go, since you can stack these racks up to about 10 feet tall.
My idea here was to have all of these plastic totes dedicated to different types of work, specifically work I don’t do on a day-to-day basis. For example, I can have a tote for siding, roofing, drywall, etc., and can grab a tote and throw it into my truck when I need to do that type of work.
Unfortunately, the big move from my old shop happened before I could wrap up this storage area, so that’ll have to wait for a future video as now, it looks like this.
Finishing Painting Addition with Drylok Waterproofing Paint
As you might have noticed, I stopped short when painting this wall, and that’s because I knew I wanted to come back and waterproof this back section where some water had gotten in a few months back during some torrential rains here in Asheville.

Luckily, there’s been no water getting in since then, but I figured applying a few coats of Drylok, a waterproofing paint, wouldn’t hurt, so I had Nate get that knocked out.
Waterproofing Main Area of Workshop
Strip Walls Back to Bare Concrete
I was also seeing some water coming in on the other side of the shop and this was a little more concerning to me since I knew I’d be covering up these walls with framing and plywood, so I really wanted to get this dealt with properly.
As you might be able to tell, these walls were in pretty rough shape, and it looked like the previous owner just kept applying more coats of Drylok to try and fix the problem without addressing the root cause.
I wanted to get the problem areas back to the bare concrete block before waterproofing, and I thought it was going to take a lot of work to remove the paint. Instead, as you can see, the paint chipped off in big sections without too much effort, especially once I switched over to an SDS drill with tile scraping bit.
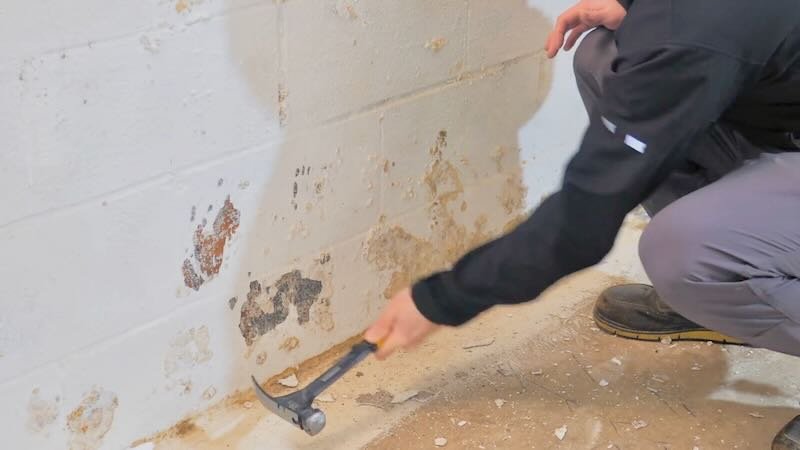
At the bottom of the wall, I ran into some mold, which was to be expected since the Drylok was trapping water between the paint and the block.

Nate got to work stripping the rest of the paint, making sure to wear a respirator in case there was lead paint on this wall, and to prevent breathing the mold spores.
Neutralize Mold that Formed Behind Paint
Once the bulk of the loose paint was removed, Nate came back and sprayed on more of that mold neutralizing spray I used in the addition and this stuff seemed to work great. In the timelapse, you can even see the color of the mold change, which seems like it means the stuff was doing its job.
Over the next few days, we had a good bit of rain in Asheville and, now that the Drylok was removed, we could see just how much water was trying to work its way through the block, and this confirmed that all of this waterproofing work would be worth the effort.

Using an Angle Grinder to Remove Remaining Paint
There were still a few areas of loose paint higher up on the walls, so Nate got to work removing those with the SDS drill along with a wire brush on the angle grinder. We had waited to use the angle grinder until after dealing with the mold, just so it wouldn’t be kicked up into the air in the shop.
Remove Efflorescence With Etch and Cleaner
Once we were satisfied with the paint removal, we could finally get started waterproofing, starting by using this concrete etch and cleaner. This stuff removes efflorescence from the concrete, which there was plenty of prior to the paint removal work.

Efflorescence is a build up of salt deposits on the surface of the block, and there were tons of craggy spots along the wall where the efflorescence had formed behind the paint.
The etch is applied with a stiff brush and then rinsed with water to neutralize the acid in the etch.
How to Patch Cracks in Concrete With Hydraulic Cement
Once the concrete was etched, we could come back and patch any problem areas with hydraulic cement, which is a fast drying cement designed to plug holes where water is working its way through concrete.
If you’re working with this stuff, you only want to mix as much as you can use in about 10 minutes, as this stuff sets up super quick once it’s mixed.
Nate started by adding hydraulic cement along the joint where the concrete block met up with the slab, as this area was where a lot of the water was working its way through.
He also filled any big cracks in the block, as these are areas where air and moisture could easily penetrate through the walls.

Nate went through the entire 10 lb bucket of hydraulic cement fixing the block and, once that was done, he could finally get the Drylok applied.

Since block is such an uneven surface, you need to use a roller with a pretty large nap, and we used a 3/4” nap roller in this case. Nate applied the first coat with the roller, working it in as much as possible, and then came back with a brush to fill in any pinholes, joints, or other areas the roller couldn’t fill.
He repeated the process for a second and third coat, repeating the process of rolling on the Drylok and then filling any pinholes with the brush, and the entire 5 gallon bucket of Drylok was used up on these walls.

Nate got this done just in time, as the Perkins Crew came out to help start the framing process here in the new shop a week or so later and, thankfully, the walls were essentially water tight.
Waterproofing Outside of Shop
Now, I should mention that waterproofing the inside of these walls is really just phase one, as the most effective way to deal with this kind of water intrusion is on the outside of the walls. I’ve already cleaned off the roof and gotten the gutters working better, which helped move water away from the building.

The next step will be borrowing my buddy Seth from Berm Peak’s excavator to do some dirt work around the building. My goal will be to create positive drainage to help move more water away, instead of the current negative drainage which pushes tons of water towards the walls.
My plan is to create a swale towards the edge of the property line, so water will naturally funnel there rather than towards the building.