
How To Install Touch To Open Frameless Kitchen Cabinets
Learn how to install touch to open kitchen cabinets (or regular frameless cabinets) in your kitchen!
🛠 Tools Used On The Cabinet Installation (affiliate):
📦 Materials Used (affiliate):
🔪 Samsung Appliances I Used :
Moving Cabinets and Appliances into the Tiny House
After getting the cabinets painted and reassembled, we could get the cabinets loaded up and moved over from my shop to the tiny house. Thankfully, I had a helping set of hands in my buddy Nate, and I’d like to officially welcome Nate to the Crafted team, you’ll be seeing him in more videos coming up on the channel.
Once we had the first half of the cabinets loaded in, we could also get a few of the awesome Samsung appliances moved into the house, the first of which was this compact fridge. I wanted to go ahead and get this thing unboxed so I could ensure the cabinets were going to fit around the fridge, as I knew it was going to be a fairly tight fit.
With the fridge unboxed, we could get to work installing the first upper cabinet, and I personally like to start with upper cabinets as it’s easier to work without the base cabinets in your way. I started with this leftmost cabinet, as I knew this run would end at the other wall with a filler strip.
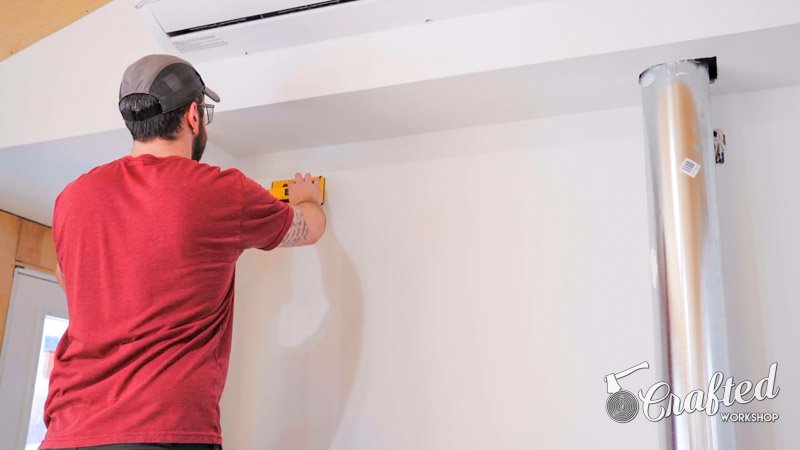
First things first, I checked the ceiling in this area for level and it was pretty close to dead on, so that simplified things a bit.
How to Easily Mark Locations of Studs
Next, I marked out the locations of the studs on the wall and also measured out the dimensions to the studs from the left corner.
Transfer Measurements to Cabinets and Pre-Drill Holes
I then transferred those measurements to the back of the first cabinet, making marks about two inches from the top and bottom edges of the cabinet at each stud location.
I could then drill through the back at those marks, drilling through to the inside of the cabinet.
Next, I flipped the cabinet over and countersunk the holes from the inside with this countersink bit, which is specially designed for the screws I’m using to install these cabinets.

These 2 1/2” screws have a large head which creates a ton of holding power and they can easily be covered up with some peel and stick caps, which I’ll show a little later, and this makes for a super clean looking install.
How to Mount Cabinets
With the screws pre-driven into the holes, we could get the cabinet mounted and this was pretty simple considering I had a second set of hands. That said, if you’re working by yourself, there are quite a few options available for supporting cabinets during installation, including these Rockler work supports which I’ve used in past videos.
When mounting this first cabinet, I spent a lot of time getting it level and plumb, as this first cabinet will really dictate the rest of the cabinets attached to it. I added shims where needed to get everything level and plumb but, before driving in the rest of the screws, I figured I’d just check and make sure the fridge was going to fit.
Unfortunately, it was a super tight fit, tighter than I really wanted, and it turned out this was because the cabinet was actually sitting a little lower than expected due to the build up created by the tape and mud where these pieces of drywall met up in these corners.
Planing Down Back of Cabinet to Open Up Space For Fridge
Thankfully, there was a pretty simple fix for this, planing down the back corner of the cabinet to essentially scribe it to fit. If you run into this issue and don’t have an electric planer, you could also use a belt sander for this.

After planing, we checked the fit again and it was still sitting a little low, but this time it was catching on the back of the cabinet.
Tip for Spacing Cabinets Off Walls
To help alleviate both of these fit issues, I decided to just space the upper cabinets off of the wall slightly by tacking a few paint stirrer sticks in line with where the cabinets would be screwed to the wall. I used my CRAFTSMAN V20 narrow crown stapler for this and this gave us an extra 1/8” of clearance in that upper corner to work with.

We checked the fit one more time and it was looking good, so we could finally get the cabinet attached to the wall permanently, once again shimming where needed to get the cabinet level and plumb. We also checked the fit of the fridge again and it fit much better this time around.
Once all of the screws were set, I snapped off the excess shims, which is one of the great things about these composite shims, and then it was on to the next upper cabinet.
Or at least, that’s what I thought. Unfortunately, as it turned out, I had somehow mixed up the order of these cabinets in my head, so instead of installing the cabinet that was supposed to go above the fridge here, we had actually installed the cabinet that goes above the microwave.
That meant we got to uninstall the cabinet we had just gotten installed and repeat the whole process on this 36” wide cabinet. Super fun!
Thankfully, this went pretty quick, since we had gotten our process pretty dialed in on the last cabinet and, once that was installed, we could get the 30” cabinet installed above where the microwave will be installed.
Cut Out Holes for Microwave Install
First, though, I needed to drill and cut a series of holes in the underside of the cabinet and thankfully this Samsung microwave came with a paper template, so this was pretty simple.

I got the holes drilled and also drilled a few starter holes for my jigsaw, which I needed to use to cut a large opening for the microwave to vent outside. Before removing the template, I also marked where I needed to cut this opening by scoring the cabinet with a utility knife and then I could get the template removed and get to cutting.
The jigsaw made quick work of this large opening and then I could get the hole drilled and slot cut for the cord for the microwave to route into the cabinet.
I drilled the hole with a hole saw but only drilled about halfway through the cabinet so I didn’t blow out the other side. I then cut the slot with the jigsaw to wrap up the bottom of the cabinet.
I wasn’t quite done yet though, as I needed to cut a hole for the 6” duct to run through the top of the cabinet, and I used the jigsaw for this as well.
Finally, I could cut a hole for the outlet box in the back of the cabinet.

Test Fit Cabinets, Make Adjustments, and Install
Once all of that cutting was done, we test fit the cabinet and everything looked good, so I roughly marked where I needed to cut down the duct, since I had left it long when installing it earlier.
To make this cut, I pulled out my CRAFTSMAN V20 angle grinder, which made quick work of the task.
With that done, we could get the cabinet installed on the wall and I only added one screw to start here, just to hold the cabinet in place while I got the front edge lined up with the first cabinet.
Because I knew the first cabinet was plumb, lining up the edges of the two cabinets would ensure this second cabinet was also plumb, plus obviously your cabinets look a lot better if the edges are lined up.
Once everything was flush, I clamped the cabinets together and then I could add screws to hold the front edges together permanently. I pre-drilled and countersunk the holes and then drove in 1 1/4” screws, since my cabinets have 3/4” thick sides.

Next, I got the other end of the cabinet plumbed up, again shimming it where needed, and then drove in the rest of the screws to secure the cabinet to the wall permanently.
We could then repeat the process again for the last cabinet in line and, as you might be able to see, I’ll be installing a filler strip between this cabinet and the wall so the door on this upper cabinet won’t interfere with the upper trim.
The last cabinet to install was this little 12” wide unit which creates the opening for both the microwave and fridge, and we repeated the process of clamping the front edges, only this time I added the screws from above.
Also, I realize this is a bit of a funky cabinet layout compared to your typical upper cabinets, and that was because I built these specifically for this kitchen layout and for this hardware. Your cabinets might look a little different but the basics of installing them will be the same.
Installing Microwave and Drilling Into Wall Safely
With that, the upper cabinets were in, so we could go ahead and get the microwave installed.
One thing that made my particular microwave install a little tricky was that I have an in-wall toilet right behind this microwave and the last thing I wanted to do was drill a hole in the tank and cause a huge leak. I had seen that happen to Matt Risinger and that is the stuff of nightmares.
To avoid this, I marked out the location of the toilet tank and then I could use the provided template to drill a few exploratory holes to ensure I wasn’t going to hit anything.

The leftmost hole ended up being a no-go but thankfully the other two were clear for toggle bolts, so we could move on with the install.
We got the Samsung microwave removed from the box so we could remove the mounting bracket from the back of the microwave, and then I got the toggle bolts installed on the bracket in the specified locations. Finally, I pushed them into the wall, then I could snug them up to get the bracket secured, also adding a screw to the single stud I had in this area.
Since the toggle bolt wouldn’t work on the left side, I installed few of these wall dog anchors, which supposedly hold 50 pounds each by themselves, so this microwave should be plenty secure.
With that done, we could get the microwave lifted into place and set on the bracket, and then I could attach the microwave to the cabinet from above using the included screws.

I didn’t have the transition piece to get the microwave attached to the ductwork, so we called it there for the microwave install and I went ahead and got the doors reattached so I could take in the upper cabinets in all their glory, and I’m pretty excited with how they turned out.
How to Install a Ledger Board and Base Cabinets
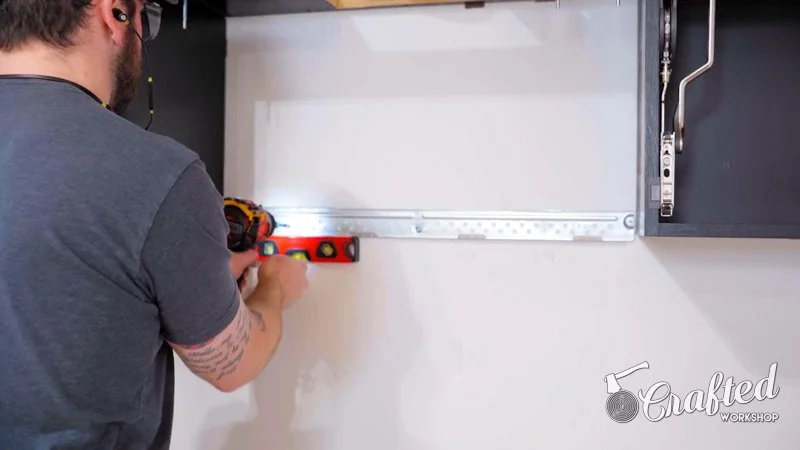
Next, it was on to the base cabinets and the first thing I needed to do was install a ledger board onto which the base cabinets will be installed. This style of install might be a little different from yours, as my cabinet boxes are 30” tall with leveling feet at the front vs. the more standard 34 1/2” tall boxes with a cutout for the toe kick, and this why I’m using this ledger board method.

I marked the height for the ledger board, accounting for the 3/8” flooring which obviously hadn’t been installed yet, and then set up a line laser at this height, which was 4 7/8” in my case.
Once the laser line was set up, I checked to make sure there weren’t any major high or low spots in the floor and thankfully everything was within 1/8”, so I could get the ledger board installed.
I marked the stud locations on the first wall and then got the ledger board, which was just a 2x6 ripped in half in my case, screwed to the studs with some 3” screws.
I could then repeat the process for the ledger board on the other wall, aligning the top edge of the board with my laser line.
The first base cabinet to install was the corner cabinet, and you typically want to work out from the corner when installing cabinets just for ease of installation.
Since my corner cabinet wasn’t the full width of this space by design, to give me a little room for adjustment, I needed to make sure it was installed where it would set the sink cabinet in the correct location, centered under the window opening.
I went ahead and measured and marked a line where the corner cabinet should stop based on this and then I could get the corner cabinet prepped for installation.
First, I went ahead and removed the sacrificial pieces I had added to the bottom of the cabinets so I could slide them around my shop floor without damaging them, and these were super helpful throughout the process of finishing and moving the cabinets as well.
Installing Leveling Feet on Base Cabinets
Next, I got the leveling feet installed on the bottom of the cabinet, screwing on the bases and then setting the height of the legs to that same 4 7/8” measurement as a starting point.
Once that was done, we could just flip the cabinet over and set it onto the ledger board.
Before screwing the cabinet to the wall, I went ahead and set up a laser line at 23 3/4” from the wall, and I could use this line to make sure all of my cabinets were in the same plane along this wall.
Once that was set up, I could go ahead and adjust the leveling feet to get the front corner of the cabinet plumb and I also marked the stud locations while I was at it.
Next, I shimmed the back right edge of the cabinet until the front edge was lined up with my laser line and then I could drive in a few screws to attach the cabinet to the wall.
I repeated the process for the back left corner, getting the left front edge aligned with the laser and then screwed it to the wall, and the corner cabinet was installed.
Drilling Holes for Drain Pipe and Water Supply Lines
Next up was the sink base, which is always a bit of a pain with all of the holes you have to drill to get it fit. I started the fitting process by getting the locations of the drain pipe and hot and cold water supply lines marked on the bottom of the cabinet and then I could get the holes partially drilled with a hole saw, once again stopping early so I didn’t blow out the other side of the hole.

Cutting Hole For Outlet Box
Next, I cut the hole for the outlet box on the back of the cabinet and then finally flipped the cabinet right side up to finish drilling the holes for the plumbing.
I got the leveling feet installed off camera and then we could drop the cabinet into place, and thankfully it fit great. I did majorly oversize the holes for the water supply lines so I wouldn’t have to remove the shutoff valves, but the escutcheon plates will cover the holes so no big deal there.
Attaching Cabinets to One Another
I repeated the same process as the upper cabinets to get the front edges of these two cabinets attached; clamping them, pre-drilling and countersinking holes, and then driving in 1 1/4” screws, and then I got the cabinet leveled and shimmed before attaching it to the wall.
Also, as you can see, this cabinet only landed on one stud, but I was able to screw through the bottom of the cabinet and attach the corner to the ledger board to help secure it a bit more, and I’ll probably add a toggle bolt later there as well.
I could then repeat the exact same process for the next two base cabinets and of course my camera decided to go out of focus just as I started this Timelapse, so apologies there.
Unboxing My New Samsung Wall Oven
Once the wall oven cabinet was installed, I could finally get the sweet Samsung wall oven unboxed to make sure it fit in the cabinet and unfortunately, things didn’t go quite as planned here. As you can see, this unit suffered some major damage at some point during the shipping process, meaning I need to figure out a replacement on this wall oven unit.

I was still able to verify the fit with this mangled unit but it was a real bummer to find this out when I was finally getting these units installed in the kitchen after they’ve been sitting in my crawlspace for months.
Finishing Base Cabinet Install
Anyway, I kept chugging along installing the base cabinets, and I got the trash and recycling cabinet installed next. The dishwasher was going to be installed between this cabinet and the sink base, so I marked out the 18” space I needed and worked on getting the cabinet set in place.
This cabinet was a little tricky, as I had to make sure to leave room for the dishwasher while getting everything nicely lined up with the sink base and I spent way too much time trying to accomplish this with a 4 ft level.
It finally dawned on me that I could set up another line laser, matching the height of the already installed cabinets, and save myself a ton of trouble, and that’s what I did.
Once I had the second laser set up, it was as easy as lining up both laser lines with the edges of the cabinet, making adjustments to the leveling feet as needed, and then I could shim the cabinet and get it screwed to the wall.
The last base cabinet outside of the island was this 3 drawer base next to the wall oven cabinet, and it was simple enough to install, although I needed to drill holes for the electrical for the wall oven and cooktop here.
I once again attached the front edges of the cabinets using 1 1/4” screws, then I could get the cabinet screwed to the studs and finally get the drawers reinstalled.
With that, all of the kitchen cabinets were in, except for the island which I’ll be covering in a future video, so next I could get to work getting all of the cabinets wired to the power supply for the touch-to-open drawers and doors.
Mounting Power Supply For Touch to Open Cabinets
Believe it or not, I only needed one power supply for all of these cabinets, and I started by getting the power supply mounted in the trash and recycling cabinet, as there was an outlet located inside this cabinet.

The SERVO-DRIVE power supply comes with this mounting bracket, and once it was mounted, I ran the cable down through the bottom of the cabinet and did a little cable management with these included clips. You won’t see any of this wiring once the drawers are in and I really just wanted to keep the wires from getting snagged on the drawers.
I reinstalled the drawers and then I could connect the cable from the power supply to the cables coming from the SERVO-DRIVE units with one of these clamp connectors, which was super simple.
Installing Samsung Small Spaces Dishwasher
While I was in this area, I went ahead and got a hole drilled in the sink base for the dishwasher plumbing and power and then got the Samsung small spaces dishwasher moved into place. Thankfully, it fit great and I just needed to tweak the height of the leveling feet to match the cabinets.
Attaching Wiring For Touch to Open Cabinets
Next, I attached another length of low voltage wire to the line I had just run, as I needed to run this wire all the way around these base cabinets and up the wall to the upper cabinets, and then I ran the cable under the cabinets and up the wall behind the fridge.
I used more of the peel-and-stick clips to secure the cable to the wall and ran it up into the upper cabinet above the fridge, where it could tie into the rest of the upper cabinets.
Thankfully, running this wire behind the fridge worked perfectly, as I was initially thinking I’d have to run this cable behind the drywall, which would have been a pain.
From there, I could get all of the AVENTOS hinges wired up in the upper cabinets, doing my best to keep the cables nice and tidy. I also programmed the collision settings on this rightmost cabinet, as I didn’t want the upper door opening into the lower door while it was opened. This collision functionality is built into the SERVO-DRIVE units and programming them was super simple.
Once all that was done, I could try out these touch-to-open cabinets for the first time in the tiny house, and needless to say, it was pretty exciting.
Installing Finished End Panel on Rightmost Cabinet
From there, I was really in the home stretch and the next thing to get installed was the finished end panel on this rightmost cabinet. As you can see, this panel not only gives the cabinet a much nicer look, but it will also allow me to cover up the rough edges of the flooring without adding additional trim. I can do this by removing the panel temporarily during the flooring installation.
Once the end panel was on, I could get the toekicks set in place, and I just set them in place for now, without adding the clips which attach to these leveling feet. I know I’m going to have to cut these toe kicks to width once I add the flooring and I don’t want those clips in my way when I do that, so they’re just set in place for now.

Adding Peel and Stick Caps Over Screws
The last thing to do was add these peel-and-stick caps over the screws in the upper cabinets, and I painted these caps with the same paint so they matched perfectly. As you can see, they really help to hide the screw heads and they all but disappear once the caps are on.
With that done, I could call this cabinet installation a wrap!
