
INSTALLING WINDOWS & DOORS ON MY TINY HOUSE! // Not So Tiny House BUILD Part 7
Learn how to install windows and doors on a house with ZIP sheathing in part 7 of the (Not So Tiny) House Build series!
How To Install Windows And Doors On Your Tiny House
In case you missed last week’s video, we got the roof on the (Not So Tiny) Tiny House framed and sheathed and, with that, the building was roughly dried in. We did a little more interior framing prior to the plumbers and electricians coming out, which I’ll show in a future video but, besides that, the roof was the last thing we did before our new kid arrived on November 9th.

Step 1: Taping The Window Sill

Roughly a month later, I got back to work on the house, getting the windows and doors installed. This step would really get the house a lot more watertight, and it would also get these windows and doors out of our garage, where they had been sitting for the last few weeks.
Anyway, we started on the back side of the house, getting the windows installed, and, since this was my first time installing windows, I wanted to get the process down before filming the steps close up.
The process I followed was one I found in a video on the Fine Homebuilding YouTube channel, in which Jake from Aarow Building goes over his process for installing nail fin windows on a house with ZIP Sheathing. This video was hugely helpful for me and I’d definitely recommend checking it out.
Anyway, the process for installing this type of window is fairly simple, and Jake’s method actually goes way beyond Huber’s requirements on the amount of ZIP tape applied, making it a little more time consuming.
I think the extra work is well worth it though, as all of this extra tape ensures the window openings are both water and airtight. This was particularly important to me, since I used the ZIP-R sheathing and wanted to make sure no air was going to work its way behind that layer of foam.
I started the installation process by taping the window sill, which is the only tape required by Huber inside the window opening. I used ZIP Stretch Tape here, which is a super cool product that has a ton of flexibility when working around these corners.
Step 1a: Tape Bottom Of Window Opening
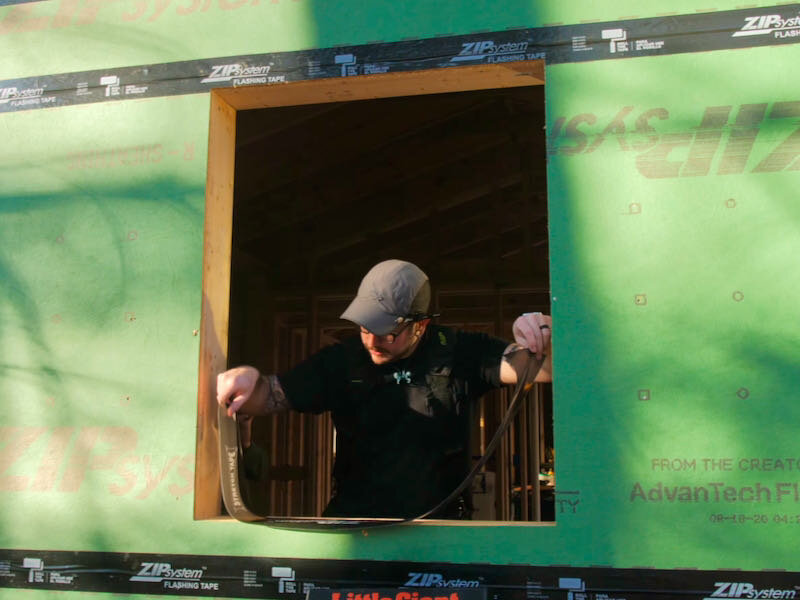
I cut a piece of Stretch Tape long enough to lap up the sides of the rough opening about six inches on either side, marked a line where I wanted the edge of the tape to land, and also marked a center line on both the sill and the piece of tape to make it easier to get centered.
I could then peel off the backing from the Stretch Tape and get it applied to the window sill, using my speed square to help work it into the inside corners of the window opening.
Next, on the outside of the house, I pulled the Stretch Tape out from the corners and stuck it to the sheathing, and this is really where the Stretch Tape shined, as there is nowhere for water to work its way in with one continuous piece of tape covering this entire area.

Once I got the Stretch Tape stuck to the sheathing, I came back and rolled the tape before moving on, and this was another good tip I picked up from that Fine Homebuilding video. It’s really easy to forget to roll these pieces, so I just rolled them as I went and this just made sure I didn’t miss anything.
Step 1b: Tape The Sides And Corners Of The Window Opening

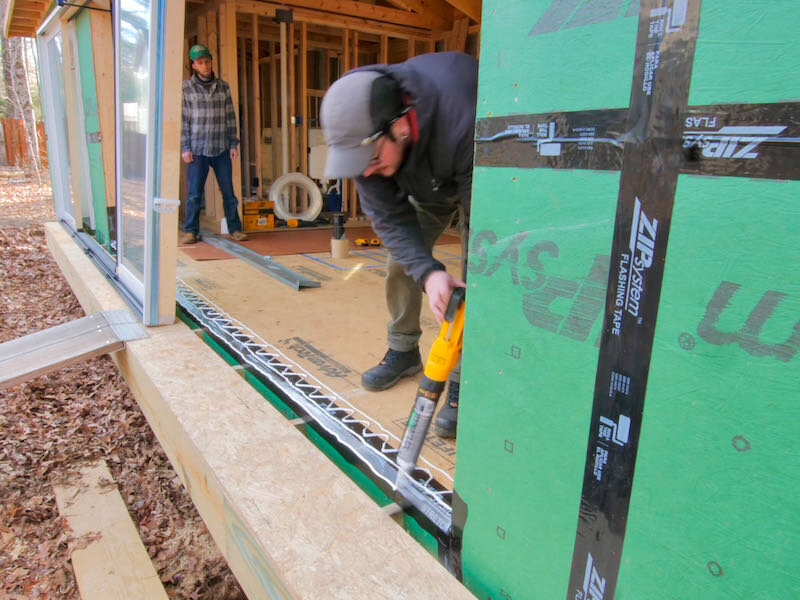
Next, I got the sides of the window opening taped, and this was mainly for air sealing, as it’s really unlikely water will ever work its way into this area. I added one piece of standard ZIP tape to each side of the opening and I did need to cut a slit at the sill and top of the opening to allow this tape to lap onto the sides of the opening.
Once again, I rolled each piece of tape after applying it and, once both of those pieces were added, I could add another piece of tape across the top of the window opening to seal up that part of the sheathing.
The last pieces of tape I added were in the top corners of the opening and, again, this was for air sealing. The bottom corners were already covered by the Stretch Tape so they didn’t need this piece added.
Step 2: Place Window In Opening
With that, the inside of the window opening was fully taped, with all of the seams between the sheathing and framing sealed, so next we could get the window added into the opening.
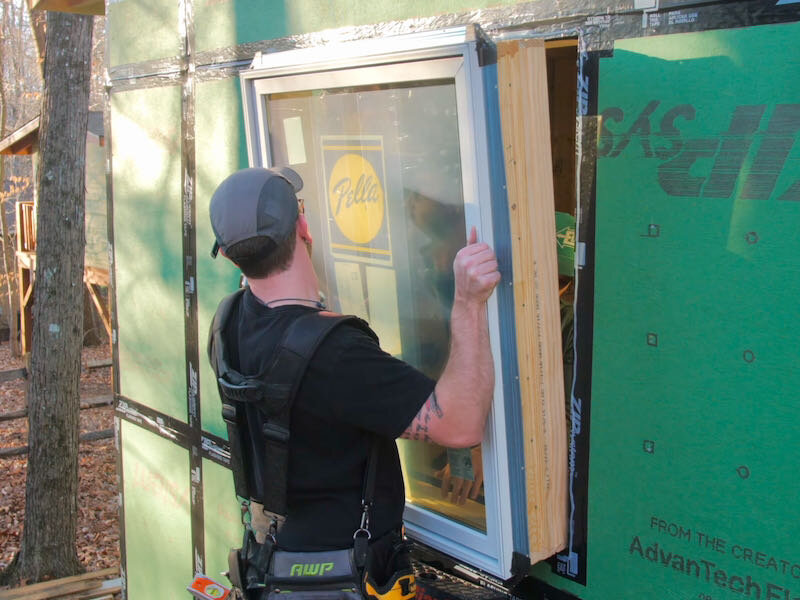
I went with Pella Lifestyle windows and doors on this project, and, as you can see, we went with casement windows, which I personally much prefer over double hung windows.
Step 2a: Fold Out Nail Fin
To install the window, we first folded out the nail fin, which comes folded flat from the factory.
Step 2b: Add A Bead Of Silicone Around Outer And Top Edges Of Window
Next, I added a bead of silicone around the top and two sides of the window opening, but didn’t add caulk along the bottom edge so that any water that may eventually work its way into the sill has a place to drain.
Step 2c: Center The Window In The Opening
To help center the window in the rough opening, I placed three carpenter’s pencils on the sill as spacers and this works out well since Pella calls for a ¾” oversized rough opening and these pencils are about ¼” thick, so this leaves room for shimming while still keeping the window roughly centered.
With that, I was ready to place the window in the opening, and my buddy Eddie Aaronson was on hand to help hand me the window and then run inside to make sure I had the window centered in the opening side to side. He also checked the window for level and plumb on the inside and, once that was confirmed, I could tack the window in the opening with a few 2” long roofing nails.
Step 2d: Tack Window In Place And Check For Level

After tacking the window in a few spots, I double checked the window was level and plumb and that the window frame was square, and then I could add nails to the rest of the holes in the nailing fin. The number of nails you’ll need to add will vary by manufacturer but Pella requires every hole in the nailing fin has a nail added, so I got to work with my hammer.
As you can see, I choked way up on my hammer when adding these nails as the last thing I wanted to do was ding my brand new window with this framing hammer. You could also use wafer head screws here, but roofing nails are cheaper and the lower profile head will keep the trim I’ll be adding later from being pushed out of whack by the screw heads.
Step 2e: Check Window Functions Well
After adding all of the nails, I could check that the window functioned well, which it thankfully did, and I just love how smooth these casement windows operate.
Step 3: Seal Around Window

With that, I could get the last pieces of tape added to waterproof around the nailing fin, starting with one piece along each side of the window. Once again, I didn’t add tape along the bottom of the window to allow drainage in case any water ever builds up in the sill.
The last piece of tape to add was along the top of the window and, once that piece was added and rolled, this window was essentially waterproof.
The one other thing I’ll do before adding my window trim is add a piece of rigid head flashing to the top of the windows, like I did on the doors, and this will just add another layer of protection from water working its way into the window opening.
Step 4: Cutting Down Deck Joists
Speaking of the doors, next we could move on to getting the doors installed. First, though, we needed to address something that probably should have been dealt with earlier in the build.
If you watched the floor framing video, you’ll know these deck joists are actually an extension of the floor joists, which just extend out past the front face of the house to form the deck. Because of this, the deck was on the same plane as the interior floor, and this meant the threshold on these exterior doors would have only allowed for ¾” deck boards, which don’t really exist unless you’re custom making them.
This also meant any water or snow build up on the deck would have ended up working its way onto the door thresholds, which wouldn’t have been great over time.
In retrospect, we could have solved this a few ways, either by notching these boards during framing or by doubling up our subfloor, both of which would have increased the distance here, but we obviously didn’t do either of those things, so that left us with the task of cutting down the height of these deck joists after the fact, which was a royal pain.
We started by marking a line where we wanted to make the cut, roughly 1 ¼” from the top edge, and then we could remove any of the nails that were in line with where we’d be cutting.

While Eddie worked on removing the nails, I also went back and filled in the areas between the joists with more sheathing material, which we never got to during the framing of the house.
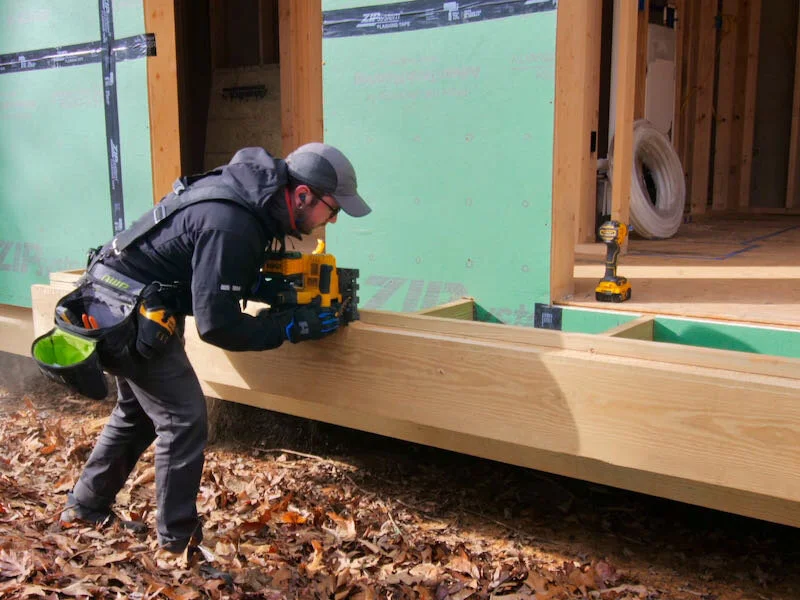
Next, we could get to work making the cut along the rim joist, and I figured the track saw would work best for this. Unfortunately, there wasn’t really a way to attach the track to the joist in this orientation, so we ripped a straight edge on a 2x12 to use as our ripping guide and screwed this board to the face of the joist.
Once the board was attached, I started the cut with my track saw, and we could just move the board down the joist to finish the cut.
We could then remove the board, which was still nailed to the floor joists in a few spots, and then it was on to the tough part, notching the ends of the floor joists to match the rim joist.
I started by marking a line even with the rim joist along both sides of the floor joist, and then I cut down to the line along the face of the sheathing with a pull saw.
Next, I tried to rip the remaining part of the joist with the pull saw, but the tension in the board was causing it to close up on the saw, making it just ridiculously difficult to cut. I pulled out my reciprocating saw to finish the cut, but this left a super rough surface that was far from flat.

On the next joist, we tried attaching a guide board to the joist and plunging the track saw to make most of the cut, but unfortunately, there just wasn’t enough room to make much of a cut with the saw.
We then went and bought a regular hand saw, thinking it might cut a little more quickly, but we were having the same issue with the kerf closing on the saw, plus we kept running into more hidden nails while we were cutting.
Eventually, we just ended up back with the reciprocating saw and just accepted that the edges of the joists would need to be fine tuned after cutting.
Finally, after literally trying to use every saw I own to make these cuts, we got all of the joists cut down, so we could get to cleaning everything up. To do this, I pulled out an electric planer and first made a few passes on the rim joist to bring it down below the floor joists, to give us room to clean them up.

We basically just repeated this same process over and over until we started getting close to having all of the edges cleaned up, and then I pulled out a level to start checking for high and low spots.
After what amounted to most of one work day, we finally got everything dialed in, and, with that done, I went ahead and threw a leftover piece of subfloor on top of the joists, which gave us a surface to stand on while installing the doors.
Step 5: Prepare For Entry Door Installation
Step 5a: Cut Away Bottom Plate From Door Opening

We started by installing the smaller entry door, because we figured it’d be a little simpler, and the first step was to cut away the bottom plate from the door opening, which I did with the reciprocating saw.
Step 5b: Assemble Sill Pan

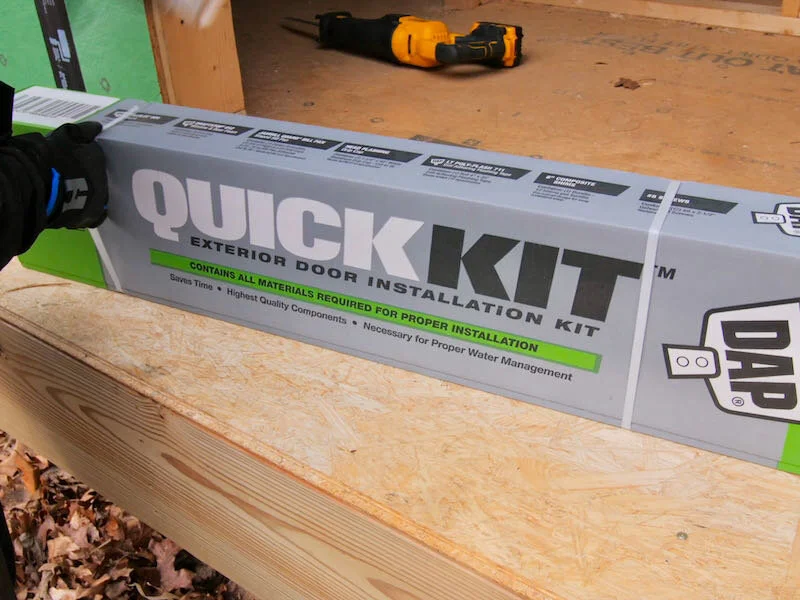
After removing the bottom plate, we swept out the door opening and then we could get the sill pan assembled. The sill pan I went with was part of this DAP Quick Kit system, which is a door installation kit that includes everything needed to properly install a door.
This kit includes a few tubes of caulk, flashing tape, foam sealant, shims, rigid head flashing, screws, glue, and finally the sill pan flashing, which comes in three pieces.
After unboxing, I got to work assembling the sill pan flashing by gluing the three pieces together in the overlapping areas. This kit allows for some flexibility in the size of your exterior door, and DAP makes another kit for double doors, which is what I used on the large sliding door opening.
It was super cold the morning we got this assembled, so I had to encourage the glue out of the bottle with a bit of clamping pressure, but eventually I got the glue added and the pieces clamped together.
Step 5c: Check Door Opening For Level And Plumb
After the glue had a chance to dry, I checked floor in the door opening for level and checked the sides of the door opening for plumb, and once I confirmed they were all good to go, I could get the sill pan installed.
Step 5d: Install Sill Pan And Air Seal Sheathing

To do this, I added caulk along the bottom of the door opening, up the sides of the door opening, and along the front of the house where the sill pan would lap over that area.
Next, I put the sill pan in the opening, making sure it was well adhered to the caulk. The last step to prepare the opening for the door was to air seal the sheathing, just like I did with the window openings, with more ZIP tape.
Step 6: Install Entry Door
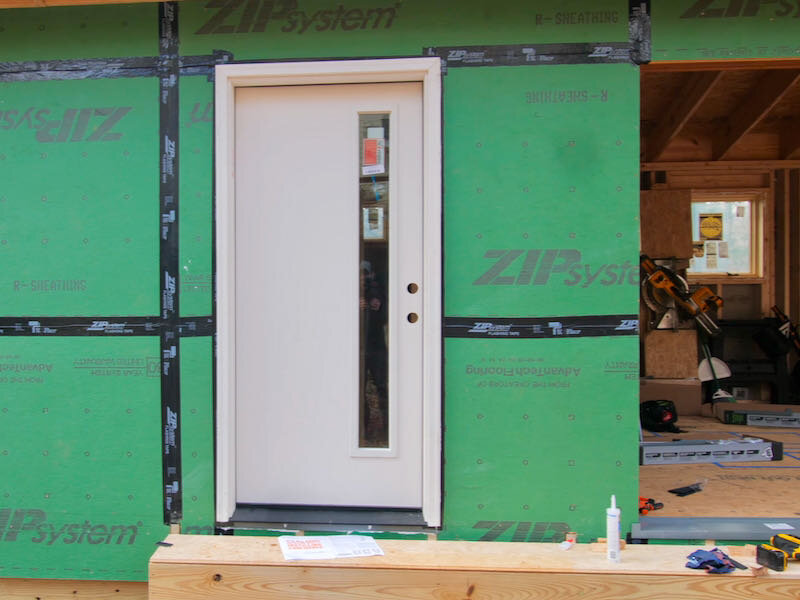
With that done, we could prep the door for installation, first removing the packaging and then removing the door itself. Next, I added two beads of caulk to the back side of the brickmold trim which came pre-installed on the door, one along the inside corner and one along the outside edge of the brickmold.
The last thing to do before setting the door into the opening was to add a bead of caulk along the back edge of the sill pan, which air seals the door threshold to the sill pan, as well as at each of the seams in the sill pan, just in case the glue didn’t fully seal the seam in those areas.
Finally, we could set the door frame into place and it was at this moment that we realized that we framed the rough opening essentially the exact same size as the door frame, which meant we really had to work to get the door into the opening.
As it turns out, we didn’t have the rough opening dimensions for this particular door when we framed the house and just used a standard rough opening size, but this door needed a slightly larger door opening.
Thankfully, the door frame fit into the opening with a little persuasion and, to make sure the door was fully seated, we clamped the door frame into the opening.
Step 7: Secure Door Frame In Opening

Next, we got the door frame secured in the opening using screws, first adding one 3” screw through each of the hinge screw locations and then adding more screws on the other side of the frame underneath the weatherstripping, so the screws were hidden.
Because this door frame was so tight in the door opening, we didn’t really need to do much shimming, but typically you’d need to add shims on both sides of the door frame to get it centered in the rough opening.
Finally, we could reinstall the door and, with a little tweaking, the door was working great and looked great.
The last thing to do to waterproof the door was to add rigid head flashing, which was again included with this kit.
I first cut the flashing to length and then notched each end of the flashing, so I could fold the flashing down over either end of the door trim. I didn’t get a great shot of this but the instructions that come with the kit go over this in detail and it’s a pretty simple process.

After cutting and folding the flashing, I added a bead of caulk to the back of the flashing and then installed it above the door, adding a strip of ZIP tape to seal the flashing to the sheathing.
Step 8: Installing Huge Sliding Glass Doors

With that, the entry door was installed and next it was on to something that I had been stressing over since the doors arrived, getting the huge sliding door installed.
This was basically the same process as installing the other entry door, but obviously I had a 16 foot wide door opening to contend with this time, so making sure that opening was flat was a little more work.
Step 8a: Level Subfloor

As it turned out, the subfloor was a little high at a few of the joist locations, so I started by finding those spots with a level, making sure any nail heads were below the surface, and then I removed material from those spots with the electric planer.
This was the worst spot in the door opening and, after fixing this spot, I just worked my way along the rest of the opening, making sure the whole area was nice and flat.
Step 8b: Assemble Sill Pan
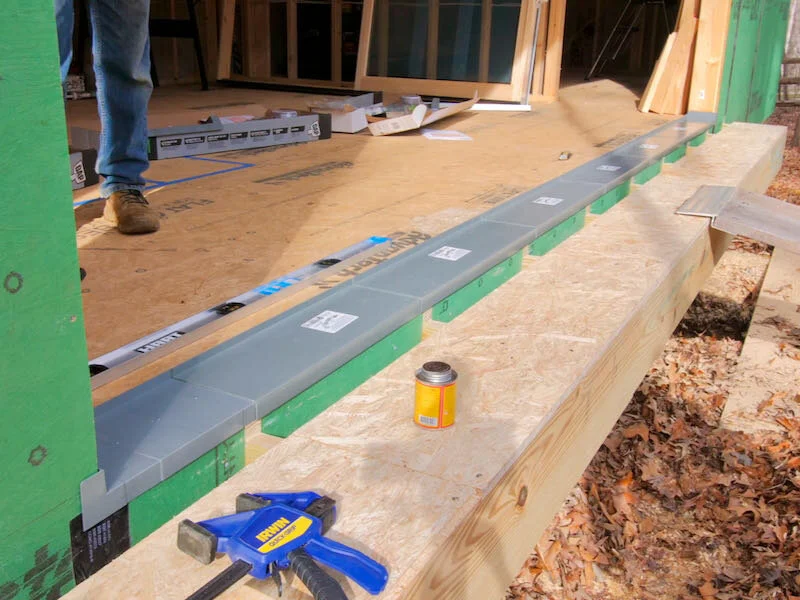
Once that was done, we cleaned off the opening and then started to dry assemble the sill pan for this opening, which was just a bunch more of the pieces I used on the previous opening.
I went with actual PVC cement when assembling this sill pan, just because it was quicker to apply in large quantities, and we just worked our way across the opening, making sure the sill pan stayed straight as we went.
Step 8c: Assemble And Prepare Doors For Installation
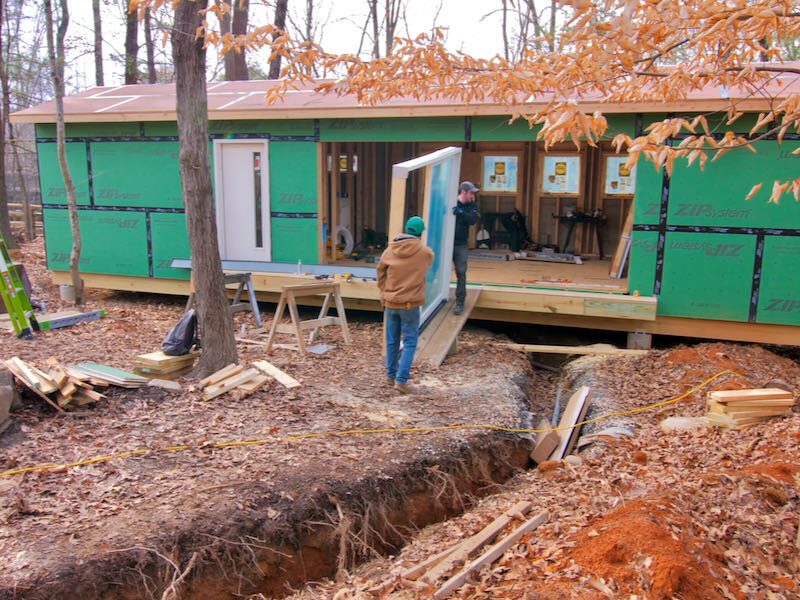
After assembly, we could go ahead and get the rest of the sliding door, which comes in two halves for shipping purposes, moved out to the house. Thankfully, the sliding doors can be removed, which makes the whole assembly a lot lighter, but it was still quite the process to get the doors out to the house.
Once the doors were moved in, we got them laid out on the floor of the kitchen and living room area, which took up just about the entire room, so we could get the two halves joined together.

This door, which Pella calls an OXXO sliding door, comes with detailed assembly instructions and was overall pretty easy to get assembled so I’m not going to go into a ton of detail here.
Also, in case you’re wondering, this massive sliding door was actually cheaper than the cost for three standard sliding doors which we were initially planning to install. This door was also about 75% cheaper than some of the fancier accordion or multi-slide doors you might have seen, making it a great budget option.
Anyway, after getting the door assembled, we got it stood up and slid it out onto the deck before adding the sill pan, since the door wouldn’t fit through the opening with the sill pan in place. Also, just for some added security, I clamped the door to the house so it couldn’t fall over while we worked on the sill.
Step 8d: Add Sill Pan And Seal Door Opening
Next, we repeated the process of adding the sill pan and sealing the door opening, but we also went ahead and added a layer of Stretch Tape to further seal up that sheathing between the joists, just for good measure.
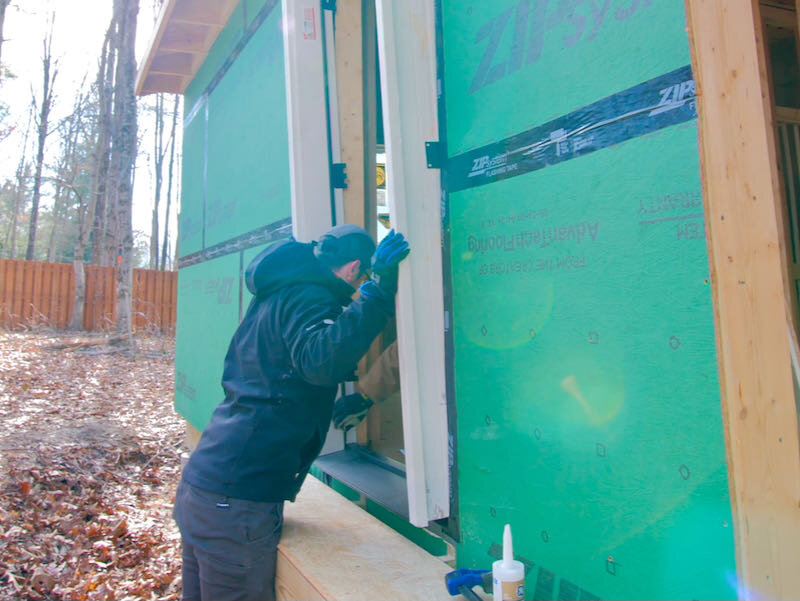
Also, this door actually had a nailing fin, so it was a little more similar to installing the windows in that way, and after bending out the nailing fin, we got the door propped up on some 2x material to make it easier to slide into the door opening.
Step 8e: Slide The Door Into The Opening

With that, it was time for the big moment of truth, sliding the door into the opening and, thankfully, this went fairly uneventfully. It was definitely awkward because there wasn’t really anything to grab onto to lift the door, but we eventually got it into the opening and got it centered, then we attached it to the house through the nail fin in a few spots.
Step 8f: Check for Level/Plumb And Secure Door Frame In Place
After checking the door frame for level, plumb and square, I added two screws centered along the top of the frame and then finished adding the rest of the fasteners to the nail fin.
Next, I fastened the door frame in the areas called out in the instructions, through the threshold in this case.
Step 8g: Install Sliding Doors In Door Frame

With that done, we could finally get the two sliding doors installed, which was again a little awkward due to the weight of these huge doors. Eventually, we got them both added and, let me tell you, it was a huge relief to finally get this door installed.
I installed the door handles off camera and then made a few adjustments to get the height of the rollers dialed in, and, once that was done, this massive door was officially installed.
Step 9: Spray Installation Foam

The last thing to do to wrap up the door and window installation was to add spray foam in the areas between the window or door frames and the rough openings. This foam air seals these gaps and is essential to making your house energy efficient.
I went a little overboard with the foam, so after it dried, I came back and trimmed off any excess and also sanded any spots where it got on the bare wood on the inside of the windows, since these windows are unfinished.
Once that was done, I double checked that all of the windows and doors still functioned well and then I could officially call the windows and doors installed!