
FRAMING THE ROOF ON MY TINY HOUSE! // Not So Tiny House Build Part 6
Learn how to frame a hand cut roof, including cutting common rafters and installing a ridge board, in Part 6 of the (Not So Tiny) House Build series! This will include cutting all of the rafters, assembling the ridge board, then sheathing the roof with ZIP roof sheathing.
🛠 Tools and Materials Used :
How To Frame A Roof:
One thing to mention before we get started is the fact that we stick framed this roof rather than using engineered trusses. This wasn’t necessarily because I didn’t want to use engineered trusses. It was more due to the fact that companies making engineered trusses in my area were about a month and a half out on being able to deliver the trusses, and I needed to get this roof built ASAP.
Step 1: Create Supports And Mount Ridge Board

Anyway, the first step in getting this roof framed was setting up supports for the ridge board, to which the rafters will be attached. We built this roof in roughly 12 foot sections, so we started by getting two supports set up on either side of the master bedroom.
Next, we could mark our rafter layout on the ridge board, which was a 2x8 in our case.
After getting the correct layout marked, we could get the first section of ridge board mounted on the supports.
Step 2: Determine Rafter Size

Next, we needed to get our rafter size worked out, and this first rafter would end up being a pattern for the rest of the rafters, so we took our time making sure things were laid out accurately.
Our architect, Rick Kazebee, specified a 4/12 roof pitch on this house, and we laid out the rafter based on this pitch. In case you’re not familiar with roof pitch terminology, a 4/12 pitch means the roof line rises four inches vertically every 12 inches along its length.
Marking this angle is simple with a speed square, and it was especially helpful having a 12” speed square since we used 2x12s for our rafters.
Also, since the rafter tails on this house are exposed and need to continue out horizontally in the soffit area, we didn’t actually cut a bird’s mouth on these rafters, like you might typically see. Instead, we cut a straight line perpendicular to the parallel angle cut on the ends of the rafters.

The last bit to cut on the rafter was a notched section along the top edge of the rafter at the bottom end. This notch will house a layer of ¾” Radiata Pine plywood and will be the show face on the underside of the exposed rafter tail and soffit area, which you’ll see a little later.
Anyway, with all of the cuts done, we could test fit the rafters and they required a little tweaking to get right. Actually, this ended up taking way longer than expected and the problem ended up being that the ridge board was slightly off center at the end of the building, causing the rafters to be out of alignment.
After getting that fixed, we could finally get the first two rafters set, which was as simple as screwing them into place at both ends to hold them in place, then toenailing the rafters at the ridge beam. The rafters were more permanently attached at the double top plate a little later, which I’ll show in a bit.
Step 3: Attach Rafters To Ridge Beam

From there, it was really just rinse and repeat, using that first rafter as a pattern for the rest of the rafters and setting the rafters at a 24” on center spacing.
Rick, our architect, also came by to visit the site and this was his first time seeing the building in person. We also got to discuss a few more of the nitty gritty details on the design of the building while he was on site.
We repeated the same process of setting the rafters at the other end of the building, above the guest bedroom, and then we could move to the center section of the building, which was essentially the same except for the slightly different rafters on the back half of the building.
As you might have noticed during the wall framing video, this back wall is actually about 6 inches shorter than the rest of the exterior walls, and this is to accommodate the cathedral ceiling in this area, where part of the building extends past the rest of the structure.
Lowering the wall height meant the rafter would meet up with the wall in a different location, and we had to cut the rafters in this area accordingly.
This also meant we have very little roof overhang in this area, and this was mainly due to the strict footprint size restrictions placed on us by the HOA. Since this size restriction won’t be necessary for most people, we actually detailed this differently in the building plans, which are up for sale now in case you’re interested in building a house like this yourself.
Step 4: Attach Rafters To Double Top Plates

Anyway, we got the rest of these rafters set and then I could go around and permanently attach the rafters to the double top plates.
There are a few ways to do this, with the most common probably being metal rafter ties or hurricane ties, but installing those are incredibly time consuming due to how many fasteners need to be added to each tie.
Instead, I went with these TRUSS screws, which are designed specifically for connecting rafters or trusses to top plates with a single screw at each location.
The package includes the screws, a driver bit, and an angle guide, to ensure you’re driving the screw at the correct angle.

There’s even a special impact driver attachment that allows you to drive these screws from the ground, rather than having to get on a ladder, making the process even faster.
As you can see, this process goes much more quickly and, considering the pricing is roughly the same or cheaper, I’d definitely go with these screws on future builds. I’ll link to these in the video description below in case you’re interested.
Also, the screw head on these truss screws leaves an orange hole, which inspectors can easily see when it comes time to get the framing inspection.
I finished adding the truss screws right as the guys were setting the last rafter.
With that, the rafters were set and it was incredibly exciting to see the final roofline of the building in real life after staring at the 3D model and building plans for months.
Step 5: Installing Blocking Between Each Rafter And Collar Ties

That said, we were still far from finished with the roof framing, and next we got to work installing the blocking between each of the rafters. Typically, this entire area would be covered by the soffit, but again we’re going to have this area open, with exposed rafter tails, so this blocking needed to be added to close up the interior of the house.
We also ripped a matching angle on the top edge of the blocking, so it would butt up against the roof sheathing cleanly.
Once we got all of the blocking added between the rafters, we went back and added collar ties at each rafter location. Since this house will have cathedral ceilings through the majority of the areas, these collar ties serve both to help hold the rafters tight to the ridge board but also help to resist the spreading force created by the downward force of the weight of the roof.

This collar tie layout was specified by our architect and was actually contested by the building inspector, since this specific layout isn’t covered in the building code book. Because of this, I had an engineer take a look at the plans and stamp his approval on the roof design, and this is something you’ll likely need to do if you decide to go with this type of layout on your roof.
Step 6: Adding Fascia Board

Before adding our fascia board to the end of the rafters, we went ahead and snapped a chalk line so we could trim any protruding rafters, since this would cause the fascia board to be wavy.
Erik whipped up a quick jig for marking the vertical line on the rafter tails, where we’d need to cut them, and this jig could then be aligned with the chalk line and Erik could then mark the vertical line using the jig. Finally, he could cut the rafter tails using a circular saw, following the line he just marked.
We repeated this process on any of the other protruding rafter tails, getting the ends of the tails all in line with each other, and then we could move on to adding the fascia.
Typically, this board would be called the sub fascia, since you’d have some kind of trim on the face of the board and soffit material on the underside, but again we’re going with an exposed rafter tail and soffit.
Because of this, these fascia boards will serve as the finished surface, so we wanted them to look as clean as possible. To help with this, we first squared up one edge of the boards, which matched the look of the rafter tails more closely.
After ripping a square edge on one edge of the board, we then tilted the blade to match the roof pitch and ripped the other edge of the board with this angle. By doing this, we were able to easily align the top angled edge of the fascia board with the top edge of the rafter, making it easier to attach the fascia.

Next, we could get the first board cut to length, and I also went ahead and started two screws at each rafter location, to make it easier to drive the screws once I was up on the ladder.
As you can see, there is a 6” overhang at the gable end of the roof, and we accounted for this overhang when attaching the fascia, allowing it to extend past the last rafter.
We attached the fascia with two 3” screws into each rafter tail, and this allowed for some tweaking if anything wasn’t pulling together tightly.
Step 7: Add Plywood Sheathing On Top Of Rafters

After getting all of the fascia boards attached on the front half of the house, we could add the layer of plywood sheathing to the notched area of the rafters. You might be wondering why we added this layer of plywood, and it’s because again this area will be exposed in the finished house.
If we didn’t have this additional layer of ¾” plywood, the roofing nails would have protruded through the underside of the roof sheathing, which would have looked terrible. Also, the Pine plywood matches the Pine rafters, blocking, and fascia, so they will look more consistent, even though they’ll all be painted.
Anyway, we ripped the pieces of plywood to width at the table saw and, because the overhang is 16”, we were able to get three strips out of each piece of plywood, so we only needed two sheets of plywood to sheath this half of the roof soffit area.
Once the plywood was added, we could finally start getting the roof sheathed, and this was a pretty exciting moment because, as soon as this was done, we’d have a dried in building.
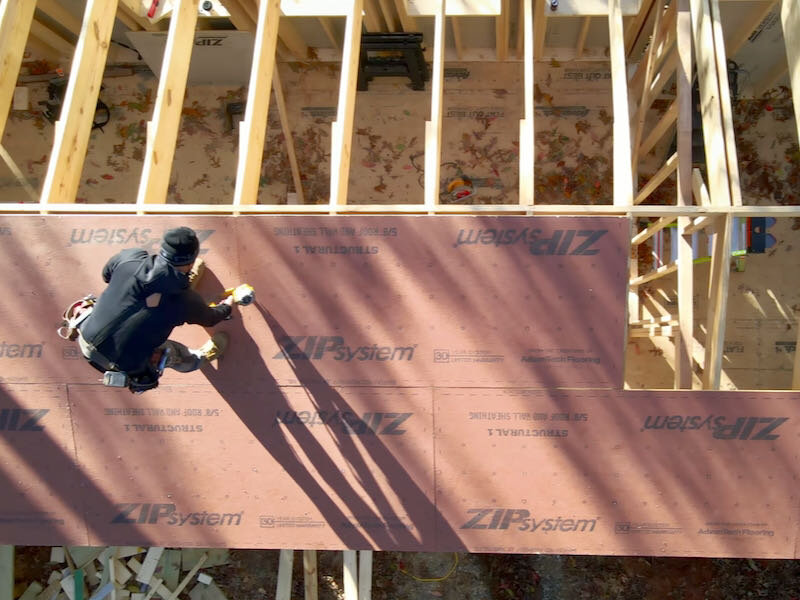
The roof sheathing, which was ⅝” ZIP System Roof sheathing in our case, went on pretty much just like the floor and wall sheathing and the only annoying part was getting the sheets up onto the roof.

Once again, we made sure to stagger the butt joints at the ends of the panels and, once again, the nailing pattern was printed right on the sheathing, so attaching it was simple. We also made sure to leave the sheathing overhanging by 6” at each end of the building, so we could attach our gable fascia to the sheathing later.
We used the track saw to make any cuts where they were needed and, before we knew it, we had one half of the roof sheathed. We taped the seams on that half of the roof before moving to the other half of the roof, using the same method as when we taped the wall sheathing, working our way up from the bottom of the roof and overlapping the tape where it met up.
One other big bonus of this ZIP roof sheathing is that you don’t need to install any additional felt paper or underlayment when it comes time to shingle the roof, and the roof was weatherproof from the moment it was taped.
Before moving on to sheathing the other half of the roof, Erik also went back and added more nails connecting the rafters to the ridge board, since this area was easily accessible with half of the roof sheathed.
Next, we could repeat the whole process on the other half of the roof, first cleaning up the rafter tails and attaching the fascia, and the only main difference here was the fact that the fascia board attached directly on top of the blocking between the rafters in the area where the back side of the house bumps out.
After getting the fascia added, we repeated the roof sheathing process on this half of the roof, which went super quick.
Step 8: Sealing The Roof With Zip Tape

With the roof sheathing on, the only thing left to do to get the roof water tight was seal up the open area where the ridge vent will be installed. Since I knew this roof wouldn’t have shingles installed for at least a month, we went ahead and ran a strip of the 9” wide ZIP tape along the entire ridge, and this 50 foot long roll was perfect for this roof.
Now, because I know someone is going to say adding this tape doesn’t allow ventilation, we will be cutting away this tape from the ridge vent area before adding the roofing, this was just a temporary solution to get the building dried in.
It was also at this point that the fire Marshall came out to tell me I wasn’t allowed to have a fire on site, even though I wasn’t burning anything besides non-treated wood and was just trying to create an area for us to get warmed up while working. Thankfully, they were really nice about it and just told me not to do it again, but it seems awfully silly to send these bits of scraps to a landfill when they could be burnt for warmth.
Step 9: Adding Fascia To Gable Ends

Anyway, moving on, we could get the fascia added at the gable ends, and first we snapped a chalk line and cleaned up the edge of the roof sheathing here, to make sure the fascia ran nice and straight.
Next, I got one of the fascia boards cut to length, making parallel angled cuts at each end, and the angle here once again matched the roof pitch.
I cut the board a hair long on the first try but, after taking a hair off, Erik got the board temporarily attached to the roof sheathing.
We repeated the process with the other board, and Erik actually fine tuned this board with his circular saw before attaching it to the sheathing.
Once both boards fit well, we ran more screws to attach the board to the sheathing more securely, as well as to the eave fascia, and we tweaked the boards as needed to get them in line with the edge of the sheathing, which we knew was straight.
We repeated the process at the other gable end and then we could move inside the house to finish the framing in the gable area. We actually considered leaving this area open and adding glass here to allow more light into the bedrooms but decided against it due to the cost of the glass, plus I would have had to run it by the HOA, and they probably would have denied because it doesn’t match our main house.
Step 10: Adding Framing To Gable Ends

Anyway, for framing here, I added a 2x6 perpendicular to the rafter and this would serve both as a place to attach the cripples, and also the additional overhang on the inside of the house would give me an area to attach the ceiling covering, which will be plywood in our case.
Next, we got the cripples cut and attached, which was a bit of a slow process since we wanted to make sure they aligned vertically with the studs below.
Finally, I added one more layer of blocking between the cripples, and this is where the plywood panels will break, since this is right at the 8 foot mark, so we needed some material behind this area to screw the panels to.
Step 11: Add Sheathing To Gable Ends

With that, the roof framing done, and we could go back and add the wall sheathing to the gable area on the outside of the house to get everything sealed up. These pieces were a little funky to cut but we eventually got them attached and taped the seams.
While we were at it, we went back and added the last few pieces of missing sheathing where we hadn’t gotten to it during the wall framing and, once those pieces were taped up, we could officially call this house dried in!
