
ELECTRICAL and PLUMBING ROUGH IN // Not So Tiny House Build Part 8
Learn how to frame interior walls along with the plumbing and electrical wiring rough-in process in part 8 of the (Not So Tiny) House Build series!
🛠 Tools and Materials Used :
How To Rough In Electric And Plumbing On A Tiny House:
Step 1: Finish Framing The Walls

In case you missed the last video, I covered how we installed the windows and doors on the (Not So Tiny) House and in this video, I’m going to go over the electrical and plumbing rough-in work.
Before we get to that, though, let’s rewind a bit and talk about the rest of the interior framing work we did. This was the last bit of work I did with the Perkins Builder Brothers crew before they had to move on to their current house build and man do things move a lot slower without them around!
Anyway, we were framing the bathroom walls here in this shot and, after getting the first wall built and stood up, we framed the adjoining wall, which has the door opening for the bathroom. This wall creates a kind of hallway as you enter the house through the entry door, and, after framing the wall, we got it stood up and attached to the other two walls.
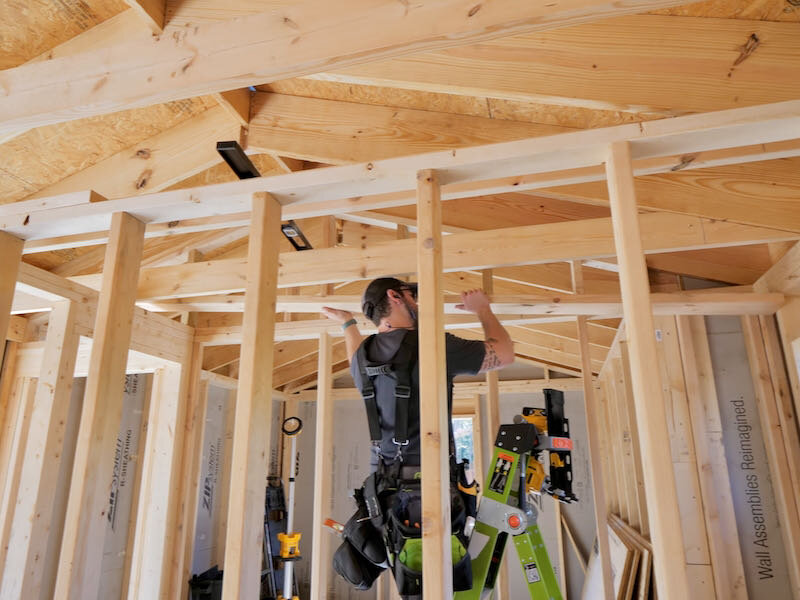
Next, we needed to frame the ceiling in this area, as this hallway and bathroom won’t have the cathedral ceiling like the rest of the house.
After mounting a plate to the wall, which is where the ceiling joists would attach on one end, we got the joists cut to length. We needed to cut one end of the joist at an angle to match up with the roof rafter at the other end, since again that side of the house has lower walls.
We attached the joist to the plate at one end and to the rafter at the other end, and then repeated the process for two more ceiling joists, and then that was a wrap with the Perkins crew before my wife and I’s new kid arrived.
A few weeks later, I got back to work by myself, starting with adding the cripples to the wall between the master bedroom and bathroom. I also needed to add another piece on the underside of the rafters here to give myself a larger area to attach the cripples.
Once that was done, I could add that last ceiling joist, which will also act as a nailer for the drywall ceiling in this area. I got the joist cut to length and wrestled it into the house, which was a little tricky by myself, only to realize I had cut the board a hair too long. Thankfully, I was able to shave a bit off with a circular saw without bringing the board back outside, and then I could get the joist attached.
After adding that last joist, I also went back around and added a 2x6 across the top plates of these 2x4 interior walls, and these will act as nailers for the drywall in those areas.

Also, in case you’re not familiar with this nailer terminology I’ve been using throughout the framing, a nailer is basically an additional piece of framing that’s added so you have a spot to attach your interior wall coverings later, which I’m illustrating here with these two pieces of plywood.
Anyway, I repeated the process of adding cripples to the wall area above this newly framed ceiling, and you might notice that I added these cripples with the wide face of the board oriented outwards, and this was mainly just to give myself additional surface area for attaching the drywall on this wall later.
I repeated the cripple framing process on the partition wall between the living area and guest bedroom.
Once that was done, the interior framing work with pretty much complete, so I could have my electricians and plumbers come out to get their work started.
Step 2: Call The Electrician

In case you’re wondering why I didn’t do this work myself, it’s because I’m not allowed to since I’m not a licensed electrician or plumber. These trades will generally have to be subcontracted out if you live in an area that requires building permits and inspections and, honestly, unless you really know what you’re doing, it’s probably a good idea anyway, since you can get yourself into a lot of trouble with shoddy electrical and plumbing work.
Anyway, the electricians started outside, getting the conduit ran in the trench running from our main house to the tiny house. In case you missed the excavation video where I dug this trench, we aren’t running a separate meter to this new house, but instead are running a sub-panel to the tiny house from the panel in our main house.
Once the electricians figured out where they wanted the conduit to end, they could start assembling it in the trench, starting on the back side of the tiny house, where the panel will be located.
They continued running the conduit in the trench and, as you can see, each joint needed to be glued so that the conduit was water tight.

Once they got closer to the main house, they went ahead and ran the electrical lines through the conduit, starting by running some pull line through the conduit so the wire could be more easily pulled through.
My electrician, Robbie, had a pretty cool trick for getting the pull line through the conduit, and he started by tying a plastic grocery bag to one end of the line. Next, he placed a small shop vac’s hose at one end of the conduit and turned it on to create some suction, and then he fed the plastic bag into the conduit at the other end.
As you can see, even with just that little shop vac running, the pull line was fed through the conduit super quick and, after running back to the other end of the conduit, we found the bag and pull line.

Next, Robbie, cut off a few of the strands on each of these huge wires and bent them over to create a hook, where they could attach to the pull line. He tied and taped the pull line to the wire and then could finally run it through the conduit, which was a super easy process with the pull line attached.
Once that was done, the guys could get back to running the conduit to the house, and they went ahead and pulled the wire at this point in the process as there were a whole bunch of turns left to add, which would have added a lot of friction if they had waited to pull the wire later.
They got the rest of the line run into the panel in our garage and then they could move into the tiny house to get the electrical work started inside.

They started by drilling the holes for running Romex through the studs and then got the various electrical boxes mounted throughout the house, but unfortunately that’s where they ran out of time and it was a few more weeks before they could come back to finish things up.
Step 3: Wrap Up Loose Ends So Electricians Can Finish Up

In the interim, I got a few more things done so they’d be able to wrap things up when they came back, starting by installing these cathedral ceiling mounts, which will be used for the ceiling fans and hanging lights throughout the house.
These were super simple to install and just attached with two screws into the collar ties in my case, and these will either be painted or wrapped with the plywood I plan to use on the walls and ceiling.
Next, I could work on mounting a few of the exterior outlets along with the panel, but first I needed to create some mounting blocks so I could properly waterproof and flash around these penetrations in the sheathing.

I made these mounting blocks from 1” thick Royal PVC trim, which is what I’ll be using on this house, and I started by making mounts for the two exterior outlet boxes. These were super simple, since they fit nicely on this 5/4x6” trim, and I just needed to cut an opening in the mounting block for the outlet box.
Unfortunately, this thin jigsaw blade drifted quite a bit while making these cuts, so I needed to make some adjustments to get the outlet box to fit but, once that was done, I just pre-drilled through the mounting holes already drilled on the outlet box into the PVC so I could easily mount these to the house later.

Next, I needed to create a mount for the electrical panel, which will be located on the back side of the house. I needed to join three pieces of this trim to make this mount and I used a combination of pocket screws and PVC cement for this. The pocket screws really just provided clamping pressure while the PVC cement set up and this made for a super strong bond.
Unfortunately, this particular cement was extremely runny and made a bit of a mess, and I’m going to experiment with a few different options before assembling the window trim later on in the build.
Anyway, after getting the pieces glued and screwed together, I went ahead and pre-drilled and countersunk holes in each corner so I could mount the PVC panel to the wall.
With that done, I could move out to the tiny house to get everything mounted and I started with the electrical outlet on the front of the house, between the entry door and sliding door.

I first got a hole cut through the sheathing, centered between the two doors, for the outlet box to go through. Somehow, I ended up cutting this way oversized and should have just used my PVC mount as a template, but it’s nothing a little spray foam on the inside of the house won’t fix.
Next, I needed to waterproof the connection between the outlet box and PVC mount, and I used the sealant putty included with the outlet box for this.
Also, in case you’re wondering, this outlet box is an Arlington IN BOX and I personally really like the low profile look of these outlet boxes vs the typical bulky boxes that stick out from the house. I just picked these up off of Amazon and I’ll link to the specific box I used in the video description below in case you’re interested.
Anyway, once the box was sealed to the mount, I could get the whole assembly mounted to the wall, and I started by adding a heavy bead of an exterior rated sealant to the back of the PVC and then I could squish the assembly onto the wall to really seal it up.

This outlet box included some stainless mounting screws but unfortunately they weren’t quite long enough to grab onto the sheathing, so I instead added some temporary screws, which I’ll swap out for some lower profile stainless screws in the future.
Once that was done, the only thing left to do to completely waterproof this setup was to add a drip cap, which I unfortunately didn’t have on hand but will be covering in my trim installation video in a couple of weeks.
With that done, I could repeat a similar process to install the mount for the panel on the back of the house, once again adding a heavy bead of caulking around the perimeter of the mount. I got it screwed to the wall and then I could partially disassemble the panel so I could get it mounted on the wall.

I marked where the screw locations on the back of panel landed on the PVC, pre-drilled holes, and then screwed on the panel. I also added blocking on the inside of the house to this area so the panel was mounted securely, since it is fairly heavy.
I repeated the same process to add another outlet next to the panel, which is required by code since I’ll also be installing my mini-split unit on this back wall.
Step 4: Electricians Rough-In The Wiring

With that done, my electrician could come back to wrap up the rough-in wiring, and while he was here, I had him try out my new Arrow T72 and T75 staplers. These staplers made really quick work of stapling the Romex to the studs, much quicker than hand driving staples, and the built-in guide made lining up the stapler super simple.
These staples come in different lengths for different thicknesses of wire and there are both insulated and non-insulated staples available. I’ll link to the staples and the staples I used in the video description below, in case you’re interested.

With that, the electrical was pretty much wrapped up and it was really exciting to see all of these wires run to the various parts of the house. We are still waiting on a few odds and ends before having our electrical rough-in inspection, most notably the bathroom fan which is on backorder, but I expect we’ll pass our inspection with flying colors.
Step 5: Preparing For Plumbers

Next up, let’s talk about the plumbing rough-in process, most of which happened before we were finished with the electrical.
Before the plumbers showed up, I wised up and made some better layout marks in the bathroom and kitchen, in the form of painter’s tape. Before adding the tape, I needed to clean up all of the chips left by the electricians, and then I could start getting things laid out, starting in the bathroom.
I once again referenced to my SketchUp model here and started by laying out the location of the floating vanity, which will be to your right as you walk into the bathroom.

Next, I marked the center of the toilet location, which had shifted slightly since we marked it during framing. Also, I decided to go with a wall hung toilet here, which you’ll see more on a little later, so I was really just marking the center line here, not the location of the toilet flange.
I finished up in the bathroom by marking out the shower, which will have a center drain and shower curb to contain the water.
With that, the bathroom was done so I could move on to the kitchen. I’ll be using appliances from Samsung’s small space lineup, including their compact fridge, dishwasher, wall oven and cooktop, all of which will be perfect for this tiny house and will save us a bunch of space in this kitchen area.
Since the fridge doesn’t feature an ice maker, I am also going to be adding an undercounter ice maker from Manitowoc in the island, which will be perfect for all of the entertaining we plan to do in this space, like making some cocktails during our parties.
Step 6: Plumbing In The Tiny House

Once the layout work was done, my plumbers came out and started getting the plumbing roughed in, starting by drilling all of the various holes for the water supply lines as well as the sewer drain lines.
They also needed to drill a hole up through the double top plate in the bathroom wall for the vent stack which runs up through the roof and, unfortunately, they ran right into an area where we had lapped a few pieces when adding this top plate and the nailers and there were a bunch of nails to drill through here.
This is the main reason you really only want to nail your double top plate near the studs when adding them, as otherwise your plumber and electrician aren’t going to be very happy with you when they have to drill through your nails.
Anyway, the plumbers continued drilling the rest of the holes for the hot and cold supply lines and then they dropped lengths of PVC and PEX into the holes, so they could easily see where the holes were on the underside of the house.
To keep the pipes from falling right through the holes, they added scraps of PVC to the drain pipe and PEX hangers to the PEX, which temporarily held them in place ,and I thought was pretty clever.

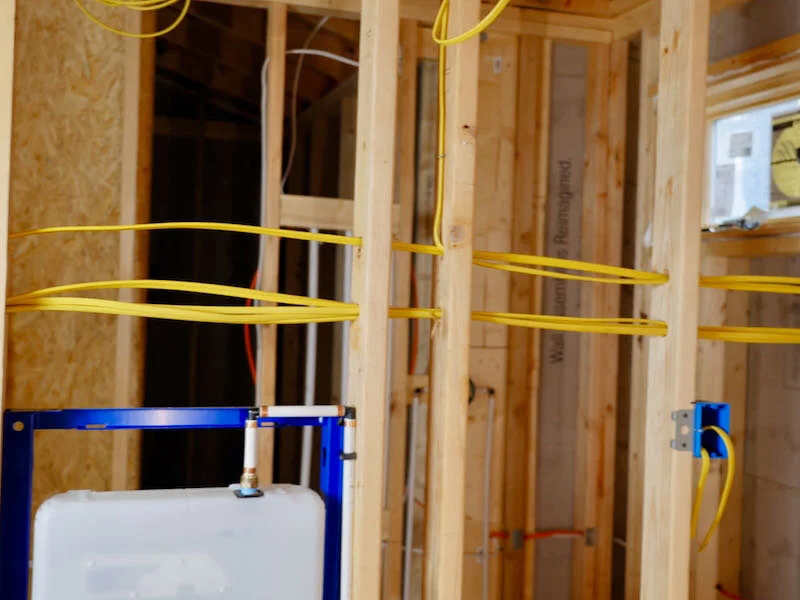
Next, they worked on getting the wall hung toilet unit attached, and this unit is located between the studs inside the walls. Of course, the toilet location ended up landing dead center with a stud, so they got the stud cut out and then I added back a pair of studs on either side of where the unit would be located.
The plumbers then got the unit bolted to the studs and the bottom plate and then got the unit plumbed in, which was a little tricky but they eventually got it done.
In case you’re not familiar with how a wall hung toilet works, the toilet bowl will hang off of these pieces of threaded rod and attach to the sewer drain line, which runs through the bottom plate and the floor. The tank will be accessible through an access panel, which will also have the buttons for flushing the toilet.

Not only do these wall hung toilets save a ton of floor space, which is great for tight bathroom space like this one, but you also don’t have to tile around a toilet flange, which is a big win in my opinion.
The last bit of interior work was to get the shower mixing valve, shower head, and water heater plumbed, and then the rest of the work was under the house.
They also ran PEX in the trench to the main house, where we’ll be tapping into our water line for the main house.
Before the rough-in inspection, the plumbers needed to add fire caulk anywhere the plumbing penetrated the studs, and they also had to cap off the entire system and add air pressure to check for any leaks. The system had to hold that air pressure for a set period of time to pass inspection, which thankfully it did, and when that was done, our rough-in inspection was officially passed for the plumbing.

With that, we could call our electrical and plumbing rough-in work pretty done, which was a big relief and meant I could continue moving along with the build process on my own.