
Installing Plywood Walls (instead of Drywall) in the Not So Tiny House
Learn how to install a plywood wall (or plywood walls in my case), including all of the mounting details like how to mount the wood walls, the spacing between the panels, and more!
🛠 Tools Used On The Plywood Walls (affiliate):
📦 Materials Used On The Plywood Walls (affiliate):
In case you missed last week’s video, I got the custom trim milled and prepped this plywood for installation in the Not So Tiny House, so now it was time to finally get these walls installed.
After bringing the first batch of plywood over from the shop, the first thing I did was get my track saw workstation set up and, in this case, that was this Kreg ACS Adaptive Cutting System.

To make sure my pieces were fully supported while we worked on the plywood, I built this little support platform, which was super handy. I attached the platform to the ACS table with these extension brackets, and the other end of the platform is supported with a Kreg Track Horse.

As you’ll see, this workstation was used for basically every task, from cutting the pieces to length to pre-drilling and countersinking the screw holes to making scribe cuts and cutting around outlet boxes and windows.
If you’re going to try your hand at plywood walls, I wouldn’t even attempt it without a good track saw setup like this one.
We actually worked on this guest bedroom, with its darker, less aesthetically pleasing pieces, first, as this room would be kind of where we learned the process. We did this part of the install off camera to remove some of the stress from the situation, but it was still a pretty rough experience, just working out the order of operations and figuring out how we were going to install these panels.
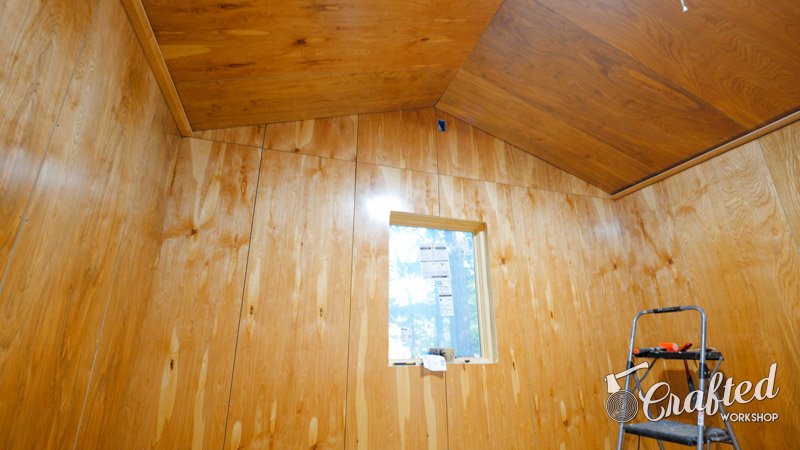
I messed with multiple spacing options, multiple screw options, and debated on whether or not to countersink the screw holes. I fretted about what order to install the panels so any errors would be hidden, since there wouldn’t be any trim to cover a lot of these areas where the panels met up at adjoining walls.
This all added to the stress of the install but, by the time we were finished with this room, we had our workflow down for the most part and next, we could move on to getting the master bedroom prepped for installing the panels.
The installation process started by setting up a laser line. This line gave us a reference point for the top edge of the panels on this gable end wall and would also show us where to install the light rail trim for the LED strips on these side walls.

While I was setting up the laser, my wife, who was amazing enough to help me with this plywood process, was getting this foam weatherstripping installed on every stud and rafter, basically everywhere a plywood edge would end up. This weatherstripping served a few purposes.

First of all, it blacked out the framing so the reveal between the plywood panels would look more clean. Second, this 1/8” thick foam gave us a little buffer for any minor inconsistencies in the framing and allowed for some adjustment by driving in the screws further to tighten the pieces to the wall.
Last, and probably more importantly, the weatherstripping air sealed the panels to the framing. Typically, with a wall covering like drywall, the taping and mudding process would take care of this, but since I was intentionally leaving gaps between these pieces, I needed another solution, and this weather stripping seemed to work well.
There are a few places where I’ll be adding sealant, like where the ceiling panels meet the light rail trim, and also where it meets the trim at the peak of the ceiling. These areas will be prone to a lot of air movement with the soffit ventilation, so I figure a little sealant in those areas won’t hurt.
Once the weather stripping was in, we could finally start hanging some plywood, and we started by mounting a straight board flush with the laser line on the gable end wall.

As you’ll see, we could butt our plywood directly up against this board while installing this first row, which made keeping the row straight much easier than just trying to visually line it up with the laser line.
Next, I could cut a piece to length with the track saw and I used the stops on the ACS to make sure the panel was square to the track.

Also, I had the orientation of the table flipped around from how you might typically use it, and this was because I was only trimming a few inches off the length of these pieces and this orientation allowed me to still use the stops for squaring up the pieces.
Next, I set up a vertical line with the laser so we could position the edge of the panel centered on the studs.
This first board obviously needed to be cut around this window opening, so we got the piece positioned and then I could mark the location of the window by tracing on the back face of the panel. I used this method for marking my locations whenever possible on this project, as I personally find it pretty tricky to measure these openings and then accurately transfer the measurements to the panel.

To cut the opening, I headed back to the cut station and laid down a few bench cookies so I could cut the opening with my jigsaw without cutting into the platform.
I wasn’t trying to get particularly close to my line here, since I would be flush trimming the plywood to the window jambs later, and this cut went super quick.
Next, we could pre-drill, countersink, and pre-drive the screws in the panels. To drill the holes, we used the jig I showed in last week’s video and used a self-centering drill bit to basically mark the hole locations.

We could then countersink the holes with my all time favorite countersink bit, which has the absolute must-have feature of this non-mar depth stop. This feature was pretty much a requirement on this project, as I wanted all of these screw holes to look consistent.

Finally, we could partially drive the screws, and having the screws already in place made it much easier when getting the panels mounted.
Speaking of the screws, I used these 1 5/8” SPAX stainless steel deck screws, and this extra threaded area helped to pull the plywood super tight to the framing.
Once the screws were in, I could get the first piece mounted on the wall. I made sure the top of the panel was tight against our alignment board and the edge of the panel was lined up with my laser line, and then I could drive in all of the screws, making sure not to overdrive them to allow some room for adjustment later on.

Next, we repeated the process for the other panel nearest the window opening, again cutting it to length, cutting around the window opening, and pre-drilling and driving the screws. The only difference here was the top edge of this panel needed to be scribed ever so slightly to match up tight with the alignment board.
I’m not really sure why we had to do this on some of these panels, I’m guessing things just might have ended up ever so slightly out of level or square, but scribing the board with the track saw was super easy.
To set the reveal between the panels, we used paint stir sticks as our spacers, and I picked up this tip from my buddy Mike from Modern Builds. These paint stirrers worked great as spacers since they’re a consistent 1/8” thick and they’re rough enough that they don’t slip out as easily as something like plastic would.

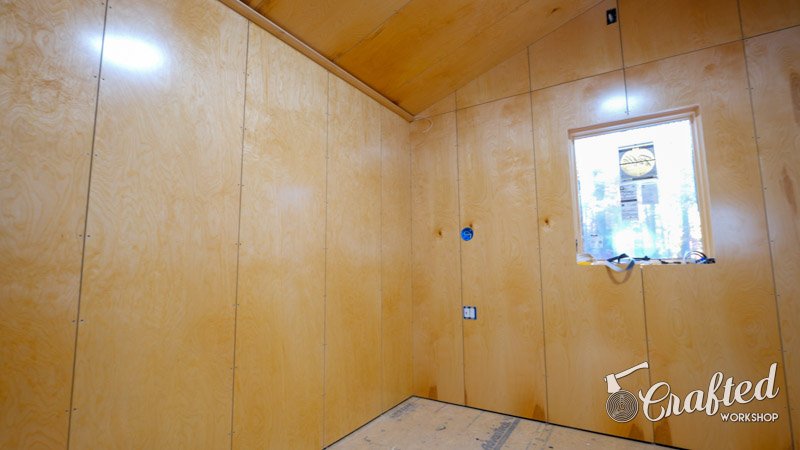
Next, it was on to our first board with a few outlet boxes to cut around, and I had purchased this awesome little tool for helping mark these outlet box openings. Unfortunately, the tool didn’t work with these USB outlets I installed next to where the bed will go in this room.
Instead, I had to go with the old school method of measuring and marking and, as you’ll see, I managed to screw that up later on, which is why I avoid this whenever possible.
Anyway, I roughly marked where the boxes intersected the panel and then moved back to the cut station to get things marked out. Thankfully, I hadn’t actually installed the boxes on the other side of the bed, so I could use those to trace out the openings and then I used my jigsaw to cut the openings.

One tip here would be to figure out how much coverage you have with your switch plates and fixtures, because I know I erred on the side of way too tight on these openings, which meant I usually had to trim these areas multiple times before I got them fitting which, as you can imagine, was pretty annoying.
Once the piece finally fit, I got it screwed to the wall and then we repeated the process on the other side and this panel once again required multiple fittings.
The last two pieces to install on this row were the pieces that met up with the adjoining walls, and I made sure to measure the width here in multiple spots so I could account for any inconsistencies in the framing when cutting the panel to width.
To make this rip cut, I used a longer Kreg track and, as you’ll see, this panel had already been cut previously, but with the outlet box locations accidentally flipped, making the piece unusable. Thankfully, I was able to rip off that area and still use this piece, which was a relief considering each of these panels cost $30.

We repeated the process for the panel at the other end and, with that, our first row was installed.
Next, we could fill in the top row, which was a little tricky since it had to be cut to fit the roof line. Thankfully, we didn’t have to get this perfect, since the ceiling panels would cover up 1/2” of space, and it was easy enough to measure and then cut to those measurements with the track saw.
We used the drilling jig on these pieces as well, but instead of referencing off the top edge like with the other panels, we referenced off the bottom edge, to keep a consistent screw spacing.
Finally, I could install the piece, using more paint stirrers as spacers and lining up the edge with my laser line.

I repeated the process for the other panels and thankfully I was able to get these pieces out of the offcuts from the ceiling panels, which I’ll show next.
I didn’t end up with much waste on this installation because of the way the house was designed and any scraps of this pre-finished plywood will be used for the drawer boxes on the kitchen cabinets, which I’ll be building next in this series.
Anyway, once all of these pieces were installed, we could call this first wall complete and move on to the ceiling panels.
We once again started in the middle and worked our way out on the ceiling, and this meant the first piece needed to be notched around the ceiling fan box.

After measuring, I first cut the panel to length and then I could mark out the location of the fan box.
I once again used my jigsaw to make this cut but I did back bevel the horizontal cut, just to make it a little easier to fit the piece against the fan box.

Once the piece was notched, we could get it installed, and I also set up a vertical laser line here for reference.
Also, let me tell you, this was pretty tiring work, since not only were we working overhead but, as you might be able to see, this insulation was really stuffed in these cavities. Thankfully though, with a little brute force, the panels snugged up nicely.
We repeated the process for the next two panels in line, once again notching around the fan box, and then we got to another piece that met up with a wall.
I used the long track again to scribe the piece to the wall and thankfully all of our walls were straight enough to where we didn’t have to cut any curved scribe lines.
From there, it was really just rinse and repeat for the ceiling panels and I was so glad to finally get this insulation covered up, as I’ve been bumping into it and getting itchy for the last few months.
We finally got to the last two end panels, and the only difference on these two pieces was the fact that we needed to feed the low voltage wire for the LED strips through these panels before installing them. This low voltage wire will connect the LED strips on either side of the room and, thankfully, we were able to install all of the ceiling panels without forgetting any of these wires.
With that, the ceiling was done so we could get the light bar trim installed. Once again, we called on our alignment board and got it mounted so the trim piece would rest on this board during installation.
Next, I used my laser measure to take a measurement for the length of the trim and then cut the trim to length with, you guessed it, the ACS.

If you watched last week’s video, you’ll know that my plan was to attach this trim with pocket screws, so next I could pre-drive a few 2 1/2” pocket screws before moving the board into place.

We got the trim positioned, making sure it was spaced evenly at either end, and then I could drive in the pocket screws, making sure to hold the trim tight to the alignment board.
Thankfully, pocket screws have the tendency to push your piece in the direction of the screw, which meant they naturally wanted to pull the trim tight to the alignment board.
I added all of the screws and then I could remove the alignment board so we could get started on these wall panels.
For the most part, installing these panels was just more of the same, cutting the pieces to length, pre-drilling and driving the screws, and then installing the panels, again starting in the center of the room. One note here is that we added spacers between the trim and top edge of the panels, to once again maintain that consistent 1/8” reveal.
We decided to work towards the gable end wall in this case, probably to avoid dealing with that outlet box, and I once again scribed the last panel with the longer track.
Once that was done, it was back to my nemesis, the outlet box, but thankfully I could use my little gadget to mark the location of the box this time.

As you can see, the way this works is you add one half of the tool to the outlet with the arrow on the plate facing up. Next, you set your panel in place, get it positioned, and then stick the locator plate on the wall. The magnets on this thing are surprisingly strong, so the plate stayed put well enough to trace around it.
One thing I figured out as we went along is that this plate seems to be sized for tracing with a carpenter’s pencil, as the hole ended up being pretty much the perfect size when tracing with one of those vs trying to draw a tight line with a mechanical pencil.
I once again used my jigsaw to cut the hole, and I found that drilling a 3/8” hole at each of the corners not only made cutting the opening easier but also matched up really well with the outlet box.

After cutting the opening, we got the panel installed and then finished up that wall in the same way.
You might notice that I’m removing this Romex wire here and that’s because I decided to go with a tankless water heater to save some space and, since it’s all electric, it’s going to need a much beefier wire, which we’ll have to run up through the floor into the closet cabinetry I’ll be building on this wall.
With that, this wall was done and, I’ve got to say, I’m pretty proud of how clean all of our reveals ended up, as it took a lot of forethought to make that happen.

We repeated the process on the other wall and there’s really not much else to say that I haven’t already covered, so let’s just let the timelapse roll for a minute.
With that, the master bedroom was pretty much done except for some trim at the ceiling and floor, plus flush trimming the window, but I was really happy with the way this plywood was looking. I know a lot of you guys in the comments on the last video weren’t into the look, but I personally think it looks super cool and very unique.
Next, we moved out here to the main kitchen and living room, which we actually saved for last as I figured we’d have gotten our installation method down by this point, which was definitely the case. We got the ceiling done in about two half days, then got the extra long trim pieces mounted.
I did have to cut the drywall in the kitchen area to fit the trim here, as I had purposely left it long, but this was easy to do with a utility knife, and I used the Dominos I had cut mortises for in the last video to join the pieces.

My SD card filled up right as we started installing the plywood on this wall with all of the windows, but the installation here was really just more of the same, roughly cutting the panels to fit around the windows, plus we had a lot of outlets to contend with on this wall.
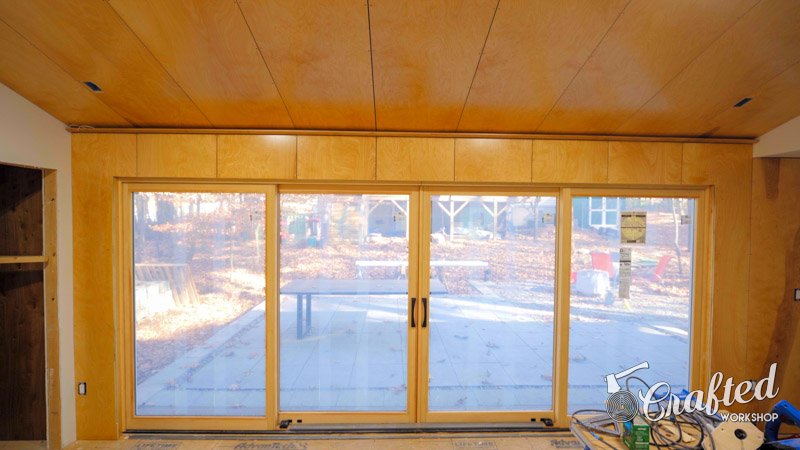
This wall was a bit of a different story, since I had this giant sliding door to deal with. Because this door was sized for 2x4 framing, I had to pack out the area for the extension jambs and these scraps of this plywood were perfect for this.

Luckily, there was a whole pile of these two inch offcuts from the wall panels and I got them tacked in place with a narrow crown stapler.

Once that was done, I could get the actual extension jambs installed, and these were more strips of plywood, but in this case they were longer pieces and I installed them with the same screws to match the rest of the plywood.
After installing the extension jambs, I got the foam weatherstripping added and then I could get to installing the plywood on this wall.
As always, I started in the center of the room, which meant I was starting with these small pieces above the door. Again, I lucked out with my offcuts here and I was able to get two of these pieces out of the ceiling panel offcuts.
After drilling, countersinking, and pre-driving the screws, I could get the first piece installed, which went smoothly.

I continued on down the wall, installing more of these small pieces and then I was in the home stretch with the last few larger pieces. This left panel went in easily enough, but we really struggled on this panel close to the door since it had to be scribed to the ceiling and had multiple outlet boxes.
After getting it fitting perfectly, we finally noticed that our screw pattern didn’t line up since the ceiling height changed in this hallway, so I had to scrap that board and recut it, which was super frustrating.
I got the new piece fit and installed and could move on to the last two pieces around this entry door, which were easy since there will be trim to cover the edges around this door opening.

The very last thing to do for the installation was to add more screws around the edges of this door opening, and my wife and her dad showed up right as I was installing these and, let me tell you, we were pretty excited to have these plywood pieces installed.
All in all, this process took almost two months, chipping away at it a few days a week, and I’m really happy with the result.
I wasn’t quite done yet though, as the edges around the windows were still ragged. To clean these up, I got a flush trim bit installed on my trim router and went around the inside edges of the window openings. This was pretty stressful routing, as any big screwup here would require me to replace a panel entirely, since there isn’t going to be any trim around these windows.

Thankfully, the routing went pretty smoothly and, with a little sanding, I should be good to go. I really like how the foam around these window openings maintained that same 1/8” gap and I’ll be coming back to finish these edges and the windows themselves with some TotalBoat Halycon.
I repeated the process around the windows in the bedrooms and around the big sliding door and then I could finally vacuum up all of the sawdust generated by cutting this plywood before stepping back to admire our work.
Overall, this plywood installation was probably one of my least favorite parts of this build so far, a close second to installing the tile in the bathroom, but I’m so happy with the way the inside of the tiny house is looking with the walls installed.
There’s obviously still some trim that needs to be installed where the ceiling panels meet, but that’ll be done later.
Next up in the series, I’ll be building the custom kitchen cabinets, which I’m super excited about. I’m using some really cool Blum hardware and I’ll show you guys everything in the next video in the series.