Huge Closet Makeover! How To Build Cabinets & Shelving for Closet Organization
Learn how to makeover your closet with custom built-in cabinets, closet shelving, and tons of storage! Complete with closet rod and tons of drawers, this will take your closet from mess to masterpiece.

Thanks to AMD for sponsoring this video, learn more about PCs powered by AMD, like the Dell Inspiron 14 7000 2-in-1 laptop I used, here! #sponsored
📦 Materials Used On The Closet Cabinets (affiliate):
🛠 Tools Used On The Closet Cabinets (affiliate):
If you’ve been following along for awhile, you’ll know that I despise wire shelving, and unfortunately every closet in our house is full of this stuff.
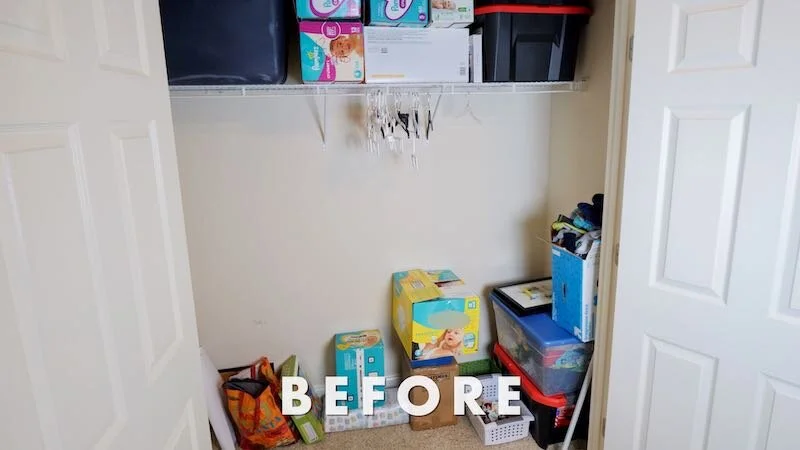
To make matters worse, in our two guest bedroom closets, which act as our nursery as well as my son’s room, there is a ridiculously minimal amount of shelving, meaning there is a ton of wasted space in these closets.
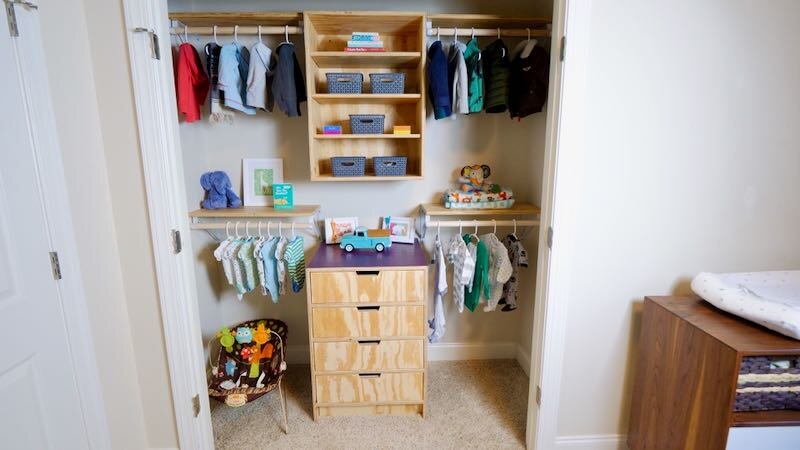
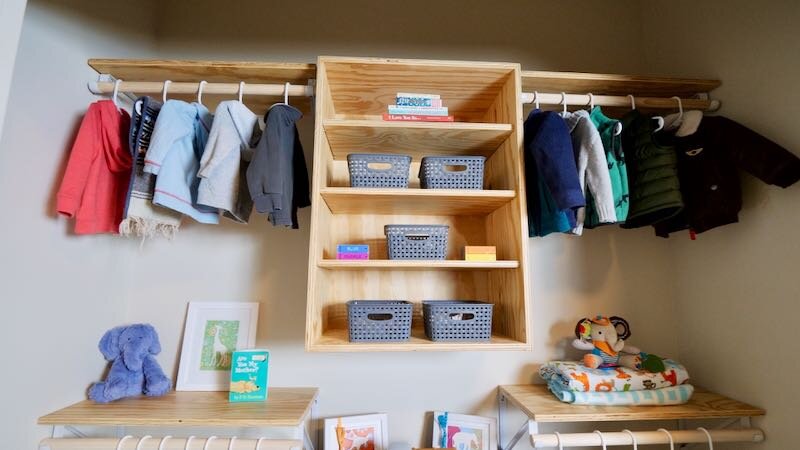
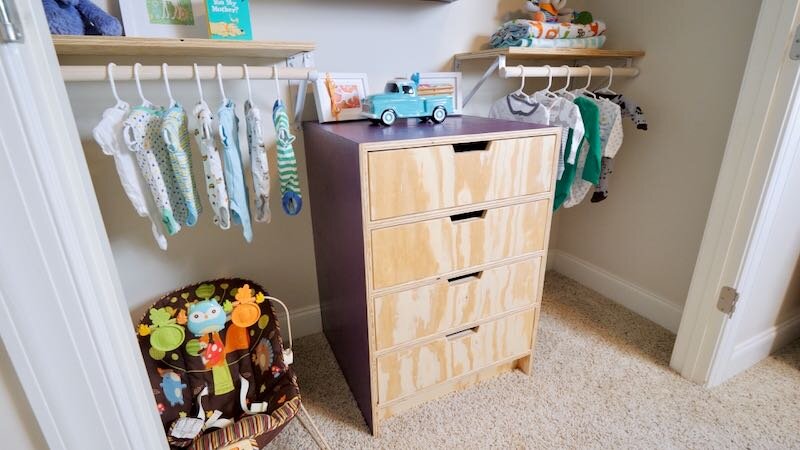
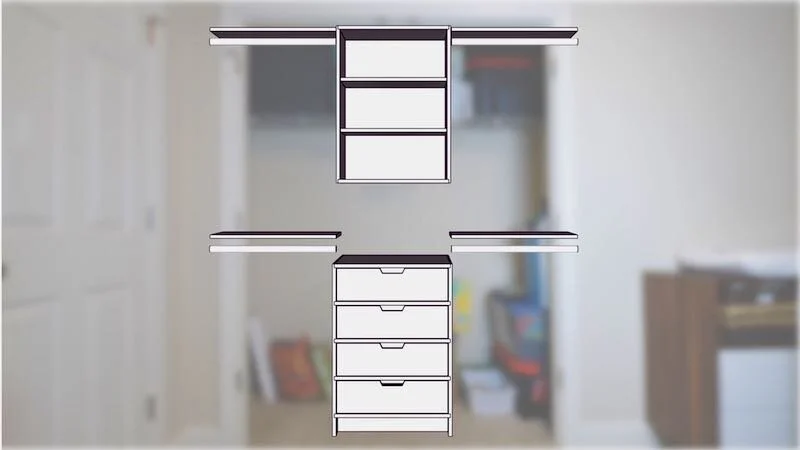
With our second kid arriving soon, now felt like the time to finally give these two closets a complete makeover. My plan was to fill these closets out with a base cabinet with drawers, an upper cabinet with adjustable shelves, and then four more shelves with closet rods for hanging clothes.
Closet Cabinetry Build Process
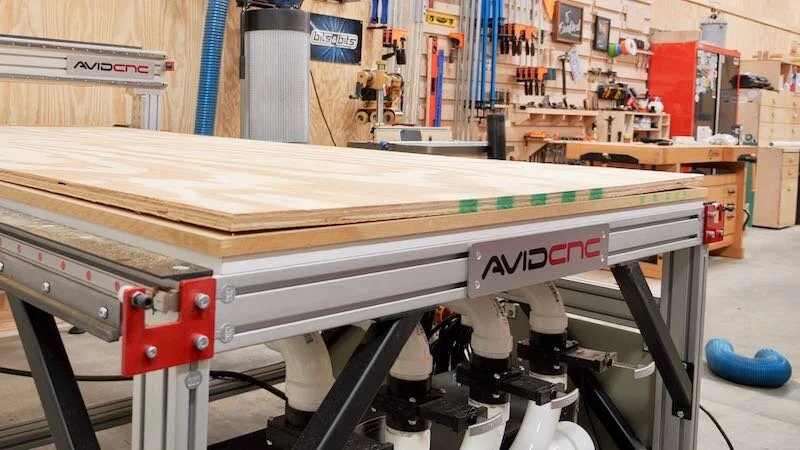
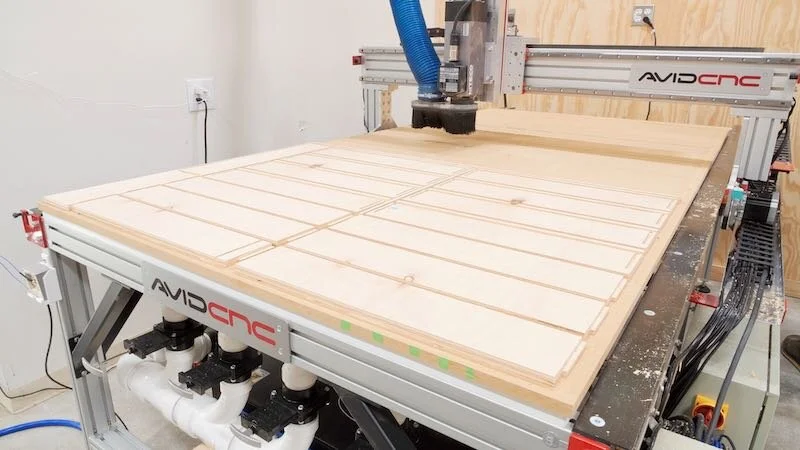
In case you missed my last video, I recently added a 4x8 Avid CNC to my shop and I have been anxiously awaiting being able to cut cabinets on this beast of a machine.
I’ve definitely made my share of cabinets in the past using more typical woodworking tools and I have plenty of videos showing the process of building them that way. That said, the thought of being able to load up a full sheet of plywood and watch as the CNC cut all of the joinery, shelf pins holes, drawer slide mounting holes, and then finally cut the parts to size was incredibly exciting.
Step 1 : Cut Cabinet Parts on the CNC
To design the cabinets, I initially used SketchUp, but then to actually create all of the g-code files to cut the parts on the CNC, I used a CNC cabinetry software called Mozaik. Mozaik is super powerful and, once I figured out the settings, it was insane how quickly I could design the cabinets and then get them cut.

Before actually trying to cut anything, and since this was my first time using g-code generated by Mozaik, I first did a quick air run cutting above the spoilboard just to make sure everything looked right and, luckily, it looked perfect, so I could load up my first sheet of plywood.
I decided to go with Radiata Pine plywood on this build, as I planned to paint the outside faces, but honestly, I’m not sure if I’d use it again in the future on this type of project. As you can see, most of these sheets had a pretty significant warp to them and the faces looked really rough in some areas.
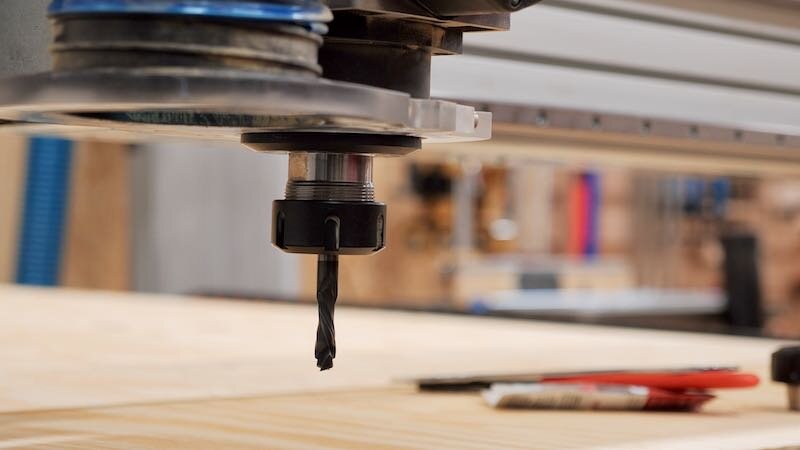
Thankfully, after flipping the sheet over, my vacuum pump was able to pull the sheet flat to the spoil board and I could get my first bit, a 5mm drilling bit which drilled the drawer slide mounting holes and the adjustable shelf pin holes, zeroed out. After zeroing the bit, I ran the first program, which took all of 30 seconds.
After that was done, I switched over to a ⅜” compression bit, which I picked up from BitsBits. This bit was the real MVP on this project and was responsible for cutting all of the dados into the cabinet pieces, as well as cutting the parts to size.
This was really the first time I had done any serious cutting on this CNC and I was blown away at just how quickly it cut through this plywood. As you can see, this ⅜” bit was able to easily cut through this ¾” plywood in a single pass and the edge quality I was left with was pretty incredible.
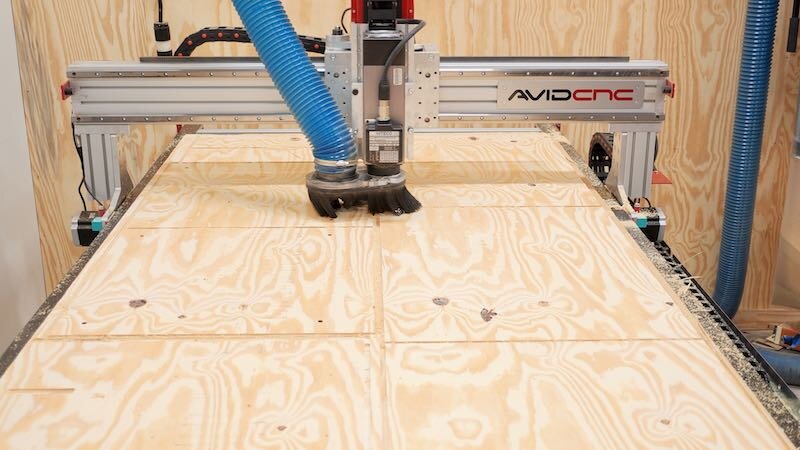
I do need to do something about my dust collection though, as my current setup just can’t keep up with the ridiculous volume of dust generated by the CNC.
After removing the pieces from the first sheet and vacuuming off the spoil board, I loaded up the second sheet and repeated the process, first drilling the holes then cutting the dados and profiles.
I repeated the same process on the next two sheets, for a total of four sheets of plywood, and I had all of the cabinet parts cut in about an hour and a half, which is absolutely crazy.
I actually think I spent more time changing bits and vacuuming up the leftover dust than the CNC actually spent cutting, so there’s definitely plenty of room for improvement there.
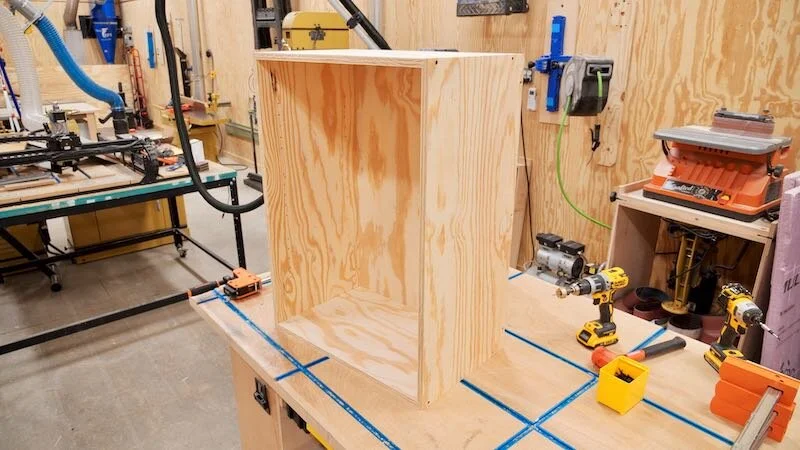
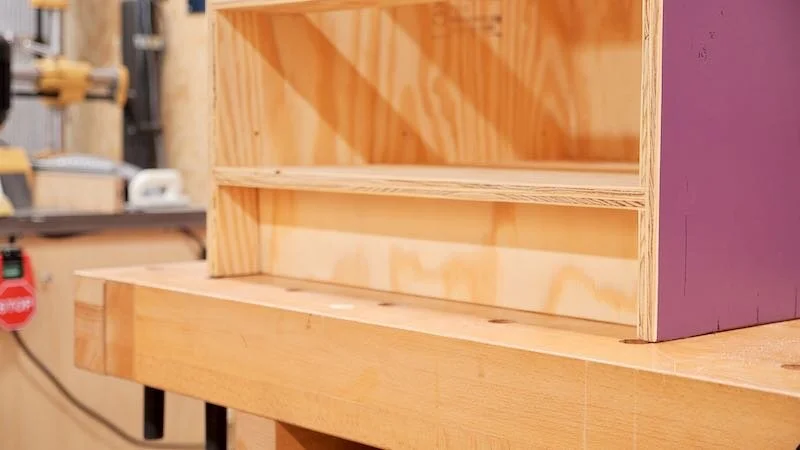
Step 2 : Assemble Upper Cabinets
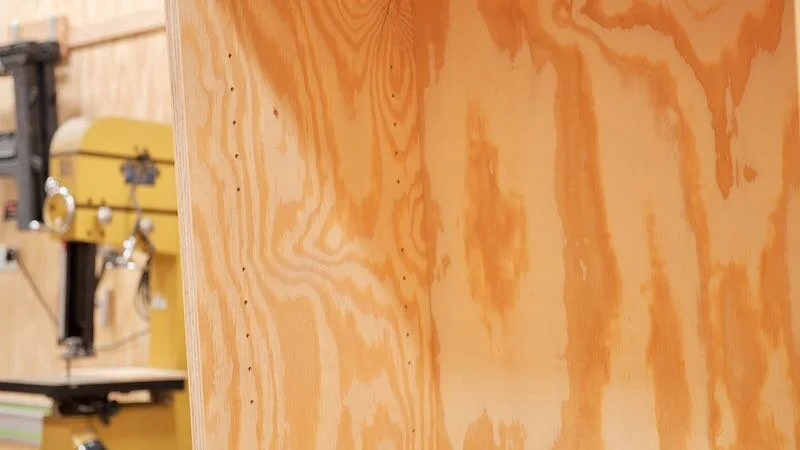
After cutting, I could dry fit one of the cabinets, which came together pretty much perfectly. You can see all of the shelf pin holes for the three adjustable shelves are already drilled in this upper cabinet and all the dados were nice and tight.
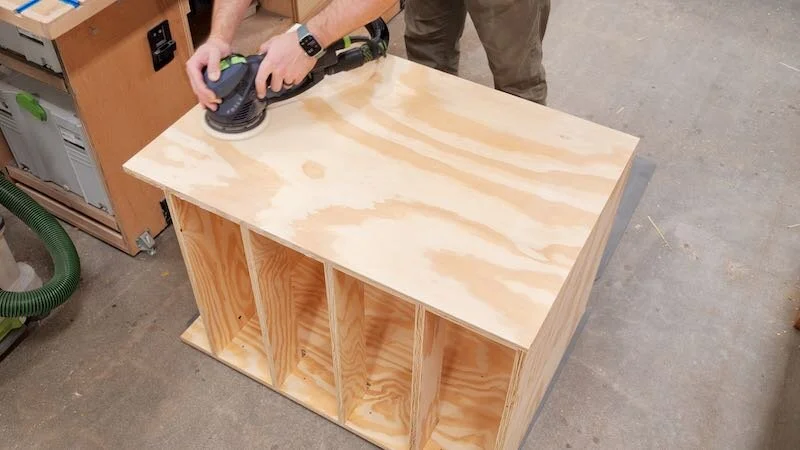
Next, I took the dry assembly apart and sanded all of the inside faces of these upper cabinets up to 120 grit, since it was a lot easier to sand these pieces prior to assembly.
The assembly process went smoothly, and I just added enough glue to help hold everything together without having to deal with a ton of squeeze out.

I added the top and bottom panels next, which are housed in a rabbet, and then I screwed the whole thing together through the pre-drilled assembly holes. I did countersink the holes slightly so they’d be easier to fill, but otherwise this was almost as easy as assembling IKEA furniture.
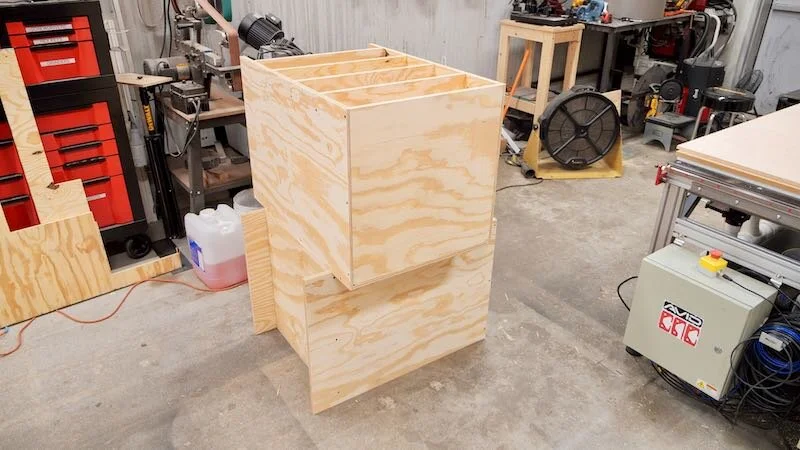
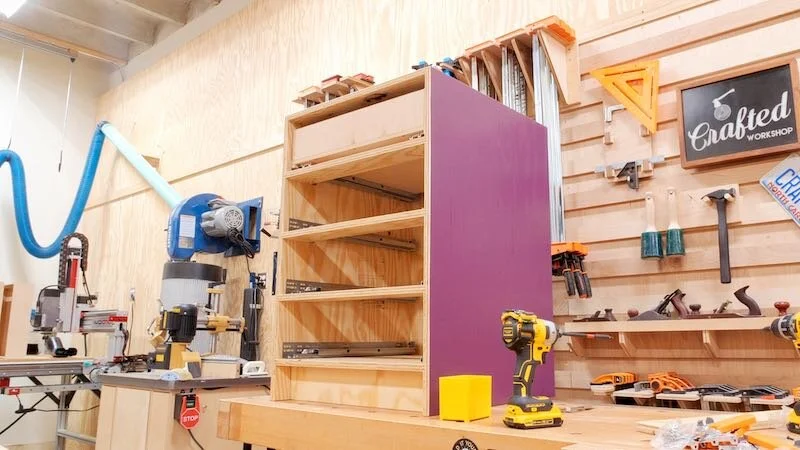
Step 3 : Assemble Base Cabinets
I repeated the same process for the base cabinet, which went together in pretty much the same way, but I realized that one of the customizations I had made to this cabinet in Mozaik hadn’t carried over to the g-code.
The dados on the inside of the side panels are for the drawer stretchers, which go between each drawer, and I wanted these stretchers flush with the front edge of the cabinet, not recessed.
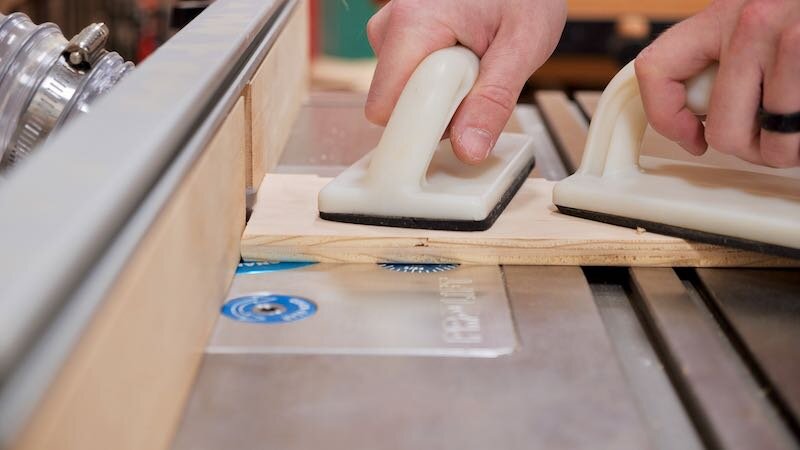
To fix this, I whipped up a quick little jig made of scraps and then, using a Whiteside pattern bit from BitsBits, I extended this dado to the front edge of the cabinet.

This went super quick and then I could get the stretchers installed with glue and screws, plus I’ve already figured out how to fix this on future projects.
I repeated the whole process one more time on the second base cabinet and, once that was done, all of the cabinets were assembled, so I could move back to the CNC to cut the drawer parts.
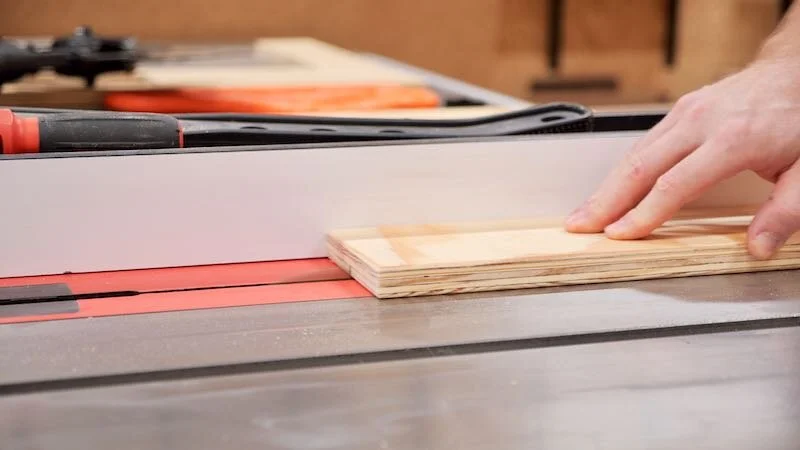
Step 4 : Cut Drawer Parts On The CNC
I used a ¼” compression bit for this, as the general rule of thumb here is you can cut through material twice as thick as the diameter of the bit. This ¼” bit could cut through ½” plywood in one pass without wasting material like would have happened if I used a wider bit.
I loaded up a larger offcut of ½” plywood I’ve had around the shop, and I was actually able to add this piece into Mozaik and have it nest the parts onto a piece this size, which is pretty cool, then I could load up the g-code file into Mach4 running on this AMD-powered Dell Inspiron 14 7000 2-in-1 laptop and get to cutting.
Step 5 : Round Over Drawer Box Edges
Next, I decided to try a little trick I’d seen my buddy Mike Farrington use on his drawer parts and used a half-round router bit to ease the top edges of the drawer box parts. This removes any sharp edges from the top edges of the drawer boxes, and is just a really nice touch.
I used my power feeder to run the parts through quickly and at a consistent speed, and this made quick work of the task.
Before assembling the drawers, I sanded the inside faces with 180 grit sandpaper, both to clean them up but also to give me a little more wiggle room on those qualified tenons, which had a pretty snug fit.
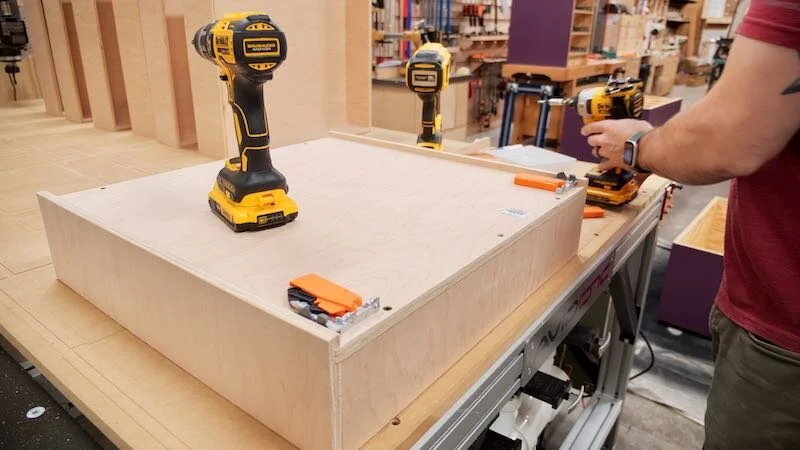
Step 6 : Assemble Drawer Boxes
Assembling the drawers was simple enough once I figured out how all the parts came together, and the only screws I needed to add were to attach the bottom to the front and back, which were cut shorter to allow room for the drawer slides.
I glued and screwed together the rest of the 8 drawer boxes and left them in the clamps for the glue to dry.

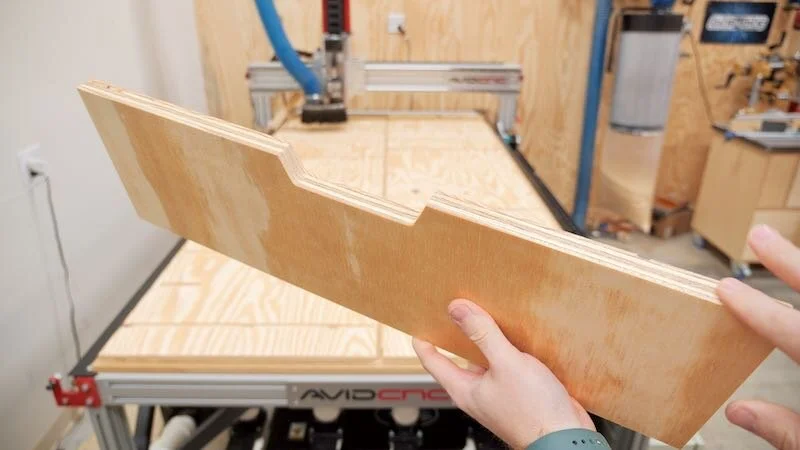
Step 7 : Cut Toe Kicks and Shelves
The only other parts left to cut were the toekicks, which will clip on to the leveling feet I’m using on the base cabinets, and then the shelves which will go on the shelf brackets for the closet rods.
After cutting these last parts, I could start the lengthy finish prep process on these parts by chamfering all of their edges at the router table, again with the assistance of the power feeder, and I also chamfered the edges of the drawer fronts while I was at it.
Finally, I sanded the ridiculous number of parts with 80 grit, 120 grit, and finally 180 grit sandpaper.
Step 8 : Prep Cabinets For Finish
Next, I could do a little finish prep work on the cabinets, first filling all of the screw holes with wood filler.
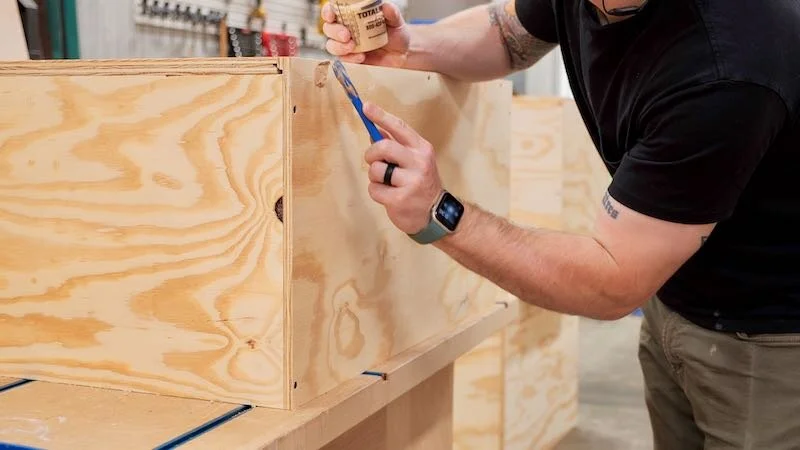
After the wood filler dried, I sanded the outside faces of the cabinets up to 180 grit, also breaking all of the sharp edges while I was at it. I didn’t worry about the front edges or insides of the cabinets at this point, as I’d sand them after painting.
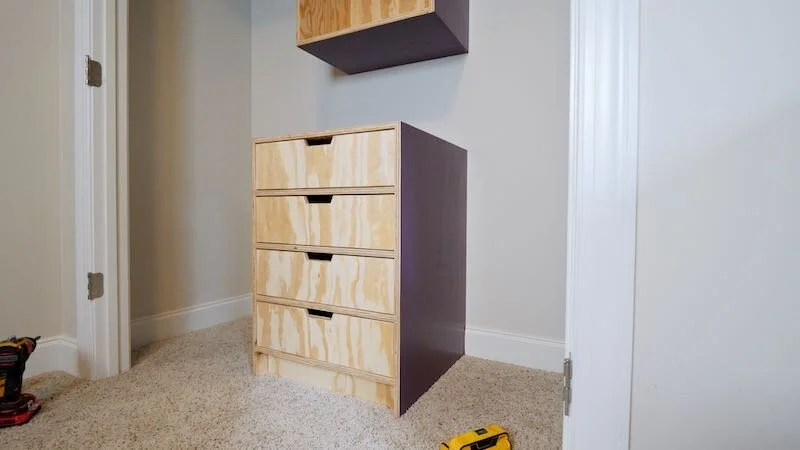
Step 9 : Paint The Cabinets Purple!
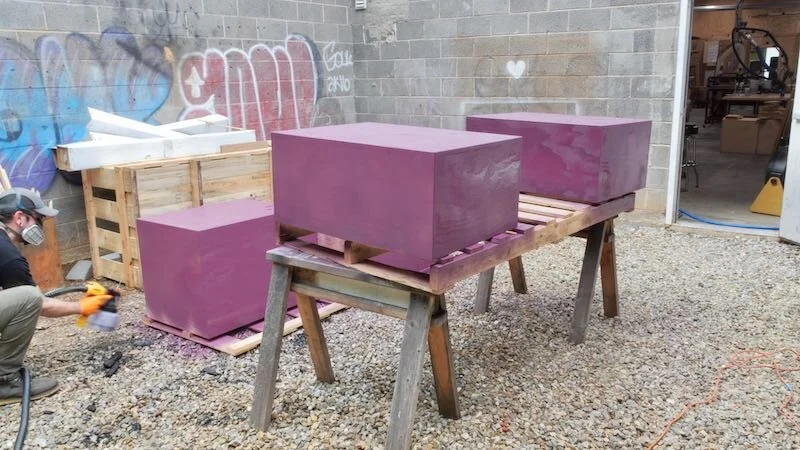
Speaking of which, next I could get to painting and I ended up going pretty funky on this project and went with this pretty cool shade of purple for the outside faces of the cabinets. I think this purple really played off the yellow of the Pine plywood nicely, plus these cabinets are for kid’s room closets.
I used TotalBoat’s Elixir paint on this project and this purple color is actually equals parts of their Seafoam Green, Fire Red, and Flag Blue, which I had a ton of on hand so I decided to experiment with mixing the colors.
I sprayed on two coats of paint, let the paint dry overnight, sanded the paint with 320 grit sandpaper to smooth things out, and then finally rolled on a final coat off camera, since it was now raining outside.
Once the third coat dried, I cleaned up the line between the painted and unpainted areas with a block plane, chamfering those edges and adding a nice, sharp line between those areas.
Step 9 : Spray On Clear Coat
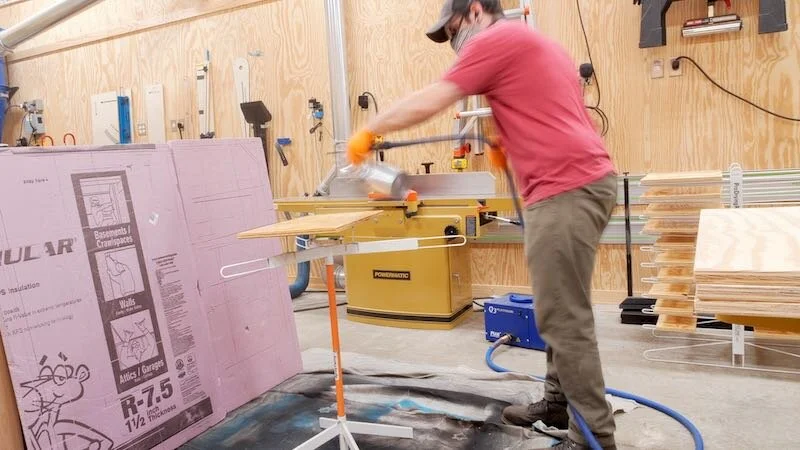
After a little more sanding on the front edges off camera, I could move on to adding a clear coat to the rest of the pieces, and I used TotalBoat’s new Halcyon Clear Matte finish on this project.
I’ve used their gloss version on a bunch of projects in the past, and this matte version looked great, with a super flat finished sheen.
Step 10 : Install Cabinet Leveling Feet and Toe Kick
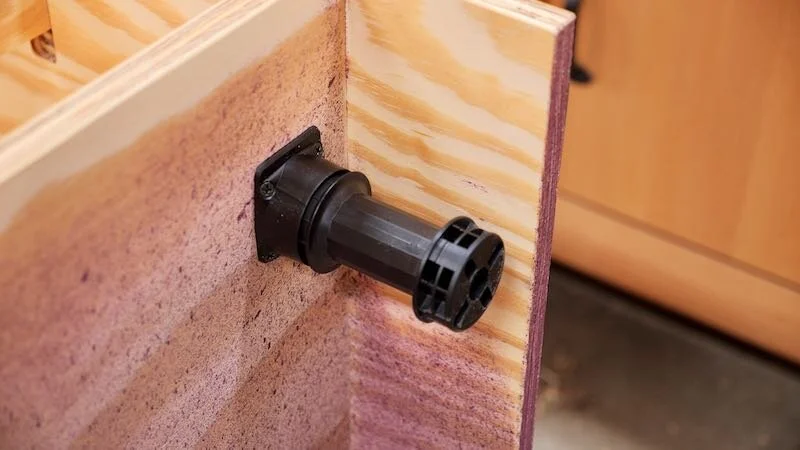
Once the clear coat had dried, I could move on to getting all of the hardware added to the cabinets, starting with these leveling feet from Rockler. The CNC had actually already cut the holes for these in the bottom of the base cabinets, but I needed to enlarge the holes to work with these particular feet.
After drilling out the holes, I pre-drilled holes for the mounting screws and then drove in the screws to secure the base to the underside of the cabinets. Once that was done, the other half of the feet just friction fit onto the mounting base.
The cool thing about these leveling feet, apart from the fact that they make leveling the base cabinets super simple, are these little clips which allow you to easily add and remove the toe kick.
These clips friction fit into a groove on the back side of the toe kick pieces, and next I needed to cut that groove at the table saw. I really tried to sneak up on the fit but unfortunately still ended up with a looser fit than I wanted, but that was easy enough to fix with a little CA glue when it came time to add the toe kick.
As you can see, once the clips are added, the toekick just clips into place and the clips have a ton of adjustability built in so placement is really easy.
Step 11 : Install Blum Undermount Drawer Slides
Next, I could get these Blum undermount drawer slides installed and, as I mentioned, the mounting holes for the slides were already pre-drilled by the CNC. This made mounting the slides a total breeze compared to the normal process I have to go through when mounting drawer slides.
These 5mm holes work with these Blum system screws, which have a deeper thread, which allows them to grab really well in melamine or MDF cabinets. I added three screws for each drawer slide and they were installed, no jigs needed.
I did need to use a few jigs on the drawer boxes, starting with this jig to locate and mount the clips for these undermount slides. These clips need to be spaced ½” off the back of the drawer box, and this little shop made jig helped me do this quickly.
Next, using this Rocker jig, I drilled the holes on the back of the drawer boxes which accept a little locating pin built into the drawer slides, which keeps the drawer in place securely.
I then repeated the process on all 8 drawers, and then I could get the drawer fronts attached to the drawer boxes.
To do this, I centered the drawer fronts in the opening using ⅛” shims, clamped the drawer fronts to the drawer box, pre-drilled holes from inside the drawer box and then attached the drawer fronts with 1” screws.

These drawer fronts have an ⅛” reveal on all four sides, and I personally love the look of these inset drawer fronts with the drawer stretchers between each drawer.
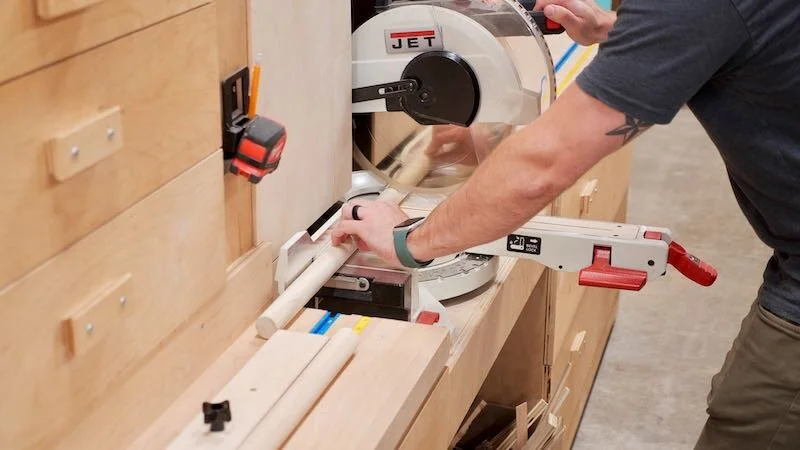
After getting the drawer fronts added to all of the drawers, I cut a few pieces of 1 ¼” Pine dowel rod, which I’m using for the closet rods, down to size and then I could load up and get everything moved back to my house for installation.
Step 12 : Remove Wire Shelving From Closet
Before installing anything, I had to get everything moved out of the closet and then get the wire shelving removed.
The key to removing these types of clips without damaging your walls is to pry out the little nail which expands the end of the clip in the drywall. Once the nail is removed, the clip can be pulled out of the wall with minimal damage.
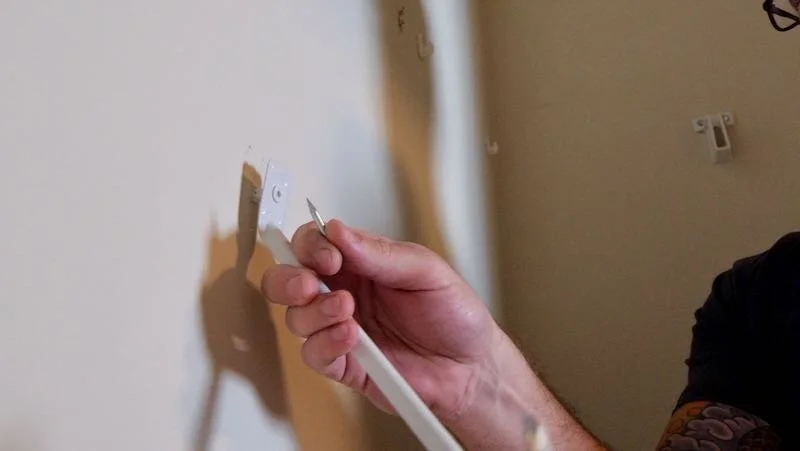
I removed all of the clips and then came back with spackling to fill all of the holes, and I found this plastic shim actually worked great as a temporary putty knife.
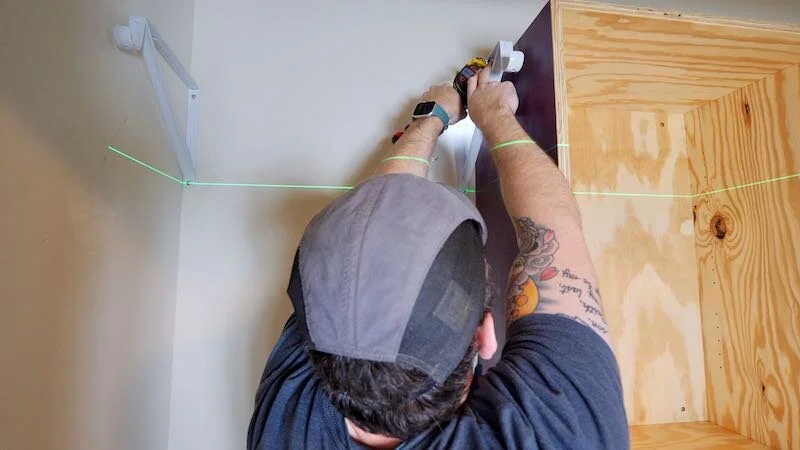
Step 13 : Mount Upper Cabinet In Closet
While the spackling dried, I could prep for hanging the upper cabinet by finding the stud locations where the cabinet would be mounted. Luckily, I had two studs centered on this wall, and I measured the distance from where the left edge of the cabinet would be mounted to the studs.
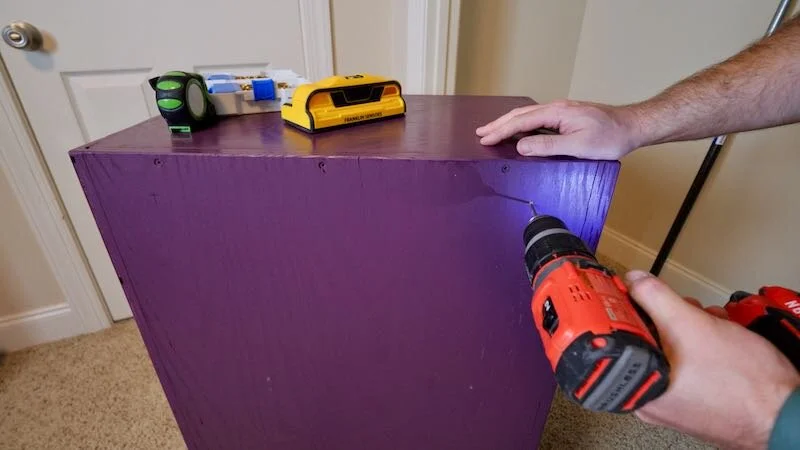
I then transferred this measurement to the back side of the cabinet and then pre-drilled holes through the cabinet.
Finally, I partially drove in some 3” screws which I used for mounting the cabinets.
To assist in mounting the cabinets, I used these Rockler work supports, which I was able to roughly set to the height I’d be mounting the cabinet, 51” in this case, and then I could set the cabinet on top of the supports to free up my hands to make any fine adjustments. These work supports were a real life saver and I can see them really coming in handy on future cabinetry projects.

I got lucky and the cabinet was perfectly level on the work supports, so all I needed to do was shift the cabinet slightly to center it on the wall and then I could drive in the screws, which I knew would hit the studs behind the cabinet.
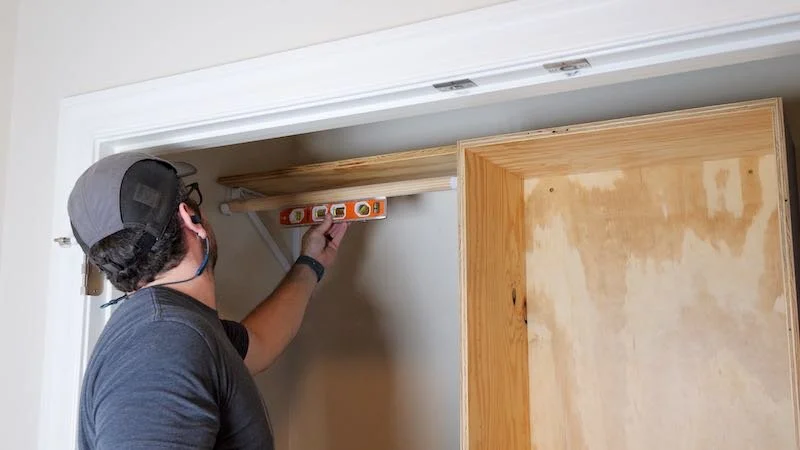
Step 14 : Remove Baseboard & Install Base Cabinet
With that, the upper cabinet was mounted, so I could move on to mounting the base cabinet. I started by setting up my line laser to be even with the edge of the upper cabinet, so I could transfer that location to the baseboard below. I needed to cut away the baseboard in this area, so I marked a line, using a level as a straight edge.
I marked another line 24” from my first line, again using the level to make sure it was straight and plumb, and then I cut through the baseboard at those locations using an oscillating multi-tool.
Before prying off the baseboard, I scored the caulk line between the baseboard and wall to avoid tearing the drywall paper, and then I used this super handy Trim Puller tool to remove the section of baseboard, as well as to pry out the finish nails that were left behind.

After removing the baseboard, I double checked the stud locations were consistent with where they were higher on the wall, transferred those locations to the back side of the base cabinet, then pre-drilled holes in those locations.
Next, I slid the base cabinet into place, leveled it using the leveling feet I had added previously, clipped the toe kick in place, and then screwed the cabinet to the wall. Finally, I could reinstall the drawers and the base cabinet was done.
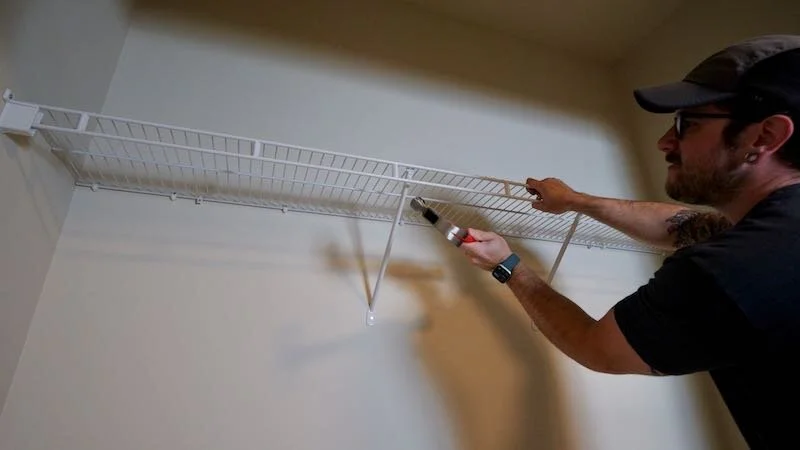
Step 15 : Install Closet Shelving Brackets & Closet Rod
With that, the cabinets were in, so next I could work on installing the shelves and closet rod on either side of the cabinets. I went with these metal shelf brackets here, as they were barely more expensive than plastic closet rod sockets and they gave me an option for adding more shelving.
To install the brackets, I first set up my line laser at the height of the bottommost mounting location on the brackets and then screwed the left bracket onto the wall, hitting the corner stud. Unfortunately, the right bracket didn’t have a stud anywhere near where I wanted to mount it, so I instead went with toggle bolts here.
To install the toggle bolts, I first drilled a ½” clearance hole and then pushed them into the wall. These toggle bolts had a ratcheting mechanism which held them in place while I added the brackets.
Finally, I bolted on the shelf bracket using the bolts includes with the toggle bolt hardware, and then I could add the shelf and closet rod. I spaced the shelf about ¼” off the side of the upper cabinet and attached it to the brackets using ¾” screws. I used the same screws to mount the 1 ¼” dowel rod I used for the closet rod.
I repeated the process for the other three shelves and closet rod, and then all that was left was a little clean up, some touch-up paint, and some staging and I could call this project complete.
Finished Closet Cabinets & Shelving!