
How To Build A DIY Wooden Kayak Storage Rack (With Plans!)
Learn how to build a DIY wooden kayak storage rack from scratch! This kayak rack features amazing timber frame inspired joinery and will easily provide storage for four kayaks or canoes. This project is also a great woodworking skill builder.

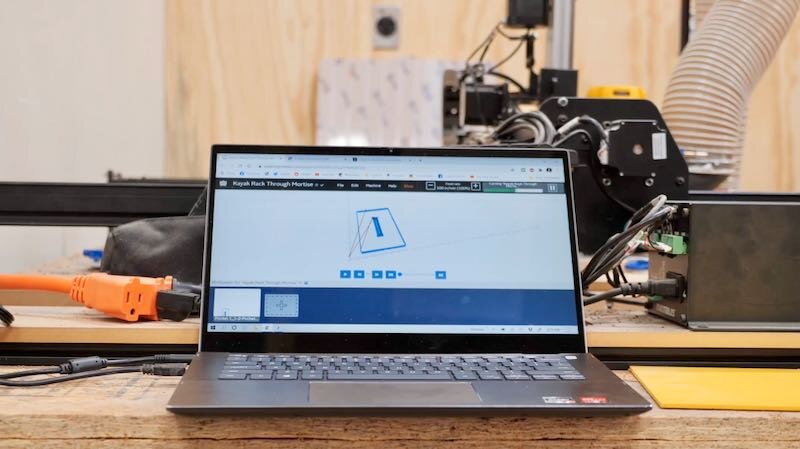
Thanks to AMD for sponsoring this video, learn more about PCs powered by AMD, like the Dell Inspiron 14 7000 2-in-1 laptop I used, here! #sponsored
Process For Building A Kayak Rack
Step 1: Milling Cypress For Boat Rack

This kayak rack started out as massive 16 foot long Cypress boards, which I bought from a local lumber dealer. I started the build by breaking down the boards into rough lengths at the miter saw, making sure to cut off any checking from the ends of the boards during this process.
This lumber was rough, so next I needed to spend some time milling it down to size at the jointer and planer. That said, these boards were essentially rough 2x6s, and you could totally skip this milling process if you used standard dimensional lumber 2x6s.
I also sized all of the parts in the plans for this project, which are linked here, to work with 2x6s, in case you want to build one of these racks for yourself.
I actually did this milling over the course of two days, to allow the boards time to acclimate and, after milling the boards to final thickness, I could rip them to width at the table saw. Luckily, I was able to get the full 5 ½” inch width out of all of these boards, which made laying out the joinery later a lot simpler.
After ripping the boards to width, I cut them to final length at the miter saw, I’m loving my new stop block system. It makes cutting multiple parts to the same length so much simpler and I’m kicking myself for putting it off until recently.
Step 2: Cutting The Joinery
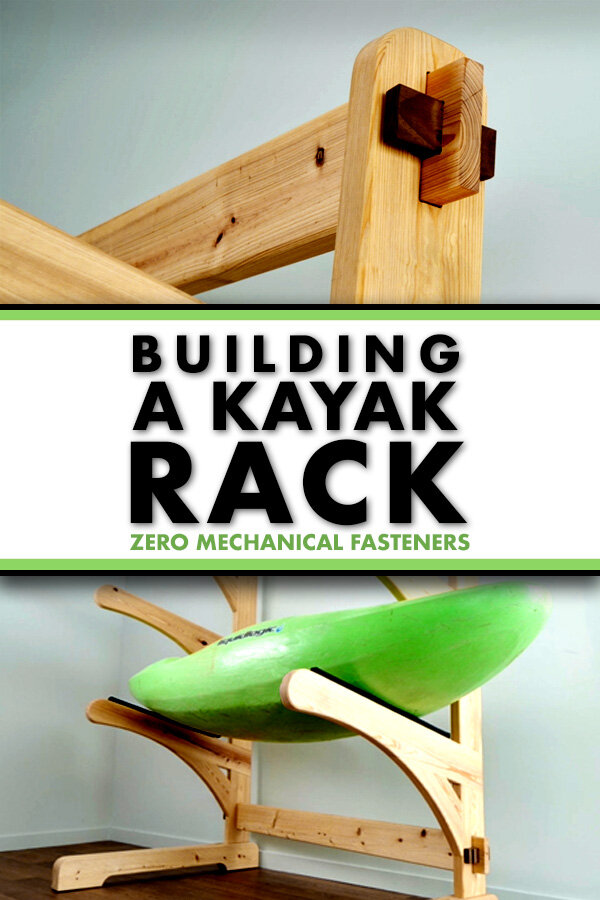
With the pieces milled and cut to final dimension, I could get started on the fairly daunting task of cutting all of the joinery for this kayak rack, of which there was quite a bit. I was kind of going for a quasi-timber framed look with this project and decided to try to build the entire rack with no mechanical fasteners.
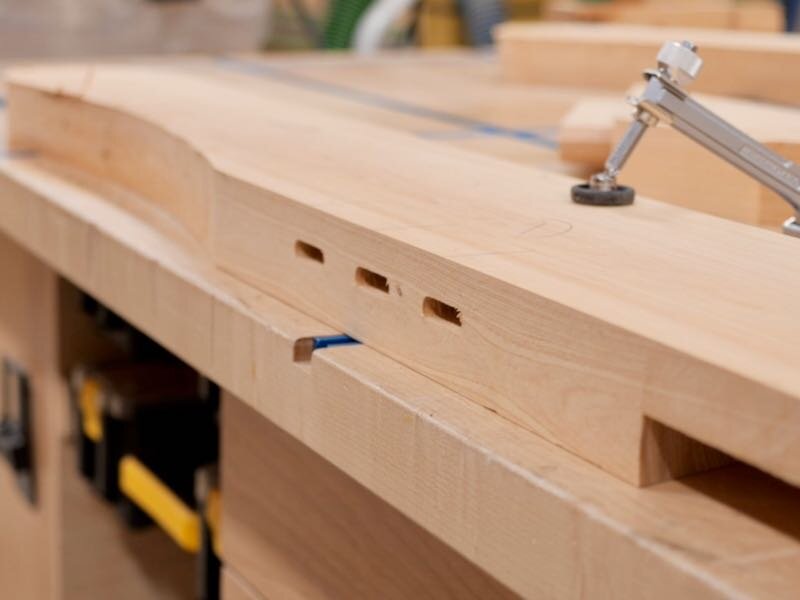
The first bit of joinery to work on were the through mortises at the top and bottom of the uprights, which are how the horizontal stretchers connect to form the frame of the rack.
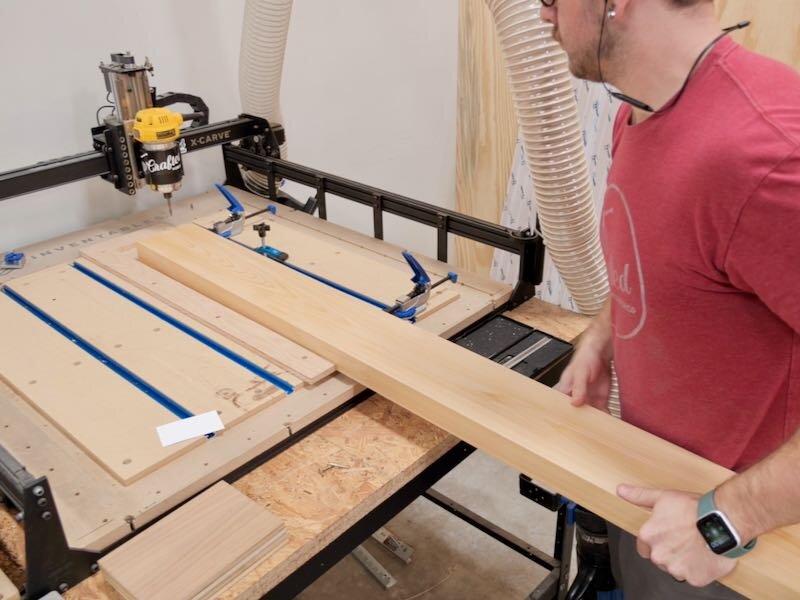
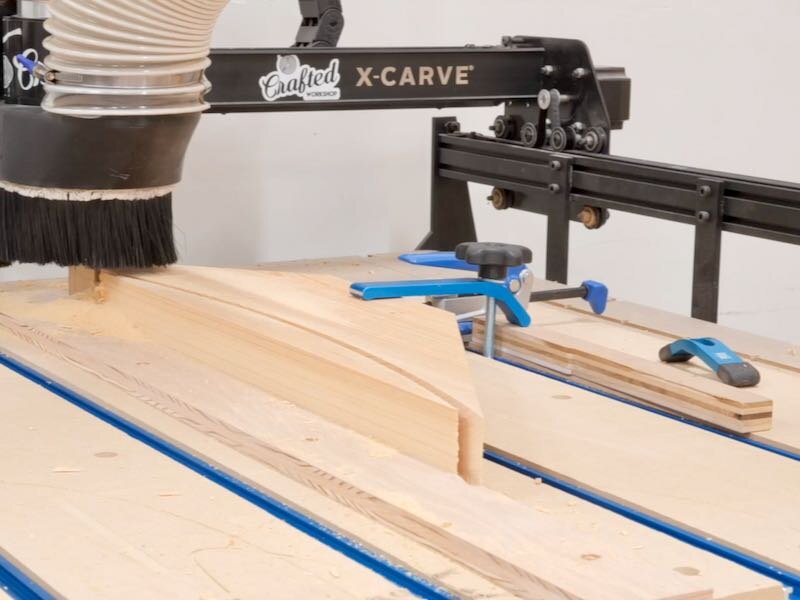
There are a ton of ways to tackle this kind of through mortise, but I decided to make it easy and use a template, which I could cut on my X-Carve CNC with the assistance of my new AMD-powered Dell Inspiron 14 7000 2-in-1 laptop.
I also took this project as an opportunity to learn the basics of Vectric Aspire, an extremely powerful CNC software that happens to be Windows only and, let me tell you, having this laptop at my fingertips in the shop was super handy for making tweaks on the fly.

After getting the file designed in Aspire, I exported it to Easel, the software that communicates with the X-Carve, and I could get to cutting, hovering over that e-stop in case I had screwed anything up with this new process, but things went smoothly.
This was obviously an extremely simple first project for Aspire, but I’m already loving some of the more advanced features, like 3D tabs as well as being able to add these dog-bone fillets to the corners of pockets like you see on this mortise template.

I knocked off the tabs with a chamfer bit off camera and then attached a board to the edge of the template, so I could reference the edges of my uprights when attaching the template.
With that, I could attach the template to a scrap piece using the CA glue and painter’s tape trick to test it out. Unfortunately, I didn’t plunge deep enough on the initial pass with the longer bit and dug into the side of the mortise, but overall this worked well and is definitely a good option for these types of mortises.
That said, it was quite a bit of work to remove all of that material and I had a lot of other joinery to cut, so I figured I could potentially rig something up to cut these mortises into these long boards on the X-Carve.
To do this, I started by screwing down a piece of ½” plywood to my spoil board on the X-Carve and then cut out a rectangular section, leaving me with an L-shaped piece I could use as a reference point for all of my pieces.
I could then load in one of the long uprights, which was way longer than the capacity of the X-Carve, but I was able to clamp it securely as well as add a roller stand to help support the overhanging end.
I zeroed the bit to the upper left corner of the piece, which I used as the reference point for all of the pieces I cut as part of this build, and then I could get to cutting, which went extremely smoothly. Because I was now using a smaller ¼” bit, I could also reduce the size of the dog-bone fillets, which looks a lot better, plus I could obviously work on other things while these mortises cut.
After cutting the mortise, I realized that I had also modeled in a 2” radius on the top corners of this piece, which I was planning to awkwardly cut at the router table, but I realized I could kill two birds with one stone and go ahead and knock that out while I had the piece on the CNC.

Once that was done, all I needed to do to reposition the piece to cut the mortise in the lower area was remove the piece, vacuum up any dust, flip it end over end so it’d be referencing the same edge, clamp it back in place and hit run.
As you can see, having this kind of simple fixture set up allowed me to work on other things while the CNC worked as my robotic apprentice, and I actually went ahead and created the rest of the CNC files while these operations were cutting.
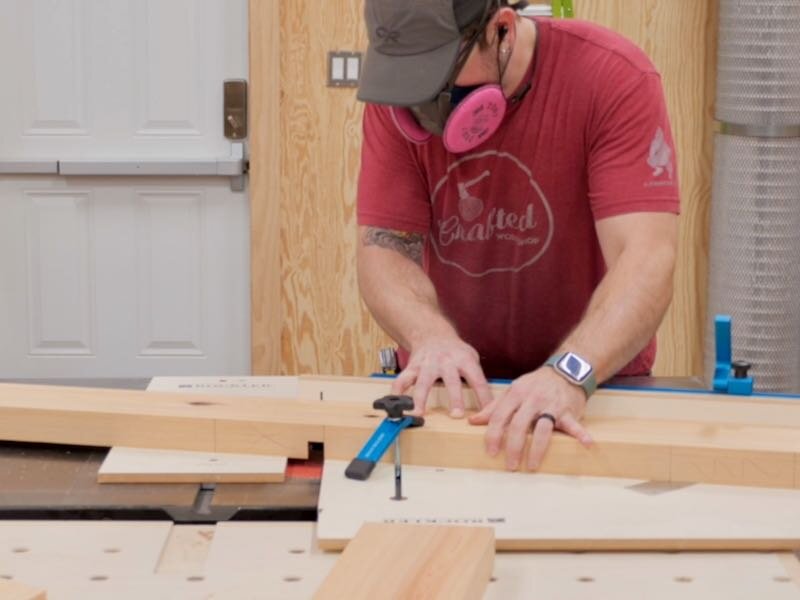
Next, I could start working on the half laps which connect the arms of the rack to the uprights. I set up a ¾” wide dado stack on my table saw and set the depth to be exactly half the thickness of these boards, checking the depth with a pair of calipers after making the first test cut.

With the depth set, I could establish the shoulder of the half lap, which should match the width of the board the piece will be mating with, the upright in this case.
Now that the width of the half lap was dialed in, I could clear out the rest of the waste, and I set my Rockler crosscut sled to match the 15 degree angle I had already cut on the ends of these pieces, so the arms would angle upwards at 15 degrees.
After clearing the waste, I checked the fit one more time and it was dead on, so I could go ahead and cut the half laps on the rest of the arms.
After the half laps were cut on the arms, I could I get matching half laps cut on the uprights, and I referenced my SketchUp model to get these locations. I marked out the locations on one of the uprights and transferred the locations to the other upright using a combination square.
Cutting these half laps was a little tricky due to the sheer length of these pieces, but I was able to do it with the same crosscut sled setup I used for the arms, making sure to clamp the piece in place while making the cut to keep it from moving around.
Unfortunately, I didn’t realize just how short the t-slot bolt was on this clamp and the knob ended up coming off, landing on the blade, bouncing off my thumb then hitting my stomach. If we slow this down, you can see that I didn’t even react until well after the knob hit me, which shows just how quickly this happened.
Anyway, after getting a longer bolt and a knob with longer threads, I got back to cutting the half laps, which went smoothly. As you can see, I ended up with a nice, snug fit on the joints, actually snug enough to pick the upright up with the arm.

I cut the rest of the half laps into the uprights in the same way, and instead of mirroring the locations of the half laps, I kept them in the same orientation on both pieces, and this was just for ease of cutting the joints.
The last pieces of the frame to cut, which were actually cutting while I was working on these half laps, were the stretchers which connect the two uprights. These uprights needed a tenon cut on each end, as well as a through mortise for the wedges I’d be using to lock the stretchers in place.
Once again, I was able to quickly create a file for these in Aspire and used the same fixture setup to cut the pieces and this process worked great.
Step 3: Test Fitting Kayak Stand

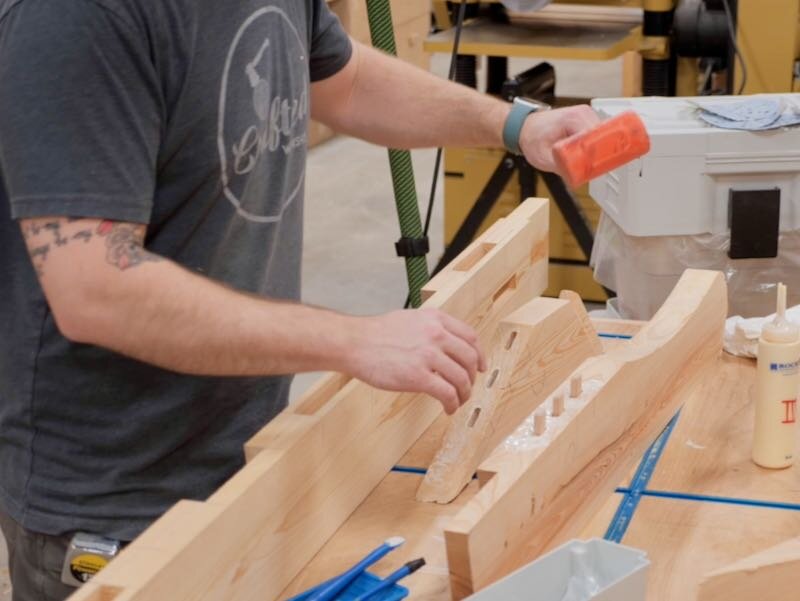
With the tenons cut on both stretchers, I could finally test fit the frame and I actually needed to sand a few of the tenons slightly so I could fit the joints a little easier.
With a little persuasion from my dead blow mallet, the stretchers dropped into place and I added some clamps to hold the pieces together, since I hadn’t made the wedges yet.
I then stood up the frame, clamped the leg pieces in place and then finally I could add the arms and man, this thing was huge! I was really happy with the way things were coming together though, and I still had a ton of shaping left to do to give this rack some more style.
Step 4: Shaping The Legs For The Kayak Stand

The first pieces I worked on shaping were the legs, and I wanted to add a curve to the underside of the legs to create the feet. I cut a template for this curve on the CNC. Also, I should mention that, if you’re interested in building a kayak rack like this one for yourself, I’ll be selling a set of MDF templates for all of these pieces so you could build this rack without a CNC. I’ll also be including the SVG files in the plans, if you’d rather print them and create your own paper templates or if you have access to a CNC.
After cutting the template, I added a backer strip to reference the edge of the leg blanks and then traced out the area of the curve so I could remove the bulk of the material. I initially used my jigsaw for this but switched to my bandsaw after this first leg blank, which went much more quickly.
Since my pieces ended up at 1 ¾” thick, I had to pull out my most monstrous of flush trim bits for this shaping, and I am extremely thankful I finally got my router table rebuilt with a beefier router before this project. This bit did an incredible job flushing up the leg to the template and left a close to perfect surface finish with zero tearout.

After adding the curve, I repeated the process to add a radius to the two upper corners of the leg blanks, and I used these awesome corner radius templates from Rockler for this.
With that, I had one of the four leg blanks shaped, so I could repeat the process on the other three pieces, again cutting away the excess material at the bandsaw then flushing everything up at the router table.
Once all four leg pieces were shaped, I needed to get dados cut into the inside face of each of the pieces. These dados would end up creating a mortise for the upright piece to seat into, as I’d be gluing these leg pieces into double layered pieces to form my final leg parts.
I once again called on my crosscut sled to cut these dados, and these were just standard square dados and were simple enough to cut after getting my sizing dialed in.
Step 4: Glueing Up The Two Halves Of Each Leg

To help keep the pieces aligned during the glue up, I added a few Dominos along the top edges of the pieces, and then I could glue them together, using plenty of Titebond III wood glue.
While I was working on the legs, I had the CNC running in the background shaping the arms
As luck would have it, all six arms finished cutting right as I finished shaping the legs and, after removing the excess pieces held on by the tabs, the arms were looking great, so next I could work on the knee braces which would give the arms a little more support.

Step 5: Creating The Knee Supports

These knee braces were inspired by timber frame joinery and I figured they’d be the perfect addition to this rack, although they were a little tricky to cut.
I pulled the measurements I’d need for the knee braces from SketchUp, and might I add that having a touchscreen laptop is pretty clutch when doing this, and next I laid out the angles on my pieces using a speed square.

I used my new Rockler miter sled at the table saw to cut the 60 degree angle on one end of the pieces and then set up my stop block at the miter saw to cut the 45 degree angle on the other end, which also cut the piece to final length.
After confirming the fit on the upright and arm, I cut the rest of the knee braces to size.
When I modeled the kayak rack initially, I added a continuous curve running from one end of the knee brace through onto the arm, and to cut this curve on the knee brace, I once again called on the CNC. I also had the CNC square off one corner of the 45 degree end of the piece while it was at it.
While the CNC worked, I got the router table setup to cut the tenon on the end of these knee braces, which is how they would connect to the uprights. I used a ¾” straight bit for this and made the cut in two passes, moving the fence before the second pass, which established the shoulder of the tenon.

Step 6: Creating Mortises For The Arms Of The Boat Rack To Mount Into

Cutting the matching mortises on the uprights was a bit of a tricky task, as the uprights wouldn’t fit under the CNC in this orientation, and they were also slightly too tall for my hollow chisel mortiser, which I had originally planned to use.
On to plan C, I figured I could use my router and an edge guide and I even cut one of the mortises using this method, but I didn’t like how tippy this felt, considering how little surface area the router was riding on.
Finally, after a partially sleepless night of working out a solution in my head, I realized I could repurpose the template I had created when I made the floating shelves a few months ago and use it as a template for the mortises. This would give the router a much larger surface area and would make all of the mortises the exact same size.

I centered the template on the upright, using the mortise I had already cut as reference, and then I could get the rest of the mortises cut, which went quickly. Locating the mortises was as simple as temporarily fitting one of the arms, sitting the knee brace in place and transferring the location of the edges of the tenon to the upright.
With the mortises cut, I needed to shape the tenons a bit more, cutting away the angled section of the tenon. This would give me more clearance while assembling the kayak rack and the pieces wouldn’t have gone together without this notch being cut out.

The last thing to do was to remove some material from the corners of the tenon, to provide clearance for the rounded corners of the mortises. Because of the grain orientation, I could only use a chisel on two of the four corners and then I needed to switch to a handsaw, but this made quick work of the process.
Finally, I could add the knee brace to the upright and it fit perfectly, the tenon was just snug enough without being annoyingly tight.
Step 7: Cut The Last Bit Of Joinery
I had a hard time deciding how to connect the other end of the knee braces to the arms and, after thinking through a bunch of options, I decided to take the easy route and use Dominos here, as I was frankly running out of time to finish this project.
I marked out locations for the Dominos on the arms and knee braces, also labeling the pieces while I was at it so I could reassemble them, and then cut mortises for three Dominos in each joint. One other note, I did cut the mortises using the widest setting on the Domino to give myself plenty of wiggle room during assembly.
Step 8: Assembling Each Side Of The Boat Rack
With that, I had finally cut all of the joinery on this kayak rack and I could get the side assemblies glued up. These was definitely an order of operations to follow here to be able to get these pieces assembled, and the first step was getting glue added to the knee brace and arm, adding the Dominos, and putting those two parts together.
Next, I added glue to the corresponding half lap and mortise on the upright and then I could put the pieces together and, as you can see, I had to kind of pull apart that joint between the knee brace and arm to get the pieces in place, which is why I cut the Domino mortises on the widest setting.
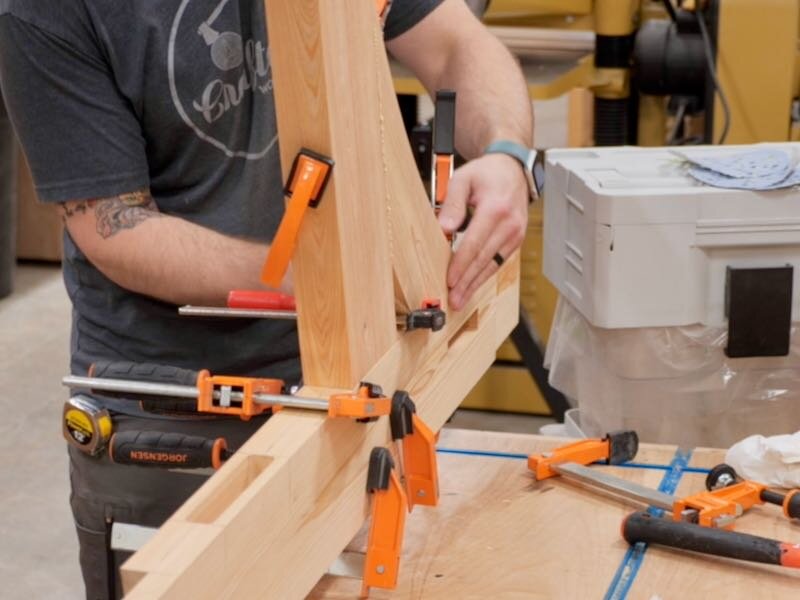
After that, all that was left was to add an excessive number of clamps, then I could repeat the process on the rest of the arms, as well as on the other side assembly, and let the glue dry overnight.
Step 9: Sanding Kayak Rack Before Finishing
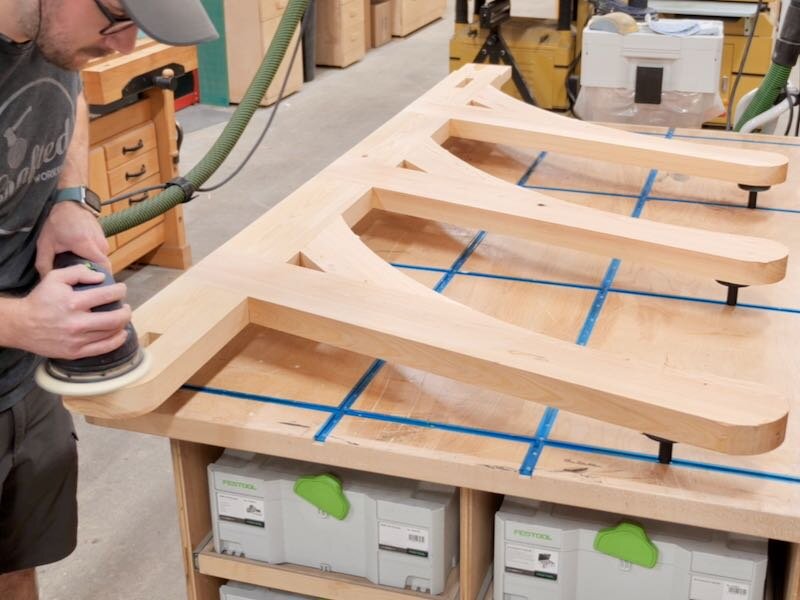
The next day, I had the fairly daunting task of getting all of these pieces sanded and blended together, and while this was actually easier than I thought it’d be due to how soft Cypress is, I still spent about five hours sanding and chamfering to get these pieces finish prepped.
I started with my Rotex to get the sides of the racks smoothed out, flushing up all of the pieces and removing any glue squeeze out, and then I switched over to my regular random orbit sander to get the edges blended in. I was kind of dreading trying to blend the curve from the knee brace to the arms but this was actually super simple since the pieces matched up so well.

After getting the faces and edges sanded with 80 grit, I added a chamfer to all of the edges, both to soften the edges but also to help blend all of the pieces together.
The chamfer bit didn’t quite reach into the inside corners of this area where the three pieces met up, so I used a chisel to get everything cleaned up, and this is always so satisfying.

I repeated the process on the other face of the side and it was looking great, with that curve flowing perfectly from the knee braces to the arms.
I sanded the other side assembly off camera and then I could get the legs cleaned up, starting at the oscillating belt sander, which was really the perfect tool for this task.
I finished sanding the legs with my random orbit sander and also added a chamfer to the edges off camera, as well as the stretcher pieces, and then it was time for finish.
Step 10: Finishing The Kayak Rack With Teak Oil
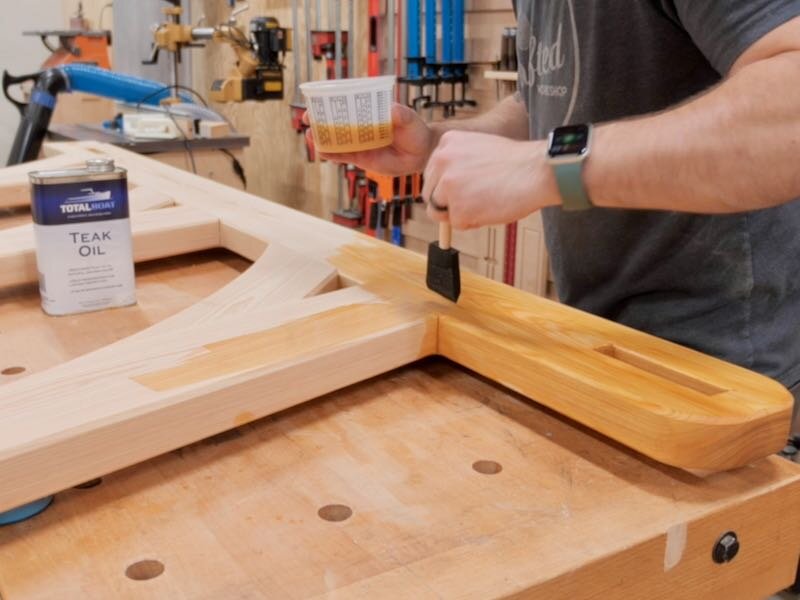
I decided to go with TotalBoat’s Teak Oil finish on this project, as I wanted something really low maintenance, and Teak Oil is about as simple as it gets. It’s a penetrating oil, not a film finish, so it won’t flake off once it starts to degrade and, even if I never get around to reapplying it, this Cypress should be weather resistant enough to hold up for years.
This Teak Oil also really brought out a gorgeous color in the Cypress and was super simple to apply, and I’ll link to it here in case you’re interested.
Step 11: Assembling The Boat Rack

After the finish had a chance to setup, I could get the side assemblies glued to the legs, and I started by adding plenty of glue to the mortise. I only added glue to the mortise, not to the tenons, to avoid dealing with a bunch of squeeze out, and after adding the glue, I could drop the side assembly into the leg mortise.
This was definitely a little awkward due to the sheer size of these parts, but I was able to use gravity to assist in driving the tenon into the mortise and, after it was fully seated, I checked the joint for square in the only square corner, between the leg and upright.

I repeated the process with the other side and then got the two pieces lined up side by side to check them against each other. It was really more important that the two sides lined up with each rather than being square, so I tweaked the pieces until this was true and let the glue dry.
Step 12: Creating The Locking Wedges And Adding Final Touches

The last pieces I needed to work on were the wedges, which I wanted to make out of a few scraps of this thermally modified Ash I’ve had lying around. This would not only give the wedges some contrast against the Cypress, but this wood is incredibly weather resistant and dimensionally stable, perfect for this application.
I milled up a piece and got it cut to width, and then I cut a quick little jig so I could cut the wedges at the table saw. This jig is just one of the scraps of Cypress with an angled cutout matching the wedge shape I want, and I could use this jig to safely push the piece through the table saw.
After cutting the angled face, I trimmed the pieces to length using my crosscut sled and then gave them a quick sanding.
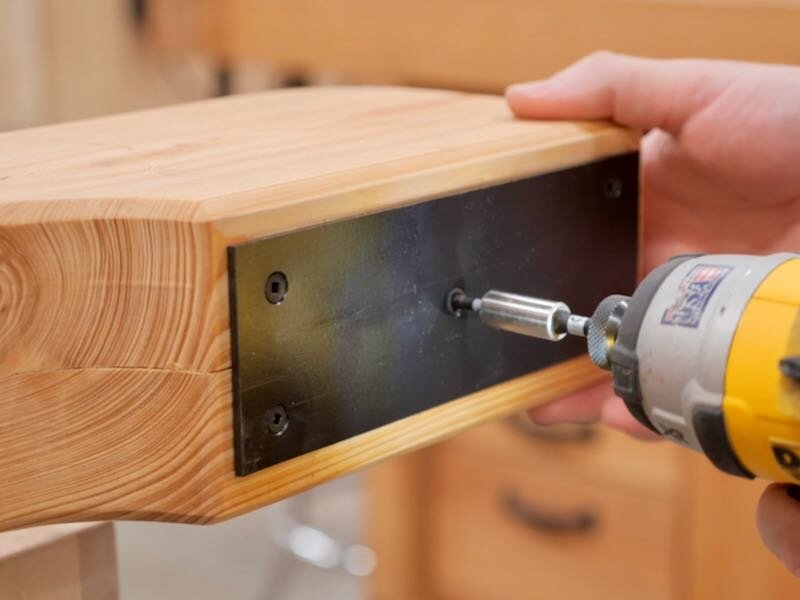
Before fitting the wedges and assembling the rack, I wanted to add a few pieces of HDPE plastic to the underside of the feet, which will help keep them from staying in contact with water and rotting. I cut a few pieces to size at the table saw, countersunk holes and finally screwed the pieces in place on the bottom of the feet.
Step 13: Final Assembly Of Kayak Rack
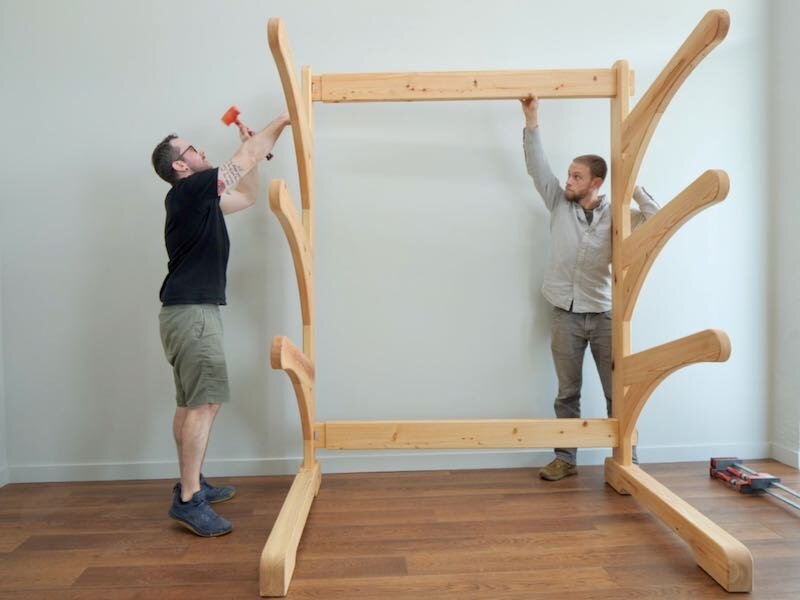
With those added, I could get the rack assembled, which went smoothly with a set of helping hands. I used a scrap piece of Cypress to keep from denting the sides of the rack when seating the tenons on the stretcher and then clamped the sides together when adding the wedges, to reduce the chances of splitting the ends of the stretchers.
With the rack assembled, the very last thing to add was a few strips of neoprene rubber to the top edges of the arms, which will keep our boats from tearing up the rack and vise versa. This rubber is peel and stick and waterproof and is really perfect for this type of rack.
Finally, after all of that work, I could get one of our kayaks loaded onto the rack and stand back to admire my work, calling this project complete.

More About PCs Powered By AMD!
Let’s take a second to talk about the sponsor of this week’s project, AMD, and this AMD-powered Dell Inspiron 14 7000 2-in-1 laptop I’ve been using in this project.

I’ve been extremely impressed with this laptop’s performance so far, with the the new Ryzen™ Mobile Processor allowing me to run all of the programs I needed for this project simultaneously, including some fairly resource intensive 3D modeling softwares.

The 13 hours of battery life have also allowed me to use the laptop all day without having to be tethered to power, which was great for working on the go.

Another huge plus of this particular laptop is the touchscreen, which is something I didn’t realize I was missing when doing this type of work. From being able to manipulate the 3D model I was working from to being able to easily give commands to the CNC, having a touch screen is a big bonus here.
All of those features, combined with things like a built-in SD card reader, USB-C port, and HDMI port, makes this a great choice at an awesome price point, and if you’d like to learn more about this AMD-powered laptop, click here. Big thanks to AMD for sponsoring this project!