
How To Layout A Foundation & Dig Footings // Not So Tiny House Build Part 2
In part 2 of my (Not So Tiny) House build series, I'll show how we did the layout work for the foundation using batter boards and string line, then dug the holes for the footings with an excavator!

Thanks to AMD for sponsoring this post. All opinions are my own.
How To Layout And Dig Footings For A Tiny House
As you might remember from part 1, I had already laid out a rough string line where the guest house would be built so the arborists could figure out which trees needed to be removed.
This line gave a good rough estimate of the location, but now I needed to set up the actual building layout, with a string line set to the final grade, which in my case was the top of the concrete piers.
Step 1: Double Check Your String Layout

To start, we first double checked the location and found out we needed to make a small adjustment to bring the building parallel with our main house. When I had laid out this rough string line, I had pulled my measurements off of our fence line, but, as it turns out, our fence isn’t parallel to our house.
After making this adjustment, I double checked the setback from the fence line, which has to be 20 feet in my neighborhood, and then we could move on to getting our laser line set to grade.
First, we set up the laser on our fancy job site tripod, aka a paver on top of a stump, and then checked the drop from one corner of the building to the other corner at the far end.
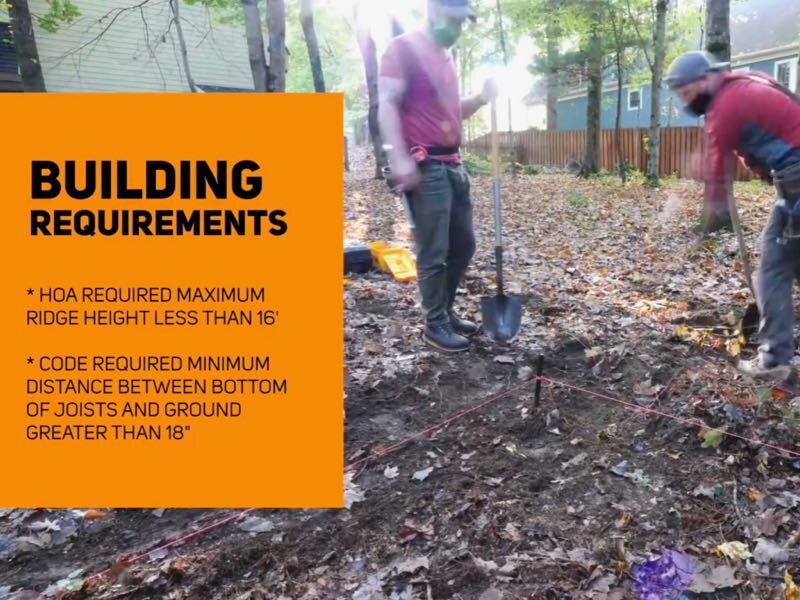
Since the drop ended up being three feet, and since I can’t have my ridge height on this building higher than 16’ based on HOA restrictions, and since the floor joists have to be at least 18” off the ground based on code, we decided to dig out the ground on the high side of the building, digging down roughly a foot.
We just dug down in the area around the stakes initially but would end up grading this entire area later on once I rented the excavator, which you’ll see later in this video.
Step 2: Setting Stakes To Secure Batter Boards

Next, we could move on to cutting a bunch of stakes for our batter boards, and I had already pre-cut a few stakes before Erik showed up, but evidently I didn’t do it quite right. Since I had cut the stakes using a miter saw, the angle was only on two faces, which would cause the stake to be pushed sideways when pounded into the ground.
Erik used a circular saw here instead, to cut a perfect point on the stakes, and this made for a much easier to drive stake.

Speaking of Erik, I guess I should introduce him to y’all, since you’ll be seeing a lot of him in the next few videos. This is Erik Perkins, and Erik and his brother Jamie own Perkins Enterprises, a custom home building company here in Western North Carolina.
They also have an awesome YouTube channel called the Perkins Builder Brothers, where they cover their construction projects, offering tips and tricks based on their years of building experience.
I stumbled across their channel when doing research for this build and, after becoming buddies, Erik offered to help out on this project.
All that to say, you’ll be seeing a lot of Erik and some of the Perkins crew over the next few videos and, if you want to learn more about construction stuff while watching entertaining videos, you should go subscribe to their channel.
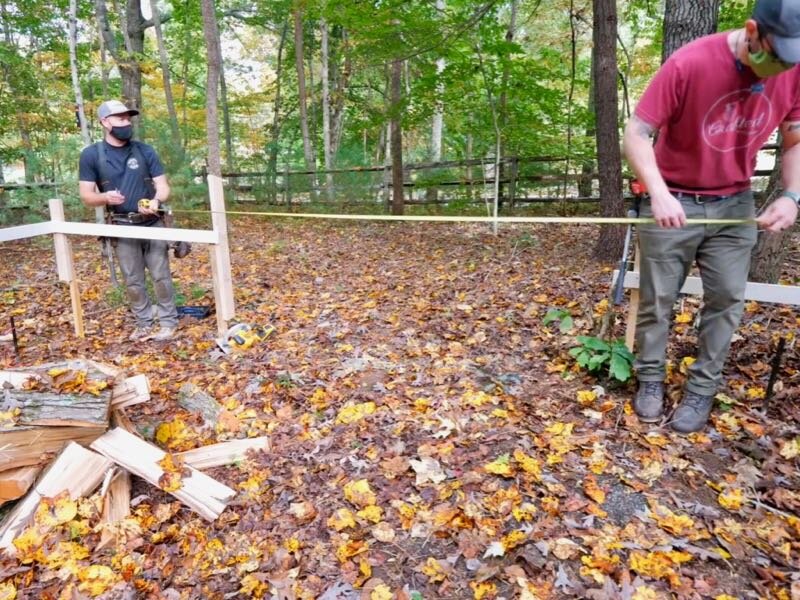
Anyway, with some stakes cut, we could move on to setting them in place around the corners of the building with a mini sledge hammer. Instead of just using two stakes and having the batter boards run diagonally, which is what I thought we’d do, Erik instead recommended using three stakes at each corner, so we could create L-shaped batter boards.

This helped to keep the stakes and batter boards out of my way when I dug the footings with the excavator, which you’ll see later in this video.
We ended up setting the stakes off of our string line by about three feet, again to get them out of the way of the excavator, and we also made sure our stakes were long enough at the tall end of the building so our string line would be able to be set to grade.
Once all of our stakes were set, we could mark our actual grade on each of the stakes, which was 12” below our laser line. We had to do it this way because, otherwise, the ground at the high end of the building would have blocked our laser.

After marking, we could attach our batter boards, but first we needed to dig through my scraps to find the material we needed.
Next, we could attach the batter boards flush with our marks, and this set each of the batter boards to our final grade, so that we could then run our string lines off the top of these batter boards and know they were also at grade.

We repeated this process at the other two corners and then we could set the stakes on the high corner. We used stakes here rather than batter boards so we didn’t have to dig this entire area down by a foot, just where the string would run.
Step 3: Setting String Line For Final Reference

Finally, with the stakes set and the batter boards set up, we could get our first string line set, and this was our reference line, parallel to our main house.
Once the nail was set in the batter board, we needed to tighten the string so it didn’t sag in the middle over this 48 foot span, and Erik had a great trick for temporarily tightening a string line.

After setting the first line, we double checked the measurement off of the house one more time, just to make sure it was parallel.
Finally, we could set the string on the stake to grade and, with that, we finally had one of our string lines set, which only took about two hours.
With the first line set, we could reference all of our other lines off of that, and we started by setting the other line parallel to our first line.
We also decided to add a little diagonal bracing to the stakes and batter boards at the tallest corner of the building, to keep them from moving around when we pulled our string line, and we had to get a little creative with our bracing material here.

With the bracing added, we pulled the string line and then we could set the shorter lines at each end of the building.
To do this, we first made a mark on the string at one end of the building then pulled a long tape measure and made a mark at the final length of the building, which is 48’, at the other end of the string line.
We then pulled a diagonal line to mark the location at the other corner of the building, but first we needed to calculate our diagonal measurement.
Because I love 3D modeling, I had gone ahead and modeled this entire building in SketchUp prior to doing this layout work, so I could easily pull my diagonal measurement from my model. If you don’t have a 3D model of your building, you could also use a calculator like the one on learnframing.com, or an app like Construction Master Pro, both of which would figure out this number for you. In our case, the diagonal measurement was 49’ 5 ¾”.

After pulling the diagonal measurement, we pulled the straight measurement from the diagonal mark to mark the other corner and then checked our diagonal in the other direction, and it was off by ¼”.
After struggling moving around our lines trying to correct for this, we finally came to a realization of an error we had made when setting the batter boards.
After fixing this, our diagonals lined up perfectly and we ended up with a nice, square corner after setting the line at this end of the building.

Finally, we could set the last line at the other end of the building, and we also set the position of the last stake at the same time.
We also decided to go ahead and move the other stake back by a couple of feet, again to get it out of the way of the excavator.
With that, our layout was officially done, with our string lines set to grade, which was again at the top of the piers, and next we needed to go ahead and layout the locations of those piers and footings.
Step 4: Layout Pier & Footing Locations

Our architect, Rick Kazebee, had already laid out these footing locations on the building plans and we had already had this foundation engineered, so we knew both the locations and the size of the footings. That made this layout process pretty simple, just referencing off of our string lines and using marking paint to mark the locations.
One thing we didn’t realize, though, was just how large the 18” Sonotubes we had originally specified were going to look.
After confirming 12” Sonotubes would be fine with the engineer, we laid out the footing again and this looked a lot more reasonable.

It was pretty simple to reference the string line when it was near the ground but, once we got to the tall end of the building, we had to get a little creative.
We repeated the layout process for the rest of the 10 footings.
I used the AMD-powered Dell Inspiron 14 7000 2-in-1 laptop throughout this process and have been extremely impressed with its performance. The AMD Ryzen mobile processor allowed me to run all the programs I needed to for this project simultaneously including some fairly resource intensive 3D modeling software.
The 13 hours of battery life allowed me to use the laptop all day without having to be tethered to power which was great for working on site. Another huge plus of this particular laptop is the touchscreen and the screen’s ability to fold back into tent mode. All these features combined with things like a built-in SD card reader, USB C port and an HDMI port really makes this a great choice at an awesome price point.
Step 5: Digging The Footings

After getting all of the footing locations laid out, it was time for the fun part, digging the footings.
To help with the digging, I decided to rent a machine I had never used before, a mini-excavator, and I was honestly shocked I could just go rent one of these machines with no experience. I just had to sign the damage waiver and the machine was mine for a week, for the cost of $1,000, which included the trailer.

After getting the excavator home, I could get it unloaded, and my little guy is obsessed with construction machinery, so he had to supervise the process.
This was the very first time I got to actually try driving this thing and it was a bit of a trial by fire getting it off of the trailer, but I had watched a bunch of YouTube videos on operating excavators, so I felt pretty prepared.
After getting it unloaded, I could drive the excavator back to the site, making a pit stop along the way to let little man sit in the driver’s seat
Once I hopped back in, I could not for the life of me get the excavator to start back up and I spent way too long trying to figure this out, thinking maybe the battery had died.
After looking through the manual and getting thoroughly frustrated, I realized the little lever that engages all of the controls has to be in the upright position when starting up the machine, I guess to keep you from accidentally moving the arm during startup, and I had it in the lower engaged position.

Once I figured that out, I could finally get to work with the machine but, rather than diving right into digging the footings since, again, I had never operated an excavator before, I figured it’d be good practice to finish deconstructing that fire pit area, which I had started in Part 1.
This area had to be cleared so the excavator could get to the site anyway, and trying to pick up these small rocks was great practice operating the bucket and moving the arm.
I was able to spend the rest of the afternoon moving all of the rocks out of the way, also digging up a stump and the metal landscaping border around the fire pit while I was at it.
The next day, Erik came back over to help with digging the footings and, after removing the string lines, we could get to work.
I should also mention that, before we dug these footings, I called 811 to have any buried utilities marked, and we didn’t start digging until we were sure this area was clear.

First, we needed to grade the area near the end of the building with the highest grade, again to increase the distance between the ground and the floor joists, since that distance has to be 18” by code. I figured this would be the perfect opportunity to dig a test footing, since I had to dig this area down anyway.
After digging the trial footing, I got to work moving the dirt and Erik marked out roughly where I should dig. This was a decent amount of work, which was made a lot more difficult by the giant stump in the middle of the site, which I didn’t have ground down until later in the process.
After a lot of digging and running the excavator around to compact the dirt, we pulled out the laser to check my work and things looked pretty dang good.

Erik decided to hop on to finish things up and also because, honestly, this excavator was a ton of fun to drive.
Finally, after getting everything dialed in, we could double check the height of the string line off of the newly graded surface and, with all of our digging, we brought the distance between the ground and the bottom of the floor joists to about 22”, well over the code requirement of 18”.

With that, grading was done so we could finally move on to actually digging the footings, which went actually went pretty quickly and only took about half a day.
First, we remarked the locations, since the original layout marks had been removed during grading, and then I started digging the footings. I watched a lot of videos on this process and, while I’m still a definitely beginner excavator operator, I figured I’d offer some tips that helped me.
The process that worked for me was first fully extending the bucket, then placing the teeth in line with where I wanted the edge of the footing to be, lowering the arm until the teeth just contacted the ground, and then curling the bucket to grab the first scoop of dirt.
After dumping that first bucket, I repeated the process a second time, again extending the bucket, lowering the bucket so the teeth just contacted, and then curling the bucket again.
Because of the curved bottom of the bucket, I would have ended up with sloped walls if I hadn’t started digging with the bucket fully extended, and you really want square walls on your footings because, otherwise, you’ll end up paying for a lot of extra concrete to fill in those sloped areas.

After about six scoops, three scoops per half of the footing, they were ready for Erik to clean up with a little hand digging, and I could move on to the next footing in the line.
This process went super quick while Erik was on site to help clean up the holes but, unfortunately, he had to run after the first row, so I was on my own for the second row.
Working by myself definitely slowed things down quite a bit, as I had to get in and out of the excavator to check the size of the holes and also clean out any loose dirt.
These footings also ended up having a lot more roots in them, because they were closer to where some of the big trees had been removed, and this made it really hard to get good, clean buckets full of dirt.
After a lot of work cutting roots with a reciprocating saw and clearing out the leftover dirt with a shovel, the footings were dug, and of course Johnny 5 and my very pregnant wife had to come inspect my work.