
I'M BUILDING A (not so tiny) TINY HOUSE! // Part 1: Permits & Site Prep
In part 1 of my (Not So Tiny) House build series, I'll show how we created the design for the building, achieved HOA approval, obtained proper permits and prepped the site to finally start constructing this house.
How To Start Building A Tiny House
Before we talk about the details of this tiny house project, let’s talk about why I’m building it in the first place. In case you missed it, my wife and I just had our second kid and, with the addition of that second kid, our main house is getting a little cramped for guests.
Rather than move to a bigger house, since we love our neighborhood and our house, we decided building a small guest house in our backyard would both give our guests an awesome place to stay when they’re visiting, but it would also make for an awesome experience for me, building a house from scratch.
Step 1: Plan Out The Design Of Tiny House
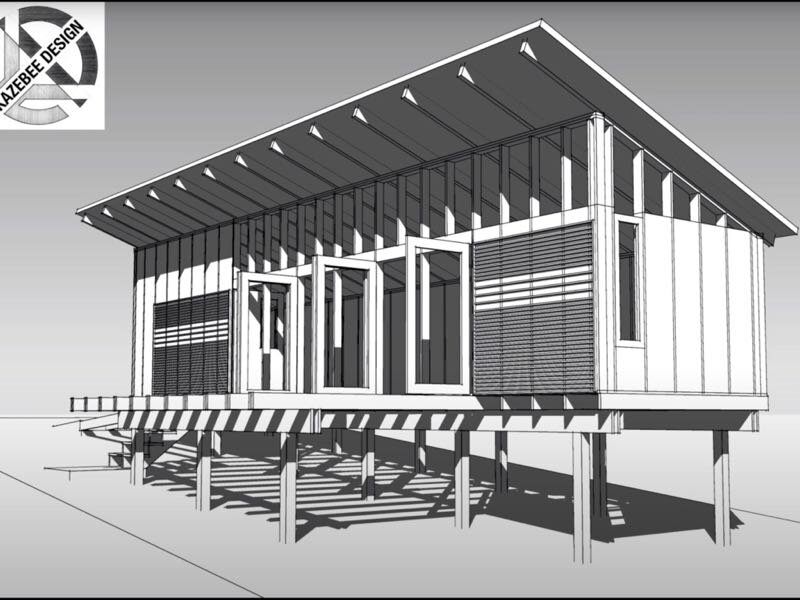
When we decided to move forward with planning the design side of the build, I reached out to architect Rick Kazebee, a fellow North Carolinian who I’d been in contact with through Rick being a fan of my videos.
The funny thing is I was a fan of Rick’s work before I even knew him, as he was the lead design architect on the gorgeous New Belgium brewery here in Asheville.
Rick’s design style matches mine perfectly, with a clean, modern aesthetic utilizing simple, well thought out design elements. Rick is also a maker with one of the nicest looking workshops I’ve ever seen and, after chatting, we decided to approach this house build as kind of a collaboration.
One of our main goals with this project was to design something that could be reproduced by the average maker, utilizing materials efficiently to minimize waste and, consequently, the impact on the environment.
We have the building plans for this house available for pre-order and the final plans will include detailed drawings of all of the construction elements of this building plus a video of Rick and I walking you through the plans.
The design for this building went through several iterations, some based on my input but the majority of which were forced upon us due to our strict HOA.
The initial design concept had the building located along the Southern perimeter of our property and featured a pier and beam floor system which gave the building an almost tree house feel.
The building featured a shed roof, tons of glass, and a beautiful modern aesthetic.

After Rick came up with this initial design, I dug a little deeper into the constraints laid out by our HOA for these types of structures and realized that this building was both too tall, since we have a maximum ridge height of 16 feet, and slightly too large, since the footprint is limited to 750 sq ft, which includes any attached decks.
To solve the height problem, Rick relocated the building to the western perimeter of our property, rotating it 90 degrees, which meant the grade difference was much less severe from one end of the building to the other. This in turn allowed the overall height to be much lower.

Rick also swapped most of the deck for a retaining wall and paver patio, which is considered part of the landscaping rather than part of the building, solving the footprint issue.
With these changes made, we felt like we were good to submit the design to the HOA for official approval, so I spent some time getting the application together, which required submitting a building plan, site map, and material and color samples, along with a $500 design review fee.
I submitted the application on August 6th and received a reply from the HOA a week later, denying my application due to the guest house not matching our main house, being essentially too modern, and there didn’t seem to be much flexibility in featuring design styles different from our main house.
This decision by the HOA really forced Rick and I to go back to the drawing board to bring the guest house more in line with our main house stylistically, while still trying to keep things fairly modern.

We made a number of changes, including altering the roof style from a shed roof to a gable roof, switching the roofing material from a metal roof to architectural shingles, and ditching the alternate material for the siding material on the bump out on the back side of the building.
After making these changes, Rick and I were confident we would get approval since this much more closely matched our main house but, after submitting the updated design on September 3rd, we were again denied on September 18th.
This time, the denial was due to the sliding wooden privacy screens on the front of the guest house. Since we don’t have these types of screens on our main house, the HOA felt these caused a stylistic mismatch. They also said the footprint was too large, as they were including both the roof overhang and the small deck in their square footage calculations.
Back to the drawing board once again, and at this point I really needed to get things moving as I was hoping to have a dried in building by the time our baby arrived.
We further bent to the will of the HOA to push for approval, ditching the sliding privacy screens and completely removing the deck and resubmitted the design on September 29th.
Finally, on October 8th, just over two months after submitting my initial application, I received HOA approval, with the caveat that some additional landscaping would required around the building after construction.
Step 2: Aquire Building Permits For Your Tiny House

With the HOA’s stamp on the building plans, I could finally submit my building permit application so I could actually get to building.
After clarifying things with the permit office, it turned out that I only needed an engineer to stamp the foundation, since this pier and beam style isn’t something that’s laid out in the building code book.
Thankfully, I got connected with an engineer who was able to quickly engineer the foundation and signed off on using footings with a 30” x 30” x 12” base, dug to a depth of 18”, with a grid of #5 rebar in this area for reinforcement.

The base of the footing then transitions to a round pier, which we’ll form using Sonotubes, and there will be steel J-bar running from the square base into the Sonotube to tie these sections together.
The Sonotube will be cut to height at grade, then our beams, or girders, which are made up of triple layered pressure treated 2x12s, will sit on the piers on 6x6 post base brackets, which will be connected to the piers with wedge anchor bolts.
After adding this information to the building plan reflecting how exactly we’d be building the foundation, I got the building permit submitted on October 13th, and then a few days later….

With my building permit in hand, I could finally get to work getting the site prepped for building, starting with removing the trees which would interfere with the building.
Step 3: Rough Layout And Tree Felling

Before contacting an arborist, I roughly laid out the location of the building with a string line and some jet stakes to give the arborist an idea which trees would need to be removed. After an initial consultation, I received a quote of $2,800 to remove about a dozen trees and, after agreeing to this estimate, the crew from Smart Fellers came out to remove the trees.
Watching the Smart Fellers team work was pretty awesome, and it was immediately clear that they really knew what they were doing.
The team started by removing a few of the smaller trees, which could be cut down all at once rather than in sections, to clear an area around the larger trees.

While part of the team worked on cutting the trees into manageable chunks, the other part of the team got the chipper up and running to turn the brush and smaller trunk sections into mulch.
Once the smaller trees were down, the real precision work began, removing the larger trees.
On these larger trees, one arborist would get up in the tree, trimming off the smaller limbs as they ascended and resetting their safety rope as they climbed.
Once they got towards the top of the tree, the arborist would attach a rope about halfway up the topmost section they were going to cut off, so the section could safely be guided to the ground, and then that section could be removed.

Once the top section was removed, the arborist could then just work their way down the tree, cutting manageable sections and dropping them to the ground, until they got the tree short enough to where they could drop the remaining portion safely, again with more ropes guiding the tree to the ground.
The Smart Fellers crew repeated this process on the rest of the trees, removing roughly a dozen trees in total, and they were done by lunch time, which was pretty amazing.
Step 4: Cleaning Up The Job Site

After the arborists finished up, I still needed to deal with the log sections I had them leave behind for firewood, and thankfully my father-in-law came over to help get everything piled up on some simple firewood racks I had put together. I’d say this firewood should last us for quite awhile.
Another site prep related task I had done later in the build process was having a few stumps ground down, since this wasn’t a service Smart Fellers offered. This stump grinder was quite the machine, and was actually remote controlled, I guess to keep the operator away from the machine while it’s in operation.
I didn’t really know what to expect here, but this thing chewed through this massive Maple stump in a matter of minutes, and this stump was located right in the middle of the building site and had to go.
With that, the site prep was pretty much done except for dismantling our fire pit area, which my buddy Seth from Berm Peak decided to help with.
I was planning to do this with the mini-excavator I’ll be renting in next week’s video, but Seth decided that, since I was going to have to move all of these rocks anyway, we might as well take advantage of the situation and whip up a quick RC crawler course.
This night of RC, cocktails, and hanging with my buddies Seth and Alex was just what I needed to destress after dealing with all of the bureaucratic red tape, and I think that’s where I’m going to end this first part of this tiny house build series.
In part 2, I’ll be covering getting the final layout of the building dialed in, including getting a string line set up at the final grade of the structure. I’ll also talk about my experience driving an excavator for the first time, which I used to get the site graded, dig the footings, and dig the trenches for water, electrical, and sewer