
How To Build A DIY Dual Murphy Bed with Hidden Charging Nightstand, Closet & Storage
Learn how to build a DIY Murphy bed (or wall bed), complete with hidden nightstand with USB charging, built-in closer/dresser combo, and above-bed storage!
Note: Below are affiliate links
📦 Materials Used On The Murphy Bed Build:
🛠 Tools Used On The Murphy Bed Build:

Pin it!
Process For Building Dual Murphy Beds:
Step 1: Breaking Down Plywood On Table Saw For Murphy Bed

I started this project by breaking down a whole bunch of plywood. In total, I used a little more than 8 sheets of ¾” plywood for the cabinet carcasses, drawer fronts, and doors, and then another half sheet of ½” and ¼” plywood for the drawers and sliding doors.
As always, I started by breaking down the plywood with my table saw, ripping the cabinet sides to their final width, then I cut the panels to length using my track saw. I’m a huge fan of this combination, as you know, since it’s really awkward to try and cut panels this large to size at the table saw, even with a sliding table attachment like I have.
Step 2: Design Layout For Murphy Bed Project

In these shots, you’ve seen me breaking down the parts for the closet cabinet that will live in between the two Murphy beds, and let’s hop into SketchUp so I can show you how that will all come together.
I essentially designed the closet cabinet to fill the space left between the wall and the window after subtracting the space the Murphy bed cabinets were going to take up. Basically, I wanted this closet to be as big as I could get into this space, as there isn’t another closet in this bonus room.
I also added a bank of drawers to the lower part of the closet cabinet which will function as a small dresser, and there’s also a hidden nightstand in that section of the cabinet, which we’ll go over in a bit.
Step 3: Domino Joinery In Plywood Carcass

Anyway, back to the build, after getting all of the parts for the closet cabinet cut, I could start working on the joinery. I ended up using Dominos and screws here, mostly because that’s what I was going to use for the Murphy bed cabinets but, in retrospect, I think screws would have been plenty strong considering this cabinet will be wedged between the two Murphy bed cabinets.
To avoid having to use a ton of clamps to hold the outer structure of the cabinet together, I added pocket holes to the top and bottom panels, and these pocket holes won’t be seen in the finished piece.
Once I had all of the joinery cut, I could get the cabinet assembled, which went pretty smoothly. I did end up using too much glue here, as always, and I’ve been contemplating whether I even need to use glue in these situations.

I think screws provide plenty of strength, especially with the Dominos reinforcing things, and avoiding the hassle of glue squeeze out would be pretty nice. Let me know if you have any thoughts on this in the comments, I’m really interested to hear what y’all have to say here.
Step 4: Assembling Murphy Bed Cabinets

Anyway, once I had the cabinet assembled, I came back and added an upper shelf, which will divide the closet area and will provide a little additional storage above the space for hanging clothes. This shelf will be behind the inset closet door, which is why it’s recessed about an inch from the front edge of the cabinet.
Next, I could start working on the dresser portion of the closet cabinet, and first I needed to get the stretchers or dividers installed in the front of the cabinet. I cut these to length from some offcuts from when I ripped the parts down previously, and installed them in the cabinet with brad nails and screws. I also cut some spacer blocks to ensure I had even spacing on these stretchers, as they’ll be visible in the final cabinet since I’m doing inset doors and drawers on this project.
The next piece to work on was the hidden nightstand, which I wanted to look like another thicker stretcher. To accomplish this, I first glued together two pieces of ¾” plywood, which were cut oversized to allow me to trim them to final size after the glue up.
Clamping these types of assemblies is always tricky, and I didn’t want to use brad nails because I’d be drilling into this piece later on. Instead, I got one of the heaviest yet most compact items in my shop, my little anvil, and sat it on top of the pieces. This provided great clamping pressure in the middle of the nightstand, and then I could use more clamps and hold downs to clamp the edges.
This ended up working great, but after the glue up, I realized that, even with two pieces of plywood glued together, the nightstand wouldn’t quite be thick enough to hide the push-to-open drawer slide I had planned on using.

To remedy this, I added one more piece of ¼” plywood to thicken things up, and this ended up working out perfectly.
Once the glue dried on that, I trimmed the nightstand to size with my table saw and track saw, and then I could get the sides notched out to hide the drawer slides.
My thought here was that I could essentially leave a ¾” by ½” little tab at the front of the nightstand, and this would conceal the slide hardware from view, making the nightstand just look like a divider.

To cut this notch, I first laid out the area using my combination square and then pulled out my Japanese pull saw and my Katz-Moses dovetail jig to cut the end of the notch.
Step 5: Soft Close Drawer Slides And Drawer Fronts

Next, I could get this push-to-open drawer slide, which is from Rockler, installed in the cabinet. I needed it to be perfectly centered between the other two stretchers for the whole thing to look right, so I did some pretty precise math and laid out where the slides needed to be mounted.
Before mounting the slides in the cabinet, I mounted one half of the slides on the sides of the nightstand, and hopefully you can start to see what this notch was for, with the little tab hiding the drawer slide.
I used the Rockler Drawer Slide Jig to mount the slides in the cabinet, and they needed to be recessed the thickness of the drawer front, which was the ¾” thick tab in my case, plus 5mm for the push to open mechanism. To make this easy, I took a scrap piece of ¾” plywood plus a 5mm Domino and used those as spacers to offset the drawer slide, and this ended up working out really well.

With the drawer slide in the jig, it was super easy to line up the slide with my layout lines, pre-drill holes with a self-centering drill bit, then drive in a few screws.
I repeated the whole process on the other side of the cabinet, and then I could install the nightstand. It was a huge relief to see that the whole push to open mechanism worked well, and the nightstand really looked like just another front stretcher outside of the small clearance gap on either side. Besides a little adjustment to get the front of the nightstand flush with the cabinet, it was good to go and I’m going to be building some USB charging ports into this nightstand, but we’ll get to that in a bit.

With the nightstand in, I could get to work on the drawers for the dresser, and I decided to go with Blum undermount drawer slides here. It can be a little tricky to build drawers for these slides and then actually install the slides themselves, and I did an entire video on how to install Blum undermount soft close drawer slides during my home bar build a few months ago.
Once the drawers were in, I could work on the drawer fronts and the closet door, which I cut from some of the leftover Oak plywood, also from the home bar build.

I happened to have an offcut that was almost the perfect width, and it was also long enough to get all four drawer fronts plus the closet door from. I cut the drawer fronts to size at the table saw, cut the door to final length with the track saw, and then I could get the drawer fronts attached to the drawers, which proved to be a little tricky.
Luckily, I had waited to add these back panels, which are essentially just nailers for attaching the cabinet to the wall, until after adding those drawer fronts, as they would have been completely in my way otherwise. I also added a similar piece at the top of the cabinet, which again will be used to attach it to the wall later on.
Step 6: Cutting Out Handles In Plywood Drawers With Router Template

With the drawer fronts and door at their final size, I could work on cutting in some cutouts to act as handles, as I didn’t want any actual pulls on this cabinet.
To make a template for these cutouts, I first hopped into Easel, which is Inventables’ free design software, and mocked up a quick design for the template. This is definitely one of the more simple tasks I’ve used my X-Carve CNC for, but getting a perfectly shaped handle like this can be pretty tricky otherwise.
Once I had the design setup in Easel, I moved over to my X-Carve and got it set up to cut the template from a scrap piece of ½” plywood. I actually had the X-Carve cut the handle cutout and a rectangle surrounding the cutout, as this would ensure the cutout was perfectly square to the edge of the template, even if I hadn’t mounted the plywood squarely.
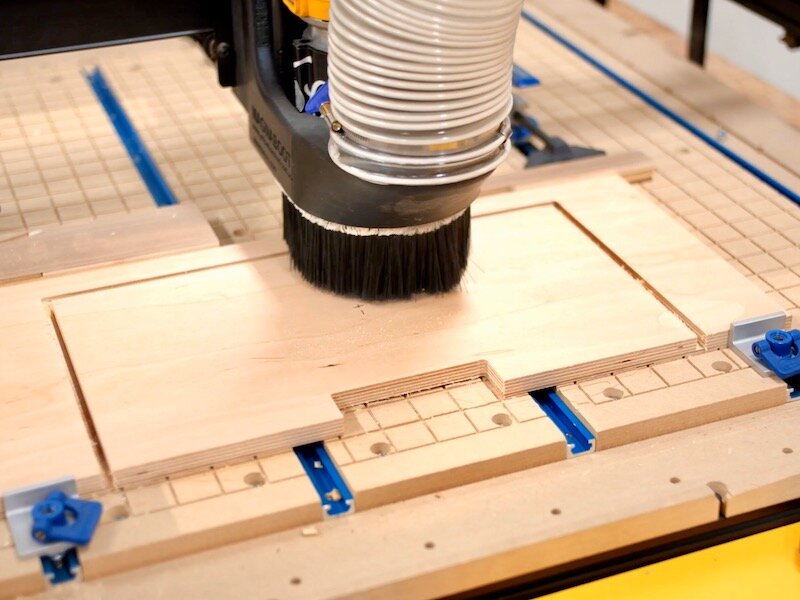
When the X-Carve had finished, I removed the piece from the CNC, cleaned it up off camera, and then added a few locator tabs to the front edge of the template. These tabs will allow me to butt the template up against the edge of my drawer fronts and door to ensure that the handle is cut into the pieces perfectly.
With the template made, I could mark a center line on my drawer fronts, line up the center line on the template, which I added off camera, and then I traced out where the handle cutout would be located.

Next, I could head over to my bandsaw and clear out the waste. As I mentioned before, I have a monstrous resaw blade installed on my bandsaw, and it’s not a fan of cutting curves, so I made some relief cuts to allow me to get into the corners of the handle cutout without changing my blade. I was looking to get close to my lines here but still stay proud of them, so the router could do its job.
Speaking of which, once the bulk of the waste was cleared out, I could attach the template to one of my drawer fronts using the CA glue and painter’s tape trick, since I’m now out of double sided tape, and then I could head over to the router table to get the handle flushed up with the template. I used this small ¼” spiral flush trim bit from Infinity Tools here, and it was able to get into that small inside corner on the handle cutouts with no problem.

Once the first handle was done, I could repeat the process on the other three drawer fronts, and this is the beauty of having a template, as it allows you to easily batch out pieces like this.
Step 7: Applying Laminate To Plywood Door And Drawer Fronts

Anyway, after getting the door handle cut out, I could move on to something very new for me, working with laminate. I have been following Kerf Design on Instagram for a long time now, and they make some amazing cabinetry using laminate for some super cool pops of color. They were a big inspiration for this whole project, and I’d highly recommend checking them out if this whole exposed plywood edge, inset cabinet thing is something you’re into.
I decided to try my hand at adding some laminate to a few of the drawer fronts, as well as the door, and I picked up this 5x10 sheet of white laminate from a local countertop manufacturer for about $100.

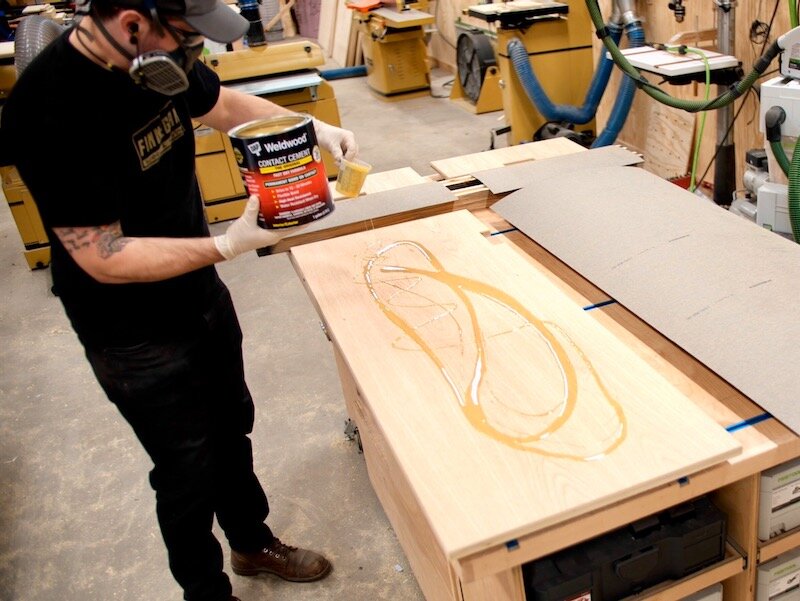
After cutting the pieces I’d need to rough size with the track saw, I could get the laminate adhered to the plywood using contact cement. I used this Weldwood contact cement here, but this stuff had god awful fumes and left my shop smelling terrible for a day or two afterwards, so I’d recommend finding a water based contact cement if you’re going to do this kind of work in your shop. I’ll link to one from WilsonArt, who also is the manufacturer of this particular laminate.
Anyway, the process for using contact cement is to coat both faces you’re going to be adhering evenly with contact cement and let it set up for about 30 minutes, depending on which particular product you’re using.
Once my contact cement had a chance to set up, I could flip the laminate and place it on the drawer front, making sure the laminate was overhanging on all edges. To make sure the laminate bonded well, I rolled the surface with this pressure roller, and I’ve seen a lot of people use j-rollers for this, but this roller is about three times as wide and seemed to work just as well, and allowed me to roll the surface much more quickly.

The drawer fronts were really easy to get everything aligned, but the closet door was a bit of a different story due to its size. The big trick here is to keep the two surfaces with contact cement on them from touching while you’re getting everything aligned because, as soon as they touch, they are going to be stuck together permanently.
I’ve been watching a lot of my buddy Mike Farrington’s videos, which are excellent and you should go watch all of them if you haven’t already. Anyway, he happened to build a built-in desk with a laminate top, and he showed this tip of using aluminum bar clamps, these Rockler clamps in my case, to keep the two surfaces from touching while you’re getting everything lined up.
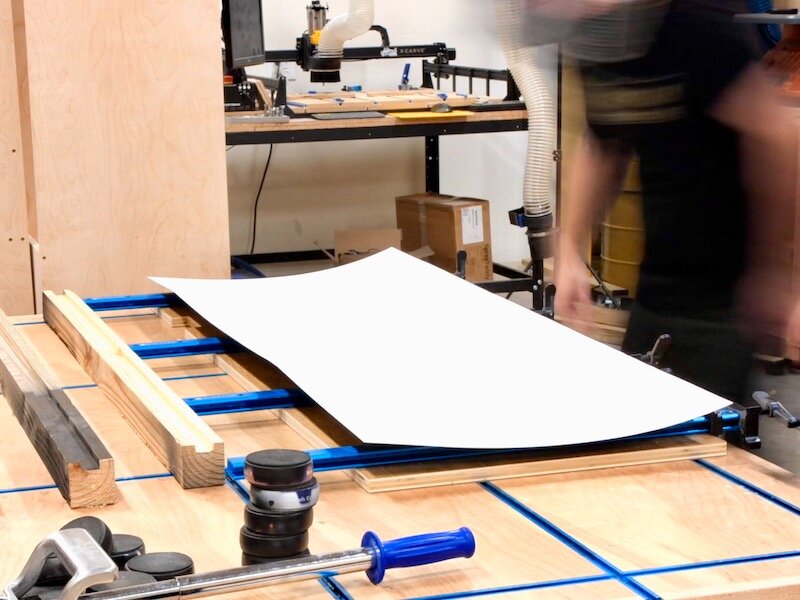
This ended up working perfectly, and I was able to get everything lined up, using the faces of the clamps to help with this, and then remove the clamps one by one until I had everything together.
Once the laminate was in place on the door, I could roll it out just like on the drawer fronts, and it was good to go.
To flush up the edges of the laminate with the drawer fronts and door, I once again called on that Infinity Tools spiral flush trim bit at the router table, and this made quick work of cleaning everything up. I was left with a super clean, although fairly sharp, edge with no lifting anywhere, so I was pretty excited.
As I mentioned, the resulting laminate edge after flush trimming was a little on the sharp side, and was also a little fragile, so I decided to help with both of these things by adding a light chamfer to all of the laminate edges. I did this using my Infinity Tools chamfer bit at the router table, but one thing I didn’t take into account was that the radius of the bearing on that chamfer bit was larger than the radius of the inside corner of the handle cutout.

This meant that the chamfer didn’t extend fully into that area and looked off visually. To fix this, I swapped over to this brass tipped chamfer bit from Infinity Tools, which actually uses this brass area for referencing the piece, rather than a bearing. This can mean a little bit of extra sanding if you apply too much pressure and cause the bit to burn, but the smaller brass tip allows the bit to get into much tighter spots, like the inside corners of these handle cutouts.
After confirming the bit height looked good, I went back and re-chamfered all of the handle edges, which really made the laminate pieces look great.
Step 8: Installing Soft Close Hinge Hardware

With all of the chamfering done, I could continue working on some more hardware installation, the next of which was getting the soft close hinges added to the closet door. You’ve probably seen me install these before if you’ve been following my videos, and I typically use this hinge jig from Kreg to cut the mortise for the hinges.
Once those were drilled into the door, it was as easy as adding the screws and the hinges were in. I actually installed the other half of the hinge in the cabinet after finishing, using another jig, but we’ll get to that later.
Step 9: Built In USB Night Stand Installation

The next thing to work on was the built-in USB charger on the night stand, but first I needed to clean up the chamfer on the inside corner of the sides using a chisel. This is one of those little details that gets skipped a lot of times, but I think these details make all the difference in the finished piece.
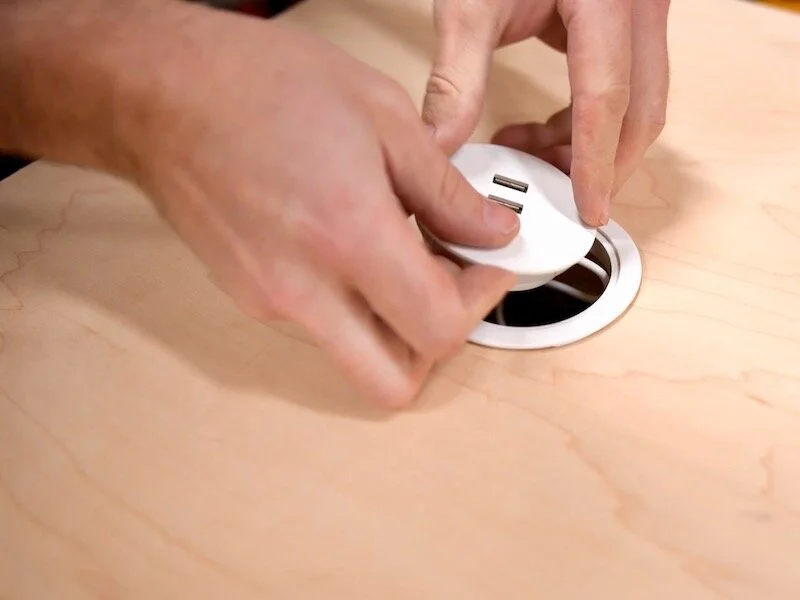
Anyway, this little USB charging puck, called the NORDMARKE, is actually from IKEA, and they have some pretty cool built-in electronics like this one, including a few wireless chargers. I considered going with a wireless charger here, but I figured not everyone’s phone has wireless charging, so a USB charger would probably be the safer bet.
To install the charger, I used a specially sized hole saw, also from IKEA, to drill a hole through the nightstand, and I evidently didn’t tighten the set screw on the center bit all the way, so it came loose.
No biggie, I tightened it up and then got back to drilling, and I actually had to drill from both sides to complete this hole, considering the thickness of the nightstand. Luckily, the center bit made it all the way through, so I had a reference point to start the bit on the other side.
Once the hole was drilled, I knocked off any fuzzies with some sandpaper and then the puck just dropped into place, with this little plastic flange going in first to cover the edge of the hole. It’s a super clean looking install and I think this is a great option for nightstands, end tables, or desks.

Next, I needed to cut a groove in the bottom of the nightstand, to allow me to route the power cable for the charger out the back of the cabinet. To do this, I just made a few passes at the table saw, using a couple pieces of ¼” plywood to fill in the notch on the edge of the nightstand.
This was much simpler than trying to cut this notch with a router, and I ended up with a perfectly straight groove.
Step 10: Top Plywood Cabinet Construction

With that, all of the parts and pieces of the closet cabinet were ready for finish prep, so I could move back to getting the Murphy bed cabinets assembled. Now, in real life, I actually assembled these cabinets simultaneously with the closet cabinet, but I figured it would be less confusing if I stuck with one cabinet type at a time.
I actually did a video on building a Queen-sized Murphy bed cabinet about a year ago, and the process here was essentially the same. You might be asking yourself, why am I building another Murphy bed if I already built one?
The old one did not fit up the steps in the new house. The one big change I made to this Murphy bed cabinet versus the last one I built was adding an additional upper storage section, which is enclosed by a pair of sliding doors. To accommodate those sliding doors, I did add a pair of ¼” wide grooves into the bottom face of the top panel and the top face of the divider.

I cut the grooves with my Dadonator dado stack, starting ¼” in from the front edge of the panels and, after cutting the first groove, I moved the fence over ½”, which left a ¼” gap between the first and second groove.
The depth on the bottom set of grooves was ¼”, but the depth on the upper set of grooves was ½”. This allows the sliding doors to be set into the grooves, as you can see in this shot of the assembled cabinet.

Anyway, I attached the top and bottom panels to the headboards after cutting in those grooves, and I evidently ended up cutting one of the panels about 1/16” too long, so I flushed that up with my block plane before assembling the entire Murphy bed cabinet.
Assembly was a little tricky due to the sheer size of the cabinets, but a few clamps helped to pull everything together. I ended up screwing the cabinet sides on through the face of the sides, rather than adding a bunch of pocket holes, and this was because 5 of the 6 cabinet sides won’t be visible in the finished installation.
That said, on this leftmost cabinet side, which will be visible, I made sure to lay out my hole locations so they looked nice visually, and countersunk the holes so I could plug them later.

Speaking of which, next I cut some plugs from a scrap piece of White Oak, and I figured these contrasting plugs would tie in nicely with the White Oak plywood I’m using for the Murphy bed doors. This little plug cutter cuts tapered plugs, which makes installation super easy.
To remove the plugs, I decided to try something new and use my bandsaw, and this method was so much faster than prying them out with a screwdriver like I had done previously. Plus, it’s super satisfying to see them pop free from the board.
Next, I could glue the plugs into the countersunk holes, driving them in with a hammer. I like to use this tiny pair of needle nose pliers to hold the plugs while I add glue, as these plugs can be a little tricky to hold on to otherwise.

Once the plugs were in, I could come back and trim them flush with my flush trim saw. I like to add a little painter’s tape under the saw, and this helps keep the saw’s teeth from marring the veneer on the plywood. Also, I like to trim the plugs off while the glue is still wet, as the glue will mix with the sawdust and fill any tiny gaps around the plugs.
With that, all that was left was a little sanding and the holes were looking great.
Step 11: Rockler Murphy Bed Hardware Installation

The next bit of work to do on the cabinets was to add the threaded inserts, which is how the Murphy bed hardware attaches to the plywood. These are included with the Rockler kit, and there are some pretty precise measurements you need to hit when installing these.
Since I was going to have to repeat this process four times, I decided to whip up a quick drilling template using a leftover piece of plywood, and this saved me a ton of time when drilling these holes.
I laid out the hole locations, center punched them, and then drilled them out over at the drill press, to ensure they were perfectly square.

Once that was done, all I had to do was clamp the template in place, butted up against the bottom of the cabinet and flush with the front edge of the cabinet, and then I could drill my holes. I did use some painter’s tape as a depth guide to make sure I didn’t drill too deep, which I still ended up doing in a few spots, but overall this worked great.
After the holes were drilled, I removed the jig, blew out any sawdust with some compressed air, and then added the threaded inserts. Again, these are included with the Rockler kit and just thread into the holes using an Allen wrench.

Once the inserts were threaded in, I double checked the fit of the mounting plate, and everything looked good, so I could repeat the same process on the other inside face of the cabinet.
With that, the cabinets were good to go, so I sanded them up to 180 grit, breaking all of the edges while I was at it.
Step 12: Sliding Plywood Door Construction

Next, I could work on cutting the cabinet doors, starting with the sliding doors, and first I measured the actual cabinet opening to make sure it matched my model.
It did, so I cut the doors to size from ¼” plywood over at the table saw.
After confirming the fit in the cabinet, I drilled a hole through each door, which will serve as the pull for the door. I like to keep things simple on sliding doors like these, and these holes are perfect for opening and closing these doors.
Usually, the Forstner bit leaves a bit of a ragged edge where it exits the plywood, so I cleaned that up with some hand sanding, and the doors were ready for finish.
The last piece to work on for this project was the main door for the Murphy bed cabinets. On the Queen sized Murphy bed, this was made up of two separate panels, but the Twin bed is small enough where it can be one piece. As I mentioned, I cut these doors out of some of that White Oak plywood from the home bar build, and this stuff is really gorgeous.

These panels are made by Columbia Forest Products, the same company that makes Purebond plywood, and these White Oak panels are from their TouchWood line. I’m a big fan of Columbia Forest Products’ plywood, as you’ll know if you’ve watched a lot of my videos, and one of their plants is right down the road from me here in NC.
Anyway, after cutting the door panels to size using the table saw and track saw, I could cut the handles, which will be used to open and close the Murphy bed, to size from a strip of plywood.

After cutting the handle to length and width, I started laying out where it was going to be mounted on the front of the door panel. It was super important that I nailed these measurements, as it would be extremely obviously in the finished piece if these handles weren’t mounted straight.
I actually considered cutting a dado across the face of the panel to house the handle, and this might have actually been a little easier in the end.
Anyway, after figuring out the placement of the handle, I clamped it in place then flipped the whole door over, so I could add some screws from the back side of the door.
I was going to be adding more handle cutouts to these handles, like I did in the drawer fronts, so I made sure to add screws in locations that avoided those cutouts. Once again, I pre-drilled and countersunk the holes to avoid splitting as well.
With the handle mounted, I could then remove them and start working on shaping the handles. First, I went ahead and added the handle cut outs, which was the same process as on the drawer fronts, cutting away the bulk at the bandsaw and then flushing them up at the router table.

To give the handles a little more shape, I wanted to taper them at the ends, and I pulled out my Rockler tapering jig for this. This jig made it really easy to add an identical taper to both ends of both handles, and I could cut them super quickly with the table saw.
Once the tapers were added, I headed back to the router table and added a chamfer to the front edges of the handle, as well as the cutouts. I made sure not to chamfer the edges that meet up with the door, as that would have resulted in a gap there.
Step 13: Sanding; Preparing For Finish

With that, the handles were done, so I could move back to the door panels and get them prepped for finish. I installed that Infinity Tools chamfer bit in my router and added a light chamfer to all of the edges of the doors. After chamfering, I sanded all of the edges as well as the faces of the doors, to prep them for finish.
All that was left to do at that point was get all of the other parts and pieces sanded and prepped for finish, and this was definitely a bit of work. Any time I add a chamfer, or any edge profile for that matter, I always make sure to go back and hand sand them, to make them nicer on the hand. This is especially important with the handle cutouts, since your hand will be grabbing them to open and close the doors and drawers.
Step 14: Finishing All Plywood Murphy Bed Parts

Once that mountain of sanding was done, I could finally move on to finishing, which was a big relief. As I mentioned earlier, I wanted these cabinets to have a little pop of color, and I didn’t necessarily want to commit to a big sheet of laminate for some of these hotter colors.
I also really like how this White Oak plywood looks with an opaque finish, as you can still see the grain pattern of the Oak. For those reasons, I decided to actually paint the drawer fronts and sliding doors, and I used this TotalBoat Elixir for my paint of choice.

Elixir is a water based enamel paint, so it’s super durable, dries quick, and is really easy to clean up. I also love these little Pour Paks they come in, as they’re a heck of a lot easier to pour from than a typical paint can.

Anyway, I rolled on three coats in total, waiting about an hour between each coat. I used the Sea Foam Green and Whaler Blue colors, and I think they turned out really nice. The surface finish was super smooth, even with rolling, and I didn’t even sand between coats.
Now, I wasn’t particularly careful when I was applying the paint, as I knew there was going to be some clean up, and this was actually pretty easy since I had already chamfered the edges. On the outside edges, I just made a few passes with my block plane, and this removed any excess paint and left with me with a super sharp paint line.

On the inside edges of the handle cutouts, I used my card scraper to remove the excess, and this worked really well. I initially tried sanding the excess paint off, but it would usually leave some discoloration in the plywood edges. It might have been better to seal the plywood edges before applying the paint, but using a card scraper and block plane worked great.
With the paint on the faces, I could spray on a few coats of water based polyurethane to the other faces and edges of the pieces, and I actually ended up adding polyurethane over the paint as well, which really gave the colors a nice, even sheen.
I also sprayed the cabinets and Murphy bed doors as well, and I applied three coats in total. I really focused on the front edges and inside faces of the Murphy bed cabinets, as the back, bottom, top, and sides will see very little wear.
Step 14: Assembling Murphy Bed Cabinets Before Installation

Once the finish had dried, I could get everything put back together, starting with the closet cabinet. I reinstalled all of the drawer slides, got all of the drawers installed, and then got all of the drawer fronts added with an even reveal.
I also installed the closet door, using this Rockler jig to drill the holes. Now, this jig is actually for overlap hinges, so I needed to put it ¾” deeper in the cabinet, and Rockler makes a jig for these inset hinges, I just didn’t have one on hand.
To keep the door from swinging in too far, I installed some of these Euro Door Stops from FastCap, and these things are super cool. The hole used to mount the stops is offset, so when you spin the stop, it acts as a cam, allowing you to fine tune where it stops the door without having to move the screw around.
The final bit for the closet cabinet was permanently attaching the USB charger in the nightstand, and it comes with peel-and-stick adhesive to do this. I also ran the cable through the groove in the underside of the nightstand and secured it in place with a few gobs of hot glue.

Last, I went ahead and reattached the handles on the Murphy bed doors, and then I could load everything up with the help of my father-in-law.
Step 15: Installing Murphy Bed Cabinets

Once we got the cabinets up into the bonus room, I could start the process of getting them attached to the wall, and I started by using my line laser to find where the low spots were in the floor.
I knew leveling the cabinets was going to be a potential issue, as they spanned about half the width of this wall and there are no toe kicks or filler strips to allow for wiggle room.
To help with this, I actually factored in adding a ¼” spacer below the cabinets and offset the Murphy bed hardware to account for this, lowering it a ¼” on the inside faces of the cabinet.
This allowed me to add strips of ¼” plywood to the bottom of the cabinets, and the gap created by these strips would allow me to shim the bottom of the cabinets without creating too uneven of a gap.

Once I could slide the cabinet into place, I saw an obstacle to work around was this outlet. I drew some layout lines on the back of the cabinet, making them about ½” oversized on each side so I didn’t need to be super precise, and I cut out the hole with my jigsaw.
I knocked off any sharp edges with a sanding block and then slid the cabinet back into place, and, thankfully, it was a good fit.
Next, I started getting the cabinet leveled, the right corner was the highest spot on this wall, so I actually removed the two plywood strips from that side of the cabinet and I was good to go with a tiny bit of shimming.
With the cabinet plumb and level, I could get it attached to the wall, and I used the hardware included with the Murphy bed kit to do this. On this Twin cabinet, there are two lag screws that go through the lower and upper headboard, plus some metal brackets that attach to the topmost panel in the cabinet, which I installed later.

Next, I continued working my way to the left, getting the closet cabinet installed next. Since the first cabinet was plumb and level, I could basically just butt the closet cabinet up against it, shimming the bottom right corner to make sure the cabinet edges were flush, and then I clamped the cabinets together and drove in a few 1 ¼” screws near the front edges to hold things in place.
To attach this cabinet to the wall, I used some 3” cabinet screws through the back panels at the bottom of the cabinet and the nailer strip at the top of the cabinet.
I slid the next cabinet into place and, unfortunately, there appears to be a slight bow in the cabinet which makes the cut look much worse than it is. Luckily, I’ll just fill this in with caulk and it’ll look fine.
Anyway, I repeated the process of attaching the Murphy bed cabinet to the wall with lag screws and attaching the front edge to the closet cabinet, and then I could go back and add the metal brackets to the top of the two Murphy bed cabinets. Again, these are included with the Murphy bed kit.

The next step in the installation process was routing the power cable for the USB charger through the back of the cabinets, over to the outlet inside the Murphy bed cabinet. This was fairly simple, I just drilled a ½” hole through the bottom corner of both cabinets and ran the cable through.
Luckily, there is just enough slack to allow the nightstand to fully extend with the two lower dresser drawers closed, which was a relief.
Step 16: Assembling Murphy Bed Platforms

Finally, I could get the bed platforms assembled and installed in the cabinets, and this is something I covered in the last Murphy bed video. It’s a pretty simple process of bolting the metal frame parts together, adding most of the wooden slats, leaving off a few for later access to some of the hardware, and then dropping the platform onto the mounting plates on the inside of the cabinets.

The door panels install temporarily with these hooks, which screw on to the back of the panel, and allow some adjustment when attaching the front panel. This is by far the most tricky part of this whole build, and trying to get an even reveal around the door panels is definitely a challenge.
Also, I’m not sure why Rockler calls for such a narrow panel here, as it leaves more than a ¼” gap on either side of the front panel. This obviously didn’t match the reveal around the drawers, but I’m guessing it’s just to allow for more adjustment.
Anyway, once I got the panels as aligned as I could stand, I went ahead and attached it to the metal frame with a bunch of the screws included in the kit, and then I was in the home stretch.

I installed the closet door and then installed the closet rod brackets, which is not the order I should have done this in. Once the brackets were in, I cut the closet rod from some dowel stock, since it was way cheaper than an actual closet rod, and the closet was good to go.
The final steps were to add the sliding doors and then add the mattresses onto the platforms.

With the mattresses in place, I could test everything out and, thankfully, everything seems to be working well. The mattress actually catches slightly on my thicker stop block, but it’s easy enough to push down on the mattress a little to move it into place.
With that, I could finally call this two day installation process finished, and call this part of the project complete.
