
How To Build A DIY Flip Top Tool Stand Workstation
I built this DIY flip top tool stand and workstation based on plans from my buddy Brad at Fix This Build That. This stand holds my oscillating belt sander and hollow chisel mortiser, but it's great for almost any bench top tool, including lunchbox planers, sanders, drill presses, etc.
🛠 Tools Used On The Flip Top Tool Stand (affiliate):
📦 Materials Used On The Flip Top Tool Stand (affiliate):
(1) 4’x8′ 3/4″ Plywood
(2) 8′ 1×2 Poplar/Pine
(4) 3/8″ nuts
Step 1: Cabinet Assembly
This flip top stand is one of those projects that I’ve been putting off for months, all the while tripping over the tools that were destined for the stand as they sat on my shop floor. When I was working on the Murphy Bed project a few weeks ago, I realized that the leftover pieces were just about enough for the flip top stand, so I decided it was finally time to build it.
This stand is based on plans from my buddy Brad over at Fix This Build That, and I’ll have an affiliate link to the plans here in case you’re interested in building one of these for yourself. I made some adjustments to the plan, to make the cart a little taller so that it could hold my hollow chisel mortiser, but most bench top tools will fit on Brad’s original stand design.
Up to this point, you’ve seen me breaking down the parts at the table saw and drilling pocket holes, which is how the main carcass of the stand is put together.
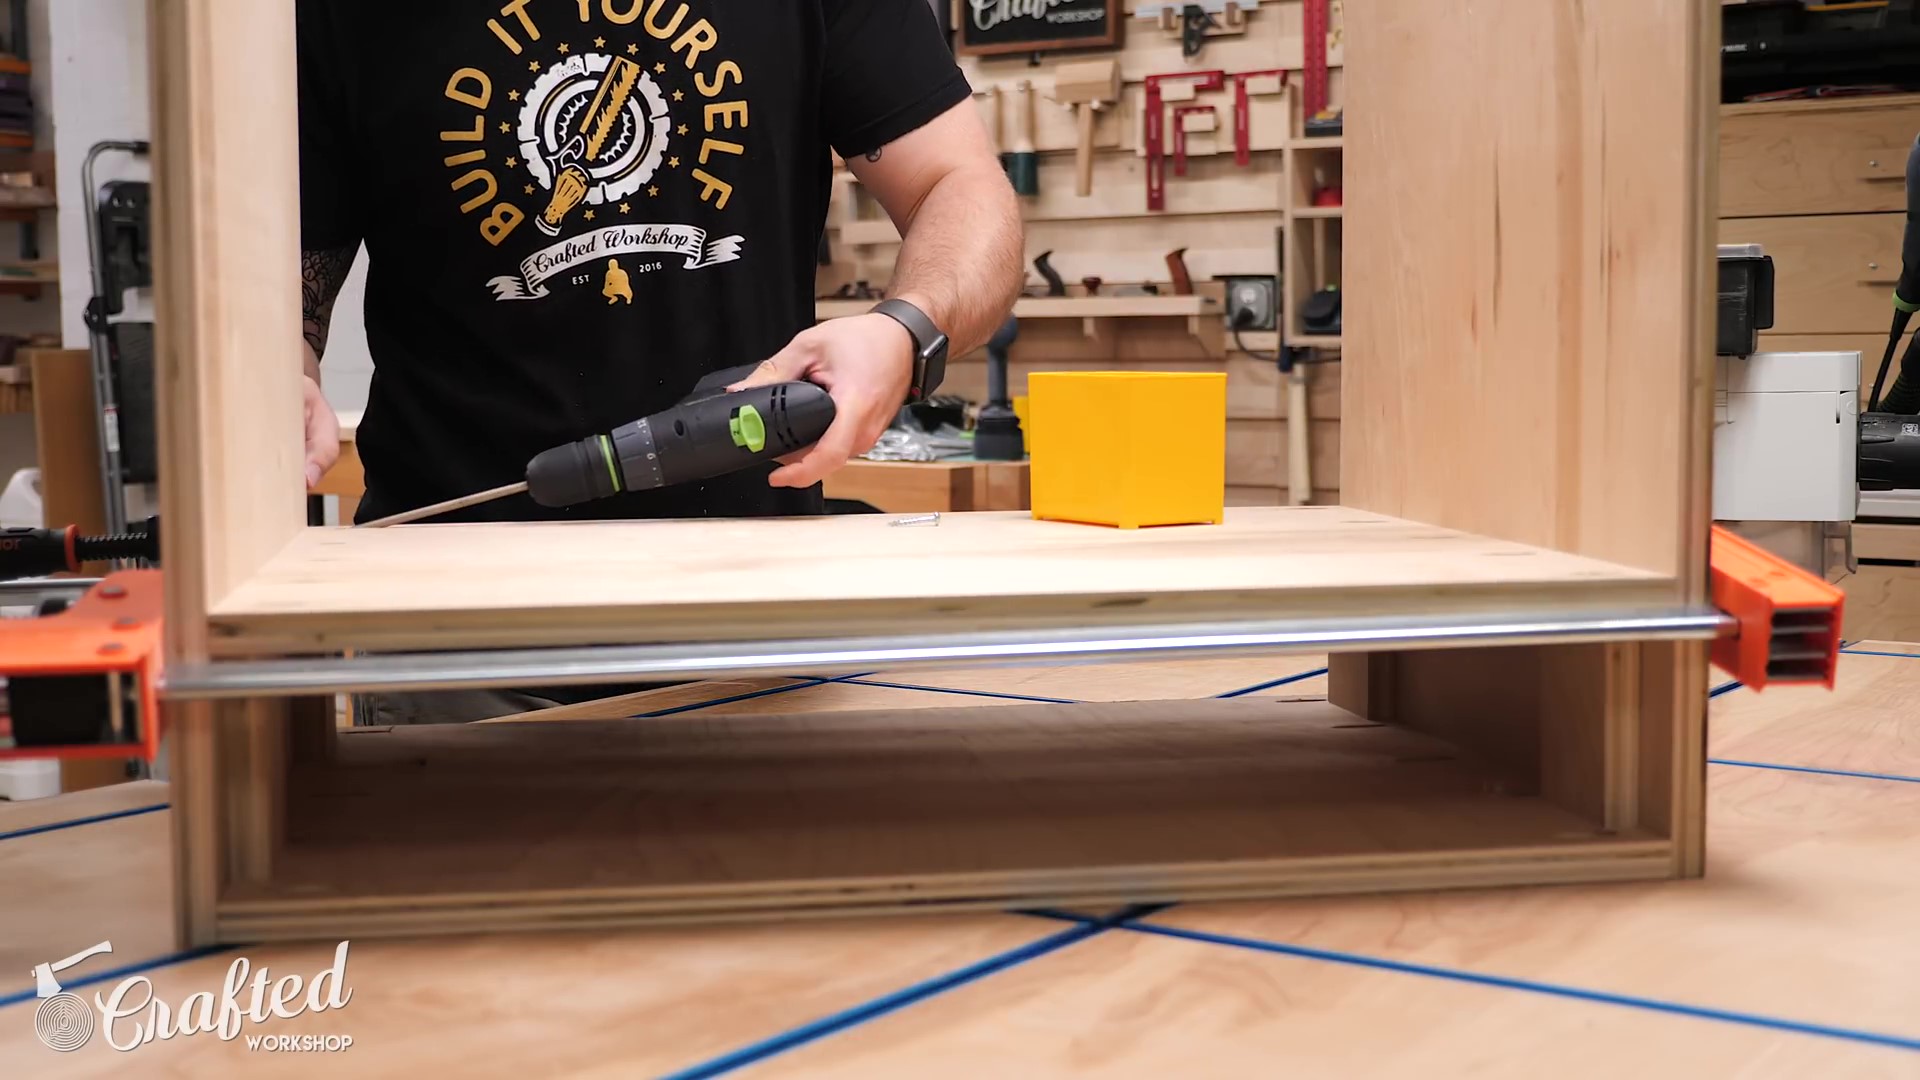
Once the pocket holes were drilled, I attached the bottom to both of the sides, and then added the top of the drawer compartment, again with pocket holes. I cut some spacer blocks to rest that top piece on, which was extremely helpful in making sure it was evenly spaced from the bottom.
Also, Brad’s plans call for these pocket holes to face the inside of the drawer compartment, but I had a fresh tattoo when working on this project and didn’t feel like scraping it up reaching into the drawer compartment to drive in the pocket screws.
Step 2: Cabinet Assembly (continued)

Next, I installed the back of the drawer compartment, which I just attached with screws through the sides, top, and bottom of the drawer compartment. Pocket holes would have been great here, but I put away my pocket hole jig before realizing I needed holes in this piece and didn’t feel like pulling it back out.
Now, I jumped the gun a little bit here, assembling the carcass before making some cutouts in the sides, but, with some careful measurement, things ended up working out fine.
First, I needed to drill a ¾” hole into each side panel, and this is where the metal pipe the platform spins around is mounted through.
I also needed to cut the groove for the locking hardware. I first drilled a hole to set the end point of the groove, drew some lines that intersected with the holes with a square and then cut out the rest of the groove with a jig saw.
Step 3: Drawer Assembly and Install
Next, I worked on the drawer box. This was made up of a mix of ¾” and ½” plywood scraps, but it’d be best to use ¼” plywood for the drawer bottom so that you don’t waste extra storage space. I assembled the drawer box with glue and pin nails and then went back and reinforced everything with 1 ¼” screws.
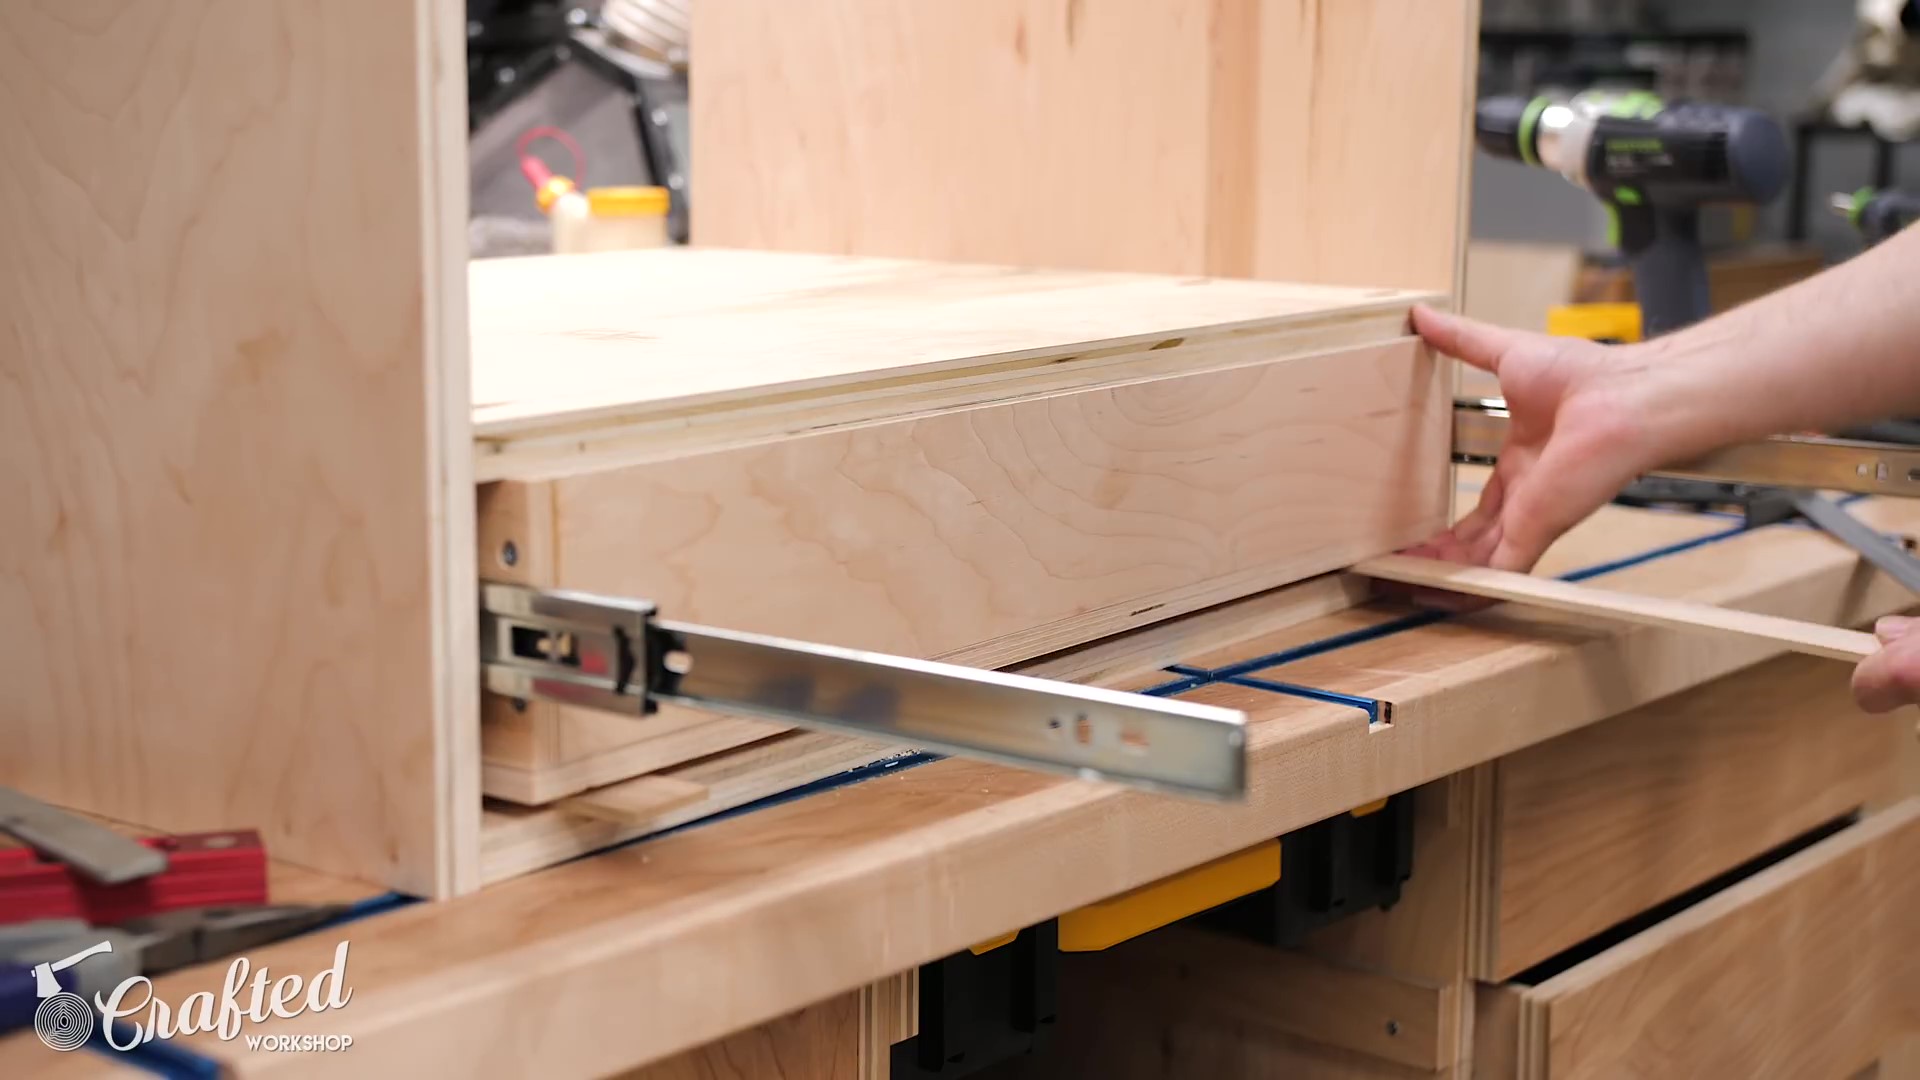
With the drawer box finished, I could go ahead and install the drawer slides. These are 18” over extension slides from Rockler, and I really like using over extension slides on drawers like this, so you can easily get to stuff in the very back of the drawer without any issues.
To install the drawer, I added some ⅛” plywood strips below the drawer box and then added one screw at a time, slowly sliding out the drawer box. To get to the last screw, I had to remove the drawer box and attach the final screw.
Once all of the screws were added, I could install the drawer, making sure to add a little pull tab made from gaffer’s tape so I actually open the drawer, and it worked great.
Next, I cut the drawer front to size at the table saw and then installed it, first attaching it with a few pin nails to hold it in place and then reinforcing it with some 1 ¼” screws from inside the drawer box.
Step 4: Building the Platform
With the cabinet basically finished, I could add some 3” locking casters before flipping the stand upright. If I had to do this again, I would have used the Rockler workbench casters instead, as the added height of my customized stand plus the casters made the whole unit a little on the tall side.
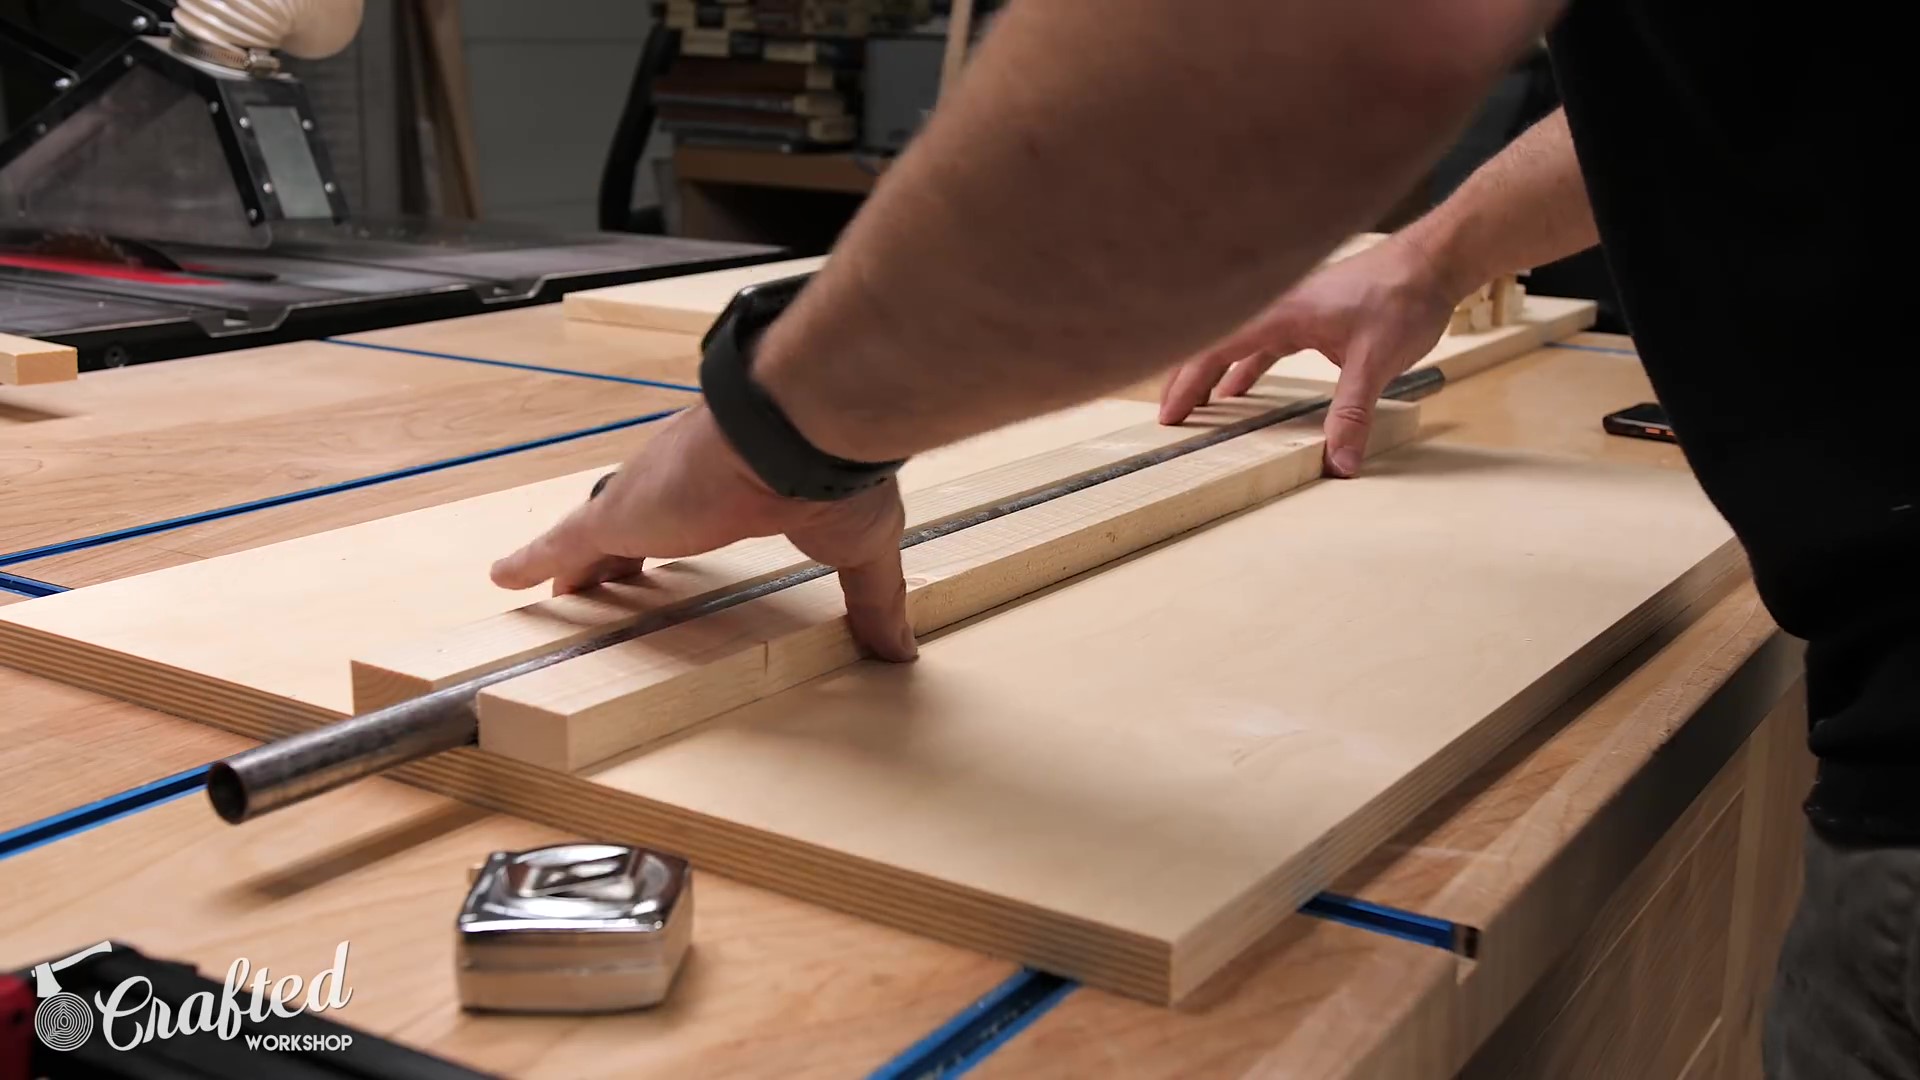
Next, I could get to work on the platform that the tools are attached to, starting by cutting down some 1x2 pieces at the miter saw. These pieces are used a blocking between the top and bottom panels of the platform, and give the whole platform more support.
The first pieces of 1x2 to attach were the two center pieces, which capture the metal pipe and are what the whole platform spins around. I centered the pieces, making sure there was a ¾” gap between them, then tacked them in place with pin nails and reinforced them with 1 ¼” screws.
The other two long 1x2 pieces needed a slot cut into each end, to accept the locking hardware. To cut these slots, I whipped up a quick little tenoning jig using some plywood scraps and then cut in the slots at the table saw. These slots are 1 ½” deep and 5/16” wide, and are centered in each end of these pieces.
Step 5: Building the Platform (continued)

With the slots cut, I could attach those pieces along with the rest of the blocking pieces to the underside of the platform, again using pin nails followed by 1 ¼” countersunk screws.
After attaching the pieces around the perimeter of the platform, I needed to attach more blocking pieces where the tools would be attached. I laid these pieces out using the tools as reference, and attached the blocking with more pin nails and screws.
Once all of the blocking was added, I could attach the other platform on top of the blocking, sandwiching the 1x2s between the two platforms. It was critical that all of the edges were flush here, so I tacked the platform in place with pin nails before adding the screws.
You can see here how the whole platform looks from the side once assembled, with that center channel for the ¾” metal pipe and then the corner cut outs for the locking hardware.
Step 6: Locking Hardware
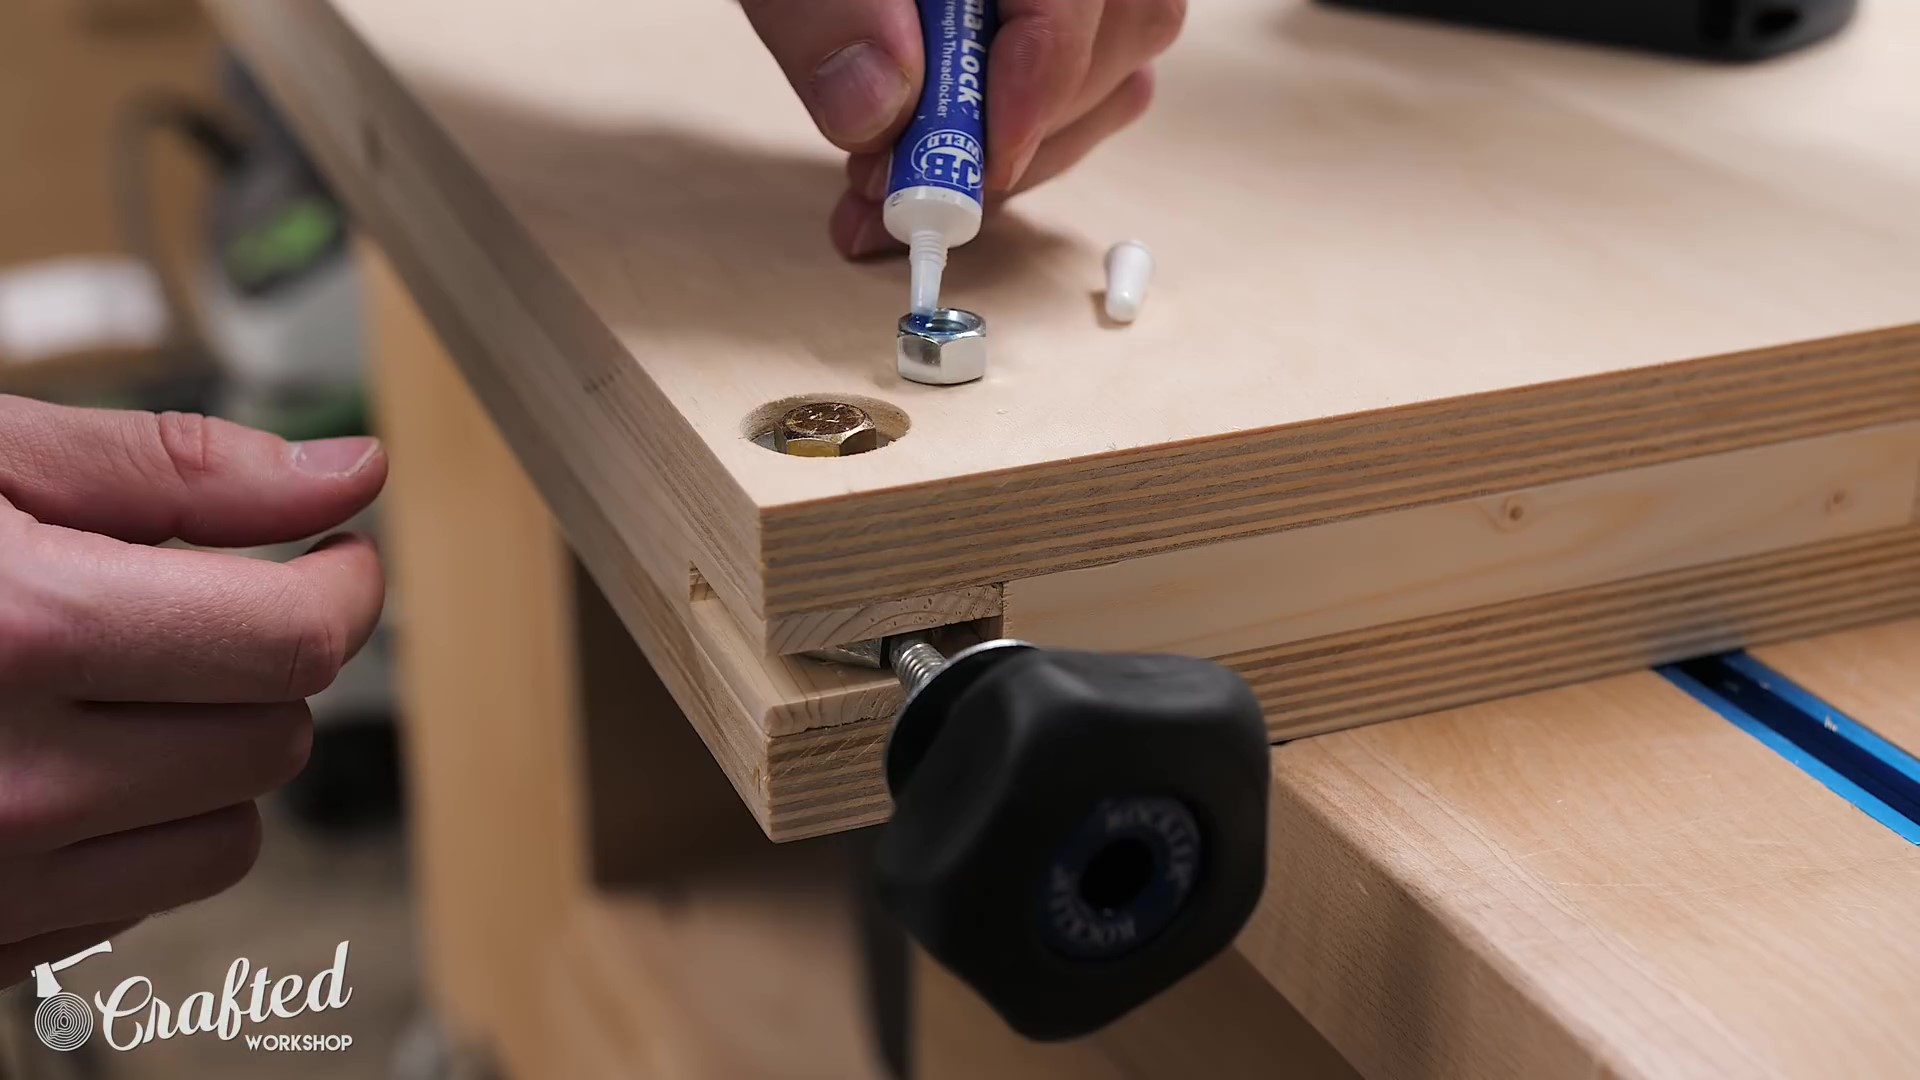
Speaking of the locking hardware, next it was time to get those parts installed. First, I needed to drill a 1” diameter recessed hole to accept a ⅜” flat washer, which I drilled with a Forstner bit. You need one of these holes on both sides of the platform in each corner, 8 holes in total.
Next, using a ⅜” twist bit, I drilled a through hole going through the center of both of those recessed holes.
The locking hardware is made up of a ⅜” washer in each of the recessed holes, then a ⅜” bolt and nut that run through those holes, with a 5/16” by 3 ¼” long eye bolt added in the corner cut out. The eye bolt has a fender washer and Rockler star knob added, which holds the platform in place. It’s important to add thread locker to the ⅜” nut to keep it in place over time.
Step 7: Installing the Flip Top

Finally, I could install the platform onto the stand. First, I added the ¾” pipe through one of the holes in the sides, with only about an inch of pipe sticking out, and then rested the platform on some clamps I had set up while threading the pipe through the hole in the center of the platform.
Once the pipe was threaded in, I clamped the platform in place and then drove it through the rest of the platform with a rubber mallet. This whole process would have been a lot easier with a second set of hands but my impatience got the best of me.
With the pipe all the way through the platform and sides, I could test out the flipping mechanism and it worked great!
Step 8: Tidying Up
Next, I cut the pipe to length, leaving about ½” of pipe sticking out on each side of the stand. I used a portaband for this, but a hacksaw or reciprocating saw would have worked as well.
To lock the platform to the pipe and keep it from shifting over time, I drilled a hole through the top of the platform into the metal pipe, then added a 1 ¼” screw through the platform into the pipe.
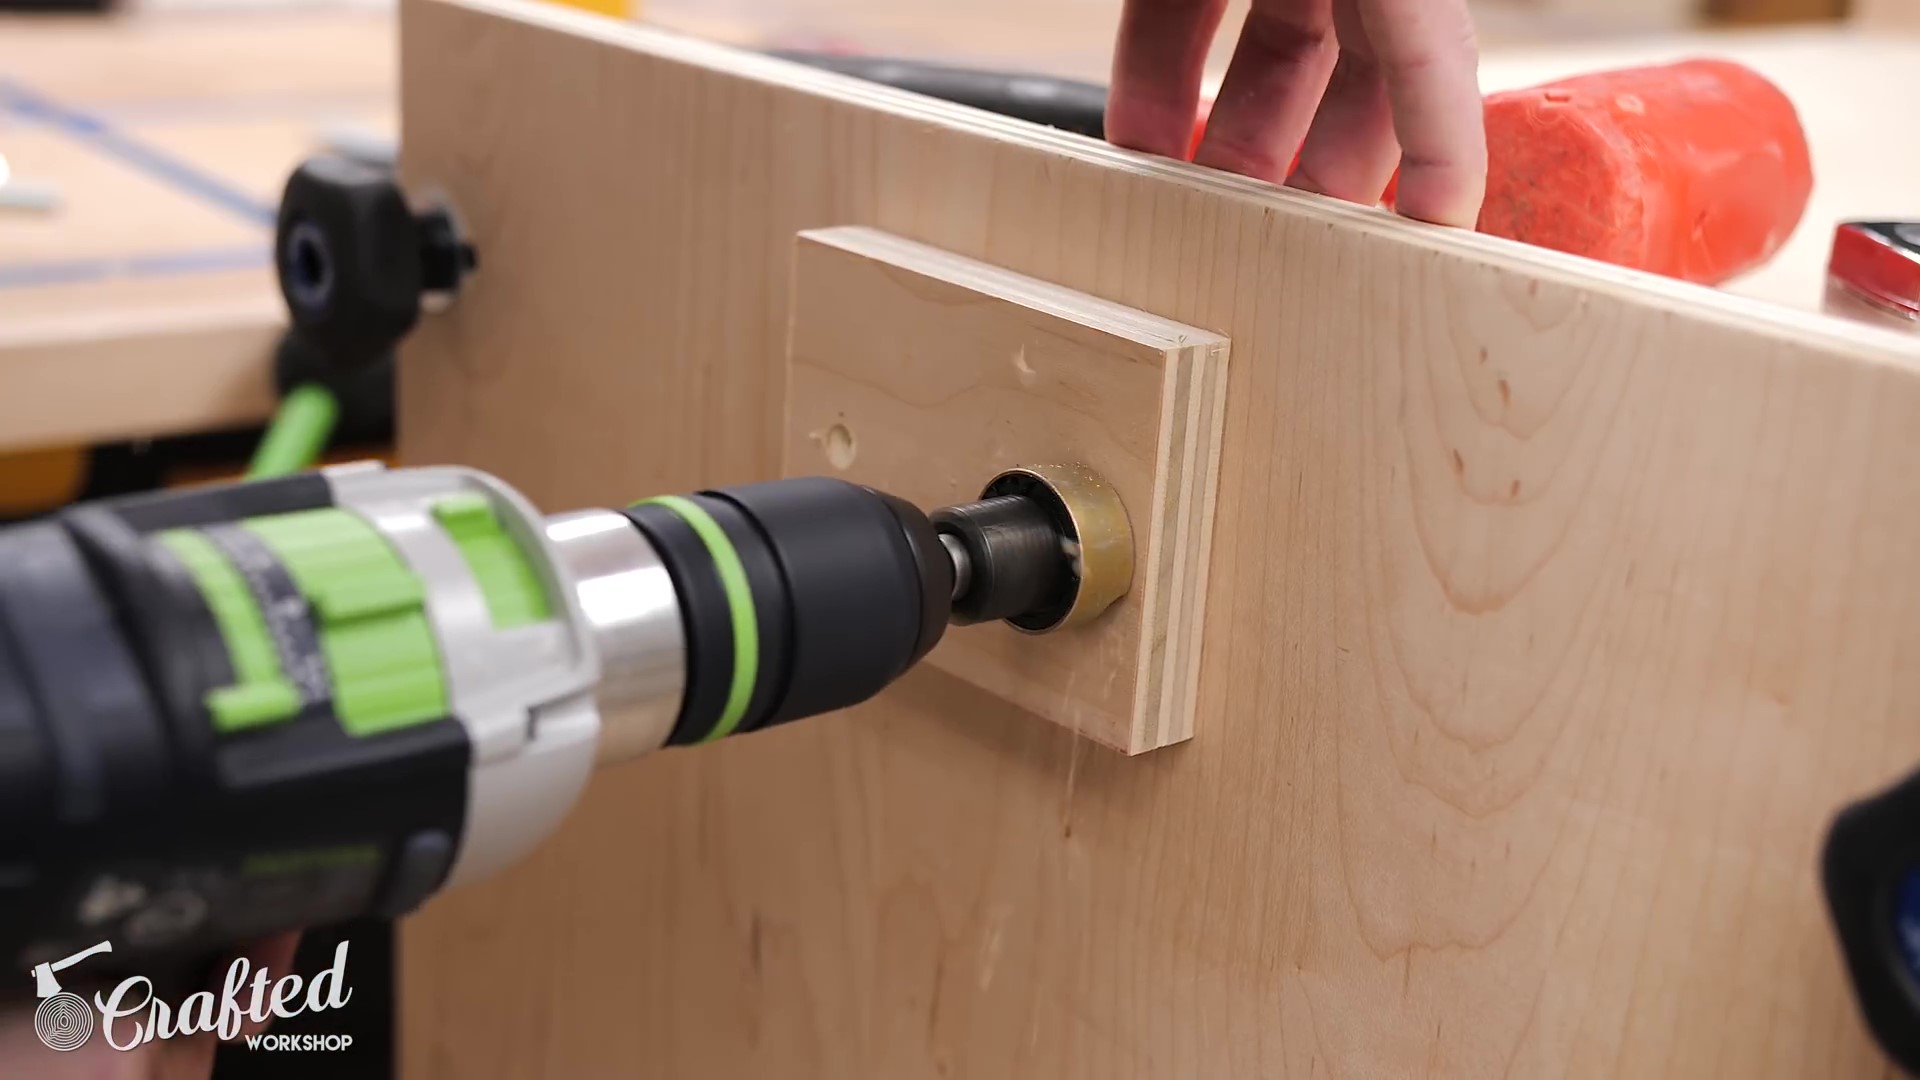
To cover up the pipe sticking out from the sides of the stand, I cut some little plywood blocks and drilled a recessed ¾” hole in the center of the pieces. I added the pieces to the sides of the stand, making sure they were square to the top edge, using pin nails and 1 ¼” screws.
Step 9: Mounting Tools
With the stand assembled, I could break all of the sharp edges with my random orbit sander and then could get the tools installed. I used 3 ½” Fastcap Powerhead screws to do this, and made sure the screws went through the blocking between the platforms.
Off camera, I also added a few more screws to act as cord management, which really helped keep things out of the way when flipping the platform.
One more final touch was to figure out what I wanted to store in the drawer and I decided to use this new Lock-Align system from Rockler to organize the drawer.
The final piece to add to the cart was a drawer pull, and I usually like to use shop-made pulls on shop furniture. I have an older video on this process, and these are a great way to use up plywood scraps.
After attaching the drawer pull to the drawer, I could call the cart done!