
FRAMING THE WALLS ON MY TINY HOUSE! // Not So Tiny House Build Part 5
Learn how to frame walls with window and door openings in Part 5 of the (Not So Tiny) House Build series! This will include framing exterior walls with window and door openings as well as the interior walls, then sheathing the walls with ZIP-R insulated sheathing.
🛠 Tools and Materials Used :
HOW TO FRAME THE WALLS OF YOUR TINY HOUSE:

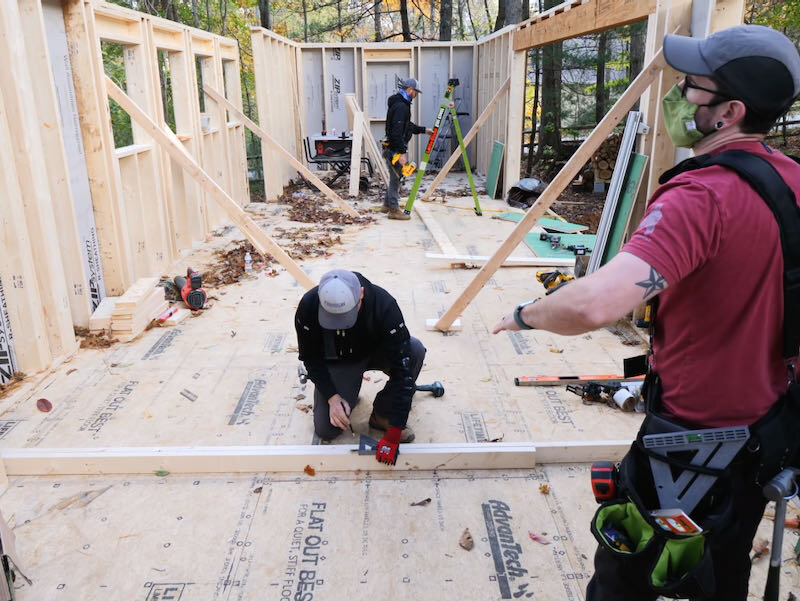
Step 1: Mark Location Of Exterior Walls With A Chalk Line

The first step was to lay out the locatiosn of the walls, starting with the exterior walls. Since the exterior walls will be framed with 2x6s, we marked in 5 ½” at each end of a wall section and then snapped a chalk line connecting those two marks.
We repeated this process around the entire perimeter of the building and then we could mark out the interior wall locations. The interior walls will be framed with 2x4s, since they aren’t load bearing.
After marking the wall locations, we could go back and mark out the window and door openings, writing the size of the rough openings in each opening as well.

After marking out all of the window and door openings, the lumber was delivered, and I didn’t make the same mistake as last time trying to transport all of these materials with my truck. No tailgates were harmed in the making of this video.
Step 2: Begin Framing The Walls

Next, we got started framing the first wall, first cutting the top and bottom plates to length at 12 feet, and then we could mark layout on the plates.
Once layout was marked, we set the plates in place on the floor and then got the studs we needed cut to length.
While Ray continued cutting more studs to length, Erik and I started getting the wall framed, first crowning all of the studs, making sure they were crowned in the same direction.
After assembling the inside corner, we could get the outside corner put together with a cordless framing nailer, which required a few more pieces of lumber to be added.

The piece towards the outside would serve as a nailer for the corner trim on the outside of the building and the piece towards the inside would be a nailer for the wall covering on the inside of the building. By assembling the pieces in this U-shape, insulation can still be added to this area later.
Once the corner was assembled, we added the rest of the studs, and the nailing pattern here was three 3” ring shank nails at each end of each stud.
We repeated the process at the other end of the building with another identical wall, since this tiny house is basically mirrored on both ends, and then we could get the wall tacked in place against the floor of the building.
Doing this not only allowed us to straighten the bottom plate of the wall by lining it up with the chalk line we marked earlier, but it also created a kind of hinge which helped keep the wall in place when we stood it up later.
Step 3: Check For Square And Add Sheathing

Next, we squared the wall by pulling diagonal measurements and making sure they matched, and then Erik added one more nail to tack the wall in this square position, so we could add the sheathing.
Before adding the sheathing, we snapped a line three feet up from the bottom plate, and this would ensure the sheathing would overlap onto the rim joist, which both further weatherproofs the building but also helps tie the walls to the floor.
Next, we attached the sheathing, and you’ll notice that Erik and his crew typically run their sheathing horizontally. The reason for this is it allows the studs to be straightened during the sheathing process.

To make sure the studs were straight, Erik marked where each stud should land before attaching the sheathing, and removing any bow from the studs will make fastening the interior wall covering later a lot easier.
The sheathing were using, which is ZIP-R insulated sheathing, has the nailing pattern printed on the panels, so nailing each piece went super quickly and, just like the floor sheathing, we crosscut a panel with the track saw to start the second row, so the butt joints were staggered.
Also, let’s talk about this ZIP-R insulated sheathing for a second, because it’s a pretty interesting product. As you might be able to tell, this sheathing has a layer of rigid foam attached to the inside face of the sheathing, and these panels are available with different thicknesses of foam. Since Asheville is a fairly temperate climate, I went with the R3 panels, which have a ½” thick layer of foam.
This might not sound like much, but even this thin layer of foam will provide a thermal break between the sheathing and the studs which will greatly reduce any thermal bridging.
In case you’re not familiar with this concept, thermal bridging is when your framing lumber essentially acts as a conduct where heat can be transmitted through your studs out of your house.
Anyway, we continued attaching more sheathing until we got to the top row, where we needed to rip a panel into strips. We also made sure to rip these pieces wide enough so they’d overlap the double top plate, which would be added after all of the walls were stood up.
Step 4: Zip Tape seams of Sheathing

After attaching the strip, we could get the seams on this ZIP sheathing taped, which is essential to making this sheathing system weatherproof.
Before taping, we blew off any sawdust which would keep the tape from sticking as well, and then we started taping, working our way up from the bottom of the wall.
After adding the tape, we then rolled it using a pressure roller which we mounted it on this extension pole to make it easier to roll. Rolling the tape helps to activate the pressure sensitive adhesive on the tape and is a required step to get the 30 year warranty that goes along with this ZIP sheathing.
When taping these seams, the tape needed to overlap in the same way as shingles would, with the tape higher on the wall overlapping the lower tape. To accomplish this, we worked our way up the wall until we got to the topmost seams, rolling the tape as we went.
Step 5: Standing The Walls Of Tiny House

We repeated the entire sheathing process on the other wall we had framed and then we could get the walls stood up.
Before standing the walls, we attached some temporary bracing, so we could lock the walls in place once they were upright.
Standing the wall was easy enough with the three of us, and you can see that those hinge nails we added earlier kept the wall from sliding off the edge of the floor when lifting.
Once the wall was upright, Erik added a screw to tack it in place and then added another block to the floor, where we could attach the cross bracing on that end. We got the wall plumb before attaching the bracing and, once the wall was braced plumb, we attached the bottom plate to the floor with more nails, making sure the nails went into the rim joist below.
We also nailed the sheathing to the rim joist, which again helped to tie the walls to the floor.
Step 6: Window Opening When Framing Walls

Once those walls were stood up, we finally got to a wall with a window opening.
In case you’ve never framed a window opening, they can be framed in a few fairly simple ways, but they can be a little confusing the first few times you do it. The thing that helped me wrap my head around the process was thinking about which parts were supported by the other pieces of the framing.
For instance, the cripples need to support the window sill, so you’ll need a cripple at each end of the sill, as well as cripples wherever there would have been studs if there wasn’t a window opening there. These cripples are not only for support, but also act as a nailing surface for the interior wall covering, which again will be plywood in my case.
The other main component of a door or window opening is the header, which is supported by the jack studs. Because of this, you need the header to be three inches wider than the rough opening so it can be supported by the jacks.

Speaking of the header, Erik recommended using this “box header”, so we could add insulation inside the header later. I’d never seen this type of header in use but building it this way will allow me to sandwich about 2 ½” of foam insulation in the header, where there typically would be none.
Once the wall was framed, we partially sheathed it and got it stood up, then we could attach that end wall to the two side walls to tie everything together.
We came back and added the rest of the sheathing and got the seams taped, and then we attempted to cut out the excess sheathing from the window opening but had to put that on hold since the reciprocating saw blade we had wasn’t quite long enough.
We repeated the process at the other end of the building and I also worked on laying out the big center wall, which has a whopping five window openings. I of course screwed this up at some point along the way, so we had to flip the plates and lay out everything out again, but thankfully Erik knew what he was doing and we got it right the second time.
We started to get this big wall framed but, thankfully, we ran out of time and didn’t get it stood up, as it just so happened a tropical storm moved through Asheville the following day and that 24 foot long wall probably would have blown over if it wasn’t really solidly braced.
After getting things cleaned up, we finished framing the wall, which was really just more of the same except for the bit of added framing where one of the interior walls would meet up with this exterior wall.
Step 7: Cut Window Openings
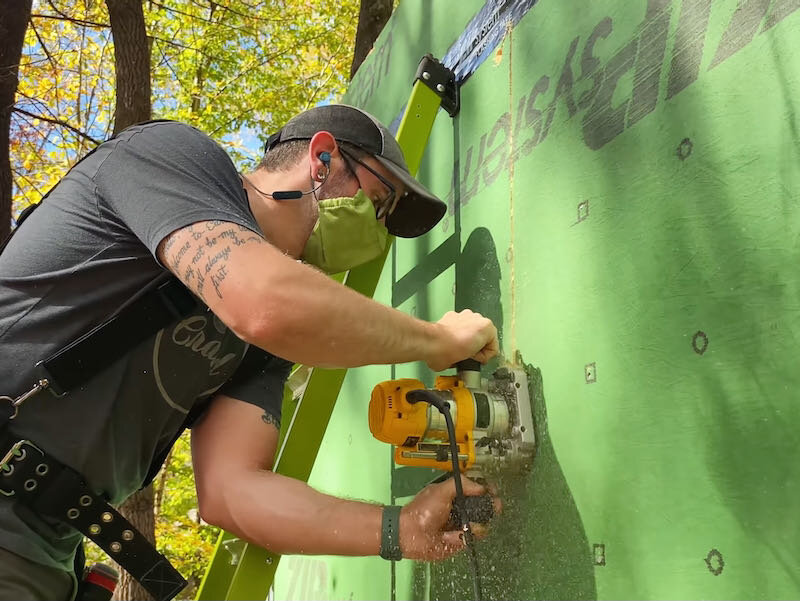
We got the wall squared up and sheathed, and we also wised up and went ahead and cut out the window openings while the wall was on the ground, since that’s a lot easier than trying to do it on a ladder.
To cut the opening, we used a router with a flush trim bit and this made quick work of the process and left us with a really clean cut. The only downside is this foam insulation dust is super itchy and I had some pretty itchy forearms for the rest of the day.
Anyway, once the wall was framed and sheathed it was time for the big moment, standing up this 24 foot long wall section, and I pulled out the drone to try and capture just how big this wall was.
Thankfully, with all four of us, it was actually pretty easy to stand up and, once it was upright, we made sure to add plenty of cross bracing since this wall was unsupported until the walls that divide the building into its separate rooms were framed.
After standing this wall, I went ahead and got the other window opening routed out, which again was much more difficult now that the wall was upright.
The last exterior wall to frame was the front wall on the center section and this is where the huge 16 foot wide sliding door will be located. Rather than try to build this wall as one long section, we framed it in two halves, since the majority of the bottom plate would be cut away anyway.
Step 8: Triple Layered LVL’s For Large Header

For this giant opening, we used triple layered LVLs as the header, which I’ll show in a bit, but we also used triple layered jack studs at each end of this door opening to provide ample support for the header.
We repeated the process at the other end of the wall, which also has an opening for an entry door, which will be the main entry point for the house since the large sliding doors lock from the inside.
Framing a door opening is the same as a window opening, except you don’t have a sill and cripples below the sill, so it’s even simpler.

We also went ahead and partially sheathed this wall, and we had to notch this sheathing around those proud joists so it could lap onto the rim joist blocking.
We got the wall section stood up and fastened in place and then it was time to assemble that enormous header.
Again, we used three layers of these 9 ½” wide by 1 ¾” thick LVL beams for the header here, which was overkill but should definitely keep the header from deflecting and sagging over time.
We assembled the header in place, rather than trying to lift it into place pre-assembled, and this made things a lot easier. We also added a back stop on the front of the wall to keep the LVLs from falling off the front of the wall while assembling it.
To assemble the header, we nailed the layers together using 3” ring shank nails and added a row of nails roughly every 12 inches.
After assembling the header, we added pieces of blocking to the top of the header, which basically act as cripples where the rafters will land above this header, and then we added the top plate across the header to finish up the framing.

That wrapped up the exterior wall framing, and the following day most of the Perkins crew were on hand to get the roof framed, but first we needed to finish getting the interior partition walls framed so we could get the double top plates added.
Jamie and I worked on getting one of those walls framed and we started by getting the layout marked on both plates. This wall needed some additional framing where it intersected with the exterior wall, as well as where it would meet up with another perpendicular interior wall.
Step 9: Framing Interior Walls
Before actually framing the wall, we got the ever present leaves moved out of the way so we’d end up with a flat wall, and then we got to framing, starting with assembling one of the L-shaped sections where the two interior walls would intersect.
After framing that half of the wall, we worked on framing the door opening, and we added a piece of sheathing between the jack studs on both sides of the opening so that the door would centered in this hallway section.
We also ripped down a 2x6 to use as the header here rather than using a 2x4, and this was to keep from having to add tiny cripples above the header.
With that, the wall was framed so we got it stood up and attached to the adjoining walls, making sure all of the walls were plumb while we were at it. The front wall was simple since it was already braced by the other walls, but the two walls at the back of the house needed a little tweaking to get them plumb.
Thankfully, we had about a dozen sets of hands on site that day, so this was pretty easy and, once we got everything locked together nice and plumb, we could come back and get all of the double top plates added.

In case you’re not familiar, these double top plates span across two adjoining wall sections and help to attach them more securely. Double top plates also help carry the load of a rafter when it lands between studs, and we technically didn’t even need them here since all of our rafters line up with a stud or header.
Anyway, we repeated the process on the other interior partition wall and then we could move on to roof framing, which I’ll cover in next week’s video.