
ROOF VENTILATION & INSULATION BAFFLES // Not So Tiny House Build Part 9
Learn how to add soffit vents with exposed rafter tails, and why roof ventilation is so important, in part 9 of the (Not So Tiny) House Build series!

In this post I’m going to talk about the process of getting that exposed rafter tail and soffit area looking better, plus some prep work for insulation.
First, though, we needed to tie up a few loose ends from earlier in the build process. As you might remember from the roof framing video, we weren’t exactly sure what the final design of this center section on the back of the house was going to look like.
I considered a bunch of options here, including adding on some rafter extensions to further bump out that roof area a bit, but after chatting with our architect, Rick Kazebee, we felt like the solution that would look the most intentional would be to just add an additional layer of fascia, as it would keep the same basic roof line.
With the overhang dealt with, we could move on to getting the soffit area prepped for paint, which we wanted to get done prior to roofing since it’d be a lot easier to paint the fascia without the drip edge installed.
Step 1: Make Template And Drill Holes

The first and most important task on the to-do list for this area was adding soffit ventilation, so that fresh air can make its way from the soffit up to the ridge vent, which will help keep the space below the roof deck better acclimated to changing weather.
Properly venting a roof has a bunch of benefits, including preventing excess moisture from building up, which can lead to condensation and mold growth on the underside of the roof sheathing.
This ventilation also helps prevent the formation of ice dams, which are created when warm air inside the house melts the snow towards the top of the roof, which then refreezes when it gets to the bottom of the roof line, trapping water against the roof. Ice dams can cause premature shingle failure if not dealt with properly.

In case you’re not familiar with this whole concept, this type of roof ventilation is usually required by code. Typically, there would be ventilation built right into the soffit at the bottom edge of the roof line, but because we have this exposed rafter tail detail, adding soffit ventilation here was a little tricky. Thankfully, our architect Rick came up with the idea of using these round aluminum soffit vents, which both look cool but also add the needed ventilation.
Since I obviously wanted these holes to look consistent from bay to bay, I went ahead and whipped up a quick drilling template, so my hole spacing would be easily repeatable.
There was a little bit of variation between the rafter spacing, so I made the jig slightly undersized width-wise and it was simple to visually center the jig once I was up on the walk board.
I first pre-drilled the pilot holes using my template for reference, and then I pulled out this beast of a joist drill equipped with a 4” hole saw to drill the holes.

I certainly could have used a standard drill here, but this joist drill was not only way more powerful so it drilled the holes more quickly, but it also had a built-in clutch to keep the drill from breaking my wrists if the hole saw got bound up in the hole.
Also, this particular hole saw arbor, made by Spyder, features this awesome functionality for ejecting the plug after drilling the hole and this was a huge efficiency boost here. This isn’t sponsored or anything, I just love this particular hole saw and I’ll link to it in the video description below.
Step 2: Finish Prep Before Paint

Once the holes were drilled, I went ahead and did a little finish prep work, giving the surfaces a quick sanding to clean up any rough edges, and then I caulked the seams.
This caulk made the whole assembly look a lot more finished, but it wasn’t only for aesthetic purposes. The caulk also served to help air seal these areas and, because of this, I definitely aired on the heavier side when applying the caulk and used a high quality exterior rated elastomeric sealant.

In addition to caulking the seams, we also went ahead and filled all of the screw holes since this fascia board will be visible in the finished house. To fill the holes, we used this two-part epoxy putty from TotalBoat called FixWood, which is a waterproof, marine-grade putty and it was great for this application.
To use the putty, we mixed up a small amount, just enough so we could use it all within five minutes, which kept it from starting to cure before we got it applied. We pressed the putty into all of the screw holes, along with any other problem areas like large knots, and we overfilled the holes slightly so we could sand the areas flush later. The putty needed to cure for about six hours before sanding.
We just continued to work our way around the house, drilling holes, sanding, caulking, and filling any imperfections with the putty. Thankfully, my buddy Eddie Aaronson was on hand to help with this process and we got in a good rhythm, with me drilling the holes and then running inside to install the insulation baffles, while Eddie followed behind me with the rest of the finish prep work.

As you can imagine, this was a pretty slow and tedious process and I can tell you that my shoulders were pretty much toast by the end of this first day after holding that joist drill all day.
The process for drilling the holes was the same on the left and right ends of the back side of the house but obviously, with no roof overhang in that center bump out, things were a little different in that area.
Rather than just being drilled into the blocking, the ventilation holes also needed to be drilled through the fascia in this area and, because of that, I downsized to 3” vents here.
This also meant that I was drilling through three layers of 2x material here, with the two layers of fascia and the layer of blocking, so this was a ton of work.
I also needed to create a new jig for this area and ended up having it reference off of the top edge of the roof, and this ended up working well. I put the top edge of the vent right at where the bottom of the 2 ½” drip edge we’ll be using would land.
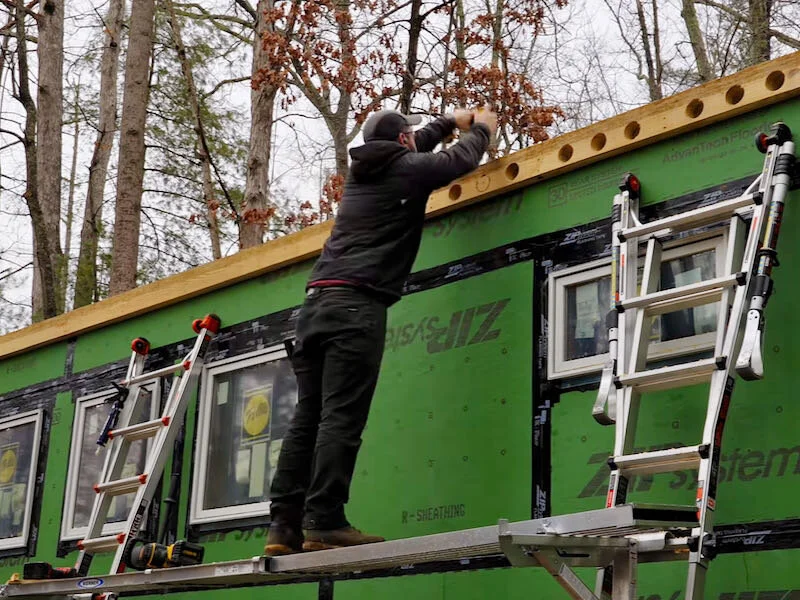
I also want to mention how essential this walk board setup was for this whole process and it made our work a lot more efficient and, more importantly, safe. The ladders we were using were both equipped with leg levelers, which made setting everything up on this uneven ground much easier.
Anyway, I continued on drilling the rest of the holes in this section, and, after about a day and a half of work, we finally got all of the holes drilled.
Step 3: Painting Soffit Area

Once we got the additional layer of plywood added on the underside of the gable end overhangs, the outside surfaces were prepped and ready for paint.
That said, since I was going to be spraying the paint, I needed a method of keeping the overspray from getting all over everything inside the house. After thinking about it, I realized the insulation baffles, which we needed to install between all of the rafters anyway, would be the perfect solution.
Since most of this house will have cathedral ceilings, these baffles will help create a pathway for air to travel from the soffit vents to the ridge vent, and this area would otherwise be blocked by the insulation which will be installed between the rafters.

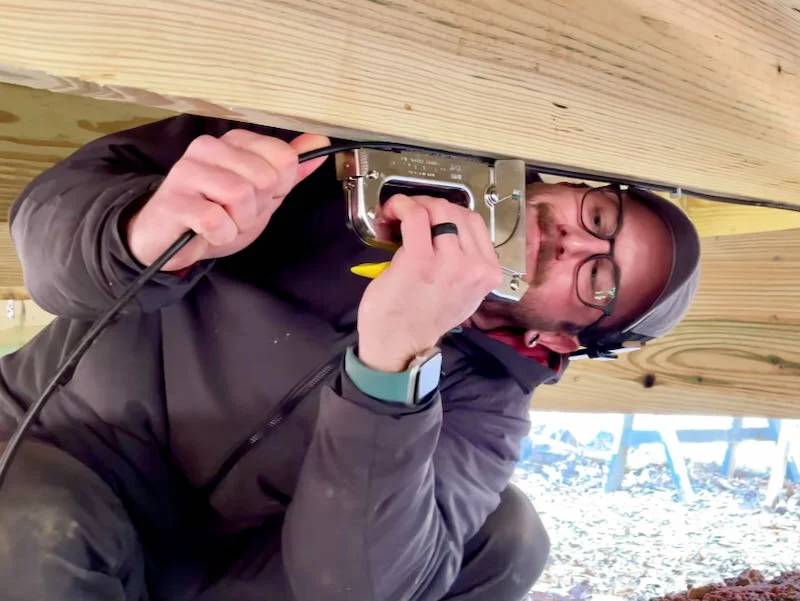
These baffles were pretty easy to install and just needed to be stapled in place. That said, this was still a whole heck of a lot of stapling and, rather than hand driving the hundreds of staples needed here, I pulled out my Arrow T50AC electric stapler which was perfect for this task.
I used ⅜” staples and just made sure the baffles were pushed all the way down to the top plate, to provide as much airflow as possible here. These particular baffles had this accordion section that allowed them to flex around this transition, which made installation a little easier.
I added the baffles throughout the rest of the house and, just a note, I only added the first row of baffles here to prevent overspray, but I did need to add a second row of baffles to get the air all the way to the roof, which I’ll show a little later.
Anyway, once that was done, it was on to one of my least favorite jobs, painting. Thankfully, I was pretty well equipped for the job and used an HVLP sprayer, which was great for getting into the tight inside corners of that soffit area.

Since I was painting bare wood here, I first applied a coat of TotalBoat TopSide Primer, a marine grade primer designed for undercoating enamel paints.
As you can see, this primer sprayed really well with no thinning and covered the bare wood in one coat, which is no easy task on Southern Yellow Pine.
I followed up with two coats of TotalBoat Elixir, which is a water-based enamel paint. I used this paint on my shed project over the summer and it’s held up extremely well, so I figured I’d go with it again on this project.
Thankfully, I got this soffit area painted just in time, as we had a decent amount of snow a few days later. We’ve been getting a ton of snow and rain over the last few weeks and it’s been good to know this area was sealed up prior to getting the shingles on.

Anyway, with the paint on, we were ready for roofing whenever the weather cleared up and, while we waited, we continued getting the house prepped for insulation, starting by getting the rest of those insulation baffles installed.
Also, I’m sure some of you will ask why I didn’t just go with spray foam in this roof so I could skip all of this venting, and it was mostly because I didn’t want to deal with the mess and expense of spray foam inside the house.
Instead, I’ll be using Rockwool in the roof and exterior walls along with Rockwool’s Safe ’n’ Sound in the interior partition walls to keep the noise transfer between rooms to a minimum, which I think is really important in a house this small.
That said, I will be using closed cell foam on the underside of the house, since the foam will be able to both insulate the floor system as well as air seal and vapor seal the underside of the house. Just to give you an idea, the closed cell foam will cost about double what the same amount of Rockwool would have cost there.
Step 4: Run Ethernet Cable

Anyway, another thing to check off the to-do list and something I didn’t get to during the electrical rough-in process was running an ethernet cable from our main house to this tiny house. I had considered just trying to extend our wifi network out here but I figured that, since I already had the trench dug, I might as well run a cable as another option.
I used Cat5e shielded Ethernet cable, which is rated for outdoor exposure, and I ran the cable through the trench, making sure to space it as far from the electrical wiring as possible to avoid any interference.

From there, I just drilled a hole through the bottom plate on the back wall and ran the cable up from underneath the house. I ran the Ethernet cable into an outlet box and I’ll add an Ethernet jack plate later on in the build process for connecting the router in this house to our main house’s network.
I also stapled the Ethernet cable in place between the studs and along the bottom of the floor joists with my Arrow T59 staple gun, and these staples are specifically designed for this type of low voltage wire.
With that, the house was ready for roofing, which I’ll cover in next week’s video, and we’re one step closer to being ready for insulation, so I think that’s where I’m going to call it for this week’s video.