
3 BIG Miter Saw Station Upgrades! Stop Block, Dust Collection & Zero Clearance
Learn how to add a t-track stop block to your miter saw station, plus covers for your dust collection hood and a zero clearance insert plate! These upgrades to my miter saw station have been a long time coming!
Note: All links below are Amazon affiliate links
📦 Materials Used On The Miter Saw Station Upgrades:
🛠 Tools Used On The Miter Saw Station Upgrades:
¾” Bit (for routing t-track grooves)
Magnetic Screw Holder (for my impact driver)

Process For Upgrading Your Miter Saw:
My miter saw station build was one of the earliest woodworking projects on this channel and was by far the largest project I had untaken at that point. This miter saw station is based on Jay Bates’ popular design and it has served me well over the last four years.
That said, I never really got it set back up properly after I moved into my new shop about a year ago, and, after receiving this beast of a new miter saw from JET a few weeks ago, I decided it was finally time to give the miter saw station a few upgrades.
These upgrades included adding a t-track stop block system for making more accurate, repeatable cuts, adding removable panels to the saw opening to improve dust collection, and finally making a zero clearance insert plate for the new JET miter saw.
Step 1: Routing In T-Track To The Miter Saw Fence Work Surface

I got started by working on getting some t-track added to the work surface, and this was a fairly straightforward process of routing a few grooves to house the t-track pieces. I used an edge guide to ensure I had a nice, straight groove, and I did have to remove the maple trim on this left side before routing.
I snuck up on the depth and got to my final depth after two passes and ended up with a really nice, snug fit with the t-track just below the surface of the plywood.

I repeated the same process on the right half of the miter saw station, although I don’t really see myself using a stop block on this side very frequently, and then I could route another groove for the peel-and-stick measuring tape.
This tape, which I got from Rockler, is actually made of metal and is just thick enough to catch on boards as I slide them across the work surface, and I figured housing the tape in a shallow groove would also help the numbers keep from being worn off over time.

I initially routed the groove for the tape measure right next to the groove for the t-track, but I realized this wasn’t going to work with the stop block design I was planning to use. Because of this, I needed to re-route the groove, this time routing it about an inch and a half from the t-track groove. That extra groove wasn’t a problem, as it was shallow enough where it wouldn’t cause any issues.
Once again, I repeated the process on the right half of the miter saw station and also cleaned up that maple trim, which had seen better days, while I was at it using my low angle jack plane.
When I went to install the t-track, I realized I had actually mistakenly ordered the wrong type of t-track from Rockler, where I get all of my t-track, and had received pieces with no holes pre-drilled. Because of this, I needed to drill holes for my mounting screws and also countersink the holes so the screw heads would sit flush with the surface of the t-track
Of course, I didn’t have a small enough countersink bit on hand, so I just went ahead and got the t-track mounted in the grooves temporarily before coming back to countersink them later.

Since there wasn’t a ton of plywood left for the screws to thread into after routing the grooves for the t-track, I decided to add a little more strength to the connection by adding some CA glue before screwing down the t-track and this made for a rock solid bond.
By the way, in case you’ve never worked with it before, t-track, which is generally made of aluminum, cuts easily with standard woodworking tools, and I used my miter saw to cut the t-track pieces to length.

I added the rest of the pieces to the left and right sides of the miter saw station, and then I could get to work on some custom stop blocks.
Step 2: Building A Custom Stop Block For The Miter Saw

I decided to go ahead and make two stop blocks while I was at it just to have a backup and I made them from some scrap pieces ¾” Baltic Birch plywood. The sizing of these stop blocks is really up to you, but my stop blocks ended up roughly three inches wide by ten inches long.
I needed a runner to keep the stop block square to the t-track, so I cut a few runners from the offcut from the stop block pieces. I snuck up on the width of the piece until I had a nice, snug fit.
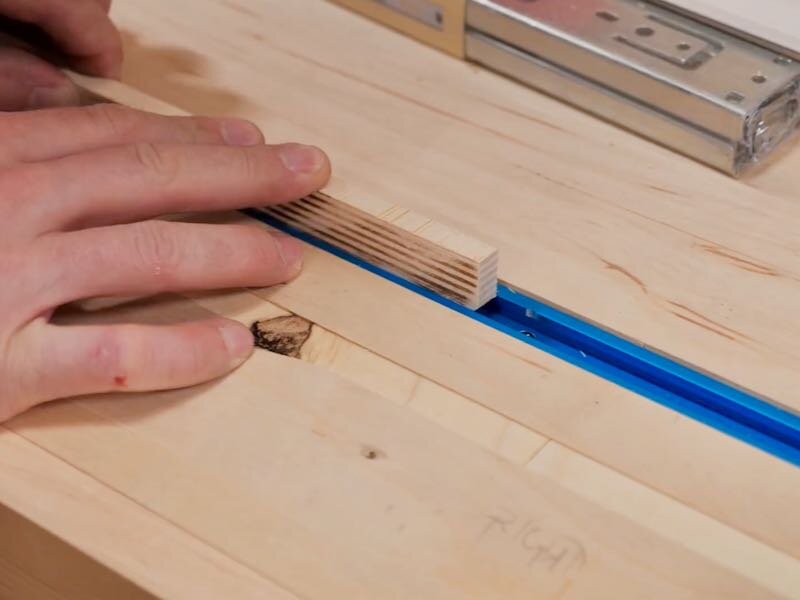
Next, I cut a groove on the underside of the stop blocks to house the runners, and I again snuck up on this fit, as I wanted it pretty snug. I also flipped the pieces around 180 degrees on each pass, to keep the groove perfectly centered on the bottom of the stop blocks.
Once I had the groove cut, I could give the stop blocks a thorough sanding to knock off any sharp edges, and I also beveled the bottom edge on the front face of the stop block, to help keep bits of sawdust from throwing off the measurements of the stop block.
After sanding, I glued the runners in place, and I used a pretty minimal amount of glue to avoid a ton of squeeze out.

Once the glue dried, I needed to layout locations for the t-slot bolts, which is how the stop blocks will lock onto the t-track. I center punched these hole locations and then drilled the holes at the drill press, confirming the fit was good after drilling the holes.
Next, I needed to notch out the runner where it intersected with the t-slot bolt, so the bolt could tighten onto the t-track. I marked out the area and then used a chisel to remove the excess material. Chiseling plywood is so satisfying, as it usually comes off in almost perfect layers, and I was left with a super clean notch.
With that, I could test the stop block on the t-track and it worked perfectly, really smooth to slide back and forth and it locked into place extremely securely.
Step 3: Permanently Adding The Tape Measure

Now that I had a working stop block, I could get the peel-and-stick tape measure located and added permanently. I lined up the tape measure with where I wanted to mount the acrylic hairline indicator I’d be using to read the measurements and then it was as simple as peeling off the backing and sticking the tape measure in place.
As I mentioned, this tape measure is made of steel, so it took some force to cut, which I consider a good thing as it should be extremely durable over time. After cutting the tape measure flush with the work surface, I filed down the sharp edge and then I could get the indicator mounted to the stop block.

To do this, I used something with a known length, a 36” long straight edge in my case, then butted the stop block up to the straight edge, locked it down, and then stuck the indicator in place so it lined up with the 36” measurement on the tape measure.
After attaching the indicator, I could make a test cut to confirm the stop block’s accuracy and it was dead on.

Now, I of course decided to change the blade on the miter saw after I dialed in the stop block, which of course threw off the measurement, and so I ended up drilling out a slot in the indicator so that I can make fine adjustments like these in the future if needed.
Step 4: Implementing Panels For Dust Collection

With that, the t-track stop block system was working great, so next I could work on the panels for the front of the opening, which will help to focus the dust collection airflow around the blade. I made these out of some scrap ¼” plywood and made the right panel off camera to work out the process.
Basically, this is just a lot of trial and error trying to get a piece that will fit the opening nicely without leaving too much space around the saw, and I actually ended up attaching a few scrap pieces together to get the shape I was looking for.
After getting the fit for the upper section dialed in, I realized there was more space I could cover up, so I added another scrap piece to fill that in and then I could figure out how to mount these panels.

These panels need to be easily removable, as I didn’t cut the holes large enough to account for having the saw angled for miter cuts, and it seemed like magnets were the most logical mounting solution.
I drilled some small pilot holes to mark the magnet locations on both the miter saw station and the panels and then I came back with a ¾” Forstner bit to drill the recesses for the magnets.
I attached the magnets in the recesses using CA glue, using a little activator to lock them in place instantly, and then I could drill out the corresponding holes on the back side of the panels at the drill press.

I really wanted a good seal between the panels and the miter saw station so I knew wanted the magnets to be flush, and the ¼” plywood I used for the panels was just deep enough to house these magnets.
Once again, I attached the magnets using CA glue, and I also made sure the magnets were in the correct orientation so they would actually stick to the magnets on the miter saw station.
After getting all of the magnets added, I realized the left panel wasn’t holding very well as it ended up being pretty large, so I added a few more magnets and this solved the problem. These are fairly cheap magnets and they don’t have a ton of holding power, but I already had them on hand, so I figured I’d use them up.
With that, the panels were done and I could test how well they worked, and I was pretty impressed with how much of an improvement they made to the dust collection. The magnets make the panels easy to remove and reinstall and I think this is a must for anyone with a similar style of miter saw hood.
Step 5: Zero Clearance Insert For The Miter Saw

The last thing I wanted to do to really get this miter saw station, and specifically this new JET miter saw, dialed in was to make a zero clearance insert for the miter saw. These inserts drastically reduce the tear out on the back side of the cuts and they’re super simple to make.
First, I removed the existing inserts, which are extremely wide to accommodate the full range of bevel angles the saw is capable of cutting. Next, using a set of calipers, I measured the thickness of the insert plate, which was a hair under ¼” on this saw, and I also measured the length and width of the opening with a tape measure while I was at it.
Since the opening was just under ¼”, I could use a scrap piece of ¼” plywood for the insert, but first I needed to figure out which type of ¼” plywood would work, because of course they varied slightly in thickness.

The ¼” Purebond plywood I had on hand was just a bit too thin, but luckily the ¼” Baltic Birch I had was just a hair thicker than I needed and could easily be taken down to thickness at the drum sander later.
Before doing that, I cut the insert to rough width at the table saw, sneaking up on the fit, and then I could cut it to length with the miter saw. I did need to use a backer board here, to bridge that opening where the insert plate would be.

With the length and width looking good, next I needed to shave off the corners a bit to match the original inserts. I traced the outline of the corners of the original inserts onto the new insert and then sanded away these areas using my oscillating belt sander, which made quick work of this.
Once that was done, I could test fit the insert and it fit great, except it was, as I mentioned, a hair too thick. To remedy this, I used my trusty Powermatic drum sander to get the piece down to exact thickness, but honestly a random orbit sander probably would have worked here if you don’t have a drum sander.
I snuck up on the thickness, making multiple passes at the drum sander, until the insert was perfectly flush with the bed of the miter saw and then I could finish it up by drilling and countersinking some mounting holes.

Once again, I used the original inserts as templates and center punched the hole locations, then drilled the holes and countersunk them at the drill press.
Finally, I could get the new zero clearance insert installed on the miter saw using the original bolts, which required a little bit of finagling, but once I had the insert secured in place, I could make the initial cut with my fresh blade to establish the kerf.
Step 6: Overview

I’m really happy I knocked this little project out right after getting this new JET miter saw set up, as the zero clearance insert not only helps to drastically reduce tear out, but it also gives me an extremely accurate reference for where the blade is going to meet up with my workpiece, in case I’m not using the stop block.
While we’re here at the miter saw, let’s take a closer look at this new JET miter saw, as I’m sure some of you will ask about my thoughts on the saw. Also, full disclosure, JET and Powermatic are one of my long term sponsors and I received this saw free of charge, but these are my personal opinions on the saw so far.
Again, I just got the saw about a week ago, so it’s very new to me, but I’m pretty impressed so far. The saw was perfectly square right out of the box and the laser indicator also seems to be spot on.
The saw has a huge 14” crosscut capacity, which is going to come in super handy for cutting wider cabinet parts to size, but this does mean the saw is fairly long. This is fine for my setup, as I obviously have a lot of depth in this miter saw station, but it’s just something to be aware of.
The saw is surprisingly quiet and definitely feels more powerful than my Festool Kapex, which was what I was using previously in this shop.
Overall, I think the price point is right in line with other similar saws and I think it has some definite advantages over some other saws in this price bracket, depending on the features you’r e looking for.
Anyway, with that, I could get the miter saw station tidied up a little more and then I could call this project complete.