
How To Build A Reclaimed Oak Extension Dining Table
In this video, I built a Parsons-Style Extension Dining Table out of reclaimed Oak and steel. The base was constructed from readily-available steel tubing, and the top was made from reclaimed lumber and features an extension mechanism that will allow the top to expand 36 1/2” with the addition of two leaves, all without moving the base.
Check out the Parsons-Style Extension Dining Table Wood Whisperer Guild project! Check out Powermatic's full line of power tools here. Learn more about my Lincoln Electric PowerMIG 210 MP Welder here.
📦 Materials Used (affiliate):
Step 1: Prep and Milling

As I mentioned in the intro, I used reclaimed Oak on this build, and that came with its own challenges. First, I had to check the boards for any hidden nails or other metal debris and remove any of those bits and pieces before milling the boards. Next, I broke down the boards into smaller chunks at the miter saw before getting to milling.
These boards varied quite a bit in overall thickness, so the milling process was pretty involved, but I eventually got all of the boards nice and square using the jointer, planer, and table saw, ending up at a final thickness of about 1 ⅜”.
Step 2: Panels

I cut all of the boards to 37” long at the miter saw, which was about ½” longer than the final length to allow for final trimming later, and then could get the panels glued up.
I used Dominos for alignment, but biscuits or dowels would also work well here.
After the glue up, I could rip the boards to their final length of 38 inches, which left me with a narrow off cut from each of the panels. I used these offcuts on the edges of the leaf panels, which I worked on next, and this allowed the grain to flow perfectly from the main table top panels to the extension leaf panels.
After gluing up the leaf panels in one large panel, I could rip them in half to get the leaf panels to their final width of 18 ¼”.
Step 3: Steel Base

With all of the table top panels mostly finished, I could move onto the steel base. I used 2 ½” square tubing for the base and I broke down the parts for the base using my metal cutting saw and then beveled the ends of all of the pieces using a flap disc on my angle grinder.
Next, I could lay out the pieces to be welded together. First, I welded the short skirt piece to the legs, which formed the leg assemblies as I called them.
I then repeated the process for the other leg assembly and then ground down the inside faces of the leg assemblies so that the weld beads were flush with the surface of the legs. I then clamped down one of the leg assemblies and added one of the long skirts, making sure the piece was perfectly square, before tacking and welding the long skirt in place. I repeated for the other skirt and then welded the other leg assembly onto the other end of the base.
With that, the assembly of the base was done, so next I ground down all of my welds and applied a few coats of flat black spray paint. I also added some plastic caps to the bottoms of the feet, to keep them from scratching up the floor.
Step 4: Finalizing the Table Top
With the table base welded up, I could trim the panels to their final length of 36 ½”. For the leaf panels, this was a simple process using my crosscut sled, but I had to get a little fancy with the larger panels and temporarily attach a plywood strip to act as the reference edge. This edge ran along the table saw fence and allowed me to square up one end, before removing the plywood and squaring up the other end.
Once the panels were at final size, I decided to add some inset c-channel strips to the underside of the panels to help reduce any future cupping. I routed in a groove using a straight bit and an edge guide on my router, allowing room for the panels to expand and contract at either end of the strips.
I then drilled holes in the strips, making sure the outer holes were oversized, and then drilled and tapped holes in the underside of the panels to accept bolts to attach the strips. This ended up working perfectly and left me with extremely flat panels.
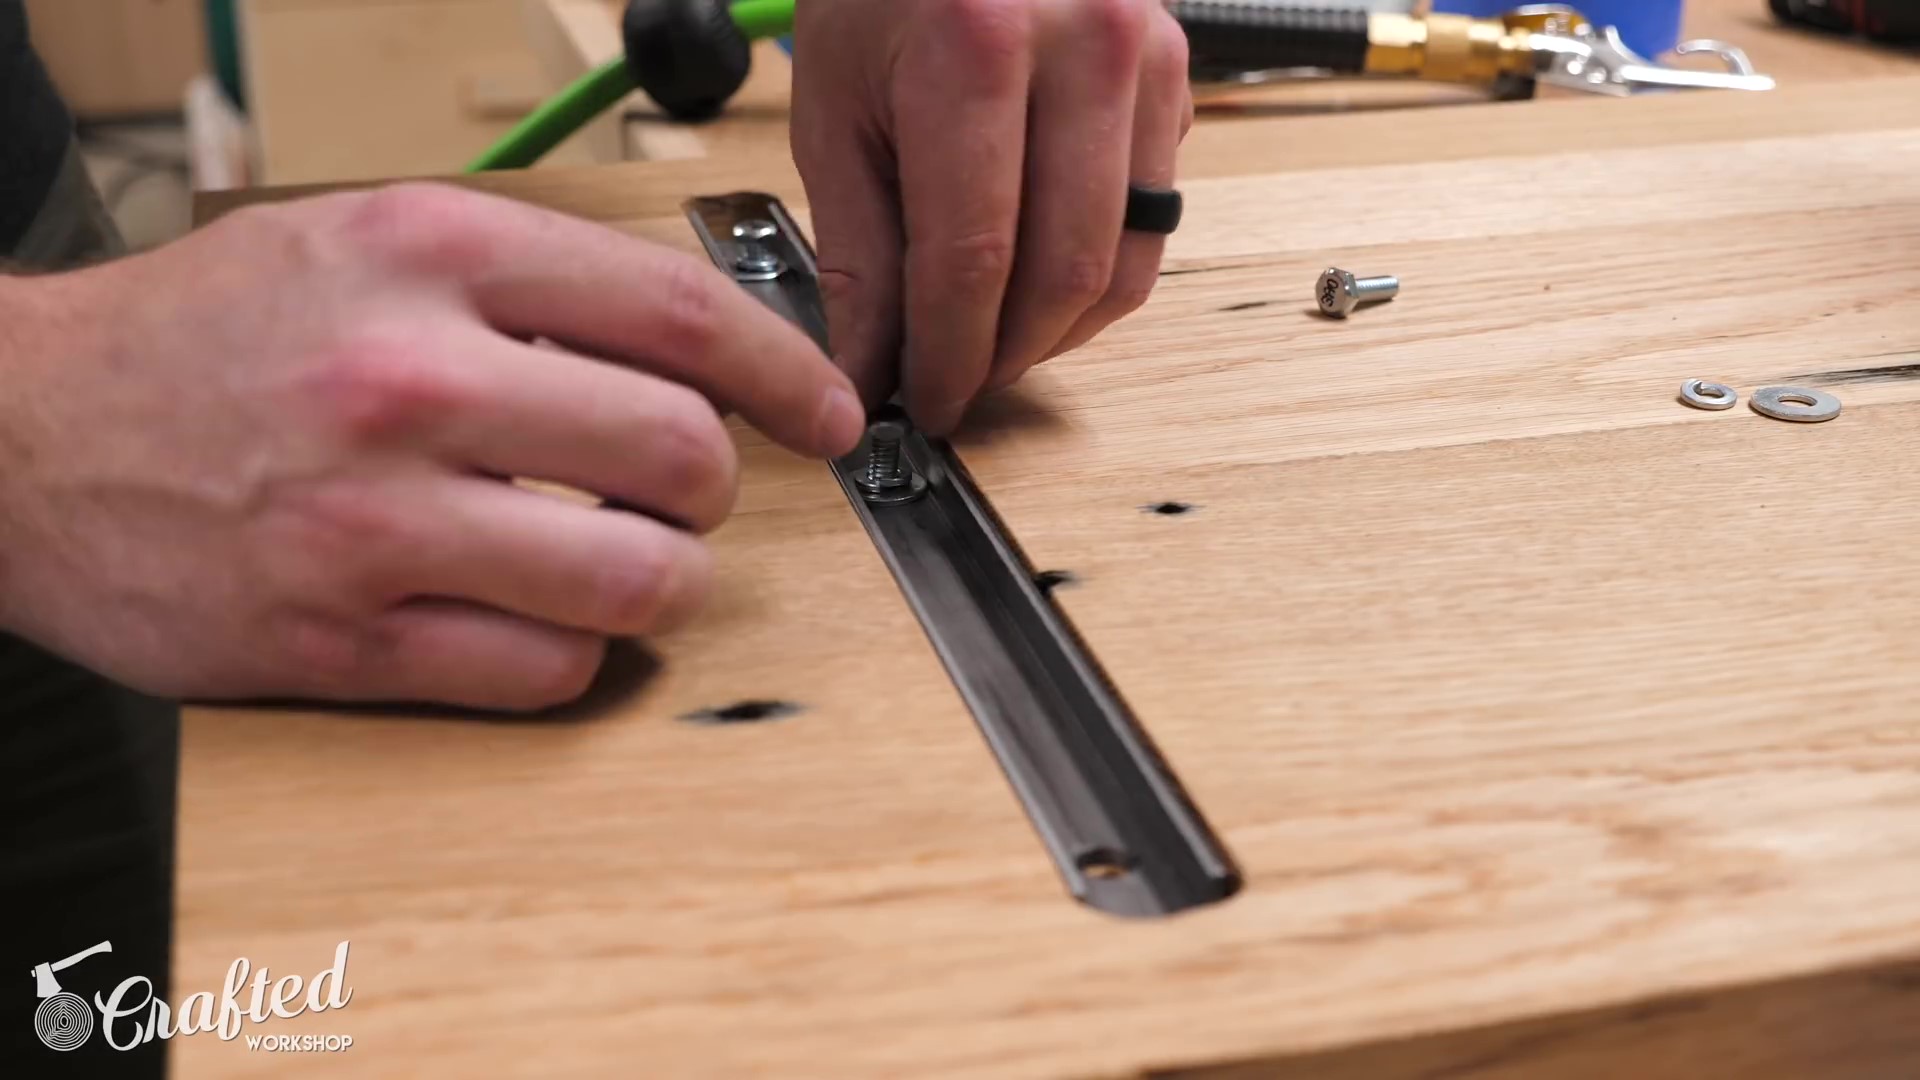
Step 5: Extension Slides

Next, I added some HDPE strips to the top of the skirts on the table base. These strips will support the table top panels as they slide along the base and will also help reduce friction. I drilled countersunk holes in the strips and then drilled and tapped holes in the table base with the awesome tapping bit to accept the 10-24 bolts I used.
While I add the strips, I just want to mention again that this build was part of a Wood Whisperer Guild course I made recently. The project included 12 video lessons, totaling over two and a half hours of content, and I’d definitely recommend checking it out if you really want to build this project for yourself. I go through every step from milling to welding to installing the hardware in a ton of detail and you can ask me any questions you have along the way. Check out the project here, in case you’re interested.
After installing the strips, I put a few strips of painter’s tape on the strips to protect them and then flipped the table base onto my welding cart. I used this as a flat reference surface to install the extension slides.
The slides install with a few bolts, and I used the same bit to drill and tap the holes. I used some of the HDPE as spacers to make sure the slides lined up evenly along the base, and this worked great.
Step 6: Panel Hardware

Back to work on the panels, I created a quick jig to help install the table pins and then drilled holes on the inside edges of all of the panels using the jig. These pins install using a 5/16” hole and keep the panels aligned when adding leaves.
To help close up any gaps between the panels, I added some table latches in between each panel. I made sure they all lined up from panel to panel as the leaves will need to be able to be added and removed without issue.
Finally, I could set the main panels in place, get them lined up with the edges of the base, and attach them to the extension slides using a few 1 ¼” screws. With the screws added, I could test out the slides and they worked great, super smooth and easy to add and remove leaves.
Step 7: Finishing

With the panels installed and working properly, I could move onto finish prep, which included removing all of the hardware and filling any knot holes, nail holes, or other defects with epoxy. I taped up the bottom of the panels with foil tape to keep the epoxy from leaking and then added epoxy. After it dried, I flattened the epoxy with a smoothing plane and a random orbit sander.
After sanding up to 120 grit, I added a chamfer to all of the edges of the panels, making sure that the chamfer flowed from the main panels to the leaf panels.
I could then label the panels and sand all of the surfaces up to 180 grit, including the chamfers. I also chamfered the corners of the table with a block plane, as it would have been tricky to get with the router.
Prior to finishing, I vacuumed up any leftover dust, taped off the alignment pins, and then sprayed on a few coats of polyurethane using my Fuji Q3 HVLP system. I sanded the panels between coats with 320 grit and sprayed on a total of three coats. After the finish dried, all that was left to do was put the table back together and it was done!