
How To Build A Live Edge Epoxy Resin "Reverse River" Table
Learn how to build this live edge epoxy resin "reverse river" table! I made this table with a Walnut live edge slab cast in black metallic epoxy resin, with a Maple base!
Note: Below are affiliate links
🛠 Tools Used On The Epoxy Resin Table:
Magnetic Screw Holder (for my impact driver)
📦 Materials Used On The Epoxy Resin Table:

Process For Building Your Epoxy Hall Table:
Step 1: Flatten Slab On Jointer

Before casting this slab in epoxy, I needed to get it at least relatively flat. Since this slab was wider than my jointer bed, I could only flatten a portion of the slab, and I needed to remove the guard on the jointer in order to do this. If you’re going to try this technique, make sure you are extremely careful, as that spinning head will mess you up in an instant if you’re not paying attention.
After removing the guard, I could start getting one part of the slab flattened, which required multiple passes. This slab had a pretty good twist to it and I was able to remove most of it during this milling process without making the slab too thin.
As you can see here, jointing part of the face of a slab leaves you with a ridge between the flattened and unflattened areas. The flattened area was now my reference surface when I moved over to the planer.
To keep that unflattened area from interfering, I added a strip of MDF to the planer bed to raise the slab off of the bed of the planer, so that only that flattened area was contacting the MDF.
One thing I didn’t notice when I was actually doing the milling but that I’ve noticed now that I look back at this footage is that the slab was being lifted slightly by the high side, which was essentially following that twist. To help resist this, I needed to put pressure on the left side of the slab as it was going through the planer, which I obviously didn’t do.

Anyway, after flattening the opposite face of the slab, I could flip it over, with that newly flattened face towards the planer bed, and get rid of the ridge left by the jointer.
Now, if you don’t have a jointer or planer, you could just use a router sled here and get pretty much the same result.
Once the ridge was gone, I flipped the slab a few times to take an even amount of material off of each face, and then I could let the slab chill out in my shop for a bit before I cast it in epoxy.
Step 2: Preparing Slab For Epoxy Pour

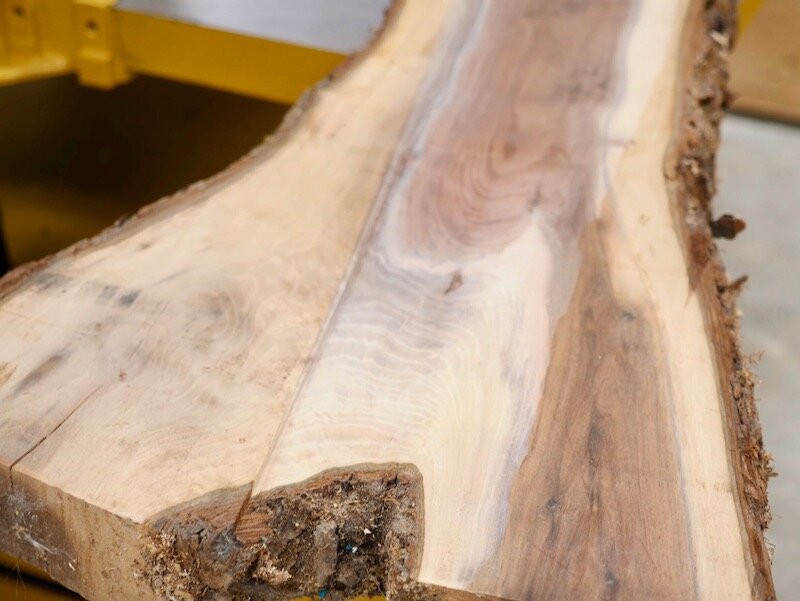
The next day, I needed to trim the slab to length, which I did with my track saw. I actually wanted this slab to run down the center of the table top diagonally, and this was because of the angle this crotch was cut at. I wanted to remove as little from this section as possible, because everyone knows crotch figure is the best, and that meant cutting the end of the slab at a slight angle.

After making the cut, I could mark out where I needed to make my cut at the other end of the slab. To make sure this cut was relatively parallel to the first cut, I set my 12” speed square against the cut edge and made sure my tape measure was in line with the square. I made a few marks, referencing different areas, and then I could cut the other end to length.
Before moving on, I decided to try a new tool that I just received in the mail, the Orion 950 moisture meter from Wagner Meters, who is the sponsor of this week’s video. I wanted to confirm that this slab was ready to use, as it was air dried and close to two inches thick.

Making sure the moisture content of the slab was at a good level was especially important on this project, as epoxy is a lot less forgiving when it comes to wood movement. Luckily, this slab had been sitting in my air conditioned shop for about six months and was good to go based on what the meter told me.
Step 3: Building the Casting Form To Hold Epoxy

Next, I could get the form built. I actually used the same form I had used previously on my river headboard, here is a link in case you missed it. Since this MDF was already taped up with Tyvec tape, all I had to do was cut it to size and assemble it, which made things a lot easier.
I used a combination of my table saw, track saw, and miter saw for this, and then I could get the form assembled.
Before assembling, I did need to add more Tyvek tape in a few spots where I had some screw holes from the previous project, so that the epoxy wouldn’t leak out of those holes. The TotalBoat deep cast epoxy I used on this project has an extremely low viscosity, so this form needed to be absolutely water tight to avoid leaks.
To assemble the form, I used 1 ¼” screws and made sure to pre-drill and countersink the holes, as MDF is extremely prone to splitting otherwise. I added screws roughly every eight inches along the underside of the form, and then added one screw in each corner to hold the sides together.

Next, I caulked all of the seams with 100% silicone caulk and used a fondant ball tool to get a really clean corner. This is a trick I picked up from my buddy Mike from Modustrial Maker and it works amazingly well. Once it sets up, the excess silicone just peels right off, and since the ball tool leaves a gap between the excess and the silicone in the seam, it leaves a perfectly clean caulk line.
Since the slab was cut at a diagonal, I needed to remove one corner on each end of the slab to get it to fit in the form. To do this, I first marked a line where the slab intersected with the form and then marked a square line on the face of the slab.
I trimmed off those areas with the track saw, and then I could get the slab secured in the form. To do this, I just used hot glue, which is plenty strong enough to hold the slab down during casting but is easily removed afterwards.
I added plenty of hot glue, pressed the slab into the form, and then sprayed out any sawdust with compressed air.
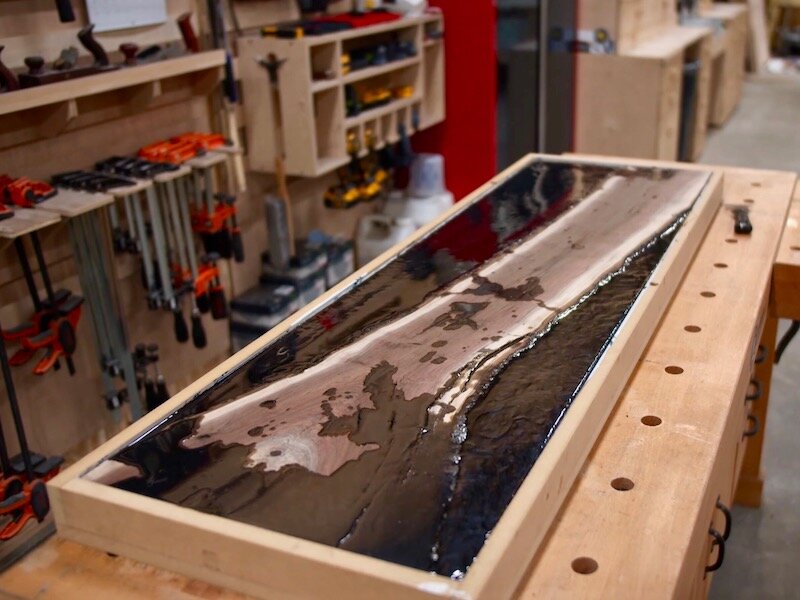
Step 4: Casting Walnut Slab In Epoxy

With that, the slab was ready for casting in epoxy, and again, for this project, I used a new-to-me epoxy, this ThickSet casting resin from TotalBoat. This epoxy cures much more slowly than their other resins, which means you can pour it much deeper. On a pour this large, TotalBoat recommends pouring to a maximum depth of 1” at a time, otherwise the epoxy will go exothermic and cure too quickly, resulting in cracking, bubbles, and cloudiness.

I mixed the epoxy in half gallon increments and added black metallic pigment in equal quantities to each batch. Since I had to do the pour in two layers, I wanted to make sure the layers were as identical as possible, so I weighed out the pigment to keep things nice and even.
Also, this Rockler silicone mat is my new favorite thing when mixing things like epoxy and pouring finishes. Since basically nothing sticks to silicone, it’s easy to clean up and saves my workbench from getting covered in epoxy.
TotalBoat recommends mixing the epoxy in 1 gallon or less increments, and I had these half gallon mixing containers on hand, so that’s what I went with. While mixing in these smaller quantities made things go slightly slower, it also allowed me to easily gauge how much epoxy I needed as I went, rather than trying to mix one huge batch in one shot.
On the first pour, I used a total of a gallon and a half, mixing three batches. Also, these slow mo epoxy pouring shots are so satisfying.
After pouring, I let the epoxy set up overnight and then could pour the rest of the epoxy, another two gallons in this case. Before pouring the second set of pours, I scuffed up the surface of the first pour with high grit sandpaper, so that the epoxy layers would adhere to each other better.
This second set of pours was just more of the same, and I was able to fill the form all the way up to the brim with the last pour. After that, I let the epoxy cure for 24 hours.
While the epoxy was curing, I went ahead and got to work on the table base, which I made out of the Hard Maple left over from the butcher block counters I built a few weeks back.
Step 5: Constructing Wooden Table Base

I kept the design of the base super simple, to allow the top to really be the main focal point. The legs are these rectangular assemblies that are connected with these two long stretchers. The stretchers are about half an inch taller than the legs, which lifts the table top off of the legs and gives the top a floating look.
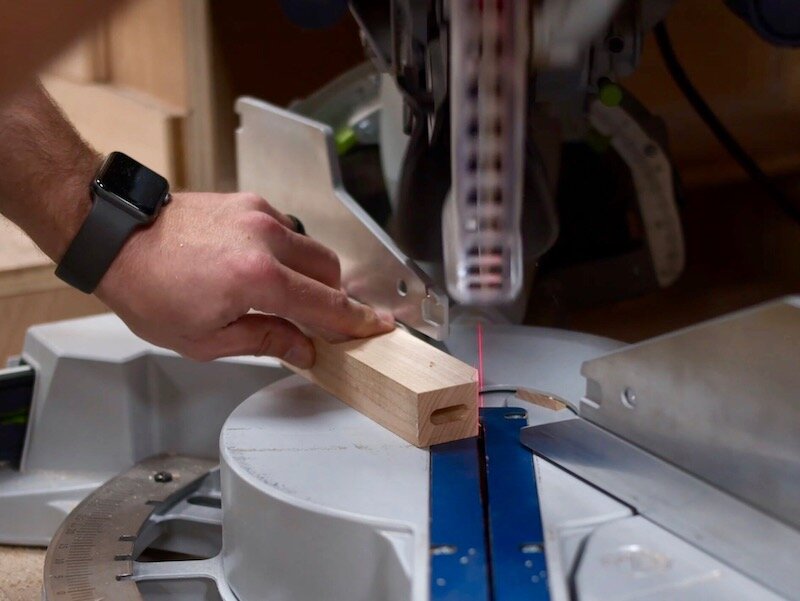
I cut the parts to rough size at the miter saw and table saw, and then squared up the pieces at the jointer and planer.
Finally, I cut the pieces to final length at the miter saw, and then I could get to cutting the joinery.

I decided to go the easy route on this project and use my Domino, which I actually haven’t used in quite some time. Actually, after thinking about it, I realized this was the first piece of actual furniture I’ve built in the new shop, which is pretty cool. And, as always, if you don’t have a Domino, there are tons of ways to assemble a base like this, including pocket holes or dowel joinery. I think I need to get a shirt made with that line on it to wear when I’m using the Domino.
Anyway, I set up my Domino with the 8mm cutter and then marked out the mortise locations on the pieces, also marking the front face of each piece.
To give the Domino better support on these small pieces, I used the Trim Stop attachment, which makes things a lot more stable. This is especially true on the longer parts of the legs, since I had to have the Domino oriented vertically.
I added two Dominos at each joint, both for strength and alignment. To do this, I cut all of the mortises with the original height setting and checked the fit, and then I lowered the height setting and went back around to cut the second mortise at each joint.
The rule of thumb here is to have a thickness at least equal to the Domino you’re using on either side of the mortises, which you can see I have here.

I cut the rest of the mortises and then I could move on to gluing up the leg assemblies.
This went smoothly, although I mixed up two of the pieces during assembly, which resulted in a little bit of misalignment. I was able to sand that away at the drum sander after the glue dried, so that wasn’t a big deal.

Next, I could cut the mortises that connected the long stretchers and the leg assemblies. I used a single 10mm Domino in each joint here, which was plenty strong for this kind of light use hall table.
I also made sure to factor in that ½” overhang on the stretchers, so that I would be able to maintain that overhang on the stretchers.
To cut the mortises on the leg assemblies, I had to use the Domino in its vertical orientation again, but I just made sure to line it up with my layout lines and the mortises ended up in the right spots.
Before assembling the base, I needed to finish up a few things, first of which was drilling the recessed through holes for the bolts I would use to attach the base to the top. I marked out the hole locations and drilled them at the drill press. I used a Forstner bit to drill a recessed hole and then an oversized bit to drill the through hole, to allow room for wood movement.
Next, I needed to cut the corners off of the raised ends of the long stretchers, so they’d blend in nicely with the leg assemblies. I’ve done this in the past with a Forstner bit to give the cutaway a concave curve, but since the top will extend past the edges of the base, you never really see this detail in the final piece, so I just kept it simple and cut the corners at a 60 degree angle at the miter saw.
With that, I could move on to finish prep, first sanding all of the parts up to 120 grit.
Step 6: Sanding And Finish Prep

I wanted to add a chamfer to the edges of the base, and I decided to try this new chamfer bit from Infinity Tools. Instead of a bearing, it has a brass tip that allows the bit to follow tighter contours, especially inside corners. This means you end up with a much more consistent chamfer, reducing the need for extra hand tool work.
I also made sure to mark out where to stop and start the chamfers where the stretchers joined the leg assemblies, as otherwise I would have been left with gaps there.
Step 7: Assembling Wooden Hall Table Base

Once I had chamfered all of the pieces, I could move on to assembling the base, which went smoothly. I added glue and Dominos and then clamped the pieces together, which required me to pull out my longest clamps. I checked everything for square and then left the base to dry overnight.
Before applying finish, I sanded the base up to 180 grit, breaking all of the edges and smoothing out the chamfers. I also chamfered the corners of the leg assemblies with my block plane, since these would have been tricky on the router table.
Last, I blended the joint between the stretcher and leg assemblies with my sander so there was a nice, smooth transition between those pieces.
Step 8: Spraying Black Polyurethane Finish

For the finish, I went with the black poly I’ve been using so much lately, and I think it was really fitting on this project. Again, I really wanted the top to be the focal point here, so having the base kind of blend in with the top worked out nicely. Also, by spraying the base black, it gives the wood a more neutral look, and it could just as easily be steel.
I sprayed on three coats in total, and then I could get back to working on the top.
Step 9: Cleaning Up Epoxy Resin And Walnut Slab Casting
So this is how the top looked after the epoxy cured, and you might notice that the epoxy looks a little weird. That’s because the epoxy did seem to go slightly exothermic during the curing process, which meant it cured much faster than intended. If I had been going for a more clear epoxy look, this would have probably caused cloudiness, but it didn’t really matter in this case with the black epoxy. This did introduce some more bubbles into the final piece, which I had to deal with later on.
Removing the form was pretty simple. I first removed all of the screws and then knocked off the sides with a dead blow mallet. Next, I used a 5-in-1 tool to lift the epoxy from the form and, eventually, I was able to pull the table top off of the bottom of the form.

As you can see, the epoxy filled in the entire underside of the table top, which actually worked out as it gave the top a little extra thickness.
After removing the silicone, it was time for the moment of truth, sending the top through the planer to reveal the final look of the top.
Now, luckily I have a 20 inch planer but, if you don’t and want to make a table like this, you could either use a router sled to flatten your top or find a local cabinet shop who’d be willing to send your top through their wide belt sander, which is what I did for my river headboard. It’s surprisingly cheap and it will save you a ton of time sanding.
Anyway, my planer was big enough for this piece, so I just made multiple shallow passes until I had an even surface, and I really liked the way it was looking.
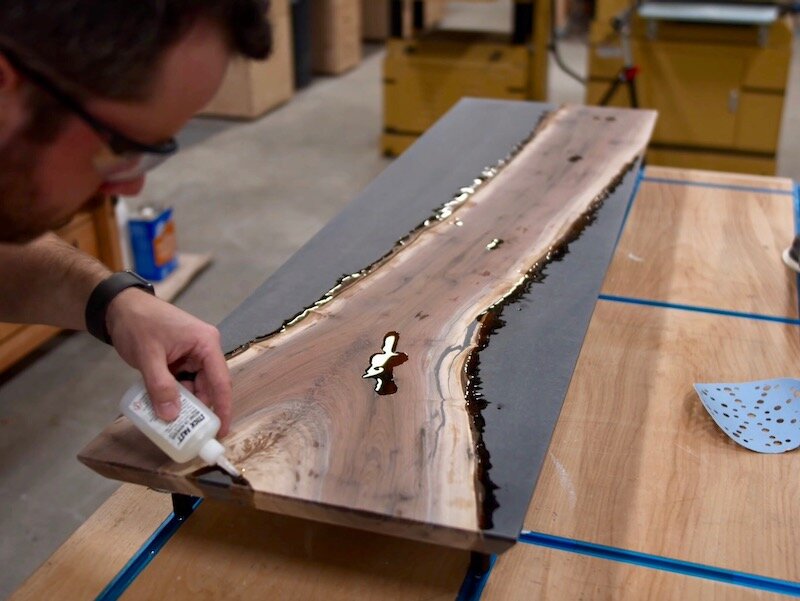
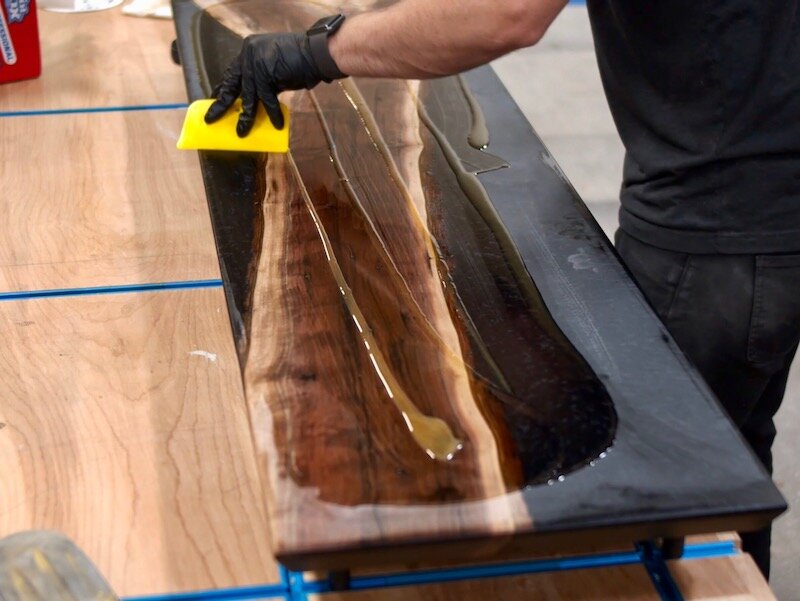
After planing, I ran it through the drum sander a bit but realized there were a few small sections that weren’t quite fully cured, so I needed to let the epoxy rest overnight again, but I couldn’t help but throw on some mineral spirits to see how the finished piece was going to look, which got me super excited.
Since I needed to wait for the casting epoxy to fully cure anyway, I went ahead and filled those little pin holes in the top with more epoxy, using TotalBoat’s High Performance epoxy this time, since it cures much faster. I just mixed it according to the instructions, added some more of the black metallic pigment, and then filled all of the pin holes and any other imperfections in the slab that were exposed after planing.
I let the epoxy cure overnight and the next day, I could get the slab cleaned up, as all of the epoxy had fully cured at that point.
To remove the bulk of the excess High Performance epoxy, I pulled out my low angle jack plane and planed diagonally across the table top. I really prefer planing excess epoxy to sanding it, since epoxy dust really gums up sandpaper and creates terrible fine dust. Also, hand planing keeps your guns looking good even when you haven’t made it to the gym in a few years.
Anyway, after planing, I passed the top through my drum sander to get all of the excess epoxy off, and then I could cut the slab to final size.
I used a combination of my track saw and table saw for this, first cutting one straight reference edge with the track saw. I’ve found that saws tend to leave a better surface finish than a planer or jointer with epoxy, so that’s why I used the track saw here rather than the jointer.
With one clean edge, I cut the table top to final width at the table saw, cleaning up the other edge.
Step 10: Beveling Edge Of Epoxy Casting Hall Table

I also wanted to add a bevel to the underside of the table top, which would accomplish a few things. First, it would give the top a lighter visual weight, which I think worked well with the table base.
Also, it would hide the layer line between the two pours more effectively. This layer line was barely noticeable, but the bevel made it essentially invisible in the finished piece.
I cut the bevel at a 30 degree angle and I think this ended up looking really nice. I also left about a ¼” wide flat area on each edge, which kept the edges from being too sharp in the final piece.
Next, I repeated the same process on the ends of the top, this time using my track saw. I snuck up on the bevel with the track saw, moving the track over in small increments until the bevels met perfectly.
With that, the table top was to its final size, so now it was time for the worst part of any epoxy project, sanding. Since epoxy is essentially plastic, it shows scratches extremely easily, so you need to sand it to a much higher grit than you would a typical wood project.
Step 11: Sanding Epoxy Casting

Luckily, the black epoxy required less of this, but it was still a lot of sanding.
I sanded the top up to 180 grit and then wiped it down with mineral spirits to check my progress and, unfortunately, those little pin holes were still visible, probably due to the amount of material I had removed during sanding.
I didn’t want to do another epoxy pour, as, one, it would have taken a long time, but I also don’t think would have solved the issue, so I instead turned to CA glue. I filled the pin holes with thin CA glue, which actually worked really well, and then wiped off the excess with a paper towel, which was evidently a bad idea.
The paper towel actually started to smoke and release some horrible fumes, so I ran it outside and spread it out on the ground. I think it was basically having an exothermic reaction, similar to the epoxy, since it was too concentrated in one area without enough airflow.
Anyway, after letting the CA glue dry, I continued sanding up to 320 grit, making sure the bevel and edges of the table top were nice and smooth as well.
I also chamfered the edges of the table with my block plane before finishing up sanding with 320 grit.
Step 12: Finishing Epoxy And Walnut Slab Casting
Once I was done sanding, I vacuumed the surface, blew off the dust with compressed air, and finally wiped down the surface with mineral spirits, to try and remove all of the dust. As I mentioned, epoxy dust is the worst, and since friction and plastic create static, the dust really wants to hold on for dear life.
For the finish on this project, I used Rubio Monocoat, which I’ve had a lot of luck with on epoxy projects in the past. It’s a low sheen, matte finish and is super easy to apply. I mixed the Pure oil and 2C accelerator throughly and then applied the finish with a plastic applicator. A little goes a long way with Rubio, and I mixed way more than I needed unfortunately, since this stuff isn’t cheap.
Once the bottom was finished, I could finally get finish added to the top, which was really the moment I was looking forward to this whole project, and it didn’t disappoint. The Walnut really came to life, and the black epoxy has this subtle pattern from the mica in the black pigment that looks beautiful.
After letting the finish sit for a few minutes, I wiped off the excess and could stand back and admire the top.
Step 13: Assembling Epoxy Cast Table Top And Wooden Table Base
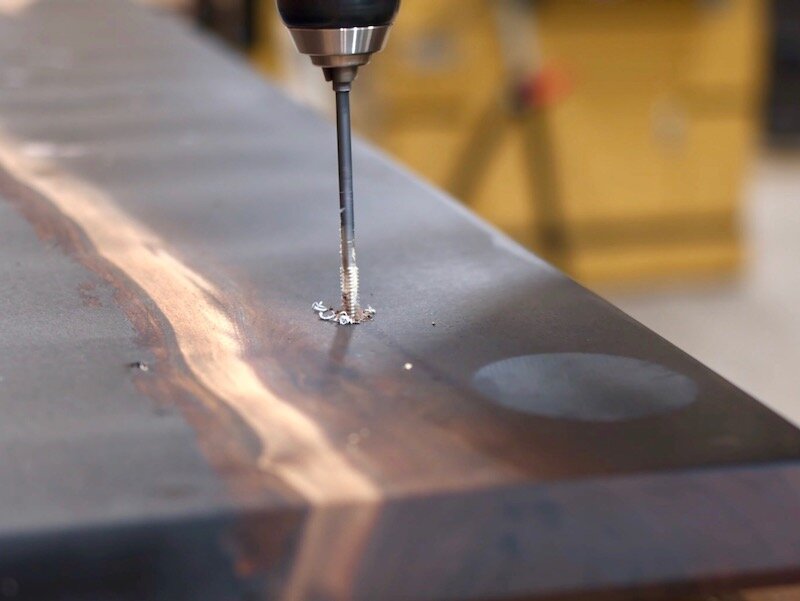
I let the Monocoat set up over the weekend and then I could get the base attached to the top. I used tapped holes for this, which I’ve had a lot of success with in the past, and they’re really easy to create.
First, I centered the base on the bottom of the top and marked the hole locations using a brad point bit, since my center punch was too short to reach through the stretchers.
Next, I drilled the holes using the corresponding drill bit for the ¼-20 tap I used. I made sure to mark my depth, as the last thing I wanted to do was accidentally drill through my top here.
After drilling the holes, I blew out any dust with compressed air and then tapped the holes with the tap. These taps were originally the Wood Whisperer Thread Taps, which are now available at Eagle America, and I’ve used this tap dozens of times and have never had any issues. It creates a super strong connection, and the benefit over using a normal wood screw is you can thread the bolt in and out numerous times without weakening the threads.

Anyway, with the top attached to the base, I could call this project finished.

