
How To Build DIY Floating Shelves For Your Kitchen // Kitchen Remodel Pt. 3
Learn how to build these super strong DIY floating shelves, perfect for open kitchen shelving! I used a ton of tools on my build, but you could build these with a drill and chisel.
Note: The links below are affiliate links
🛠 Tools Used On The Floating Shelves:
📦 Materials Used On The Floating Shelves:
Process For Building Floating Shelves:
Step 1: Milling Lumber For Floating Shelves

I started this shelving project by breaking down some Hard Maple boards that I picked up at my local lumber dealer, Asheville Hardware. When building shelving like this, the length will really be dictated by your stud locations, as you need to hit at least two studs with the mounting hardware, and my shelves ended up at 39 inches long.
After milling the boards flat and square at the planer and jointer, I ripped the boards to width at the table saw, cutting away as little material as I could while cleaning up the edge. Also, if you don’t have a planer or jointer, you could just buy pre-milled lumber in the widths you need and skip the milling process all-together.
With the boards flat and square on all four sides, I could lay out which boards I wanted to glue together to create my shelves. I made sure to pay attention to any imperfections and try to orient those so they faced the ceiling on the topmost shelf, since that won’t be visible in the final install.
I also touched up the two mating surfaces on the boards at the jointer, to make sure they were nice and smooth. I also ran the opposite face of each board against the jointer fence, to cancel out any error in the squareness of my fence.
Step 2: Glueing Up Maple Shelves

To help with alignment during the glue up, I added some Dominos, so next I laid out locations for those and cut the mortises in those locations.
Once the mortises were cut, I could get the two boards that made up each shelf glued together, using plenty of glue.
After letting the boards sit in the clamps overnight, I ran them through the planer to clean them up, and then I could run them through my drum sander to really smooth them out.
With the faces of the shelves cleaned up, I jointed one edge again and then ripped the shelves to final width at the table saw. I decided to have the widths get smaller as the shelves got higher, both because I think it looks nice visually but also because it will help allow more light from the wall sconce I’ll be installing above these shelves to make it to the countertops below.
Finally, I could cut the shelves to final length at the miter saw, setting up a stop block to make sure they were all the same length. Also, I really need to get my stop block system reinstalled on this miter saw station, I am definitely missing having it.
Step 3: Preparing For Floating Shelf Mounting Hardware

Next, I needed to work on drilling holes for the mounting hardware I’d be using, which were these heavy duty blind shelf supports from Rockler in my case.
First, I aligned the edges of the boards and then marked out the stud locations on the back edge, and this ensured the shelves would line up perfectly in the final installation.
Next, I marked a center line at each hole location and then used a center punch to help keep my drill bit from drifting while starting the hole.
To help stabilize these fairly wide boards while I worked on them at the drill press, I added a handscrew clamp where the board met the drill press table, and this worked pretty well.
I actually didn’t have a drill bit long enough to drill these holes to full depth, so I just started them with this Forstner bit and then came back later to finish the holes. While drilling, I made sure to back the bit out frequently to clear the chips, as otherwise the bit can get stuck in the hole.
As I mentioned, the handscrew clamp worked well enough, but I decided to whip up a quick fence for my drill press table, just to help hold things in place while I drilled these holes, and I’m definitely glad to have a fence like this for my drill press now.

This fence also allowed me to have one hand free, and I used it to help collect the ridiculous amount of chips created by drilling out these holes, and this project made me really want to look into making a drill press table with built-in dust collection.
Anyway, with the holes drilled on the back edge of the boards, next I could work on routing out an area to provide clearance for the hardware. I initially whipped up a quick jig for this out of some scrap plywood, cutting the center hole with a Forstner bit and a jigsaw, then adding some side supports to help align the jig on the back edge of the shelves.
To use the jig, I mounted it on the shelf, aligning the center line I added in the jig opening with the center line on the back of the shelf, which I added before drilling the holes.
Before routing, I set the plunge depth on my router and then cut the recess in two passes using a template bit.
As you can see, the bearing on my template bit was actually slipping, which took me way too long to realize, and this caused the bit to cut past my template, leaving me with a pretty janky looking recess. Thankfully, this recess is just for clearance, but it was still frustrating after spending the time making a jig.
I actually decided to remake this jig after finishing the routing, as I’m planning to use this hardware again in the future, and I figured I’d show you what I came up with, in case you wanted to make something similar.

The way I made the previous jig meant that it would only work on shelves that were the exact same thickness as the shelves I made in this video, and, since I’m planning to use this same hardware with double stacked ¾” plywood shelves in the future, I figured I could make an adjustable jig instead.
I whipped up a quick design in Easel, Inventables’ free design software, and then headed over to my X-Carve CNC to cut the template. This is one of my favorite tasks for the X-Carve, as I can make adjustments to this template in the future if I use different hardware, or I can re-cut the template if my bearing slips again and screws up the template.
This template only took 12 minutes to cut, so it would be super easy to re-cut it in the future if needed.
After cutting, I cleaned up the template off camera and then marked hole locations that matched up with the slots I cut on the template on a few scraps of plywood, and these would make up the side supports.

I drilled holes in these locations over at the drill press, threaded in some threaded inserts into the holes, and, finally, I could attach the template top to the side supports, after grabbing some longer bolts. I also marked out some center lines on the jig, although I might have done this on the X-Carve with a small v-bit just for more accuracy, if I had thought of it.
As you can see, those mounting slots make it really simple to center the jig on whatever material I’m working with just by lining up the center line on the jig with the center line on the piece, and the beauty is I can readjust the jig to work on a thicker or thinner piece if needed.
I really like the way this jig came together and it makes me want to try to make more adjustable jigs like this in the future, so they aren’t only useful for one project.
Anyway, back to the project, I routed the rest of the recesses in the backs of the shelves with the old jig, which that loose bearing on the router bit completely ruined, and then I went back with a longer drill bit to drill the holes to full depth.
Step 4: Preparing For Finish

With the hardware installation done, I could get the shelves prepped for finish, starting with a heavy chamfer on the bottom of the shelves.
If you watched my cerused oak dining table video, you’ll know I recently picked up this monstrous 60 degree chamfer bit, and I wanted to use it on the bottom edge of these shelves to lighten the look. Since this bit removes so much material, I made this cut in multiple passes, and I also used the router table fence to help support the piece as I worked.
I ended up with a super clean surface right off of the router and I really love the way this profile made these shelves look.
I came back and added a lighter chamfer to the top edges of the shelves, and then I could sand them up to 180 grit, also breaking all of the edges while I was at it.
Step 5: Finishing Shelves

For the finish on these shelves, I decided to keep things simple and used the aptly named Simple Finish from my buddies over at Maker Brand. Simple Finish just wipes on in a few coats and is then ready to go after wiping off the excess, it really couldn’t be easier.
Step 6: Install Floating Shelf Hardware

Before heading back to my house to install the shelves, I created a quick drilling guide from a scrap piece of two layers of ¾” plywood glued together. This guide helped keep my drill bit square while drilling the holes for the other half of this shelf hardware, which you’ll see in a minute.
Speaking of which, next I headed back to the house and got underway installing the shelf hardware. I started out by laying out the location of the first bracket on the first shelf, then set my line laser to match the height of that first location so I could transfer that height to the other two bracket locations.
With the hole locations marked out, I could drill the holes, starting them with the drilling guide. As you can see, by placing the guide flat against the wall, the drill bit is forced to go in square to the surface of the wall. Once I drilled as deep as I could with the guide in place, I removed the guide and drilled the hole to full depth, with the bit being guided by the hole itself at that point.
Once the pin was fully seated in the wall, I could remove the front half of the bracket and get the back half attached to the wall.

Since the locations of these mounting holes obviously fall outside of where a stud would be located in a traditionally framed wall, drywall anchors are used here. That said, these screws are really just holding this half of the bracket in place, not really providing strength.
The strength of these brackets comes from the pin on the back half of the bracket being embedded in the studs, so this connection to the wall is less important.
After attaching the bracket to the wall, I re-attached the front half loosely to give me plenty of wiggle room when adding the shelf.
Speaking of which, next I could slide the shelf onto the brackets, and thankfully things lined up nicely, so I could get the supports adjusted. The real beauty of these supports is the amount of adjustability they provide once the shelf is on the wall, because, if you’ve ever installed shelves like these, you’ll know that getting these kinds of shelves level both left-to-right as well as front-to-back can be extremely tricky.
To adjust for level in the left to right direction, you can adjust the brackets up and down vertically where they attach to the wall. This is locked into place with the button head screws.

You can also adjust the tilt angle of the pin protruding from the wall with a few set screws, and this adjusts the shelf for level coming out from the wall.
I actually set this pin angle so the front edge of the shelf was slightly higher than level, to account for any slight sag that’s created when loading the shelf down with items.
With the first shelf in, I could install the brackets for the other two shelves, which proved to be a little more awkward considering I was working over our counters, but I eventually got them installed and adjusted.
The final piece to this project was installing a wall sconce above these shelves, to provide some much needed light in our kitchen. I tapped into the existing circuit in this area and actually repurposed the old switch location for our disposal to control this light, since the disposal is now controlled with a push-button at the sink. I also made the light dimmable, so I can lower the lights at night.

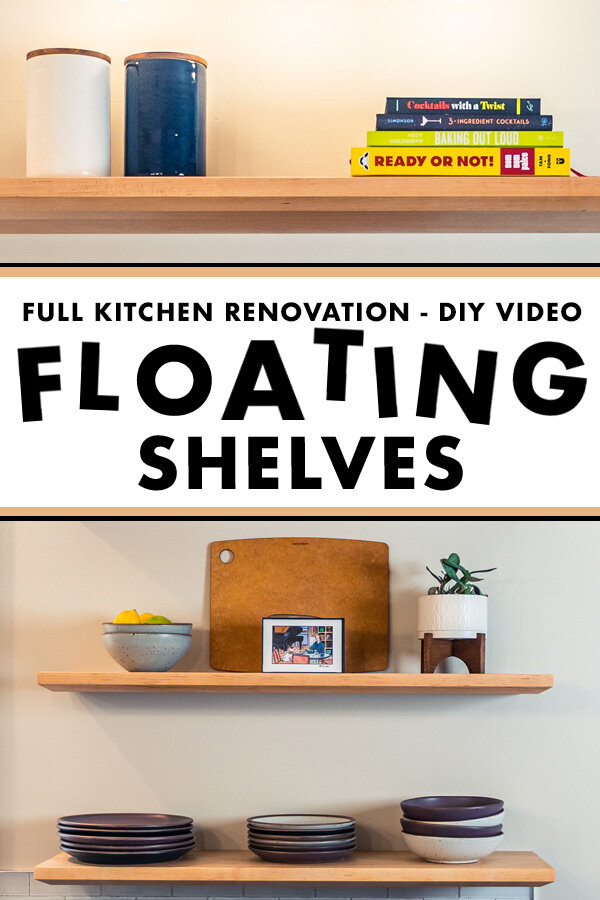
With the light installed, besides a little paint and shelf staging, I could call these floating shelves finished, and I really love the way they’ve opened up this side of our kitchen. These types of open shelves are perfect for displaying those nicer pieces, like these locally made East Fork Pottery plates and bowls, and their openness kind of forces you to keep them clutter free. Or at least, that’s the hope.
Hope y’all liked this blog post! If you did, go ahead and get subscribed on youtube so you don’t miss my future videos. Also, if you want to build a project like this yourself, check out the links to the tools and materials I used in the video description.
Alright, thanks and, until next time, happy building.
