
How I Sharpen Chisels and Plane Irons & My Sharpening Station
In this video, I go over how I sharpen my woodworking hand tools, like my chisels and plane irons, using the Veritas honing guide, a combination of DMT diamond plates and a leather strop. This system results in a razor sharp edge that is easy to touch up so you can keep working.
🛠 Tools Used On The Sharpening Station (affiliate):
📦 Materials Used On The Sharpening Station (affiliate):
Step 1: Carving the Sharpening Station

I’ve had this Ikea bamboo cutting board hanging around my shop forever, waiting for a purpose. As it turns out, it was the perfect size for this sharpening station. I modeled up a quick sharpening station design in Easel, and this whole system is based on my buddy James Wright’s sharpening station, which is based on Paul Sellers.
The system is built around three DMT diamond plates, which are in varying grits from Course to Extra Fine, and then the last sharpening surface is a leather strop, which is used as the final honing surface and can be used in between sharpening sessions for quick touch ups.
I got the cutting board clamped to the X-Carve’s spoil board and then started the first milling operation, which was a simple process of cutting the four pockets for the diamond plates and strop. The three pockets for the diamond plates were slightly deeper than the strop area, since the leather isn’t quite as thick as the diamond plates.
Step 2: Label Engraving

After the pockets were cut, I swapped over the a 60 degree V-bit so I could make this sharpening station a little extra fancy by milling in some labels for the different diamond plates.
This was my first time trying v-carving using Easel and it went really smoothly. The letters turned out super crisp and both of these operations only took about 30 minutes total. I must have shifted the labels in Easel somehow between the two operations, as they were a little off center, but that was no biggie.
After the X-Carve was finished up, I removed the cutting board which I guess now is a sharpening station, sanded away any fuzzies off camera, and then test fit the diamond plates and strop. The diamond plates were a perfect fit, with a little wiggle room, which I added during the design process for ease of removal.
Step 3: Leather Strop

I needed to cut the piece of leather to size, and I figured the easiest way to do this would be to use one of the diamond plates as a template. I pulled out my self healing mat and cut the leather to size using a rotary cutter. I love rotary cutters, they leave super clean edges and are perfect for this kind of work.
Once the leather was cut to size, I pre-drilled a few holes through the leather into the bamboo, and then drove in a few decorative screws to hold the leather in place. The screw heads are below the surface of the leather, but nothing I sharpen will ever get into those areas anyway.
Step 4: Finishing Touches
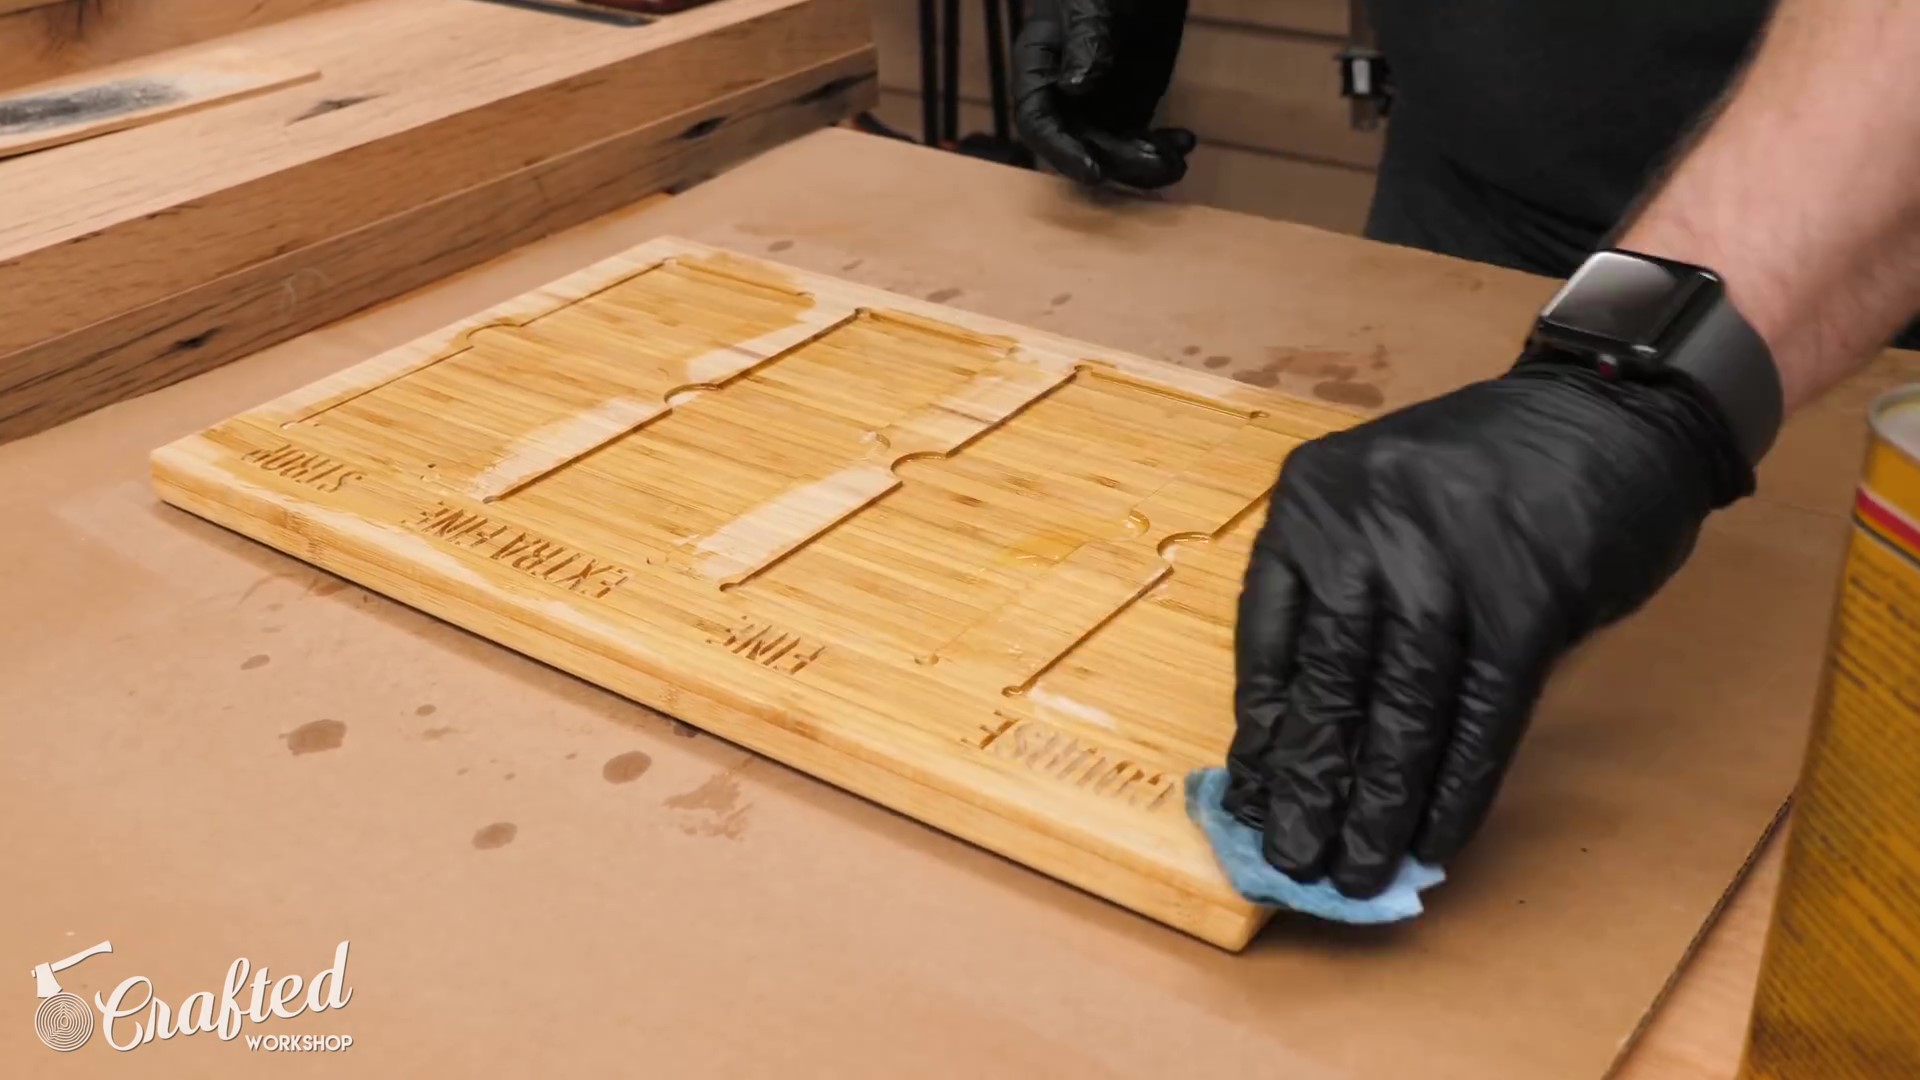
I added a few rubber feet to the bottom of the board, which actually came with the diamond plates, and then considered filling in the letters with a sharpie but figured I didn’t want to push my luck.
I applied a couple of coats of wipe-on poly to help protect the bamboo over time, since it will be getting covered in glass cleaner and metal dust on a regular basis, and then I could finally get to doing some sharpening.
Step 5: Sharpening Technique

My previous sharpening system was the Worksharp, which worked pretty well but I was never able to get things super sharp with it. You can see the old microbevel from the Worksharp, something I’ve since ditched in my sharpening routine.
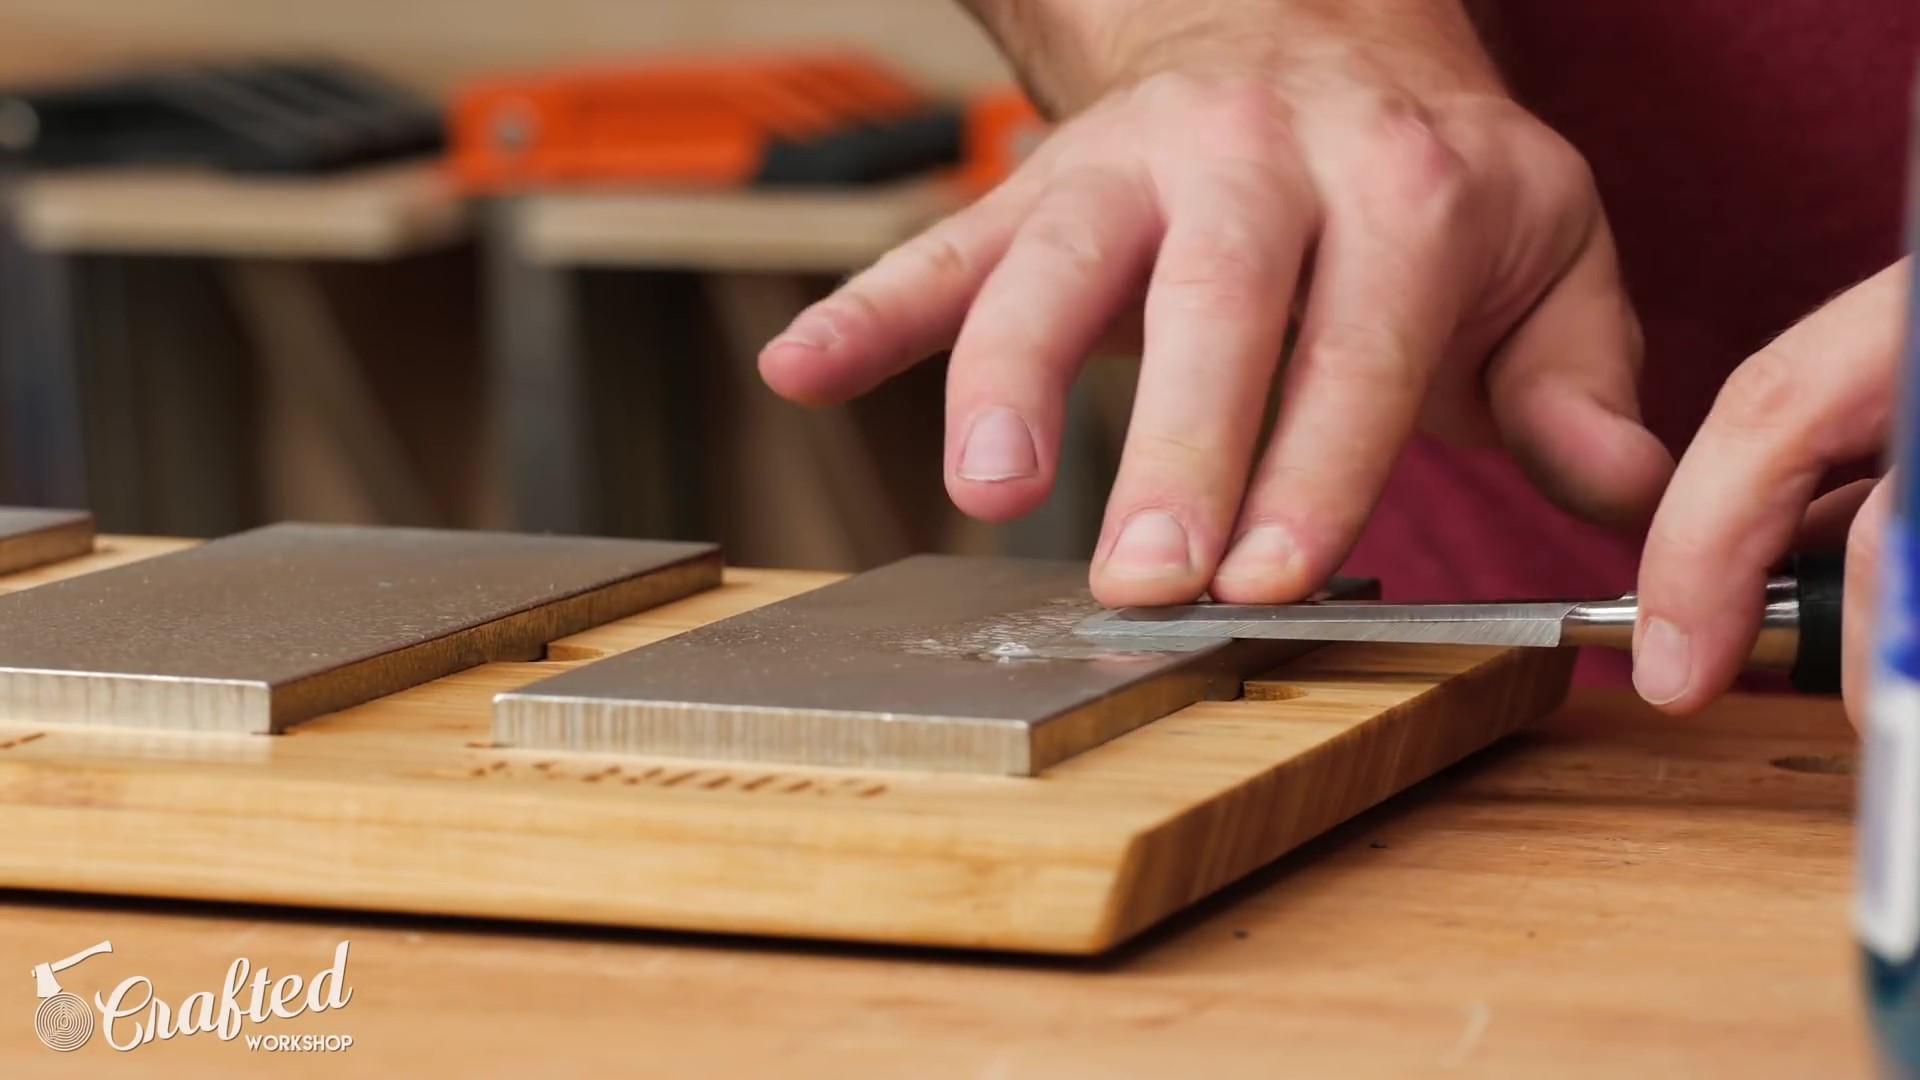
Now, I use this Veritas Honing Guide, which has worked really well for me. You set the projection of the blade with this little guide, lock it in, and then get to sharpening. It’s super quick and easy to make adjustments to different bevel angles with this system, which is nice considering I have a variety of bevel angels between my chisels and plane irons.
For the lubricant on the diamond plate, I use basic glass cleaner. A few spritzes is plenty, and then I just rest the blade against the plate, applying even pressure with my fingers, and then run the blade back and forth across the surface.
As you can see, I must have sharpened this to a slightly different bevel angle previously, so I had a decent amount of material to remove here. I just kept running the blade across the Course diamond plate, which is the equivalent of about 325 grit, until I had even scratch patterns across the entire face of the bevel.
One thing of my favorite things about diamond plates is they stay flat and don’t wear unevenly, even if you sharpen in the same spot over and over. This makes sharpening super quick, as you never have to flatten your diamond plates like you do with water stones or oil stones.
Step 6: Shapening Technique (cont)

Once I was done with the first plate, I could move onto my next diamond plate, which is the Fine grit, roughly 600 grit. These last two plates go much faster than the first, since the bevel is already established and I’m really just refining the surface.
And when sharpening in the future, unless I damage the edge by dropping the chisel or something, I don’t even need to start with the course plate unless I let things go for way too long and the edge gets super dull.
After the Fine plate, I moved onto the Extra Fine plate, which is roughly 1200 grit. This really refines the surface and gets the edge extremely sharp. Once again, this doesn’t require many strokes, I’m just removing the scratch pattern from the previous plate.
Step 7: Stropping

The last step in the process is the strop, and I think this is really the step I was missing out on with my previous sharpening system. My strop is just a scrap piece of 9oz vegetable tanned leather, which is plenty beefy for this type of application.
I applied some buffing compound to the rough side of the leather and then pulled the bevel of the chisel across the strop 30 or 40 times, until it starts to get a mirror polish near the edge. I also work on the back of the chisel a few times, to make sure and remove any burr that’s formed and polish that face as well.
After stropping, the real test for sharpness is the shaving test, and it passed with flying colors as you can see, taking all of the hair it came into contact with on the first pass.
I could also test the edge on a scrap piece of Walnut I had. As you can see, it sliced through this end grain super cleanly, leaving a smooth surface. It also made quick work of this edge grain and left a shiny, glass-like surface finish. I’d call that a sharp chisel.
Step 8: Flattening Chisel Backs
Now, all of these steps were done assuming the back of the chisel was flat, but what if it wasn’t? I had already flattened the backs of my main Narex chisels with the Worksharp, but I had some cheap Harbor Freight chisels hanging around that hadn’t been sharpened.
As you can see, the scratch pattern from the factory is still there on the back of the chisel, so the first step is to remove those scratches and replace them with some finer scratches from the diamond plate.
When flattening the backs of chisels, you really only need to focus on the inch or so nearest the cutting edge. There’s really no point in flattening the entire back of the chisel, it’s just wasted effort.
After getting a consistent scratch pattern on the Course plate, I moved up through to the Fine plate, working perpendicular to the direction from the Course plate, so that it was easier to see when the scratches were gone.
I repeated the same process on the Extra Fine plate, and then finished it off with a little stropping.
With the back flattened, I went through the whole sharpening process on the bevel and then could test the chisel’s sharpness, which it passed with flying colors.
Step 9: Sharpening Plane Irons

So that’s how I sharpen my chisels, but what about my plane irons? Well, this Veritas jig has another attachment for wider plane irons, but the whole sharpening system is essentially the same.
I used the same projection guide to set the bevel angle, 30 degrees in this case, and then I clamped down the plane iron, making sure it was parallel to the projection guide.
After that, it’s just more of the same process as before, moving up through the grits and then finishing with the strop.
You can see here that this iron is hollow ground from the manufacturer, so sharpening only hits the very front and back edge of the bevel. This makes sharpening a lot faster, since you don’t have to remove as much material.
And finally, I could test it out, first with the shaving test, which was no problem.
I then reinstalled the iron in the plane, got it set up, and then could make some shavings. This plane is now cutting beautifully, producing these awesome, paper thin shavings. I could see through the shavings when I held it up to the light, pretty awesome.
And with that, I think that’s basically it when it comes to how I sharpen my tools!