
Building My Shop, Part 3 : How To Drywall, Plywood Walls & Fiber Cement Panels
In part 3 of my shop build series, I'll show you how I installed drywall, including taping and mudding, as well as the plywood walls and fiber cement panels in the shop area.
Note: The links below are Amazon affiliate links:
📦 Materials Provided By
🛠 Tools Used (affiliate):

Pin it!
Process For Putting Up Drywall and Plywood Walls:
Let’s start with the drywall, since that part of this process was the most time consuming. Now, I had never done any drywall work prior to this, save for spackling nail holes, so I deferred to my buddy Justin here.
Step 1: Hang Sheets Of Drywall On Stud Frames

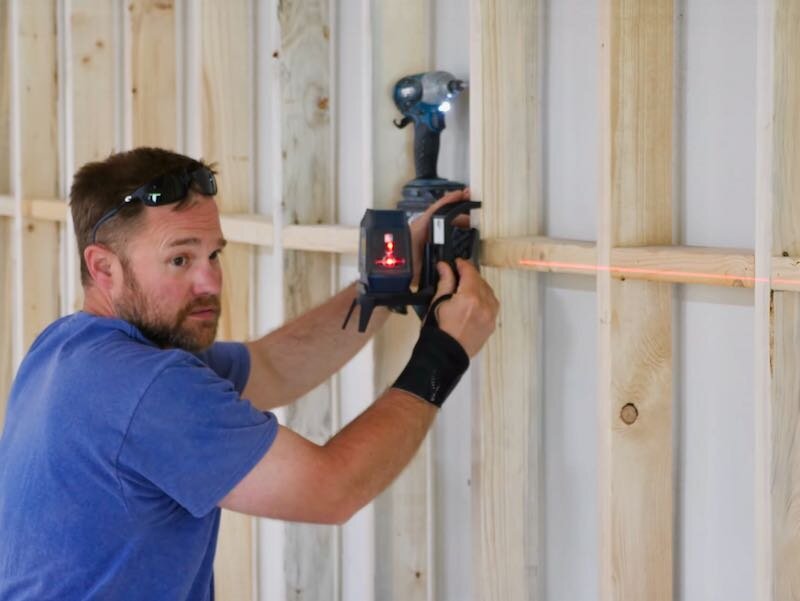
First, we needed to get the sheets hung on the wall, which was easy enough. We set up the trusty line laser to give us a level reference line, since this floor is so out of whack, and then we could start hanging the sheets.
Since the total length of this section of wall was 14’, we cut two feet off of the first sheet. Cutting drywall is extremely simple, you just score a line through the front face of the panel then snap the panel along the score line. Finally, you cut through the paper backing of the drywall and you’re done.

To hang the panel, we used drywall screws, which is just about the only thing I would use drywall screws for, by the way. We also picked up this little drywall roll lifter and used it a ton on this build. It allowed us to raise and lower these panels really precisely before screwing them in place. I’ll have a link to the one we used in the video description below.

On this first panel, we lined up the top edge of the panel with the laser line, added a few screws to hold it in place, and then added the rest of the screws.
Justin had a few of these drywall screw setters and they worked perfectly with our impact drivers. These bits drive the screws to the perfect depth without breaking the paper, I would highly recommend picking these up if you don’t have something like a collated screw gun.

We added screws every 16” through the center of the panels and then every 8” along the edges.
Also, another tip I picked up from Justin was to hold off on adding the screws along the edge you’re about to butt another panel up against, as driving the screws tends to mushroom the drywall slightly at the edges and this can create larger gaps between the panels.
Next, we hung the second panel in the row, which was a full length piece in this case. Once again, we used the lifter to bring the panel in line with the laser and then added screws.
On the second row, we staggered the seams of the panels which helps to minimize future cracks since it spreads out the load, but it also makes taping the seams later easier.
Other than that, this first wall was basically rinse and repeat, since it had no outlets or other things to work around.

With the first wall done, we could move on to the adjoining wall. The first panel was cut to length and hung, then we could work on the second panel.

Justin left this panel full length and then used a drywall saw to cut along the header in the door opening. He could then score the other side of the panel and then cut the rest of the piece away with a utility knife.

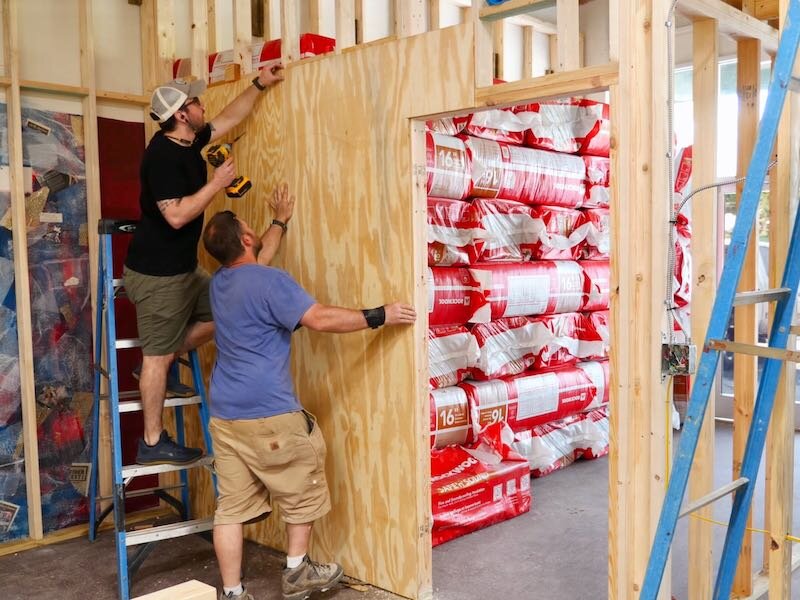
From there, we just continued working up the wall, filling in pieces where needed. We decided to do the outside and inside walls of the office area in plywood, mostly because drywall is a pain, so we only needed to do these two walls.
Once the panels were hung, we could move on to taping and mudding, which was by far the most time consuming part of the process.
Step 2: Taping and Mudding Drywall Seams

First, Justin thinned out this all purpose mud slightly with water, which just made it easier to spread evenly.
The mudding process started on the horizontal seams, since these drywall panels have beveled edges. These edges need more mud to become level and it’s also easier to run the tape for the vertical seams into these horizontal seams after they’re already taped.
After applying the first layer of mud with a 4” joint knife, Justin rolled out drywall tape across the seam. One tip here is to apply the tape very lightly, only tapping it into place in a few spots, as this will allow the tape to lay flat in the next step without creasing.
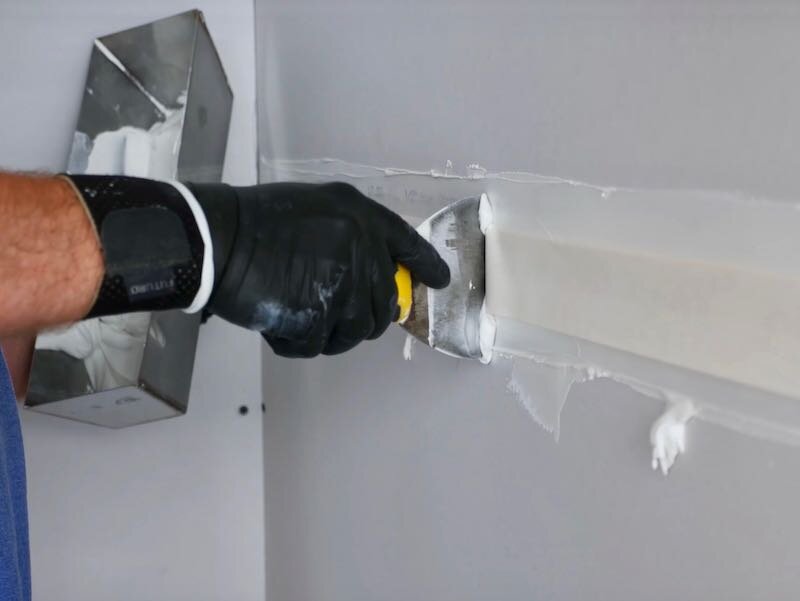
Once the strip of tape was applied, Justin used the same 4” knife to press the tape in to place, which also removed the excess mud from beneath the tape.

After pressing the tape into place, Justin would remove any excess mud around the seam with the joint knife.
The process continued in the same way along the length of the seam, applying mud to fill in the beveled edge, applying tape, then smoothing the tape and removing the excess mud with the joint knife.
The vertical seams worked in basically the same way, except we could apply less mud since, again, the ends of the panels aren’t beveled like the edges. Also, the tape on the vertical seams would overlap the tape on the horizontal seam slightly where those two seams met.

Next, I could try my hand at taping and mudding my first drywall seam and it went… OK. I was initially applying the mud with too much pressure, which wasn’t leaving enough mud on the surface.
Also, when I applied the tape, I pressed it into place too firmly which didn’t allow the tape to move with the joint knife when I was smoothing it out, which resulted in a crease.
I eventually got it though, and ended up with a pretty decent looking seam.
That said, Justin was still a hell of a lot better at this than I was, so he continued taping and mudding the seams, which saved us a lot of time when it came to sanding later, while I focused on filling all of the screw holes.
I also made sure to double check that all of the screws were below the surface of the drywall during this step, as they would be much more difficult to hide if they weren’t fully seated.
The end of the walls and corners were the last thing to get taped and mudded, as it was easier to run this last seam after all of the horizontal seams were done.
For the inside corner, Justin applied mud to both faces of the corner then creased a length of tape down the center before applying it to the seam. He worked his way down the corner, working each face and removing any excess mud.
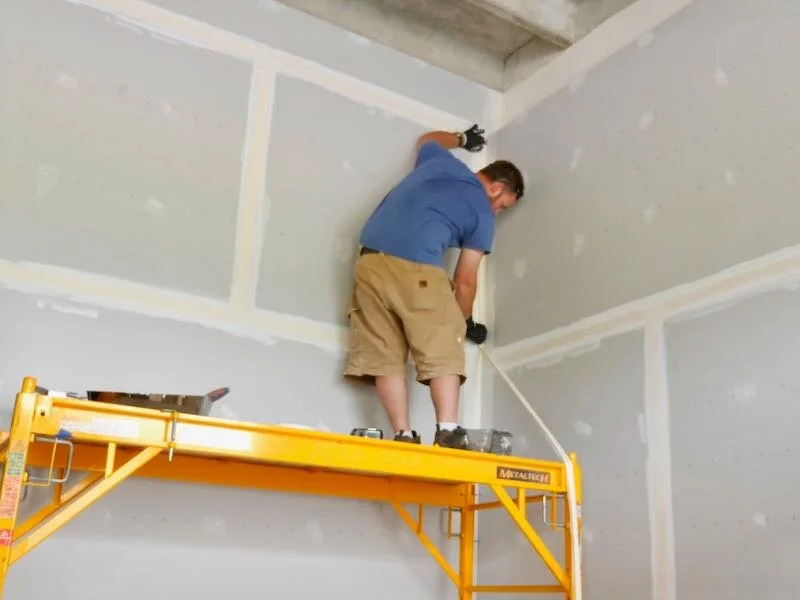
For the corner against the concrete wall, he applied tape flat against the panels and used the excess mud to fill in the gap between the edge of the drywall and the concrete.
After taping, Justin applied another layer of mud over the tape and then we let it dry overnight.
Step 3: Second Round Of Drywall Mudding

The next day, we could come back and apply the second coat of mud, this time using a wider knife. The goal here is to fan the mud out over the subsequent coats, which feathers the seams, resulting in an invisible seam between the panels.
You can see that Justin would apply the mud heavily across the seam, then scrape off the excess from the outer edges, leaving the majority of the mud right at the center of the seam. He would then spread that mud out, removing any excess during the process.

In total, Justin applied four coats of mud over the course of about four days, working up from the original 4” knife to a 12” knife for the final coat.
Step 3: Sanding Drywall

After the last coat of mud had dried, we could move on to everyone’s favorite part of drywall work, sanding. This is an incredibly dusty process, so definitely wear a respirator and plan to go home and shower afterwards.
We just used sanding blocks here, since it was a relatively small area, but there are all kinds of more complex drywall sanding options if you’ve got a huge area to do.

With the sanding done, the drywall was pretty much finished and just needed to have the dust vacuumed off before paint.
Step 4: Putting Up Plywood Walls In The Shop Space

Next, we could move on to the plywood walls, which were much easier than the drywall.We actually started this process a few weeks ago, prior to installing the insulation, covering one side of the partition wall.
First, we made a mark at about 97” off the ground and then set up the line laser at that mark. The extra inch of clearance off of the ground would allow us to keep the plywood lined up while staying clear of the undulating floor.

On this first sheet, we tried a technique that didn’t really work well, but I’ll tell it to you anyway. We mounted scrap blocks of wood in line with the laser, which we could butt the sheet of plywood up against when hanging it.
Now, this would have worked well, but the edges of this plywood weren’t dead straight, so it was easier to just line the sheets up with the laser by eye.
We tacked the first sheet in place with a few screws and then could work on cutting the second sheet to fit the door opening.
I used my track saw for this, mainly because it has dust collection, but a circular saw would have worked just as well.

Since the round saw blade doesn’t cut all the way to the corner, we finished the cut with either an oscillating tool or jigsaw, which you’ll have to trust that Justin is doing here.
Once the panel was cut, we could get it mounted. You can see that this was before we picked up that drywall roll lifter and we were using a pry bar here instead.
Also, since we knew the first sheet was plumb and level, we could just reference the top edge of the first sheet and line the second sheet up with that edge.
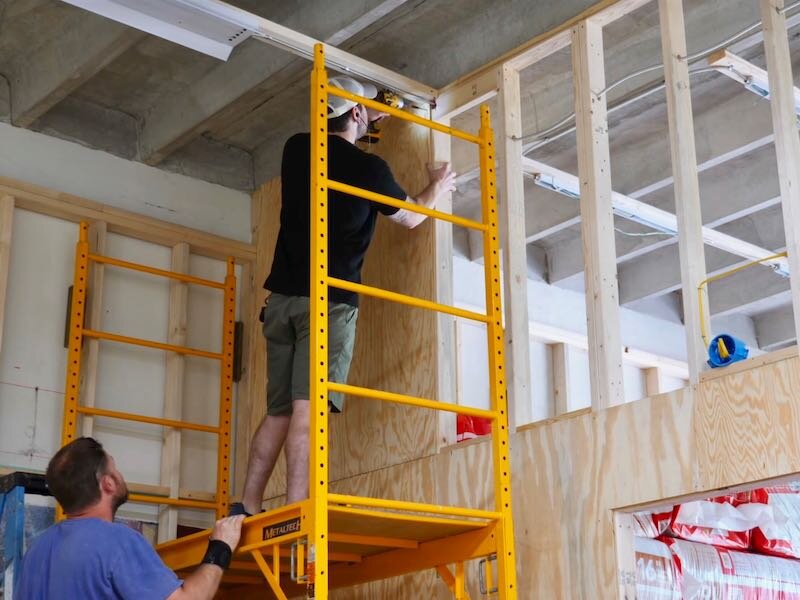
Once we tacked the panel in place, I would come back and add the rest of the screws while Justin worked on cutting the next sheet in the row. I added screws roughly every 12” since we used trim head screws here, which have slightly less holding power than screws with bigger heads but look much better in my opinion.
Also, rather than marking out the stud locations, I could use the line laser and add screws along that line. This was much quicker than marking out the locations and your walls won’t be left with any marks on them.
We just continued working down the row, with Justin cutting the panels and me adding the screws. Also, I realize I didn’t get footage of cutting around the electrical box but I’ll cover that a little later.
With the first row done, we could move up to the second row to finish this side of the partition wall. First, we went back and added a piece of blocking to close off the wall section.
Next, we crosscut the panels for the second row, cutting all of them to the same length to keep them aligned. Again, we used the track saw here and this really was the ideal tool for the job and this went really quickly.

The panels had to be notched around the first row of lights, which we did with the jigsaw.

After notching, Justin would hand me the panels and I could install them. Also, I’ve got to say, this scaffolding was a lifesaver during this whole build out, definitely worth the investment if you’re going to be taking on a project like this. I have a link to the scaffolding we used here.
The next panel had a round electrical box to work around and Justin used a hole saw to cut this opening, although the jigsaw would have also worked.
After that, it was really just rinse and repeat to finish off this partition wall, and now we can fast forward to after the insulation was installed.
One quick tip here: On this wall, I figured out that the laser was easier to see if I set it up a few feet off the floor on a ladder, as that made it brighter at the top of the panel so the line could be seen even under the bright shop lights.

Also, here’s a close up of that roll lifter, which even has a bottle opener built in. Again, I’ll have a link to it in the video description, it was incredibly useful during this whole process.
Alright, let’s take a look at the process of cutting around the outlet boxes. Justin would take some measurements, referencing off of the previous panel, and then would lay them out on the panel using his level and speed square as straight edges.

Since we mounted the electrical boxes using the line laser, we knew they were level and in line with one another, so Justin could extend the horizontal lines for both boxes with the level.
To cut out the openings, he would drill a starter hole with a spade bit and then cut out the opening with the jigsaw.
The big trick I picked up here was to undercut the openings by angling the jigsaw, which made lining up the electrical box with the cutout much easier while still keeping a nice tidy reveal around the box.

The cutouts lined up just about perfect and the undercut openings made lining everything up super easy.
We just kept repeating this process down this wall, stopping at the metalworking section, where we used fiber cement board as the wall covering, which we’ll get to a little later.

To fill in the second row, I could use the offcuts from the top row on the partition wall, and I crosscut these to width using my table saw. That said, a circular saw or track saw would have worked fine here as well.

This top row went extremely quickly and, with that done, we could move on to the right side of the shop.
The process on the second wall was the same, with the only difference being that this wall is 12 feet tall vs 10 feet on the other wall, so we could just crosscut the sheets of plywood in half to fill in the top row.
With that, the plywood in the shop was finished, so we could move on to the plywood walls in the office.
The first boards to get installed were on the ceiling, which we needed to trim about 3 ½” off the length of, since the office has an interior depth of 8 feet minus the width of the studs.
Next, Justin cut out the holes for the can lights, and then we could get the first ceiling panel mounted.

Justin whipped up a pair of these deadman supports out of leftover 2x4s and they made installing the ceiling much easier.

We would lift the panel onto one deadman and then lift the other end of the panel using the other deadman. These are wedged against the floor and provide hands free support of the panel.
With the panel supported, I could go back and add screws to hold the ceiling panel in place.
While I ran screws along the studs roughly every 12” on the walls, I used a 8” spacing on the ceiling, as the last thing I want is this ceiling coming down on top of me.
We repeated the process for the second ceiling panel and I could continue adding screws while Justin cut the last ceiling panel to size.
Once that last panel was mounted on the ceiling, we could move on to the walls, which went up basically just like the shop walls, with the exception being that we needed to cut a slight angle on the top of the panels to account for the slope of the floor.
You also might have noticed that I finally broke down and got a tool pouch during this part of the build, mainly to hold the trim screws. I drove in about 2200 of these trim screws while mounting the plywood, so needless to say I needed to have more screws close at hand during the process.
Also, I got a few questions about the magnetic screw holder for my impact driver, which is a gadget from FastCap called the ProHold. I’ll have a link to it in the video description, it was extremely handy during this build.
With the inside of the office done, we could move on to the outside, which was mostly more of the same.
After adding the first row of panels on the wall, I cut the pieces to size for the above-the-office storage area and got those mounted to the tops of the joists. This area will be great for long term storage items.
The last pieces of plywood to attach were the second row on the office walls, which we cut wide enough so that they covered the ends of the panels on top of the ceiling.
And let me tell you, I was pretty excited when it came time to get that last piece of plywood installed.
Step 5: Installing Fiber Cement Board Walls In The Metalworking Section Of The Shop

fiber cement panels going up in the metalworking area of the shop
With that, the plywood was done, so we could move on to the last bit of wall covering, which was in the metalworking area of the shop. We decided to go with these NichiPanel fiber cement panels from 84 Lumber in the metalworking part of the shop, as they’ll be more flame resistant than regular plywood.
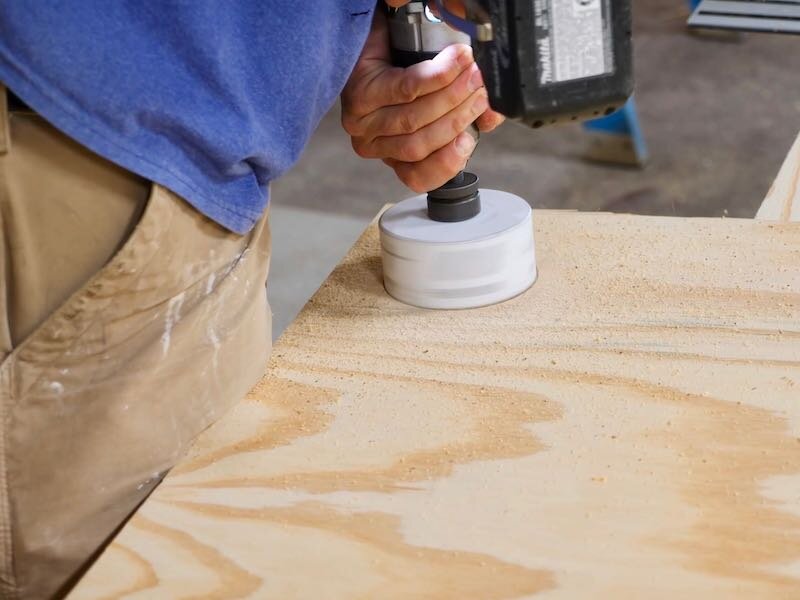
One negative about these types of panels is they can be slightly fragile at the corners, so we did a few tests and found that one of these tile drill bits worked great for drilling holes for our screws.

For the screws, we used these 1 ¼” PowerHead screws from FastCap, which provide a ton of holding power and would again help to keep the panels from breaking off at the corners, unlike a normal bugle head screw.

Before installing the panels, we would mark out all of the screw locations and drill the holes. We also worked on these panels outside, because cutting or drilling into them is extremely dusty.
To cut around any electrical boxes, we used an angle grinder with a diamond cutting wheel, which made quick work of the process.

Hanging the panels was just like the rest of the wall coverings, and having the holes pre-drilled made the process go extremely quickly. I also really like the way the large heads look on these panels, I think this could be a really cool finished look in a more industrial space.
We just continued on down the wall, once again with me driving screws while Justin cut around any obstructions. Luckily, we ended up with a full sheet at the end of the wall, which was a happy accident.
For the top row, we did need to crosscut the panels, so we swapped out the standard circular saw blade for a blade designed for cutting fiber cement, which you can see has very few teeth compared to a wood cutting blade.

Cutting the panels was incredibly messy but went pretty much as quickly as cutting the plywood, and then I could pre-drill the holes and get the last row mounted.

With that last piece in place, we could call this part of the project complete.