
Building a modern LEANING Bookshelf w/ Ebonized Oak
Learn how to build this mid-century modern bookshelf or bookcase with an ebonized oak cabinet! These bookshelves feature two large drawers and would fit perfectly in any modern home.
Note: The links below are affiliate links
🛠 Tools Used On The Bookshelves:
Magnetic Screw Holder (for my impact driver)
📦 Materials Used On The Bookshelves:

Pin it!
Process For Building Modern Bookshelves:
Step 1: Milling Oak For Bookshelf Build

I started this project by breaking down the White Oak boards I used for the shelves on the bookshelf. I picked up this 4/4 White Oak from my local lumber dealer Asheville Hardware, and luckily it was already S3S, or surfaced on three sides.
This meant that I could just cut the boards to rough length at the miter saw, joint one edge at the jointer, and then rip them to width at the table saw. When ripping them, I removed as little material as possible, just enough to be left with a clean edge on both sides of each board.
After cutting down the boards, I started laying them out to make up the panel sizes I’d need for the bookshelves. The shelves get narrower as they go up the bookshelf to match the angled front leg, so each panel size was slightly different. Out of sheer luck, I was able to match up the pieces with almost no waste, usually with only about ¼” of extra width on each shelf.
Step 2: Glueing Up Oak Shelves

Next, I laid out locations for Dominos, which I used for alignment. Since these boards were already milled down to about ⅞” thick, I didn’t want to remove much more material when flattening them after the glue up. Dominos were super helpful, but biscuits or dowels would also work well here.
After cutting in the mortises, I could glue up the panels, which required just about every clamp I had, since I was gluing up six shelves in total since I was building two of these bookshelves.
To help with this, I ended up using this Titebond Quick and Thick wood glue on the first few panels, which only required the shelves to stay in the clamps for 15 minutes. Quick and Thick also dries clear, which is a really nice feature for this kind of panel glue up. This isn’t sponsored, I just happened to pick up a bottle of Quick and Thick and really liked the way it worked.
Anyway, after letting the glue dry, I removed the shelves from the clamps and scrapped off any glue squeeze out. I let the panels cure overnight and then ran them through the planer the following day to clean them up. Having a 20” planer is definitely a luxury here, as I could run all of the shelves through at full size.
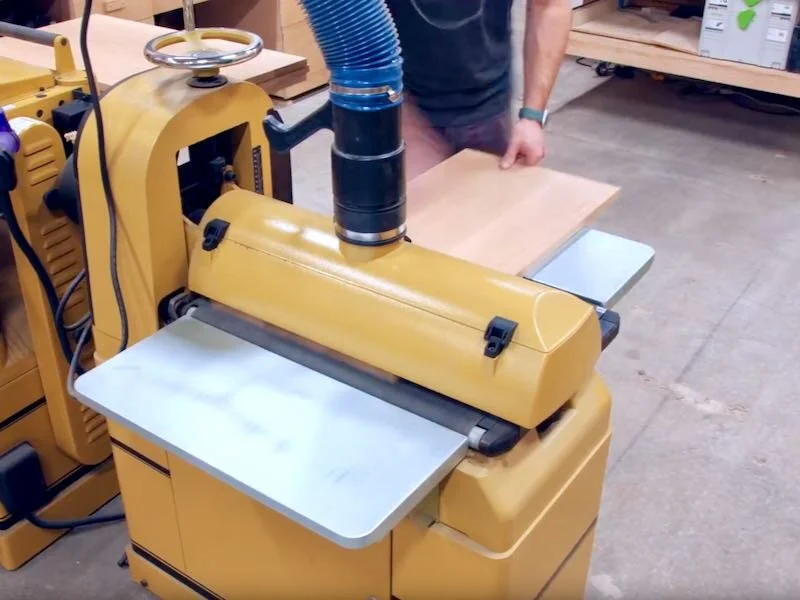
Speaking of luxuries, I also ran the shelves through my drum sander to further clean up the surface. This one-two punch of planer then drum sander can take a board from rough to almost finish ready in just a few minutes and is definitely a huge boost to my efficiency.
Next, I ripped some strips from a few of the extra White Oak boards, and I used these as a back edge for the shelves. Not only would these strips help keep items from sliding off the back of the shelves, but they’ll also help keep the shelves flat over time.
To attach these strips to the edge of the shelves, I cut in a rabbet using a dado stack at the table saw, which would provide an extremely strong bond between the shelves and the strip.
Finally, I could cut the shelves to their final width and length, again at the table saw. I ripped the shelves to width, making sure to account for the differing widths, and then pulled out my Rockler crosscut sled to cut the shelves to length.

This crosscut sled really came in handy on this project. Unfortunately, I accidentally cut the first shelf half an inch too short, which came back to haunt me later on, but we’ll get to that a little later.
After getting the boards cut to their final size, I sanded them up to 120 grit prior to gluing the strips onto the shelves.
I also went ahead and added a roundover to the front edge of the shelf and the top edge of the back strip, since it’d be next to impossible to do this after the glue up.
Finally, I could get the strips glued onto the shelves and I once again used most of my clamps during this process. I just made sure the strip was aligned with the shelf then clamped it in place, checking it for square after adding the clamps.
Step 3: Oak Veneer Plywood Cabinet Construction And Edge Banding

With that, the shelves were good for the time being, so I moved on to the lower cabinet, which makes up the bottom section of the bookshelf. The goal with these cabinets is to provide an area to store my son’s toys in our den, which is where these bookshelves will end up, and I plan to pick up some plastic totes to fit in these drawers to help keep things organized. Or at least, that’s the hope, we’ll see if that happens in real life.
Anyway, I built the cabinet out of Red Oak plywood, since I’d be spraying it black and White Oak plywood is much harder to come by.
I decided to add some hardwood edge banding to the plywood, since I had some scraps leftover that would work well for this. I used ⅛” thick edge banding on the top and bottom edges of the side panels, and I milled the edge banding down at the planer and drum sander, and bandsaw.
After cutting the edge banding pieces to rough size, I glued it to the edges of the side panels with the help of some Rockler Bandy Clamps. These things are incredibly effective for hardwood edge banding and I always seem to need more than I have on hand.

After the glue dried, I trimmed the ends of the edge banding with a flush trim saw and then flushed up the edges with a trim router, spiral bit, and this Little Lipper attachment from Fastcap. This inexpensive attachment allows you to run your trim router on its side, making it perfect for flushing up hardwood edge banding.

This is by far the fastest way I’ve found to trim hardwood edge banding, and it’s also the safest for the plywood in my opinion. I’ve tried using a block plane but always seem to end up digging into the plywood veneer when I get close to the surface, plus a block plane is much slower than a router.
After flushing up the edge banding on the top and bottom edge of the side panels, I added some thicker ¾” thick edge banding to the front edge, once again calling on the Bandy Clamps. I used thicker edge banding on the front edges of the panels so I could add a heavy chamfer to the front edge of the cabinet without exposing the plywood edges.
I repeated the same process on the top and bottom cabinet panels and then trimmed them all flush after the glue dried.
Once the edge banding was trimmed flush, I came back and sanded the inside faces of the panels to make sure everything was nice and smooth before cutting the joinery for the cabinet.
For the joinery, I decided to go with rabbets, and I cut them once again using my dado stack at the table saw. I set the height of the dado stack using some setup bars, setting the height to ½”. I used a sacrificial piece of plywood on the fence so that I could butt the blade right up against the fence, and the dado stack width was set for ¾” plywood, which is actually 23/32” thick.

After confirming the fit on a piece of scrap, I cut the rabbets into the top and bottom edges of the side panels, and I also went ahead and cut a ½” by ½” rabbet on the back edge of all of the cabinet panels to house the cabinet back.
With all of the rabbets cut into the panels, I could go ahead and get the cabinet carcasses glued up, which went smoothly. Rabbets are pretty much self squaring as long as you cut them square, and you just need to make sure to close up any small gaps with clamps. I tend to go overboard when clamping cabinets like this, but I ended up with gap-free joints.
After the glue-up dried, I removed the clamps and then flushed up one corner with my low angle jack plane. It was just slightly proud and the plane made quick work of it.
On the second cabinet glue up, I decided to try these Rockler corner clamping jigs and they did seem to help keep things aligned a little better than just the parallel clamps, probably because the panel alignment was referencing off of my assembly table rather than me having to align them manually.

The last piece for the cabinets was the back panel, and I cut these from some of that scrap packing plywood I’ve had hanging around. One side of this plywood looks fine, and the back of the cabinet will never be seen, so I figured why not use it up.
I attached the back panel with a few ¾” screws and then the cabinet was done for the time being.
Step 4: Oak Leg Assemblies For Modern Leaning Bookshelves

The next thing to work on was the leg assemblies, which run the entire length of the sides of the bookshelf. The entire weight of the bookshelf rides on these leg assemblies, so I figured I’d make them from 8/4 stock to make sure they were nice and strong.
I picked up this gorgeous piece of White Oak from Asheville Hardware and it was exactly the size I needed for the leg assemblies for the two bookshelves, with just enough of an offcut for the ⅛” edge banding.
I should mention that I didn’t actually build all of these pieces in this order, since I could work on other things while glue was drying, but I figured the build is easier to follow if I show it in chunks rather than all split up.
Anyway, I cut the board in half at the miter saw, jointed one edge, and then ripped it into strips at the table saw.
Next, I cut the shorter stretcher pieces to size from some of the longer pieces at the miter saw before squaring up the parts. I like to make parts like this as short as possible before squaring them up, as I typically end up with straighter pieces this way and I can also remove less material.
Speaking of squaring up the parts, next I squared up one face and one edge on the pieces at the jointer and then ran them through the planer to bring the other faces into parallel. I was going for 1 ½” square parts here, so I could just run them through the planer then rotate the pieces 90 degrees before raising the bed.
After milling, I cut the pieces to their final length at the miter saw, starting with the back legs. Since these had two 90 degree ends, I could just set up a quick stop block and cut them to length.

Next, I set the miter saw to 5 degrees and cut the front legs to length, once again setting up a stop block. These front legs have a 5 degree angle on both ends, and the angles are cut parallel to each other.
I also cut the bottom stretcher to length off camera, and this piece has one square end and one end with that 5 degree angle.
To determine the length of the top stretcher, I clamped up the leg assembly temporarily and then marked the length based on the actual size. I could have pulled this dimension from my 3D model, but it usually ends up being more accurate to mark the length based on your actual pieces.

Finally, I could set up one more stop block based on my mark on the top stretcher and cut all of the top stretchers to length.
I temporarily clamped the leg assembly together and it looked great, nice and square with a subtle tilt to the front leg.
While the leg assembly was clamped together, I marked out locations for Dominos, which I used for the joinery here. That said, there are a ton of options for joinery, including dowels if you want to use the same type of method I did, or half laps, which would have been a little more complicated.
My buddy Chris Salomone from Foureyes built a similar bookshelf a little while back and used half laps, and I’ll link to his video if you want to see that method.
Anyway, with the Domino locations marked out, I could cut the mortises into the pieces. I ended up using two 8mm by 50mm Dominos per joint and this made for a super strong leg assembly. Also, I absolutely love my t-track assembly table for projects like this. Being able to create a quick clamping jig for holding the parts while I cut the Dominos was so convenient.
Once I had cut all of the mortises, I could glue up the leg structures, which went smoothly. I made sure not to use too much glue, to avoid a ton of squeeze out, and I used some of the angled offcuts to help clamp the angled front legs. It’s a good idea to always save some of these offcuts when working on angled pieces like this, as they can really come in handy.
Remember how I mentioned that I had cut my shelves ½” shorter than the cabinet? Well, now I had to come up with a solution for that problem. After thinking about it for awhile, I figured that cutting a ¼” deep dado in the leg assemblies would be the easiest way to accomplish this, and it would have the added benefit of giving the cabinets a little more support rather than just relying on screws to attach them to the legs.

First, I started by marking out exactly where I needed to cut the dadoed section on the legs, to avoid accidentally cutting them in the wrong spot, and I’d definitely recommend this, especially on something with angles like this.
Next, I set up my widest dado stack, since I was going to be clearing out a lot of material, and then set the fence to the location I needed to start the dado. I set the blade height to ¼”, since removing ¼” on each leg assembly would give me my ½” of total width. With that, I could cut in the first dado, establishing one end of the larger dado.
I moved the fence to cut the other end of the dado, cut it on both pieces, and then could start clearing out the area in between the two dados.
This went pretty smoothly, except that I didn’t support one end of the leg assembly when clearing out the first dado. This meant that the leg assembly started to sag as I was cutting, resulting in the dado getting deeper and deeper as I went. This resulted in a small gap between the leg assembly and the cabinet on this first piece, but it pretty much disappeared with the black cabinet against the clear coated Oak legs.

Luckily, I figured this out on the first leg assembly and was able to use a ½” strip of plywood as a spacer on the rest of the legs to avoid this.
You’ve seen me working on two of the four leg assemblies, since I’m building two of these bookshelves, up until this point, and next I needed to work on the other leg assemblies, which angle in the opposite direction.
Luckily, I could just set the fence on the crosscut sled to match the 5 degree angle on the front legs and cut the dados using the same technique.
After cutting the dados on all of the leg assemblies, I could clamp them to the cabinets to test the fit and, thankfully, they fit really well, and it was really exciting to start to see the bookshelves coming together.
With the legs clamped in place on the cabinets, I went ahead and marked out locations for screws, pre-drilled the holes, and then drove in some 1 ¼” screws. I ended up coming back and adding some beefier Fastcap Powerhead screws, which have a lot more holding power than these smaller screws, since once again, the weight of the entire bookcase is riding on this connection.
Step 5: Assembling Oak Bookshelves

Next, I could work on getting the shelves attached to the leg structures, and I decided to use pocket holes for this. I added three pocket holes on each side of each shelf, one at the front leg and two at the back leg, with one going through the shelf and one going through the back strip.
I fit the shelf temporarily to mark the pocket hole locations and then drilled the pocket holes, using my marks to line up the shelf with the jig.
After drilling the holes, I clamped the shelf in place, using some spacer blocks I cut to set the spacing between the shelves, and then used 1 ¼” pocket screws to attach the shelves to the legs. I made sure to use pocket screws with finer threads, which are designed for hardwoods, to avoid splitting the legs. I could have definitely used longer screws, but these are honestly plenty strong as is.
I just worked my way up the bookshelf, using the same 12 ½” spacers between each shelf, and then repeated the process on the other bookshelf.
Step 6: Soft Close Drawer Construction In Lower Cabinet Carcass

With that, the main structure of the bookshelf was done, so I could move on to making the drawers for the lower cabinet. Once again, I used my favorite Blum undermount drawer slides, and I have an entire video on making drawers for these types of drawer slides, so I won’t go into too much detail here.
The one difference on these drawers vs the drawers I’ve built for these slides in the past was that I decided to go with a ½” thick drawer bottom, rather than ¼” thick, since these drawers are so big. This doesn’t really change much on the drawer construction besides needing to cut a wider groove in the drawer box front, back, and sides to accept the ½” panel.
After cutting the grooves on the inside face of the drawer box parts, I notched out an area on the backs of the drawers to accept the drawer slides, and then I could get the drawer boxes assembled.
As usual on these types of drawers, I went with smaller pocket holes, using the Kreg Micro Drill Guide in my pocket hole jig. These smaller pocket holes work much better in ½” thick material and I’d definitely recommend them for ½” drawer boxes.
I assembled the drawer boxes with a little glue and some ¾” pocket screws, making sure to clamp them together to avoid the parts slipping around while I drove in the screws. The nice thing about using screws here is you can remove the clamps immediately after adding the screws, since they provide the clamping pressure while the glue dries.
Next, I went ahead and got the drawer fronts cut to size and added the handle cutouts, which have become a favorite of mine lately. In case you missed it, I made a template for this handle cutout during my dual Murphy bed project and I’ve used this same template a bunch of times since that project.

I centered the template on the drawer fronts, traced the outline of the handle cutout, and then rough cut it with my jigsaw since these drawer fronts wouldn’t fit on the bandsaw.
Next, I attached the template to the drawer front with some CA glue and painter’s tape and then flushed up the handle cutout to the template at the router table using a small spiral flush trim bit.
To avoid blowout on the top edge of the handle cutout, I tried holding a backer block against the drawer front while I routed, but I found that just routing slowly will help prevent pretty much all of the blowout I was experiencing.
Next, I got the Blum slides installed using this Rockler undermount drawer slide jig, which makes this a super simple process. I set the offset on the jig to match the ¾” thick drawer fronts, clamped the drawer slide and jig in place, then used a self-centering drill bit to pre-drill the holes.

After attaching the slides, I drilled the holes for the Blum slides in the drawer boxes using another Rockler jig, and then I could attach the clips on the bottom of the drawers and drop the drawer in place. These slides function beautifully and have a ton of adjustability built in, and I’d definitely recommend them for any higher end furniture piece.
Next, I got the drawer fronts attached. I used a few spacers to help create an even spacing around the fronts and then pre-drilled holes from inside the drawer boxes and added a few screws to attach the drawer fronts.
With that, everything was assembled, so I could then disassemble it all and move on to getting everything ready for finishing.
Step 7: Finish Preparation On Oak BookShelves

I started by chamfering the edges of the cabinets, adding a smaller chamfer to the sides and back edges then a heavier chamfer to the front edge with that thicker hardwood edge banding.
Next, I could work on the leg assemblies. First, I worked on chamfering the edge where I cut the dado too deep on one of the legs, and I used my spokeshave for this. The idea was to add a heavy chamfer in the shallower area, so that there would be an even shadow line across the entire edge. Luckily, this line basically disappears in the final piece, since the legs are against the black cabinets, but chamfering the edge definitely helped.
I also decided to add a roundover to the leg assemblies, and I really should have done this before cutting in the dados. I didn’t think about it at the time, but those dados basically made it impossible to use my router table for this, which would have been faster and given me better results.
Any time you add an edge profile like this, it means lots of hand sanding to clean up that edge. I spent a solid four hours sanding these leg assemblies and the drawer boxes, just to give you an idea of how much time this process takes. I’m definitely thankful for audiobooks during these kinds of tasks.
The last pieces to work on were the drawer fronts, and I just added a light chamfer to them to make the handle cutouts more comfortable on the hand, and then hand sanded those chamfers off camera.
Step 8: Spraying Black Polyurethane To Finish Oak Bookshelves

With that, I could finally get to spraying on finish, and, as I mentioned, I used a black polyurethane for the cabinets. This is the same finish I used on my home bar project and my live edge bed, and I really love the finished look. It’s a one step finish, since it’s a tinted polyurethane, and it sprays on really nice.
Next, I sprayed on a water based polyurethane on the rest of the parts. Luckily, I recently picked up a second gun for my HVLP system, so that I could dedicate one gun to this black finish, and this made it really easy to swap between the two finishes.
I applied three coats of finish in total, sanding with 320 grit after the second coat.
With the finish applied, all that was left to do was put everything back together, first attaching the leg assemblies to the cabinets then reinstalling the drawers, then finally adding the shelves to the legs. With everything put back together, I could call this project finished.

Overall, I’m really happy with the way these bookshelves came together. They fit the mid-century modern aesthetic we’re going for in our home while also providing a ton of storage. I really prefer the open upper shelves with the lower cabinet rather than a traditional bookcase with solid sides, as it feels a lot more open and airy in the space.