
Installing a $3000 Bidet Toilet in the Not So Tiny House bathroom
I installed a wall hung toilet, complete with bidet seat, in the Not So Tiny House bathroom. Was it worth it? Yep.
📦 Materials Used In The Tiny House Bathroom (affiliate):
🛠 Tools Used On The Installation (affiliate):
In this week’s video, I’m going to wrap up the bathroom project that I’ve been covering over the last few weeks. I’ll show you guys how I installed this super cool sliding glass shower door, the vanity light and mirror, all of the various towel bars, and finally, probably the most exciting part about this bathroom, this insane wall hung bidet toilet.
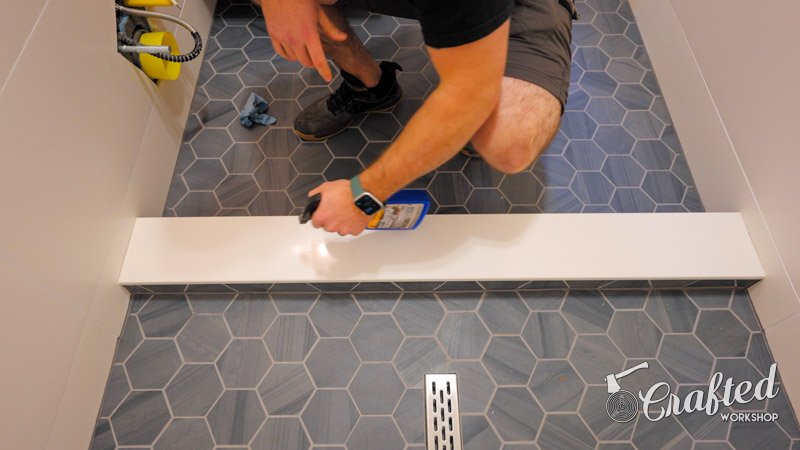
Right off the bat, I wanted to get the sliding glass shower door installed, but I needed to seal the solid stone piece I used on this curb first. Evidently, these are pretty prone to staining and the manufacturer recommended sealing the piece, so I knocked that out before installing the shower door.
Speaking of which, I could turn my attention to that next, and I used this VIGO Cass sliding glass shower door kit, which I think looks awesome.
I started the installation process by getting everything unboxed and then moved the inner sliding door into the shower before getting the rail mounted, since it’s really hard to get it there with the rail in the way.
This shower door system can fit a wall opening of 48 to 52 inches and the rail needs to be cut to length to match your specific opening size. I made this cut using an angle grinder, which made quick work of the process. Also, I should mention that the mounts on the rail can be flipped around so you can have your door slide from either the left or right wall, depending on where your shower head is installed.

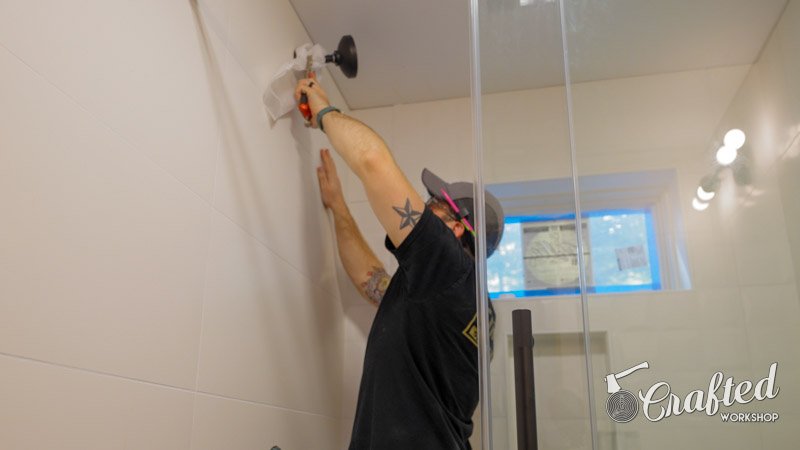
Next, I located where either end of the rail needed to be mounted on the wall so I could get the brackets attached, and I made sure to double and triple check my measurements here as the last thing I wanted to do was drill a hole in the wrong location on my freshly installed tile walls.
You might remember me having trouble drilling pilot holes with my masonry bit in my wall tile video, since the bit kept walking around on me. I got some great tips in the comments recommending I use a glass drill bit to drill holes in the tile instead, and this worked great. The pointy glass bit stayed in place and made quick work drilling the holes in the tile.

Once the hole was drilled, I got the bracket mounted to the wall, although the included screws were too short so I had to swap in my own screws. As you can see, the hole in the mounting bracket is slotted to allow for some adjustment and, depending on how you orient the bracket, you can make adjustments up and down or side to side.

I repeated the process on the bracket on the other wall and then I could unthread the brass plates from the bracket, slide the brackets onto the rail, and then reattach the brackets to the plates to get the rail mounted.
After mounting, I checked the rail for level and then repeated the process of removing the brackets to make any necessary adjustments. This part of the process was a little fiddly and a second set of hands would have been extremely helpful here.
I eventually got the rail nice and level though, and next I could get the fixed glass panel attached temporarily so I could locate the mounting clip and door guide on the curb. I made sure the door was hanging plumb and then marked the location of the pieces before removing the door.
I used the same glass drill bit to start these holes and then switched to the correctly sized masonry bit, since these holes needed to match the included plastic anchors.
Once the holes were drilled, I pounded in the anchors and attached the clip and guide to the curb before reinstalling the door for good.

Also, there is a plastic seal strip that I added to the right edge of this panel off camera, which is what keeps water from getting out of the shower along where the glass meets up with the wall. I made sure to really push the panel tight against the wall to make sure this sealed up well before fully tightening the mounts to the rail.

Next, I could get the sliding door installed, starting by adding another seal strip to the edge where it would meet the wall, then installing the rollers, and finally hanging the door on the rail. The rollers have a built-in mechanism for making fine adjustments, which was super helpful for getting both panels aligned and getting the door nice and level.
Once the door was working well, I installed the roller guides, which keep the door from being lifted off of the rail. These have an eccentric center so they can be adjusted to fit snugly with the rail without touching.

Next up was the handle installation, which again was simple, and finally I added the threshold, which is obviously pretty important for keeping water inside the shower. I’ll obviously need to come back and add silicone around this threshold later, but I want to save all of the caulking until after the drilling work is done so I don’t have to worry about dust getting in the caulk.
With that, I added the two side seal strips and the shower door was installed and I think it not only looks great but it’s super easy to use. While this kit certainly wasn’t cheap, it was much less expensive than a custom frameless shower door, plus I could install this kit myself on my own timeline. I’ll link to the kit in the video description in case you’re interested in checking it out.

Next on the list was the shower head and trim kit, and I started with the shower head. Unfortunately, I managed to scratch up the shower arm during this process. It always seems like I can never get these bent arms to line up without them being so tight that I have to use pliers, which ends up scratching them. If you’ve got any tips on this, let me know in the comments, because I always seem to screw this up.
I got the shower trim installed next, which was super simple even though this wasn’t something I had done before. The trim piece has a gasket on the back which seals against the wall, and this was especially effective in my case considering it didn’t have to span any grout joints. I really like the way this trim kit looks and it’s amazing how much more finished the shower looks with the trim kit in.
I had installed the vanity light earlier in the bathroom project just so we could have a little more light in there, but I held off on adding the glass shades until now since I didn’t want to accidentally break them during the process.

This fixture, and all of the fixtures I’ll be using throughout the tiny house, are made by Illuminate Vintage, and I’ll link to this specific fixture in the video description in case you’re interested.
Next, I could get the vanity mirror installed, which meant more holes in my new tile, but thankfully this was pretty simple after some quick layout work. I used these wall anchors to hang the mirror, which supposedly hold 50 pounds each, which should be plenty for this mirror.

When laying out the mirror height, I centered it between the vanity countertop and the light fixture but now I’m thinking I might should have centered it between the top of the sink and fixture, but we’ll see if I want to raise it after living with it a bit.
With that done, it was on to the thing I’d honestly kind of been avoiding, installing the wall hung toilet and bidet seat. Considering I’ve never worked on this kind of toilet system, this was a pretty intimidating process, and it was made worse by the fact that this toilet and bidet seat are made by Duravit, while the wall hung toilet frame is made by Geberit.
Figuring out how to make these two systems work together required way more research than I anticipated, but after a few hours pouring over various manuals, a few support phone calls, and ordering half a dozen incorrect parts and pieces, I finally figured it out. I’ll link to all of the correct parts and pieces I ended up needing in the video description, in case you decide to go this route.
As you can see, I got these connections worked out while the walls were opened up prior to waterproofing, and now, three months later, I could finally get the toilet installed.
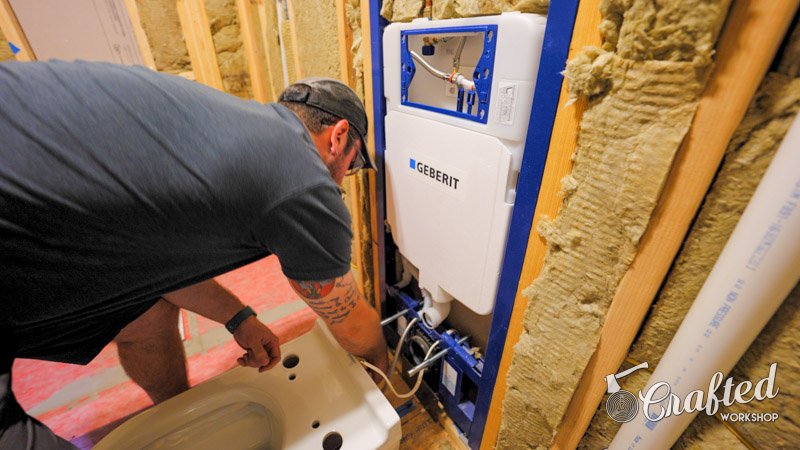
The first step in the process was to get these two pipes, which connect the toilet itself to the in-wall tank and in-wall drain, cut to length. To do this, I first inserted the pipes into the openings on the wall and marked where they met up with the wall.
Next, I removed the pipes and attached them to the back of the toilet and repeated the process of marking where the pipes intersected the back face of the toilet.
I then measured the distance between those two lines, and that was how much of the pipe I needed to cut off. This system allows the pipe’s length to be adjusted depending on the thickness of your walls, your tile, etc.
I cut the two pipes to length off camera and I also got these mounting rods positioned, as again they’re adjustable to work with different wall thicknesses.
With all that done, it was finally time to get the toilet mounted. First, I added some of the included seal lubricant to the rubber areas, so the pipes could slide in easily. Next, I routed the water line for the bidet seat, which runs all the way down in the wall, through the top of the toilet, and repeated the process for the electrical connection, since the bidet seat is powered.

Next, all that was left to do was to lift the toilet onto the mounting rods, slide in the plumbing pipes, and then tighten the bolts on the underside of the toilet to hold it in place.
Or at least, that’s how it was supposed to work. In reality, I struggled with the toilet for about half an hour, thinking I was doing something wrong when, in reality, I just hadn’t cut the pipes quite short enough so the toilet wouldn’t sit flush against the wall. Also, this toilet weighs almost 70 pounds, and I was completely shot after wrestling with it for 30 minutes.
Finally, after I took a step back and let my rage subside, I figured out the problem and, after trimming about another 1/4” off the pipes, I got the toilet mounted successfully.
Once that was done, I got the electrical box wired, which is hidden under the toilet, and this was impossible to film but it was just a simple connection of the hot, neutral, and ground.

After wiring, I got this noise reduction gasket trimmed flush with the toilet, and I mainly installed this gasket to avoid having ceramic against ceramic, which I felt like could cause issues over time.
Finally, I could get the bidet seat itself installed, starting with attaching the bracket. The seat came with this nifty cardboard template to ensure the front edge of the seat is aligned with the toilet, and I thought this was a nice touch.

Next, I got the water line and electrical connections attached to the underside of the seat and then, once that was done, I could tuck the excess into the toilet and attach the seat to the bracket.
Since the toilet tank is hidden in the wall, this area where the actuator plate will be installed functions as the access panel to all of the plumbing. I needed to get this extra part connected to route the water supply, which is controlled by the blue knob in the top left corner, routed to both the bidet seat and the tank itself.

Once those connections were made, I could also break away the excess material from this rough-in box, which again can be broken to match your wall thickness.
With that done, I ran outside to turn on the water, which was hooked up a week or so ago, along with the sewer line, and both of those inspections passed thankfully so I can fill in those trenches and start cleaning up the outside of the tiny house here soon.
With the water on, I could open up the water supply valve and check for any leaks, which thankfully there weren’t any of, and then I could try flushing the toilet for the first time, a very momentous occasion, and thankfully this seemed to work great with no leaks.
Next, I got the actuator plate mounted, which basically just covers up the rough-in opening and gives you some nice looking buttons to press.

Once that was installed, I got the batteries installed in the remote and tested it out. Yes, this bidet seat is remote controlled. As you can see, the lid and seat open and close remotely, and you can also adjust the bidet’s spray pattern, water pressure, and temperature, as well as the temperature of the toilet seat itself and the fan which dries you off after using the bidet.
Also, the seat has a weight sensor so you can’t accidentally turn it on while no one is sitting on the toilet, as that could obviously create quite the water show.
I got the remote mounted to the side of the vanity, and you’ll see that the remote even includes a little cheat sheet so guests can figure out the functions of the various buttons.

Finally, with the remote installed, I could try the bidet out for the first time…
Was the bidet worth $3,000?
Let me tell you, using this bidet for the first time was a transcendent experience. If you’ve never used a bidet, imagine that its something along the lines of the undercarriage wash when you’re getting your car washed. You’ve never felt as clean as you do after using a bidet.
The cheap bidet attachments I’ve used in the past haven’t had any bells and whistles like heated water and a fan, so things can definitely be a little too refreshing during the winter months if you catch my drift.
This Duravit bidet seat takes it to the highest level and it has bells and whistles for days. The heated water is super nice, as is the fan for drying yourself off after your undercarriage wash. Also, I don’t think I’ll ever get tired of opening and closing the seat with a remote, that is just next level fancy.
That said, the price tag on this entire toilet setup was fairly astronomical, clocking in at close to $3,000 when you factor in all of the various parts and pieces needed. Thankfully, Duravit was awesome enough to supply the bidet seat and toilet, but the question is, would I have bought this with my own money?
And the answer is yes, I was planning to buy this setup and decided to just reach out to Duravit before actually pulling the trigger. I consider this kind of thing a long term investment, one which will pay for itself day after day, sometimes multiple times a day. Not to beat a dead horse with this clip but, if you have the means, I highly recommend picking one up.
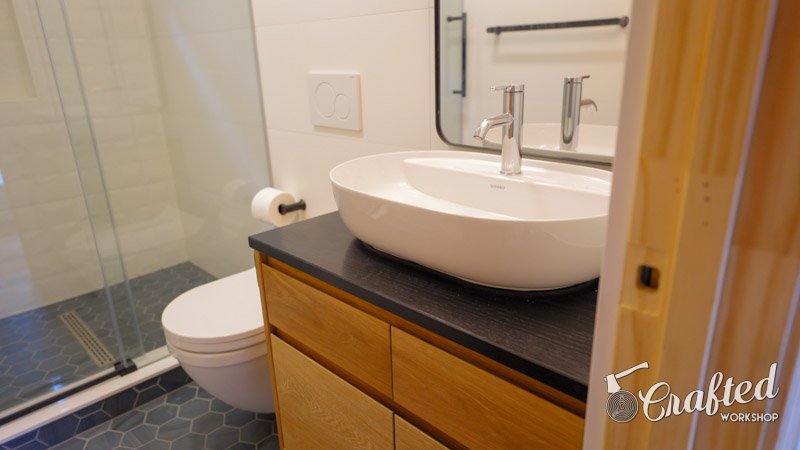
Finishing the bathroom
With the toilet installed, I was in the home stretch in the bathroom, with just a few odds and ends left to wrap things up. First, I got some caulking work done, caulking where the tile met the ceiling with a paintable siliconized caulk.

Next, I caulked where the vanity top met the wall, which was pretty tricky considering this white sealant against the black painted top didn’t give me any margin for error, but I eventually got it looking good.

With that done, I moved on to installing the toilet paper holder and towel bars, and the placement of these was something I agonized over, since I knew, once they were in, there was no moving them as you can’t just patch holes in tile.

For the toilet paper holder, I decided the best location was on the wall behind the toilet, and it seems like the standard height for these is about 26” off the floor, so that’s what I went with.
I repeated the same process for the towel bars, which I installed two of since there will almost always be two adults staying here when we have guests. I installed these at 48” off the ground, which again seems to be pretty common.

Finally, I got the switch plate installed, which I should have done a long time ago, and I also went ahead and labeled the switch for the bath fan since it has a switch for the light, the fan, and the heater.

With that, I could finally call this bathroom done, and, let me tell you, this project has been a struggle to get through, and you might have noticed I’ve put out less videos than normal because of it.
I started the process of waterproofing the bathroom on July 1st, three months ago, and I thought this project would never end. There were a lot of moments where I wanted to throw in the towel and where I felt completely out of my element but, I’ve got to say, I am incredibly proud of the end result.
This bathroom turned out absolutely gorgeous in my opinion, and I am so excited to see the rest of the interior of the tiny house come together.
Next on the agenda are the plywood walls, which should really give the space a much more finished look, and from there I’m going to dive into the kitchen, which should be a lot of fun.
If you’re enjoying this series, go ahead and get subscribed and ring the notification bell so you don’t miss the future videos. Thanks again for watching and, until next time, happy building.