How to INSTALL KITCHEN CABINETS (and remove them)! // Kitchen Remodel Pt. 1
Learn how to install (and remove) kitchen cabinets with a handful of basic tools! This is the first video in my DIY kitchen remodel series, stay tuned for Part 2 next week.
Note: The links below are affiliate links
🍳Samsung Appliances :
📦 Materials Used On The Cabinet Installation (affiliate):
🛠 Tools Used On The Cabinet Installation (affiliate):

Process To Remodel A Kitchen:
Step 1: Kitchen Remodel Assessment
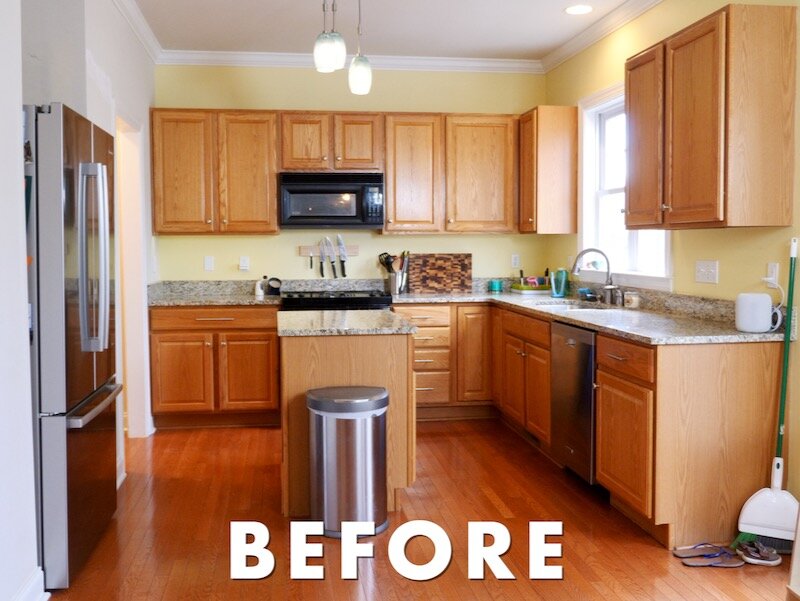
Let’s rewind a bit and take a look at how this kitchen started off. When we moved into this house almost exactly a year ago, this kitchen was the thing I wanted to remodel the most.
The cabinets were super dated, not in the best shape, and they didn’t have any of the more modern features I was looking for; most notably soft close drawers and doors and just more thoughtful storage design.
The first step in this project was to plan the layout and order the new cabinetry, which I did through my local Lowe’s store. These KraftMaid cabinets were made to order, which took roughly 6 weeks, at which point they were delivered to my house.
Let’s talk for a second about why I went with semi-custom cabinets rather than building them myself, since I obviously could have, and really the main factors were cost and time. These cabinets cost $6,300 delivered, and I managed to get them from Lowe’s during a 30% off sale which really helped bring that price down. That price includes all plywood construction, MDF drawer fronts and doors, and a thermofoil finish, plus all of the fancy options I added like a charging drawer and electronic push-to-open trash bin.
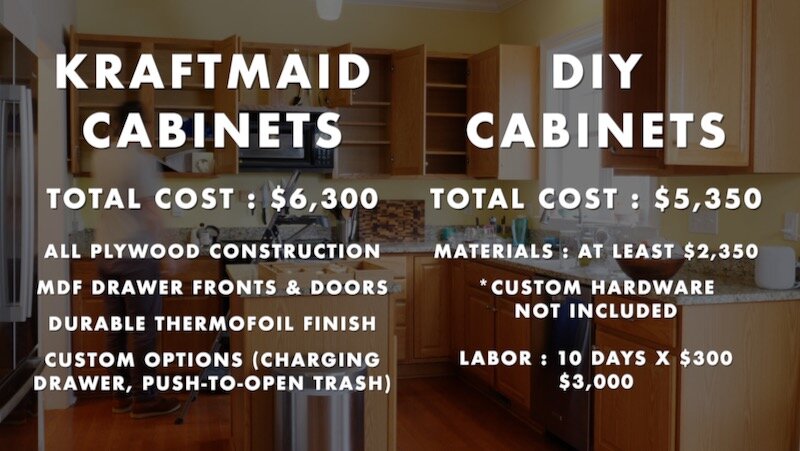
To build cabinets like these myself, I would need the following materials, and these prices are for cabinet grade plywood as well as the same types of Blum undermount soft close drawer slides and door hinges as used on these cabinets :
12 sheets of ¾” plywood : $600
6 sheets of ½” plywood : $250
Edge banding : $250
12 drawer slides : $600
14 door hinges : $200
Screws and glue : $50
2 gallons of paint : $200
Shelf pins, cabinet screws : $50
That would bring my material costs to over $2,000, and that’s assuming I don’t screw anything up and need to buy more materials, and that doesn’t include the custom hardware for those fancy add-ons.
Now, let’s factor in my time. I think I could build these cabinets in roughly two work weeks, basically 10 days of time, but I personally value my days around $300 per day, which would be $3,000 of labor. Plus, that’s two weeks I have to spend building cabinets, rather than being able to do other productive things with my time.
Obviously, whether you build these cabinets yourselves or buy them is up to you and your budget, but I am definitely glad I bought commercially made cabinets, as I also knew they would be sized correctly to fit standard appliances and they were extremely easy to install.
Step 2: Demolition Of Old Kitchen Cabinets

Anyway, thankfully, my cabinets arrived without damage, so I could move ahead with demoing the old cabinets. First, I removed everything from the cabinets, which definitely took a little longer than expected.
With the cabinets empty, I started by removing the microwave range hood, as I really wanted to know whether it was actually vented or just recycled the air back into the kitchen. As I expected, it was not vented, which means I’ll have to drill a hole through the side of my house when I install the new range hood. Yay!
Next, my father-in-law came over to help with the rest of the demo, and we started by removing the upper cabinets. It might surprise you, but upper cabinets are usually only held in place with a few screws.
The first screws to remove were through the face frames of the cabinets, and these screws connect the face frames to eliminate any gaps between them.
The next screws to remove were the ones going through the backs of the cabinets and these go into the studs in the wall behind the cabinets. After removing those screws, the cabinets came right down.
One note here is that your cabinets might be caulked to the wall, in which case you’d want to score that caulk line before removing the cabinets. Otherwise, you might end up tearing your drywall in those areas.
We repeated the process for the rest of the upper cabinets, and then we could move on to removing the granite countertops.
We started by scoring the caulk line between the small backsplash and the wall, and then I called upon my handy Trim Puller tool to pry the backsplash off of the wall.
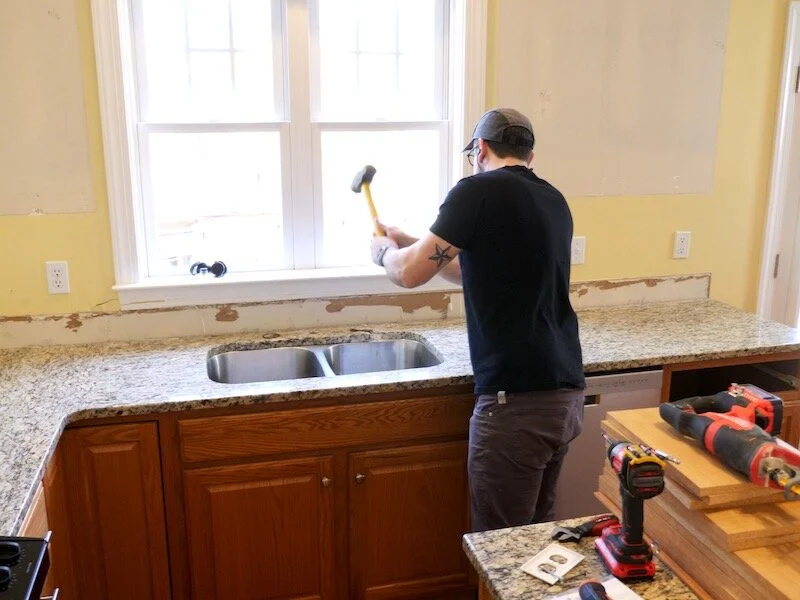
Now, I knew I was going to be adding a tile backsplash later on, which would cover any of the damage the drywall sustained during this process. If you’re not planning to cover up this area, you’d probably want to use an oscillating tool with a long blade to try and cut the construction adhesive holding the backsplash to the wall to minimize the damage.
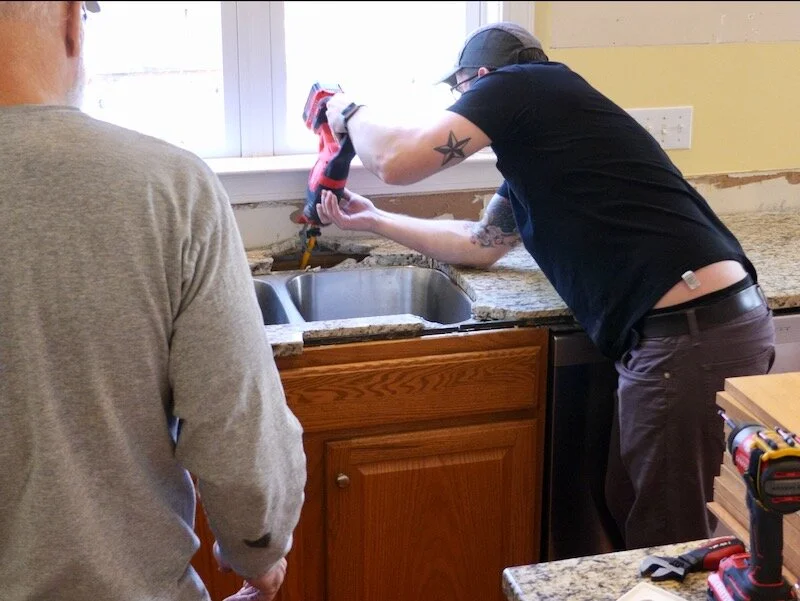
Before removing the backsplash in the sink area, I needed to get the faucet out of the way, which proved to be a little more challenging than expected. The faucet itself came right out after removing the mounting nut, but the tiny nut holding the handle in place was rusted on, and I could not get it to move.
After messing with it for way longer than I should have, I finally pulled out the reciprocating saw and cut the threaded rod holding the handle in place. As you can see, the nut was completely rusted on and this cheap handle had seen better days anyway.
With the faucet out of the way, we could work on removing the countertop itself, which was actually way easier than I expected.
There was only one seam in the granite on this wall, to the left of the sink, and I was hoping the granite would separate at that seam.
Instead, when we lifted on the other end of the countertop, it started to break at the sink opening. This actually worked out better, as this shorter length of counter was much easier to carry, but there was some steel support material running beneath the granite in the sink area.
After breaking away the granite, I cut the support with my reciprocating saw and then we could just pull the countertop free of the sink and put it into my truck, so we could take it and the rest of these cabinets to my local Habitat for Humanity Restore later.
Next, we decided to go ahead and get the island out of our way, which went pretty quickly. The countertop here was just held on with some silicone, so it came right off, and then we just removed the handful of screws holding the island to the subfloor and took it away. There was an outlet in the island, so I killed the power to that circuit before removing the outlet.
With the island out of the way, we could start clearing out the base cabinets, which once again are only held in place with a few screws.
Unfortunately, whoever built this house really cheaped out on the flooring and decided to stop it in the area where the cabinets would be installed. This really limited my options on changing the layout of the kitchen, especially where that island was, and consequently I basically ended up sticking with the same layout.
The next cabinet to remove was the sink base, and this literally fell apart as we were removing it. This thing had obviously seen some water damage over the years and I was happy to be rid of it. Thankfully, I was able to cut out the bottom of the cabinet so that I could leave all of the plumbing in place for the time being.

There was also an HVAC vent underneath this cabinet, which I decided to cap off, since it always seems to be blowing cold air on my feet when I’m at the kitchen sink.
Continuing around the kitchen, next we slid out the range and then we could remove the rest of the granite before removing the rest of the base cabinets.
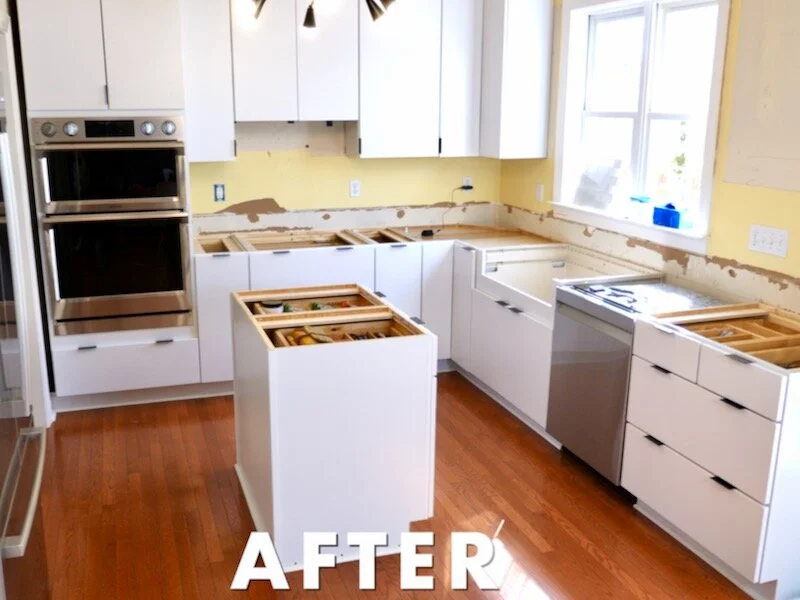
All in all, this demo only took us the better part of one day, and the next day we could get to work getting the new cabinets installed.
Step 3: Installation Of Modern Thermofoil Upper Cabinets
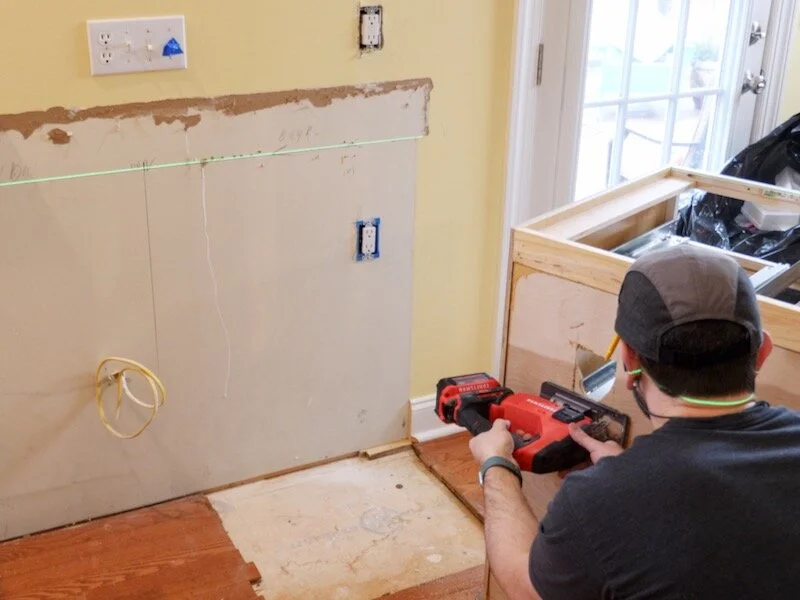
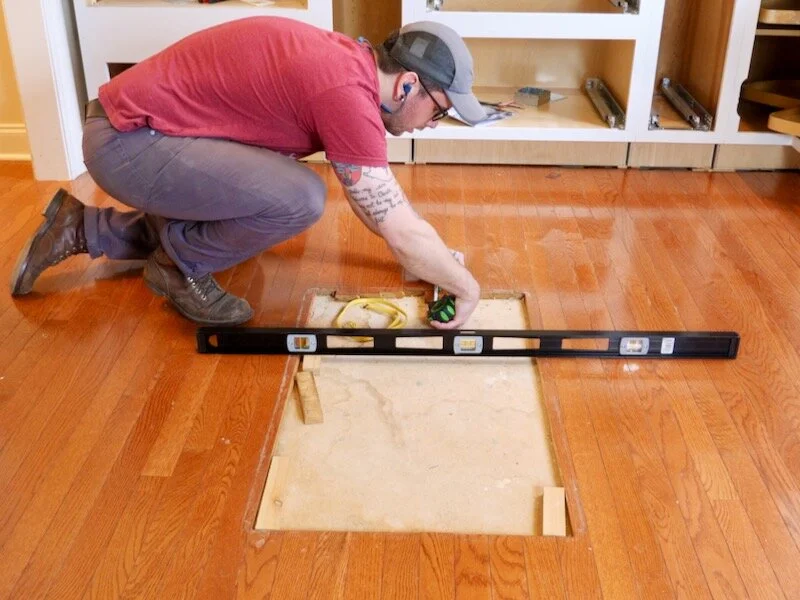
First, I set up my line laser and measured around the perimeter of the room to find the high and low spots, and luckily the floor was within ⅛” throughout the kitchen.
Next, I measured up 54” from the hardwood, or 54 ¾” from the subfloor, from the highest spot in the room and set up my line laser at that mark.
Speaking of which, if you’re planning to install an entire kitchen’s worth of cabinets yourself, I would highly recommend investing in a line laser. A good laser can be purchased from Lowe’s for around $150, and they make installing cabinets like this much easier.
Anyway, with my laser setup at 54”, I could go around the room and mark out the cabinet locations based on the layout I created with my local Lowe’s cabinetry person. This not only helps to visualize where the cabinets will go, but it also allows you to see any obstacles you might have to work around, such as outlets.
The only upper cabinet not in line with the others is the cabinet above our new cooktop, where the range hood will be installed. I ended up using an old school level to mark the line for this cabinet, which is 9 inches shorter than the other upper cabinets.

Next, I could get a ledger strip installed even with my line laser, which I did by driving some screws through the strip into the studs. This strip helped to support the upper cabinets while we installed them and, since it was in line with the laser, we knew it was both straight and level. I also added another ledger strip for that range hood cabinet off camera.
With that, we could finally get to actually installing the new cabinets, starting with the upper corner cabinet.
First, I marked out the stud locations on the wall using a stud finder, and then transferred those locations to the back of the corner cabinet.
I drilled holes in those locations, through the nailers, which are the plywood strips on the back side of the cabinet, and then partially drove in a few 2 ½” screws along the top edge of the cabinet.
One note : depending on your cabinet height, your cabinets might only have nailers along the top and bottom edge, but my 42” tall upper cabinets had an additional nailer along the center of the cabinet.
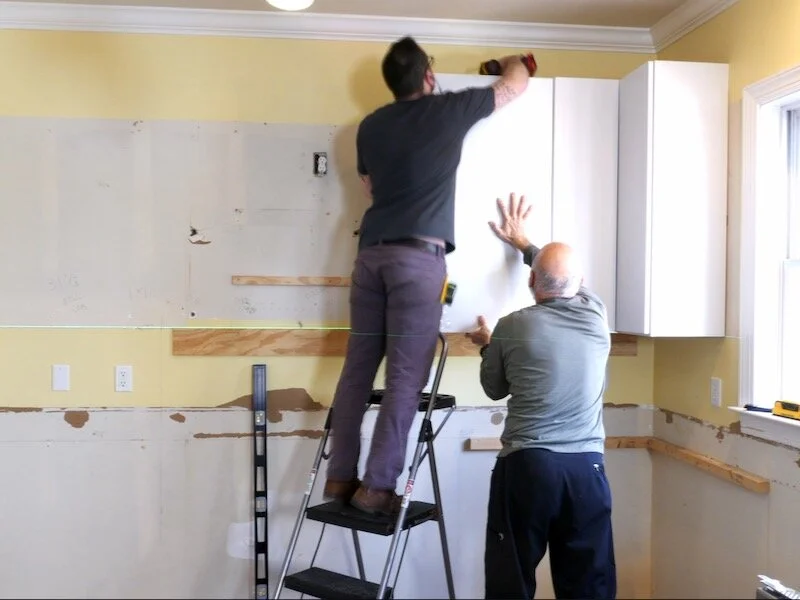
With the screws in place, we could lift the cabinet up onto the ledger strip, and then I could partially drive in one of the screws to hold the cabinet in place.
Next, we checked for plumb and level, adjusting where needed by either driving in the mounting screw a little further or adding shims. This was a bit of a tedious process with this corner cabinet, since we had to check for plumb and level in two directions, but eventually we got it dialed in and I could drive in all of the screws.
We repeated the same process for the second upper cabinet in the line, drilling holes and pre-driving screws in the stud locations and then mounting the cabinet, but we realized we had a bit of an issue after getting the second cabinet mounted.
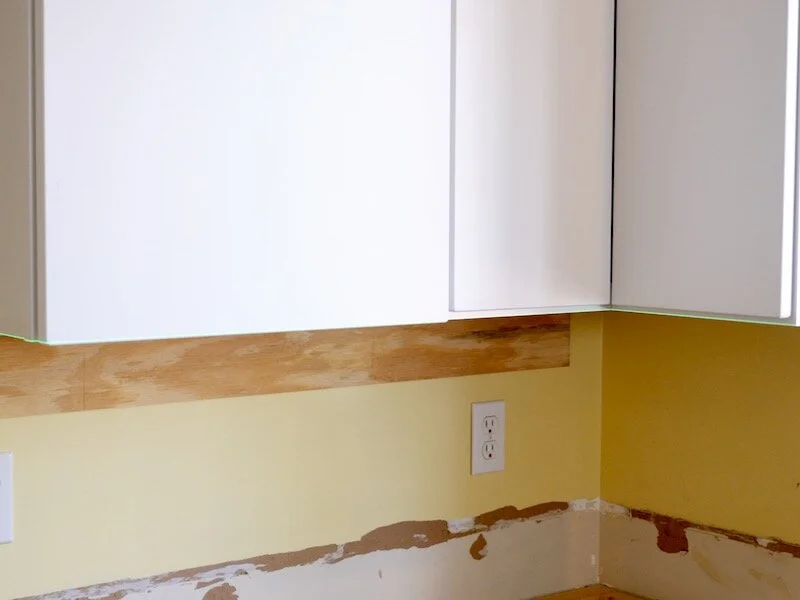
As you can see, there is a wider reveal underneath the doors on the corner cabinet, while the door is basically flush with the bottom of the cabinet on the other cabinet. Unfortunately, this larger reveal is supposed to be along the top of the cabinets, as it allows room to install crown molding directly on the cabinet, if that’s something you want to do.
Even more unfortunate was the fact that we had to remove both cabinets to fix this issue, flipping the corner cabinet over and reinstalling it. Thankfully, this went fairly quickly and the only signs of error were a few extra screw holes in the back of the cabinet.
Anyway, on the second cabinet, before shimming it or securing it to the wall too much, we clamped together the face frames so we could attach them. I would definitely recommend using something like these f-style clamps here, as they have a lot more holding power than the squeeze clamps you might have. These cabinets are heavy and will shift around if you don’t clamp them tightly.
With the face frames clamped together so they were nice and flush, I pre-drilled a hole using a tapered countersink bit and then drove in a 2 ½” deck screw to attach the face frames.
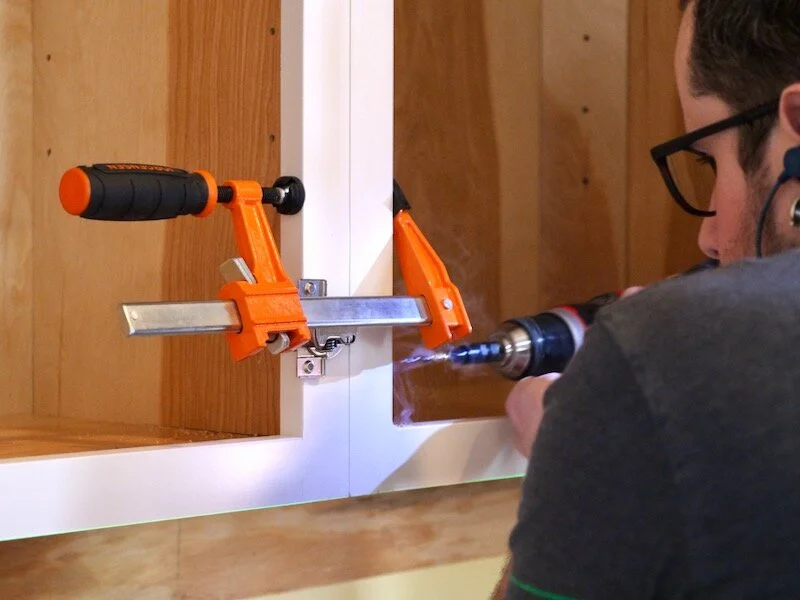
Pre-drilling here is definitely a requirement, as these hardwood face frames will split otherwise. I actually moved up to a bigger countersink bit soon after this, to better match the size of the screws I was using.
After attaching the face frames, I shimmed the cabinet as needed and then fully drove in the screws attaching the cabinet to the wall.
The next two cabinets were really just more of the same, with the range hood cabinet installing on that secondary ledger strip.
One thing you might have noticed is that I didn’t cut out the opening for the outlet on the range hood cabinet, and that’s because I actually had to change sizes on this cabinet to fit the Samsung range hood I’m using. This cabinet was only being installed temporarily and will be swapped out whenever the replacement cabinet comes in.
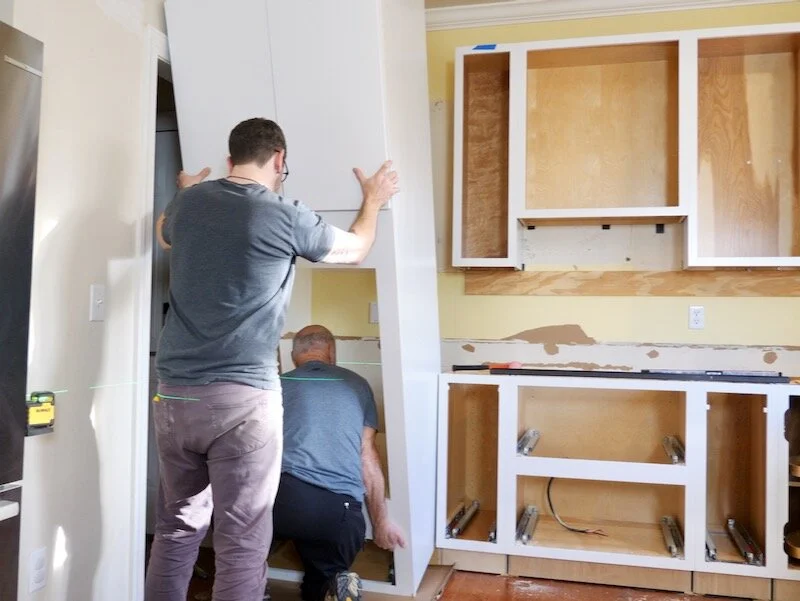
The cabinet to be installed to the left of this 12” upper cabinet is a full 8 foot tall wall oven cabinet, so we needed to get the base cabinets installed on this wall as well, before adding that wall oven cabinet.
Step 4: Installing Modern Thermofoil Lower Cabinets

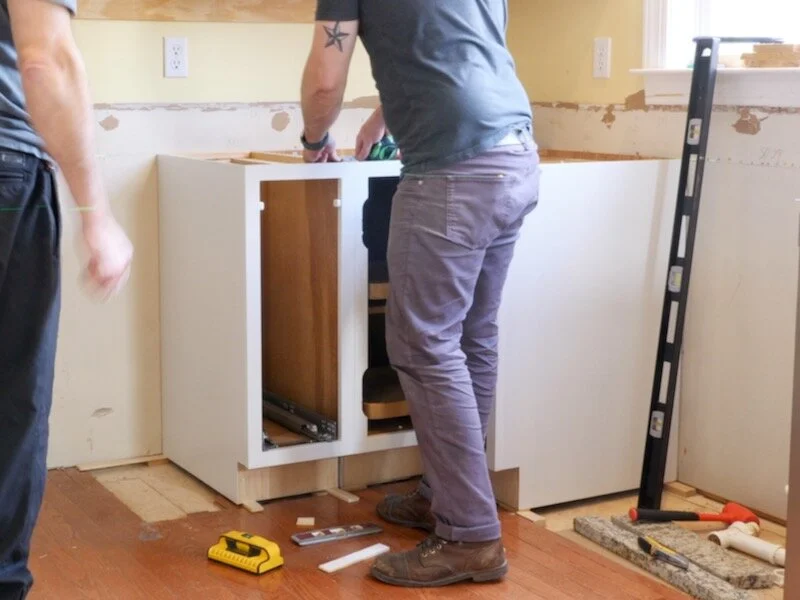
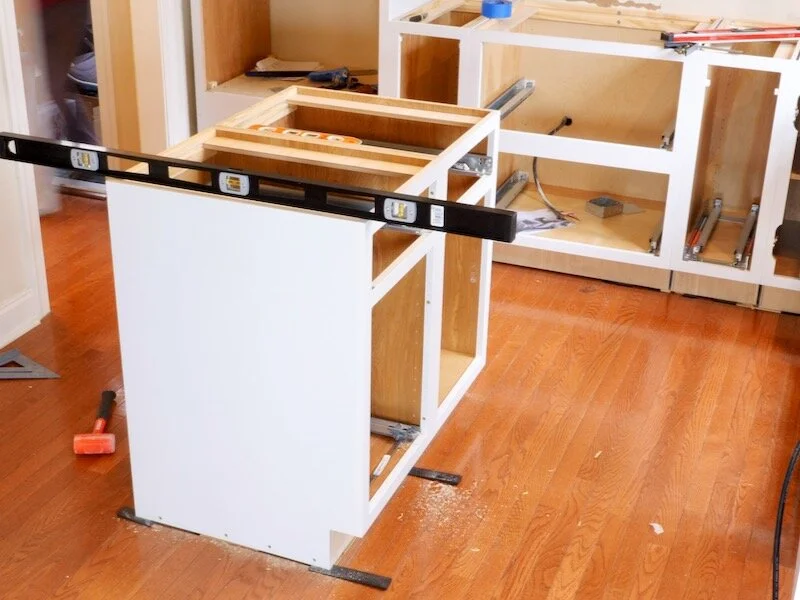
We once again started in the corner, with this lazy Susan cabinet, and we had to add some blocking underneath where the cabinet would be installed to bring it up to the same height as the hardwood flooring. I tacked the blocking in place with a finish nailer, so it wouldn’t move around while we moved the cabinet into place.
Speaking of which, next we moved the cabinet into place and then shimmed it to be even with my laser line, which I set at 34 ½”.
These dimensions are standardized on cabinets, at least here in the US, and by using them you’ll end up with an 18” area between the top of the 1 ½” thick countertop and the bottom of the upper cabinets. Since most tile backsplashes are designed to work with this 18” dimension, it’s best to try and hit this measurement as close as you can. Once again, using the line laser really helped with this, as it allowed me to account for any inconsistencies in my floor.
As you can see, as long as the laser was hitting both the front and back edges of the base cabinet along its’ entire perimeter, we could be sure the cabinet was both plumb and level, and we just needed to shim the cabinet to make this work.
We attached the cabinet to the studs using more 2 ½” screws through the back of the cabinet, and then I trimmed the shims flush with a pull saw before moving to the next cabinet.
This cabinet had a big slide-out knife block and utensil holder, and we removed it to make installation easier. As I mentioned, all of the drawers and pull-outs on these KraftMaid cabinets use Blum undermount slides, which are my personal favorite drawer slides, and they remove extremely easily by pulling on a few clips on the underside of the drawer.
We installed this cabinet in the same way as the corner cabinet, first adding blocking where it would sit on the floor and then moving it into place. We also attached the face frames together, as we did with the upper cabinets, and then we shimmed it as needed to get it plumb and level.
The next cabinet in line is where our new Samsung induction cooktop will be installed, and I needed to run the electrical for the cooktop through the back of this cabinet. The outlet for the old range was mounted to the floor here, so I killed the power and then removed it from the floor, and then re-routed it through the drywall so it was roughly centered in the new cabinet.
We drilled a hole through the back of the cabinet, fed the wiring through the hole, then attached the cabinet to the previous cabinet and the wall.
After the cooktop cabinet, there was another 12” base cabinet to install, with another slide-out shelving unit, and then it was time to get the wall oven cabinet installed.
This cabinet had a separate toe kick structure, which allowed us to level it prior to putting the wall oven in place.
Also, I tacked the toe kick in place with a few finish nails once it was level, which I would highly recommend, as it really helped keep the toe kick from sliding around when lifting the wall oven cabinet into place.
This wall oven cabinet was an absolute beast, and we found the best way to get it into place was to tilt it forward and then slide it back onto the toe kick, as I don’t think we could have really lifted it into place otherwise.
I attached the wall oven cabinet to the wall with a few screws through the bottom and top of the cabinet, making sure to hit the studs same as with the rest of the cabinets, and then I attached the face frame of the 12” base cabinet to the wall oven cabinet.
I actually had to slightly loosen the screws holding the 12” cabinet to the wall, as the wall oven cabinet’s face frame was about 1/16” proud, but after loosing the screws, I got them perfectly flush and attached the face frames with more 2 ½” screws.
Also, there will be a filler strip installed to the left of this wall oven cabinet to fill that gap between the cabinet and the wall, but it unfortunately didn’t arrive in time for this video.
The next base cabinet to work on was the sink base, and I obviously had a few obstacles to work around here, including the hot and cold water lines, the drain line, and the electrical for the disposal.

First, I transferred the locations of the plumbing to the bottom of the sink base and then cut out the holes with a combination of a hole saw and a jig saw. I also cut a hole for the electrical while I was at it.
You might be wondering why this sink base looks kind of weird, and that’s because it’s actually made of plastic. This material is what KraftMaid calls CoreGuard, and essentially it helps to prevent the sink base from falling apart when it comes into contact with water, because it will.
Also, since I completely sealed the cabinet with silicone caulk, it keeps any water from leaking through and coming into contact with the sub floor, which would obviously cause some major issues.
Anyway, after drilling the holes for the plumbing, I could cut the pipes so I could feed them through the bottom of the cabinet. I cut the PVC with a reciprocating saw and then cut the PEX tubing with a PEX cutter.
Before doing this, I shut off the water in the house, but there was still a little residual water in the lines, which I wiped up before moving the cabinet into place.
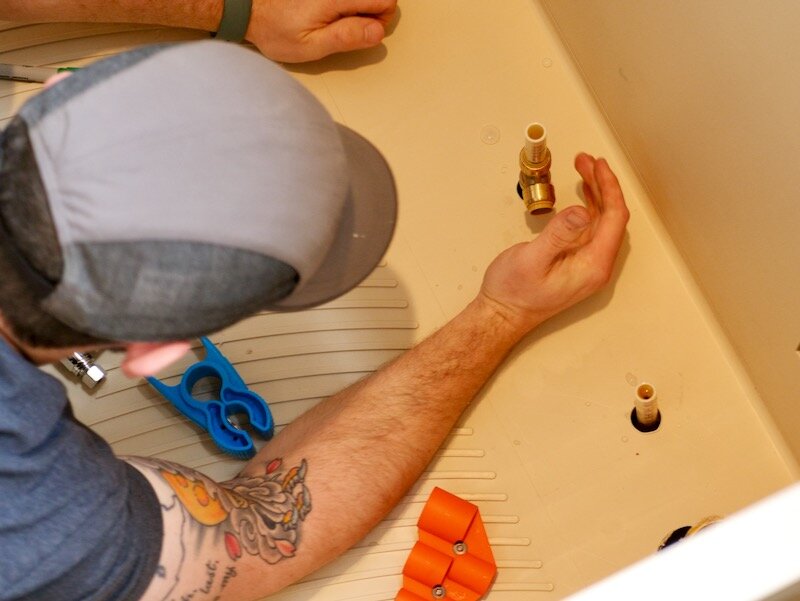
Once the plumbing was fed through the base, I went ahead and reinstalled the PEX fittings so I could turn the water back on in the house. I used these Shark Bite fittings here and they worked great.
I picked up this little orange PEX deburring tool, which also doubles as a depth gauge. By marking the depth with this tool, I could tell when the Shark Bite fittings were completely seated on the PEX.
These fittings just push on, with no special tools required, and I just replicated what was there before, with a tee on the hot water line for the dishwasher supply line and a straight stop shut-off at the end of each line. These shut-offs end with a ⅜” threaded section, which is standard for attaching faucet and dishwasher supply lines.
After turning on the water and checking for leaks, which thankfully there weren’t any, I could get the sink base plumb and level and attached to the corner cabinet.
The last base cabinet, to the right of the dishwasher, has a charging drawer for charging our devices, and I needed to install an outlet behind this base cabinet for that charging drawer to plug into.
I just tapped into the existing circuit here by removing the junction box above and running wire to a new junction box.
After verifying everything was wired correctly, I could cut out the opening for the outlet in the back of the cabinet using a hole saw and a jigsaw, and then I could get the cabinet installed.
Or at least, I could get it installed after trimming the little bit of baseboard and quarter round trim, since these cabinets ended up slightly wider than our old cabinets.
To do this, I marked where the new cabinet intersected with the old trim, extended the line using a level, and then cut the trim with an oscillating tool. Finally, I pried away the cutoff piece and then I could slide the new cabinet into place and get it attached to the wall, leaving the 24” wide opening for the dishwasher between the two cabinets.
I did make sure to double check that the cabinet was even with the sink base using a longer level, but I also referenced my line laser here as well.
One other thing I didn’t do when installing this cabinet that I went back and did later was to double check that the front edges of the sink base and the right cabinet were in line, which they’re weren’t. This was due to the wall having a slight bow to it. I fixed this by shimming the back of the cabinets slightly until they were in line.
Step 5: Kitchen Remodel Island Installation
The last cabinets to install were in the island, which is made up of two 18” base cabinets in my case. First, I marked out where exactly I wanted the island, and obviously I didn’t have a lot of wiggle room here due to the lack of flooring.
After laying out the location, I added some ¾” blocking to the floor to support the underside of the cabinets and bring them up to the same height as the hardwood.
I also added some 2x2 blocking, which is what I attached the island cabinets to, rather than driving screws into the floor like the previous cabinets. This blocking makes for a much more secure island, as it runs along the inside of the sides of the cabinets.
I attached the blocking with some 3” deck screws, so that it was secured to the subfloor, and I made sure to set them in ¾”, which is the thickness of the cabinet sides.
Before moving the cabinets into place, I needed to drill a hole into the bottom of one of the cabinets for the electrical wiring. After running the wiring through the cabinet, I moved it into place, shimmed it so it was level and plumb, and then attached the cabinet to the blocking using 2 ½” screws.
I repeated the same process for the other cabinet, also attaching the face frames of the two cabinets.
I actually messed up here and didn’t make my screws attaching the cabinets to the blocking close enough to the floor, and because of that, they’re visible even after adding the quarter round. I’ll be able to fill the holes with white caulk and hide it, but, if I were to do this again, I’d use trim head screws instead and I’d make sure the screws were closer to the floor.
Since this island is made up of two base cabinets, I needed to add a back panel to make them look like one unit. This panel comes oversized, so I cut it to size using my table saw and then installed it using a handful of brad nails. I made sure to add the nails in areas that wouldn’t be visible once the countertops were in, and in the corners where they’d be covered by the corner trim.
Step 6: Installing Stacked Samsung Wall Oven

To get our kitchen back to being a little more functional, next I went ahead and prepped for installing the Samsung wall oven and microwave combo unit. First, I needed to trim the face frame on the wall oven cabinet so the wall oven would fit, and I double and triple checked these measurements before doing any cutting.
I also added painter’s tape in the areas I’d be cutting, both to prevent tearout on the face frames, but also to prevent the base of the jigsaw from scuffing the finish.
After marking out my lines, I first cut the bottom of the face frame flush with the plywood in the cabinet using my pull saw. This plywood is what actually supports the wall oven, so I wanted to make sure it would sit perfectly flat on that plywood.
Next, I cut out the rest of the opening using my jigsaw. I used a higher tooth count blade to give me a cleaner cut and just took my time.
Before putting the wall oven into the cabinet, I needed to get it wired up, and prior to this I had an electrician run another circuit for this wall oven, since we went from one range to a separate wall oven and cooktop so we needed an additional 40 amp circuit.
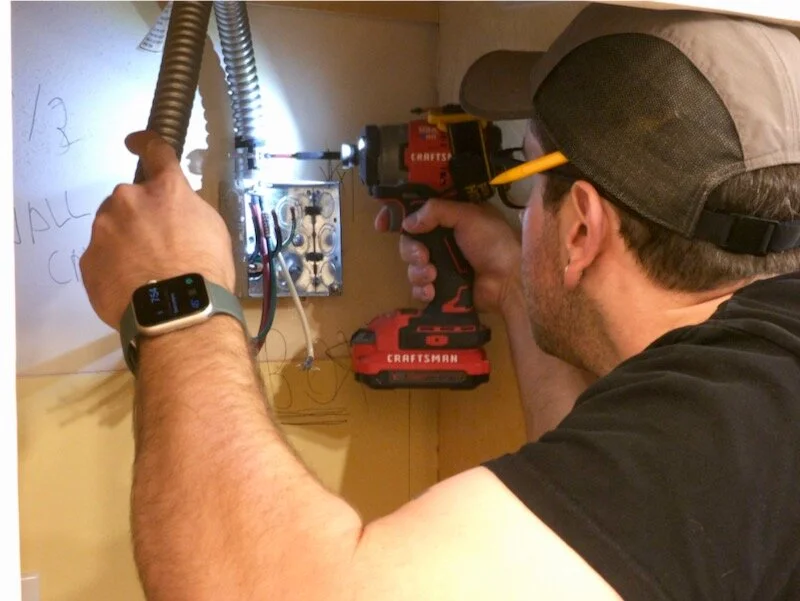
To wire the oven, I just attached the cable coming from the wall oven to the junction box and connected the wires based on the wiring instructions in the wall oven manual.
Before closing up the junction box, I turned on the breaker to make sure everything was wired correctly, and man is this thing a huge upgrade from our previous setup. I can control this oven from the Samsung app via wifi, I get notifications on my phone when things are done cooking, and obviously it’s got this beautiful touchscreen display.
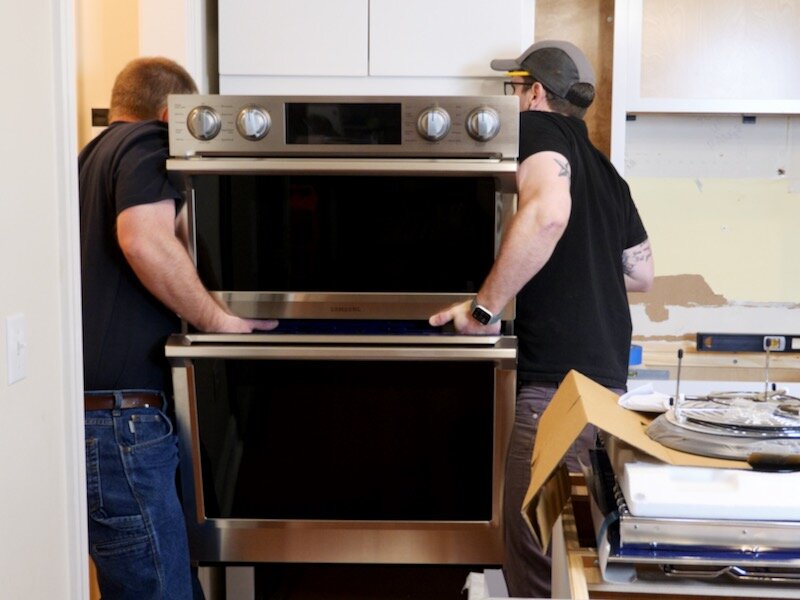
Anyway, with the oven working, I closed up the junction box and then I could lift the wall oven into place, with the help of my buddy Justin. This thing was far from light, and I probably should have removed the bottom door first since I had to do it anyway later, but we managed to get it into place and, thankfully, it fit perfectly.
The oven attaches to the cabinet with a few screws, and I made sure to pre-drill these holes to avoid splitting the face frame.
Also, there was a lower trim piece that needed to be installed, and I had to remove the bottom door to install it.
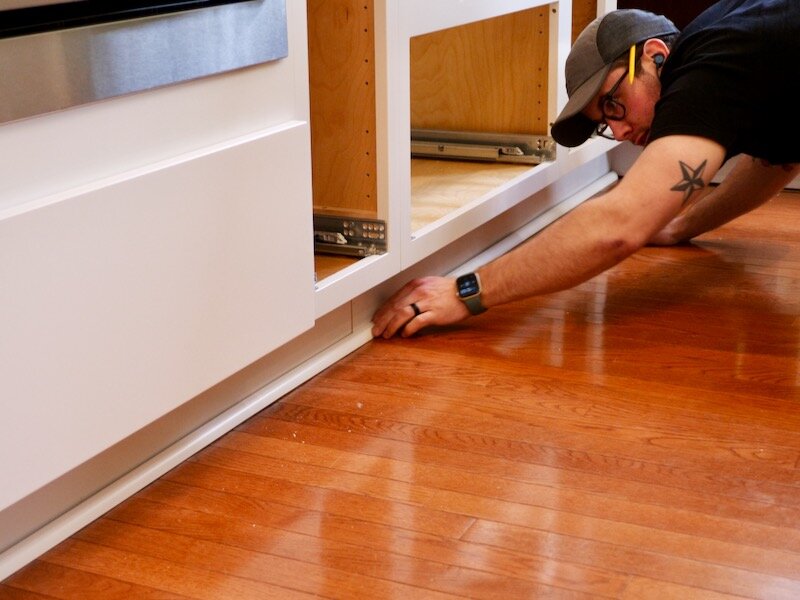
Step 7: Installing Thermofoil Toe Kicks Below New Kitchen Cabinets
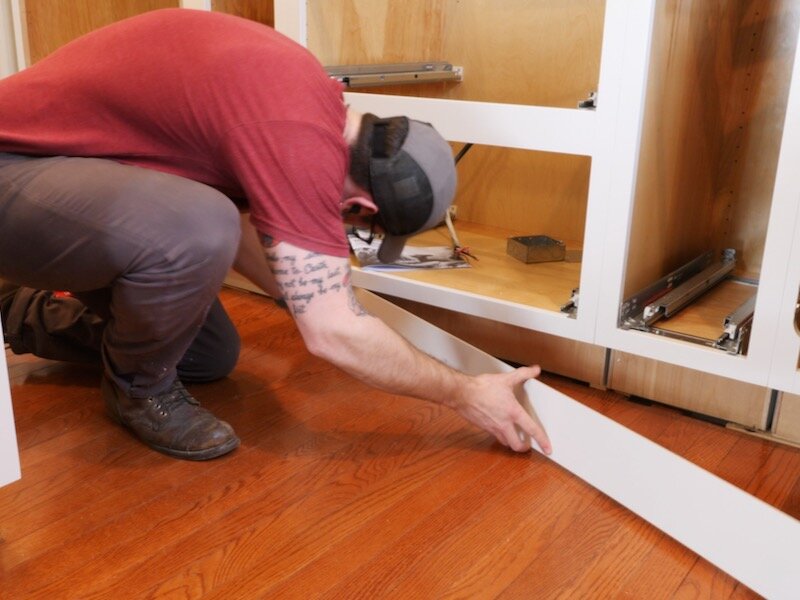
With that, the wall oven was in, so I could get back to the finishing touches on the cabinets. First, I installed the toe kick covers, which hide all of the individual toe kicks.
I installed these covers with a little construction adhesive and some brad nails, and I had to splice a few pieces on this wall with the wall oven, since these only come in 8 foot lengths, but overall they installed easily enough.
I added the toe kick covers to the island as well as the other base cabinet, and then I could get my new Samsung dishwasher installed.
Step 8: Installing The Dishwasher In Our New Kitchen
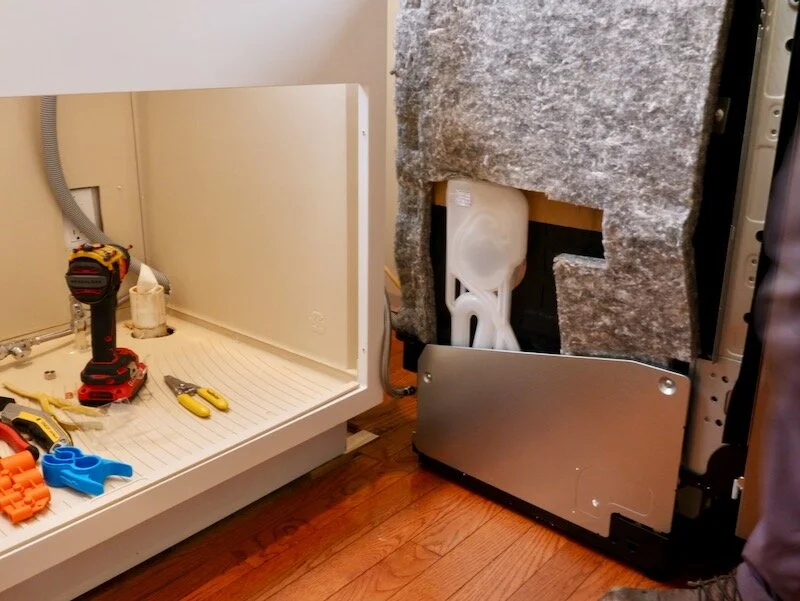
Before doing that, I went ahead and added the silicone caulk to the seams in the sink base, as well as around the PEX pipes. I had to get a separate cover for the PVC opening, since I did such a hack job on that hole, and I installed that later.
To install the dishwasher, I first drilled a hole through the side of the cabinet for the dishwasher supply line, as well as the drain line. I attached one end of the supply line to the hot water supply and then attached the other end to the back of the dishwasher. I turned on the water to check for leaks, which I did have, so I tightened the nut on the back of the dishwasher and then checked it again, and I was leak free.
While I did my leak test, I went ahead and wired up an outlet for the disposal, since I’ll be installed a push-button switch when I install my new sink, rather than using the existing wall switch.
Once the dishwasher had passed its leak test, I could get it slid into place, making sure the electrical wire for the dishwasher was running through the channel on the underside of the dishwasher as I slid it back.
To connect the dishwasher to the electrical, I ran the wire into the junction box on the front of the dishwasher, which is located underneath this front flap.
After wiring, I could peel off the oh-so-satisfying protective plastic, but I didn’t turn on the dishwasher quite yet since the drain line wasn’t attached to anything.
Step 9: Quarter Round Trim Installation
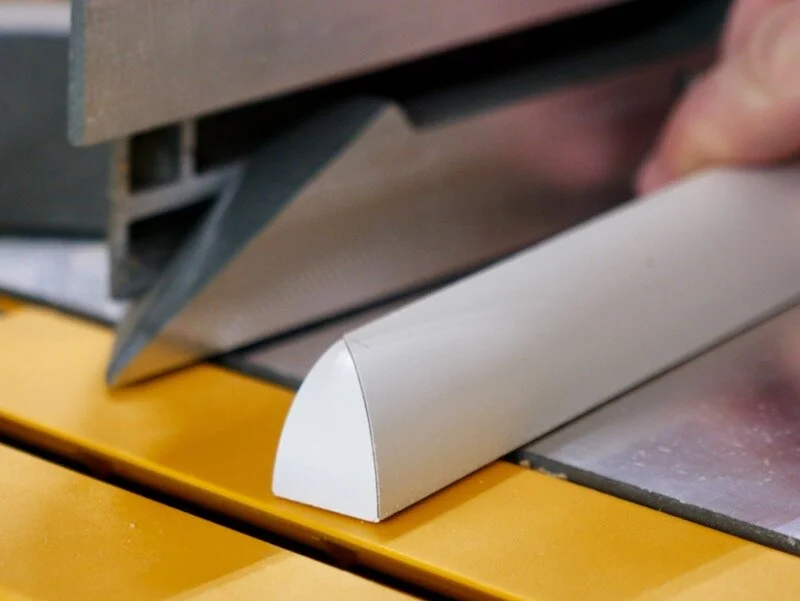
With the dishwasher in, next I could get the quarter round installed. This is a fairly simple process, just cutting the quarter round to length at the miter saw and nailing it into place with finish nails.
The only slightly tricky parts were where the quarter round ended, like here where it meets the dishwasher. You don’t want to install quarter round or those toe kick covers in front of the dishwasher, as you might need to pull it out to work on it later.
To cut a return, which is how you should end quarter round, you cut a miter on the end of your piece as if you were cutting an outside corner, with the point on the bottom front edge of the trim.
Next, on a scrap piece, make a mitered cut as if you were cutting the opposite side of that outside corner, again with the point on the bottom front edge. Finally, cut that same piece with the miter saw set to 90 degrees, lining up the cut so it meets to top of that mitered cut.
This will leave you with a tiny offcut that will match up perfectly with the end of the main trim piece, as you can see here.
To attach the return piece, I used a little wood glue and a single brad nail, and then I could install it.
I repeated the same process on the other half of the base cabinets, and I needed to cut another return piece on the other side of the dishwasher.
Finally, I could install the quarter round around the island, and this is when I realized my screw holes weren’t going to be covered up.
The last bit of trim to install was this corner trim on the back edges of the island, and this covered the edges of that back panel. I just cut this to length and installed it with some construction adhesive and brad nails. These corner trim pieces kept falling off of our previous island, hence why I’m using construction adhesive here.
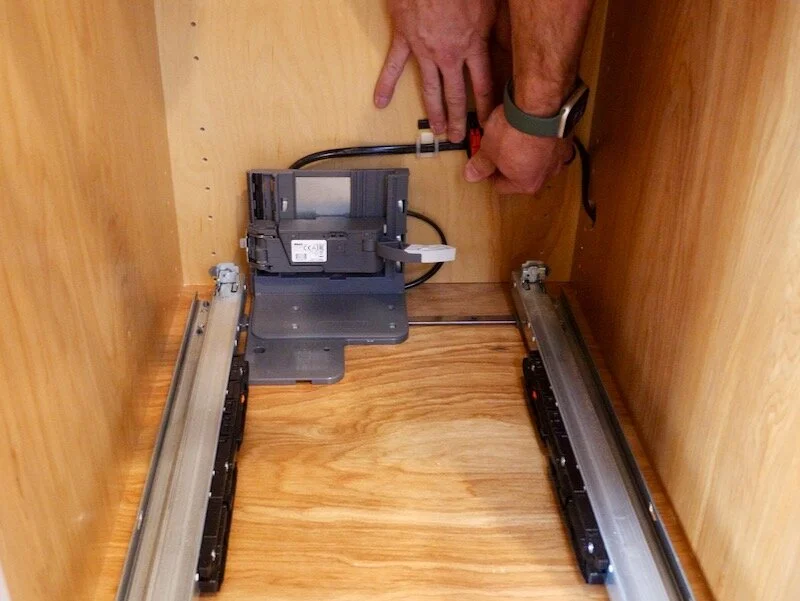
With that, the cabinets were pretty much done save for some caulking around the trim, so next I could start getting things installed into the cabinets. First, I installed this awesome electronic push-to-open trash and recycling bin.
First, I added some sensors to the face frame, then attached the motorized unit to the back end of where the drawer stops. I ran the cable through to the other cabinet, where I had installed a junction box to plug this unit in, and then I connected the wires with this really cool wire clamp that’s included with this Blum system.
Step 10: Final Details In Our Modern Smart Kitchen
Finally, I could add the trash bin drawer and test it out, and it worked great. You just bump the drawer front with your knee and the unit pushes the drawer out far enough so you can throw something away. It’s super awesome if you have your hands full of trash!
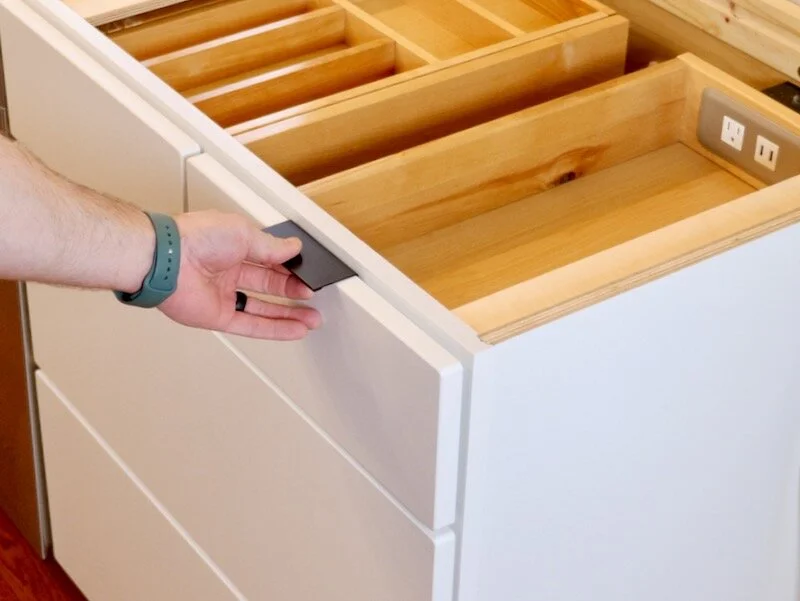
Next, I could get the charging drawer set up, first installing the outlet in the back of the drawer using the provided instructions.
Next, I added this little guard to the top edge of the slide, which just keeps the cord from getting worn over time, and then I could feed the cord through. I did need to remove the slide to do this, but it just attaches with one screw.
Finally, I used the cable clips provided to route the cord along the back of the cabinet, to keep it from interfering with the drawer, and, after a little adjustment, I got it working really nicely.
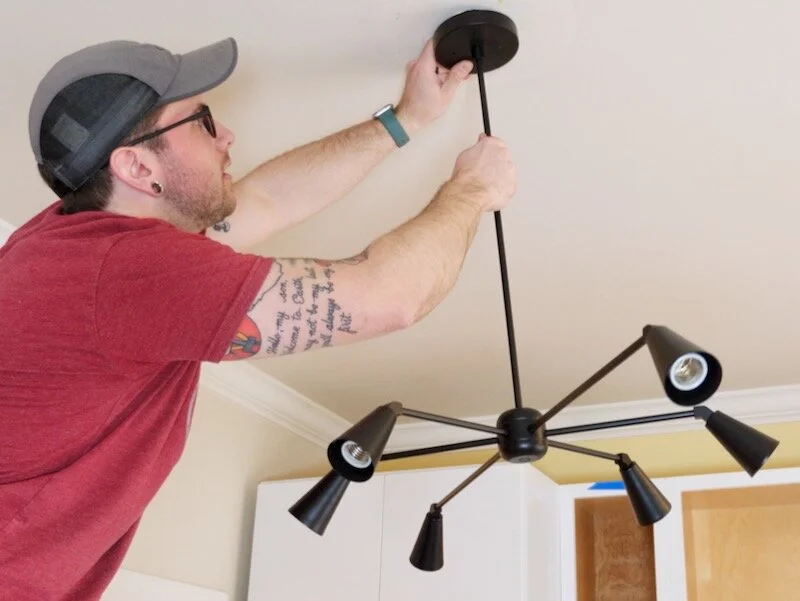
The last bit of electrical work was a new light fixture above the island, which I should have installed before installing the island. This fixture is made by Illuminate Vintage and I picked it up from the Lowe’s website. I absolutely love the look and it puts off way more light than our previous fixture, plus they’re made by hand in Texas. It even came with these LED light bulbs, which was a nice touch.
With that, I could get the rest of the doors and drawers reinstalled, making any adjustments to get them even while I was at it.
The last step in this install was to install the drawer pulls. I installed the pulls with the help of a drawer pull jig, and I would highly recommend using a jig like this, as it will ensure all of your pulls line up.
First, I marked a center line using a combination square, then lined up the center line on the jig with that line and clamped it in place. I used a self-centering drill bit to drill the holes through the holes in the jig, vacuumed up the dust, and then attached the drawer pulls with the included screws.
I went with these awesome black edge pulls, which I also got on the Lowe’s website, and I love the way they look with these white cabinets. Also, since they install on the back face of the drawer front, I can easily change them in the future with no visible holes leftover.
I repeated the process on all of the drawers and doors, and I went with two pulls on the larger drawers just for ease of opening.
Once the pulls were in, all that was left to do was load all of our stuff back into the cabinets and I could call this cabinet install complete.