
How To Build A Garage Workbench / Miter Saw Station / Outfeed Table Combo Part 2
Learn how to build the ULTIMATE workbench, miter saw station, and outfeed table combo for your garage workshop! This workbench is the perfect all-in-one unit for any small shop, with tons of storage, work holding, and it's mobile! // Get plans here
Note: The links below are affiliate links
🤖 Learn more about my Inventables X-Carve CNC :
📦 Materials Used On The Garage Workbench:
1 ¼” #6 Screws (for t-track)
T-strap hinges (for saw platform)
Eye screws (for saw platform)
Barrel latches (for saw platform)
4” Dust Port (for dust hood)
Angle Brackets (for dust hood)
Thumb Screws (for dust hood)
Threaded Inserts (for dust hood)
🛠 Tools Used On The Garage Workbench:
Magnetic Screw Holder (for my impact driver)

Building A Fold Down Miter Station Workbench Process (part 2):
In case you missed my previous post, I’ve been working on a new workbench for my garage shop here at the house. Up to this point, I had built the base of the workbench and gotten the drop-down miter saw platform working, and next I wanted to get the dust hood built, which would hopefully improve the dust collection on the miter saw. See part 1 here
Step 1: Cutting Out Parts For Miter Saw Dust Hood And Assemble

I mocked up a design in SketchUp when planning out the bench and so, after confirming some real world measurements, I could start cutting my pieces to size. I wanted the hood to be as tight to the saw as possible, both to improve the airflow around the saw but also to leave as much space on the workbench top as I could.
I cut the sides to size, cutting an angled section where the top of the hood would attach, and then I cut the top and back pieces to rough size using my track saw.
Next, I marked where the sides met up with the back panel, marking the angle on the piece, and then I got the back panel cut to width at the table saw, matching the angle by beveling my blade.
It’s really best to mark these pieces and cut them to size when building something like this, rather than trying to do a bunch of measuring, as all of those angles make things confusing in a hurry.
After cutting the back panel, I clamped it to one of the side panels so I could mark out the length of the angled top panel.
Because of the direction the blade on this table saw tilts, I had to cut this panel to size by cutting off the offcut, if that makes sense, but I got it fitting nicely and then cut the last piece, the narrow top piece, before assembly.
Assembly was a little tricky, especially since I don’t have any corner clamps here at the house, but I eventually got the pieces assembled with a combination of brad nails, trim head screws, and CA glue. Some of these pieces were fairly bowed, as I made this out of scrap ½” plywood, so I had to persuade them a bit, but I got everything together eventually.
Step 2: Secure Dust Hood To Workbench With Threaded Inserts

Next, I needed to figure out a way to secure the hood in place while in use, while also being able to easily remove it if I needed to use the entire top. I landed on using threaded inserts in the workbench top in tandem with thumb screws going through angle brackets attached to the sides of the hood.
I first added the angle brackets to the sides of the hood and then positioned the hood so the saw still had full range of motion.
After dialing in the position, I used a self-centering drill bit to mark the hole locations where the angle brackets met up with the workbench top, and then I drilled holes to accept threaded inserts.
I always sneak up on the fit on these, especially in softer woods like this Pine plywood, but eventually I got a nice, snug fit with the inserts and installed all four into the workbench top.

After installing the inserts, attaching the hood to the workbench was as easy as threading in a few thumb screws, and this made for an extremely secure but easy to remove connection.
Finally, I installed this 4” dust port from Rockler, which works with their Dust Right quick fit system. I traced out the hole opening, cut the hole with my jigsaw, and then attached the fitting with some silicone and a few screws.
Step 3: Cut Hole For Proper Ventilation

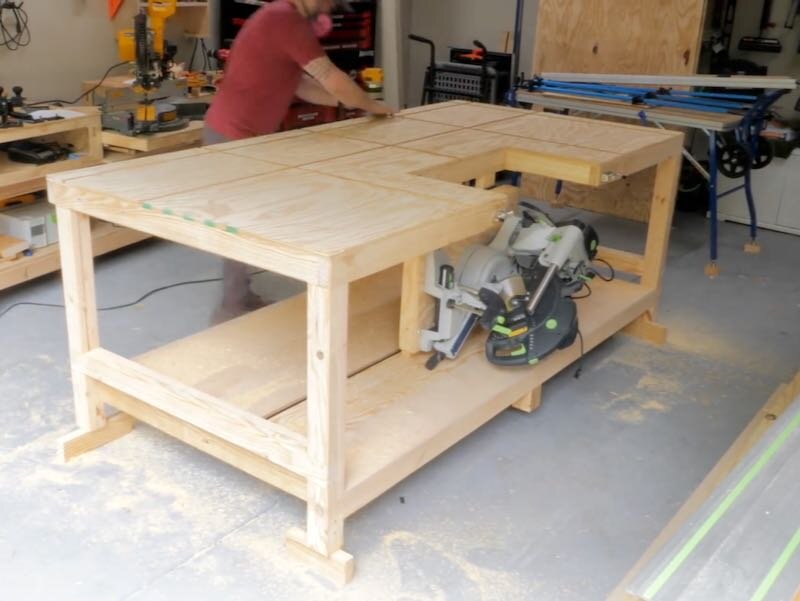
With that, the hood was done, so I could get the workbench cleared off so I could add some t-track. One added bonus is the hood actually fits on the bottom shelf of the workbench, so I can store it away easily when I’m not using it.
T-Track Grooves On Workbench Surface

Before routing the grooves for the t-track, I removed all of the screws I had used to temporarily attach the plywood top to the framing while the glue dried, and I unfortunately got a little chip out when removing these screws. I would definitely pre-drill and countersink these holes to help reduce this if I had to do this again.
Anyway, I’m fortunate enough to have a Festool router and track long enough to route these grooves, so this process was a breeze, but you could accomplish something similar with a long straight piece of plywood as a straight edge to run your router up against.
I used a combination square to confirm equal spacing at both ends of the track and then clamped it in place before getting to routing.
Step 4: Route Grooves For T-Track
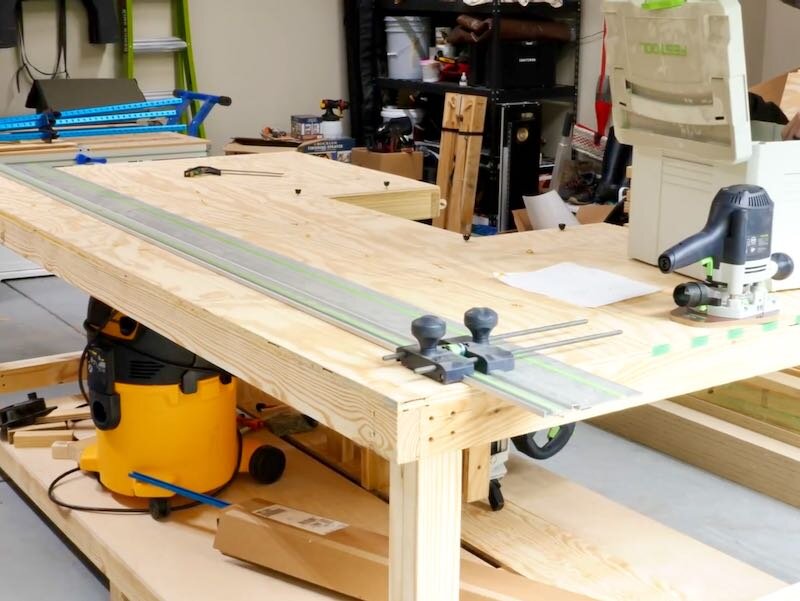
I used a ¾” straight bit to route the grooves and made the cut in two passes, although I definitely think I could have done it in one pass. I also added a little support block at one end to keep the router from getting tippy when it was close to that edge.
I found that one pass left the groove a little tight, but by just running the router across one more time with the same settings, it added enough wiggle room to get the t-track in easily.
After test fitting the track and intersection pieces, I could get the rest of the grooves routed in, which went really smoothly. This is always a bit of a nerve wracking experience, routing into a fresh workbench top like this, but having a track system like this really makes things easy.

Also, I should mention that the exact location of the t-track is covered in the plans I have available for this workbench, which I’ll link to in the video description. The plans include a detailed materials list, cut list, cutting diagram for the plywood, and step-by-step instructions. Again, I’ll link to the plans in the video description in case you’re interested.
Step 5: Apply Finish And Paint To Workbench
I wanted to get finish applied to the workbench before actually installing the t-track, so next I got the bench prepped for finish by chamfering all of the edges and doing some sanding. I really like to soften all of the edges on a workbench like this so I’m not banging into them while I’m working and a heavy chamfer is a lot easier to sand than a roundover.
I decided to add a little pop of color to the workbench by painting the legs and stretchers, and I used TotalBoat’s Elixir paint for this. Elixir is a water-based enamel paint, which means it has minimal fumes, and I’ve found it to be extremely durable.

I rolled the paint on with a mini roller and I taped off the top apron to get nice, crisp paint lines where the legs met the apron. The first coat went on more emerald green than I was expecting, but I just needed to add another two coats to get the deeper green I was after.
One of my favorite things about Elixir is that it dries in about an hour, so I was able to get the entire workbench finished in one day.
After the paint dried, I removed the painter’s tape and then, to clean up the edge of the plywood shelf, I just sanded away the excess paint. I could have taped off this area, but it was just as easy to sand it and I needed to sand the shelf anyway.

I used TotalBoat’s Halcyon Clear for the clear coat on the rest of the bench, adding one coat to the bottom shelf and two coats to the top and aprons.
Adding finish is especially important on workbench tops, as it drastically reduces the likelihood of glue squeeze out sticking to the top.
The workbench was looking pretty sweet after getting the finish added, and next I could move on to adding the t-track.
Step 5: Attach T-Track To Grooves In Workbench Top

All of the t-track on this workbench is from Rockler, and I really love their universal t-track, as it works with 5/16" and 1/4" T-bolts, as well as 1/4" Hex-bolts, making the accessory options super versatile.
I started by installing these intersection kits, using a self-centering drill bit to pre-drill the holes and then driving in some 1 ¼” screws to attach the track. I had strategically placed the blocking and framing below the plywood top so that these screws had something to grab, but I did need to add more blocking in a few areas, which I’ll show in a bit.

You could also probably just use 5-minute epoxy and shorter screws to attach the t-track with no blocking below, but I wanted to be able to remove the t-track in the future if I ever damage any sections.
After adding the intersections, I could start adding that blocking, starting with a piece for the vise I’ll be adding later. All of this blocking really should have been added when I was initially building the top, but I was in a hurry and just forgot to do it.
Positioning this piece was a little tricky given how close it was to the workbench leg but, with the assistance of a pry bar, I eventually got it positioned and then toe screwed it into place.
The blocking for the vise needed to be flush with the front apron, but the blocking for the t-track just needed to be long enough for the 1 ¼” screws, so I used some offcuts for these pieces. I cut this first piece of blocking way too tight, so I really had to persuade it into place, but I eventually got it positioned and then attached it using one of the screws through the t-track above.

I repeated this process for the rest of the underside of the workbench, which was definitely a bit of a pain, but eventually I got all of the blocking installed, so then I could get the rest of the t-track installed.
I cut the sections to length using the miter saw, since regular woodworking tools cut aluminum fine as long as you take it slow, and then I sanded off any burrs.
Unfortunately, I realized about halfway into installing the t-track that I was going to be a little short, but I went ahead and installed all of the pieces I had, again using those 1 ¼” screws.
Banks Of Drawers Under Workbench
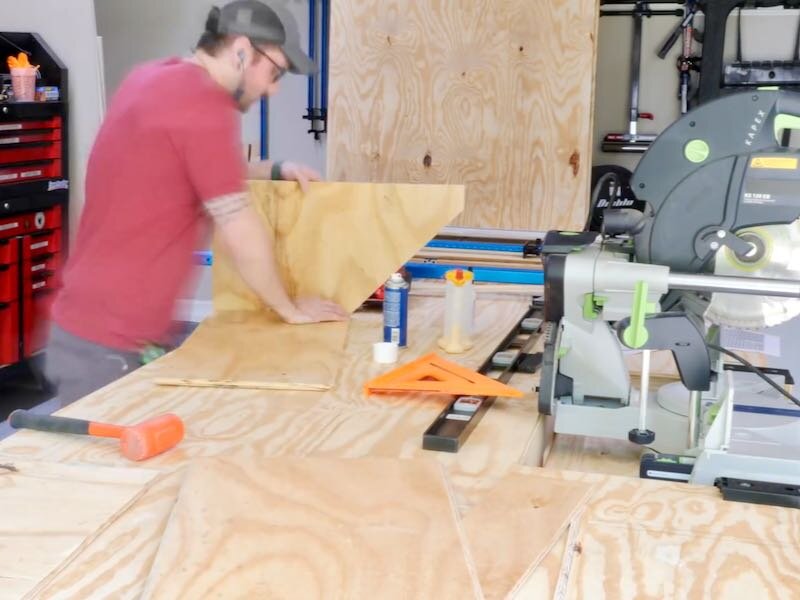
Next, I could work on the two banks of cabinets for the bottom shelf, and I started by breaking down a few sheets of ¾” plywood using my track saw. You could also have your home center do this for you, and I was only cutting these pieces to rough width at this point anyway so accuracy wouldn’t be hugely important.
Now, it was at this point that I made the mistake of dropping one of these extremely heavy sheets of Radiata Pine plywood directly onto my feet, consequently breaking my big toe on my left foot, even with my boots on. Unfortunately, I was filming a time lapse, so we only get this blurry image, but man that hurt, and I’ve got some steel toe boots on order.
Step 6: Cut All Parts From Sheets Of Plywood

This unfortunately meant I had to stay off of my feet for a few days, but I got back to it the next week and finished roughly breaking down the sheets.
Next, I cut the pieces to their final width, to ensure they were all exactly the same size, and then I could start breaking some of the panels down into the individual drawer box pieces.
When doing this, I always use the factory edge as the reference edge on my first cut, but I also cut that first piece oversized to allow me to trim off that factory edge. This means I have to make a few extra cuts, but I end up with super clean edges on all of my pieces, which typically results in a more square finished project.
There are 16 drawers in these two banks of cabinets, so I had a lot of parts to cut, and then I moved on to cutting the parts for the cabinets themselves after cutting the drawer parts.
For the joinery on the drawers and cabinets, I went with pocket holes, but there are obviously tons of options there. Pocket holes are quick and simple though, and it’s nice that all of the screw holes are hidden in the finished drawers.
Step 7: Create Joinery By Drilling Pocket Holes Into Your Parts

I added pocket holes to all of the front and back pieces of the drawer boxes, and went ahead and added them to the cabinet stretchers while I was at it.
Assembling drawers with pocket holes is pretty simple, but I do make sure to clamp the parts together before driving in the screws to keep them from moving around. Also, I didn’t add any glue here, as I really don’t think it’s necessary, but you could if you wanted even beefier drawers.
After getting all 16 drawer box frames screwed together, I got a sheet of ¼” plywood broken down to use as the drawer bottoms. I first ripped the sheet roughly in half at the table saw and then cut the piece into some more manageable chucks using a circular saw.
Finally, I cut the drawer bottoms to final size using the table saw, once again using the same technique of using the factory edge as reference but eventually cutting it off.
Also, just to clarify in case you’re following along, I call for a combination of ¼” and ½” plywood for the drawer bottoms in my plans, but I don’t really show that here.
I kept it super simple when attaching the drawer bottoms and used glue and 1” brad nails. I could also ensure the drawer boxes were square at this point by making sure the sides lined up with the bottom panels before adding the nails.
Step 8: Constructing Cabinet Carcass’s

With that, the drawers were done except for a little sanding, so I moved on to building the cabinets. I wanted to keep the weight down on this workbench, as it was already getting super heavy, so I decided to use stretchers to attach the side panels rather than having any full back, top, or bottom panels.
This made for a slightly trickier assembly process but it saved me a ton of plywood, so I think it was worth it.
Once again, I just made sure to clamp all of the joints before driving in the pocket screws and, after adding the stretchers to the top and bottom of the cabinets, I went back and added the back stretchers as well, which butt up against the top and bottom stretchers.
These cabinets each have two sections, so I also went ahead and assembled the second half of each cabinet, before assembling them as a whole unit, by adding just the stretchers to one of the side panels.
With both sections assembled individually, I could attach them to create each cabinet unit, and you’ll notice that I had to offset my pocket hole locations here to ensure there wouldn’t be interference when driving in the screws.

Once again, I just clamped everything in place before driving the screws and everything came together really nicely.
Finally, I added those back stretchers to the second section of the cabinets, and then the cabinets were done.
Step 9: Drawer Slide Installation In Each Cabinet Carcass
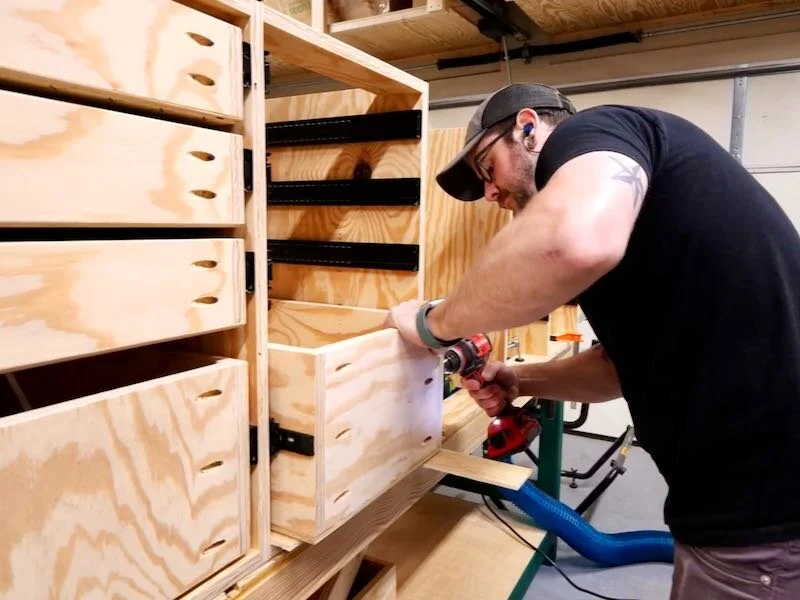
Next, I could get the drawers installed, but before doing that I went ahead and sanded all of the drawers, cleaning up any glue squeeze out and breaking the edges of the drawers. Again, I hate having sharp edges on my workbenches and the drawers are no exception.
I also went ahead and added a heavy chamfer to the drawer bottoms, both to remove the sharp edges but also because this essentially makes the drawer bottoms disappear when you look at the drawers from the side, giving the drawers a cleaner finished look.
Next, I worked on adding the drawer slides to the cabinets and, since I don’t have a drawer slide jig here at the house, I just used some scrap pieces of plywood as spacers to position the slides. I used a self-centering drill bit to pre-drill holes and then attached the slides with the included screws.

I went ahead and installed all of the slides in the highest slide location, and then I could cut down my spacers and install the next row of slides. This process definitely took awhile, but using the spacers made things super easy and, once again, the exact slide locations will be listed in the plans.
I used a similar spacer technique to install the drawers, starting with a ¼” spacer under the bottommost drawer. I added a few screws to each side of the drawer and then, with the slide position locked in place, I could remove the drawer to add the last screw at the back of the drawer.
Once again, this wasn’t particular difficult, it just took a little while to get all of the drawers added. Also, I wised up and used a flathead screwdriver to push the tabs on the sides of the drawer slides to remove them, rather than destroying my fingernails by removing 16 drawers.
Step 10: Install Cabinets Under Your Workbench

Once the drawers were installed, I labeled them all off camera and then consequently removed them again, so I could get the cabinets installed on the bottom shelf of the workbench.
The cabinets had gotten a lot heavier with the addition of the slides, but I wrestled them into place and got them positioned where I wanted, inset about ½” from the front edge of the workbench.
I added a few 1 ¼” screws through the bottom of the cabinets to hold them in place, and then I could add shims between the top of the cabinet and underside of the workbench to lock everything in place permanently.
I purposely made these cabinets about ⅛” shorter than the inside dimension of the workbench, so it’d be easy to slide them into place, and adding the shims will help to keep the top from sagging over time.

I repeated the same process for the other cabinet, added all of the drawers back, and started to consider just how heavy this workbench was going to be once all of these drawers were loaded up.
Step 11: Switch Or Add Heavy Duty Casters To Allow For Mobile Workbench

At this point, it was already extremely difficult for me to lift even one end of the workbench, even with the drawers empty, and the casters I installed in part 1 of this series are only rated at 400 lbs.
I decided to figure out a different solution for the casters and came across these really cool machine casters, which I talked about some on my Instagram stories.
Flipping the bench was definitely tough, especially with a broken toe, but luckily my thunder thighs were able to get it up on its side, so I could cut off the bottom of the legs.

I figured the best tool for the job here was my pull saw, so first I marked some layout lines using a combination square, setting the measurement using the casters themselves.
After transferring the lines to three sides of the legs, I got to cutting. I just made sure to take my time and follow my layout lines and, more quickly than I expected, the leg was cut down. I cleaned up the cut with my block plane and also chamfered the fresh edges, then I could get the casters installed.
I marked the hole locations, pre-drilled the holes, and then added some 1 ¼” screws to attach the casters. I should mention that I center punched the holes on the rest of the casters and I switched to 2 ½” screws, just to ensure the casters were super secure when I had to flip the bench back in the other direction.

Speaking of which, next I could flip the bench again, which was again quite a challenge, and unfortunately I ended up damaging the miter saw platform when it swung out while flipping the bench onto its other side, but I was able to fix it easily enough off camera.
Once all four casters were installed, I could test them out and I was extremely impressed with how well they rolled, even over the relief cuts in my concrete floor. These casters even came with a wrench for tightening the leveling feet, and I’ll link to the exact casters in the video description in case you’re interested.
Step 12: Miter Saw Fence Upgrade On Workbench

One other thing I wanted to address from part 1 of this series was the way in which I was mounting the miter saw fence system I’m using, as I again wanted to be able to easily remove everything from the top of the workbench in case I need to use the entire work surface.
I decided to go back to the drawing board and came up with a pretty cool solution, which was cutting some custom mounting brackets on my X-Carve CNC over at my main shop.
To create this design file, I actually took a picture of one of the mounts that came with the Best Fence system and used the Image Trace feature in Easel, Inventables’ free design software, to convert that picture to a vector.
After some fiddling, I ended up with this bracket shape, which attaches over the front edge of the workbench and accepts the fences.
Now, I knew I wouldn’t have nailed the dimensions right off the bat so I did a little test cutting on some scraps, but I was actually really close right from get-go, only off by about 1/16”. I scaled the bracket up and, after another round of test cutting, I got the friction fit I was looking for, so I could move on to cutting the real brackets.

I used some scrap Walnut plywood I had for the final brackets, and I glued two layers of ¾” plywood into a double thick layer for some added strength. The brackets only took about 15 minutes to cut on the X-Carve, and then I cleaned them up and added a chamfer at the router table.
Back at the house, I could get the brackets mounted to the bench, and I once again called on threaded inserts here. I did use pan head screws here instead of thumb screws, since I figured I’d remove these less frequently, and I recessed the holes so the heads didn’t stick up above the brackets.
Next, I transferred the hole locations to the front apron of the workbench, drilled a larger hole for the threaded inserts, and then threaded in the inserts.
Finally, I attached the bracket using the screws and then I could test the fit, and thankfully it worked perfectly. I think this is a much more elegant solution than the previous mounting brackets, and now these are much more easily removable.
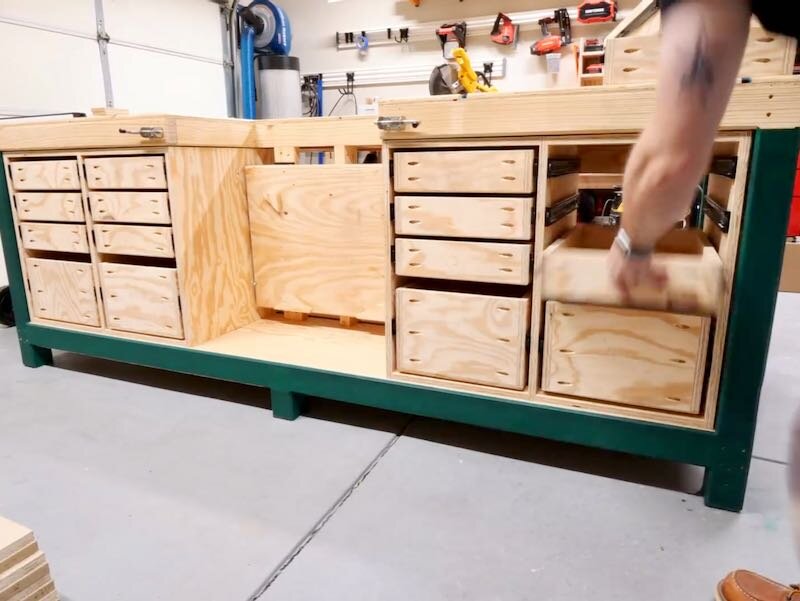
Step 13: Install Drawer Fronts Under Your Workbench

With that done, I could hop back over to the drawers and get the drawer fronts installed. Realistically, these aren’t even necessary on a workbench like this, but they do look better and help to keep dust out of the drawers.
I cut the drawer fronts from another scrap piece of plywood and managed to keep a pretty nice grain match across the drawer fronts by keeping track of the orientation of the pieces while I was cutting.
There were some screw holes I had to cut around here, since this piece was actually the bottom shelf on my previous workbench, but after some careful trimming, I got all of the drawer fronts cut.
Before installation, I gave the drawer fronts a quick sanding, breaking all of the edges while I was at it.
I decided to try a new technique for mounting the drawer fronts that I saw my buddy Marc, better known as the Wood Whisperer, use on one of his shop cabinet projects.

For this technique to work, there need to be mounting holes for drawer pulls on the drawer fronts, so I first marked out those hole locations, and I used this great Rockler drawer pull jig to do this. After marking the hole locations, I pre-drilled the holes, and I repeated this process on all of the drawer fronts.
Next, using a few spacers I cut off camera, I got the first drawer front positioned where I wanted it, and then I drove a few screws through the handle mounting holes I drilled previously into the drawer box. These screws temporarily attached the drawer front but were also long enough to protrude through the inside of the drawer box, giving me reference holes for adding the handles later.
I worked my way up the drawers, adding the rest of the drawer fronts in the same way, and then I could open the drawers and add a few more screws from inside to permanently attach the drawer fronts.

Once those were added, I could remove those longer screws, since they were no longer needed, and continue adding the rest of the drawer fronts. As you can see, the only holes left in the drawer fronts are the mounting holes for the handles, and this was much easier and more adjustable than using something like CA glue or brad nails to attach the drawer fronts initially.
Step 14: Create Homemade Drawer Pulls Out Of Plywood With The Table Saw

Next, I could work on the handles, which I cut from some scrap pieces of ¾” plywood. These handles are actually based on a video I made years ago, right when I was starting this whole channel, and they’re super simple to make.
First, I cut the handles to size at the table saw, and in my case these were roughly 5 ¾” wide by 1 ¾” tall.
Next, using that same Rockler drawer pull jig, I marked the hole locations on the back of the handles and then pre-drilled the holes ever so slightly, just to make them easier to see.
With the hole locations marked, I could move back to the table saw and cut the angles on the back edges of the pulls, which give your hands something to grab onto when opening the drawers.
This angle is fairly arbitrary but I think I went with a roughly 30 degree angle here, and set the fence so the angled cut ended just short of the front edge of the pull, to keep it from being too sharp.

After cutting all of the handles, I gave them a quick sanding off camera and then I could get them installed. I didn’t actually have any screws the exact size I needed on hand, so I recessed the holes slightly so I could use standard 1 ¼” pocket hole screws.
Once again, since I used those longer screws to mount the drawer fronts initially, these hole locations were already marked on the inside of the drawer boxes, so this was super simple.
To attach the handles, I drove the screws in from the inside of the drawer until they were just protruding, lined up the screws with the holes on the inside face of the handles, and then fully drove in the screws. This made for a super quick handle installation and they all ended up pretty much dead centered on the drawers.
I personally really like this style of drawer pull for shop furniture, not only because it’s free but they also barely protrude from the drawer fronts, so you’re unlikely to bump into them.
Step 15: Install A Vice And Power Strip To Your Workbench

At this point, I just had a few odds and ends left to install, starting with this quick release vise from Rockler. Installation was pretty straight forward, and I started by transferring the hole locations for the mounting bolts to the underside of the workbench. The vise included a paper template, so that made this pretty easy.
I decided to mount the vise using ¼-20 bolts and I threaded the holes to accept these bolts. In case you haven’t seen me use these wooden thread taps, they make for a super sturdy connection, and it’s extremely simple to create the tapped holes.
I pre-drilled the holes using a drill bit sized for this tap, and then ran the tap in the holes, making sure to back it out frequently to keep the sawdust from building up.
After tapping the holes, I threaded the bolts in to confirm the fit and everything was looking good, so I could get the vise mounted. You’ll also notice that I added some sacrificial wooden jaws to the vise off camera, which I think is essentially a requirement on this kind of vise so that the vise jaws don’t damage your work.

It was at this point that I realized the mounting holes weren’t lining up and after a minute or two of confusion, I realized the paper template has two sides, one for each of the two sizes of this style of vise that Rockler sells.
Of course, I didn’t notice this before transferring the hole locations, so I had to drill and tap a few more holes, but luckily this went pretty quickly and I could get the vise mounted with the bolts.
After mounting the vise, I added the handle and then added some peel-and-stick cork to one of the jaws, which really helps with the grip.
Once the cork was added, I could test it out and the vise worked great. The vise jaws are a little low, so sometimes the workbench top might interfere with working on whatever’s in the vise. I probably should cut away some material on the framing to bring the vise up a little higher, but I don’t think it’s going to be a huge deal and I can always fix this later if needed.

With that, the vise was done, so I moved on to another item on the final to-do list, adding a power strip. I’m typically going to be working on this workbench out in the center of the garage, away from any outlets, so being able to plug all of the tools I’m using into a single power strip will just make things much simpler, as opposed to running a bunch of extension cords.
Step 15: Miter Saw Platform Area Upgrade

The last thing to work on was something a few of you mentioned in the comments on part 1 of this video, a filler platform for the miter saw platform area. This filler platform will give me a true 4x8 work surface when the miter saw is folded down, and I was actually able to repurpose the platform from my previous workbench for this.
That said, the offcut from the workbench top would have been perfect for this, and that’ll be reflected in the plans.
After modifying the platform, I added a few strips to the inside aprons to support the new platform, but unfortunately I didn’t consider that these would interfere with the miter saw platform. I’m going to have to re-make these a little bit narrower, but you get the idea I’m going for here.
The platform also stores away nicely in the space below the miter saw when the miter saw platform is raised, which is a nice bonus.

With that, this workbench project was finally finished, and I am so happy with the way it all came together. I put a lot of thought into the design of this bench, and I think it will give me years of service in this garage.
The bench is really so versatile, functioning as an outfeed table, miter saw station, and workbench and, between the t-track and vise, there are tons of work holding options.
Again, if you’re interested in building one of these for yourselves and supporting me, I’ve got plans available which I’ll link to in the video description. Also in the video description will be links to all of the tools and materials I used on this project.
Last, if this is your first time to my channel, I’d love it if you’d considering subscribing and ringing that notification bell so you don’t miss my future videos.
Alright, I think that’s going to do it so, until next time, thanks for watching y’all, and happy building.

