
DIY Camper Van Conversion Bed Build, Bed Converts To A Couch!
I built a simple DIY platform bed in a Dodge ProMaster van, which is being converted in to a camper van by Alex of the Singletrack Sampler YouTube channel. All of the tools used in this build are available from Acme Tools. Check out Arrow Fastener's full line of tools and fasteners.
Tools and Materials:
- Arrow Fastener 1" brad nails
- Arrow Fastener hot glue sticks
- (2) 4'x8' sheets of 1/2" plywood
- (1) 2"x8"x16' Southern Yellow Pine board
- (7) 2"x2"x10' boards
- 2" Screws
- Wood Glue
- 12" x 24" HDPE sheet
- Queen Sized Mattress
- Pulleys
- Rope
- 30" Piano Hinges
- My laser cutter, the Full Spectrum Muse
- FarOutRide's bike trays
Step 1: Building the Supports

The first thing to build for the bed was the rails which support the bed platform. I made these out of an 8 foot long 2x8, and the first step was to rip the board roughly in half at the table saw.
I prefer doing this rather than buying 2x4s, as the 2x8s in my area are made of Southern Yellow Pine, which is much stronger than the white wood that 2x4s are made from. That said, if you don’t have a table saw, you could use 2x4s here.
After ripping the boards to width, I cut them to their final length at the miter saw. We made the rails 80” long, which is just long enough to support the bed platform without having the rails extend into the main part of the van’s cabin.
Step 2: Adding HDPE

To help reduce wear on the rails and also help the bed platform slide when converting it from bed mode to couch mode, I decided to line the top edge of the rails with HDPE, the same plastic they use on cheap cutting boards. This stuff is incredibly smooth and I bought this 12” by 24” sheet on Amazon for about $13.
First, I ripped the sheet into 1 ½” wide strips, to match the width of the rails. The HDPE ripped just fine on the table saw with no melting or chipping.
Next, I started installing the strips on the top of the rails using countersunk 1” screws. It’s important that the screw heads are well below the surface of the HDPE, so that the bed platform can slide without catching.
I just kept installing strips until both of the rails were covered, and then I could install the rails in the van.
Step 3: Installing the Rails
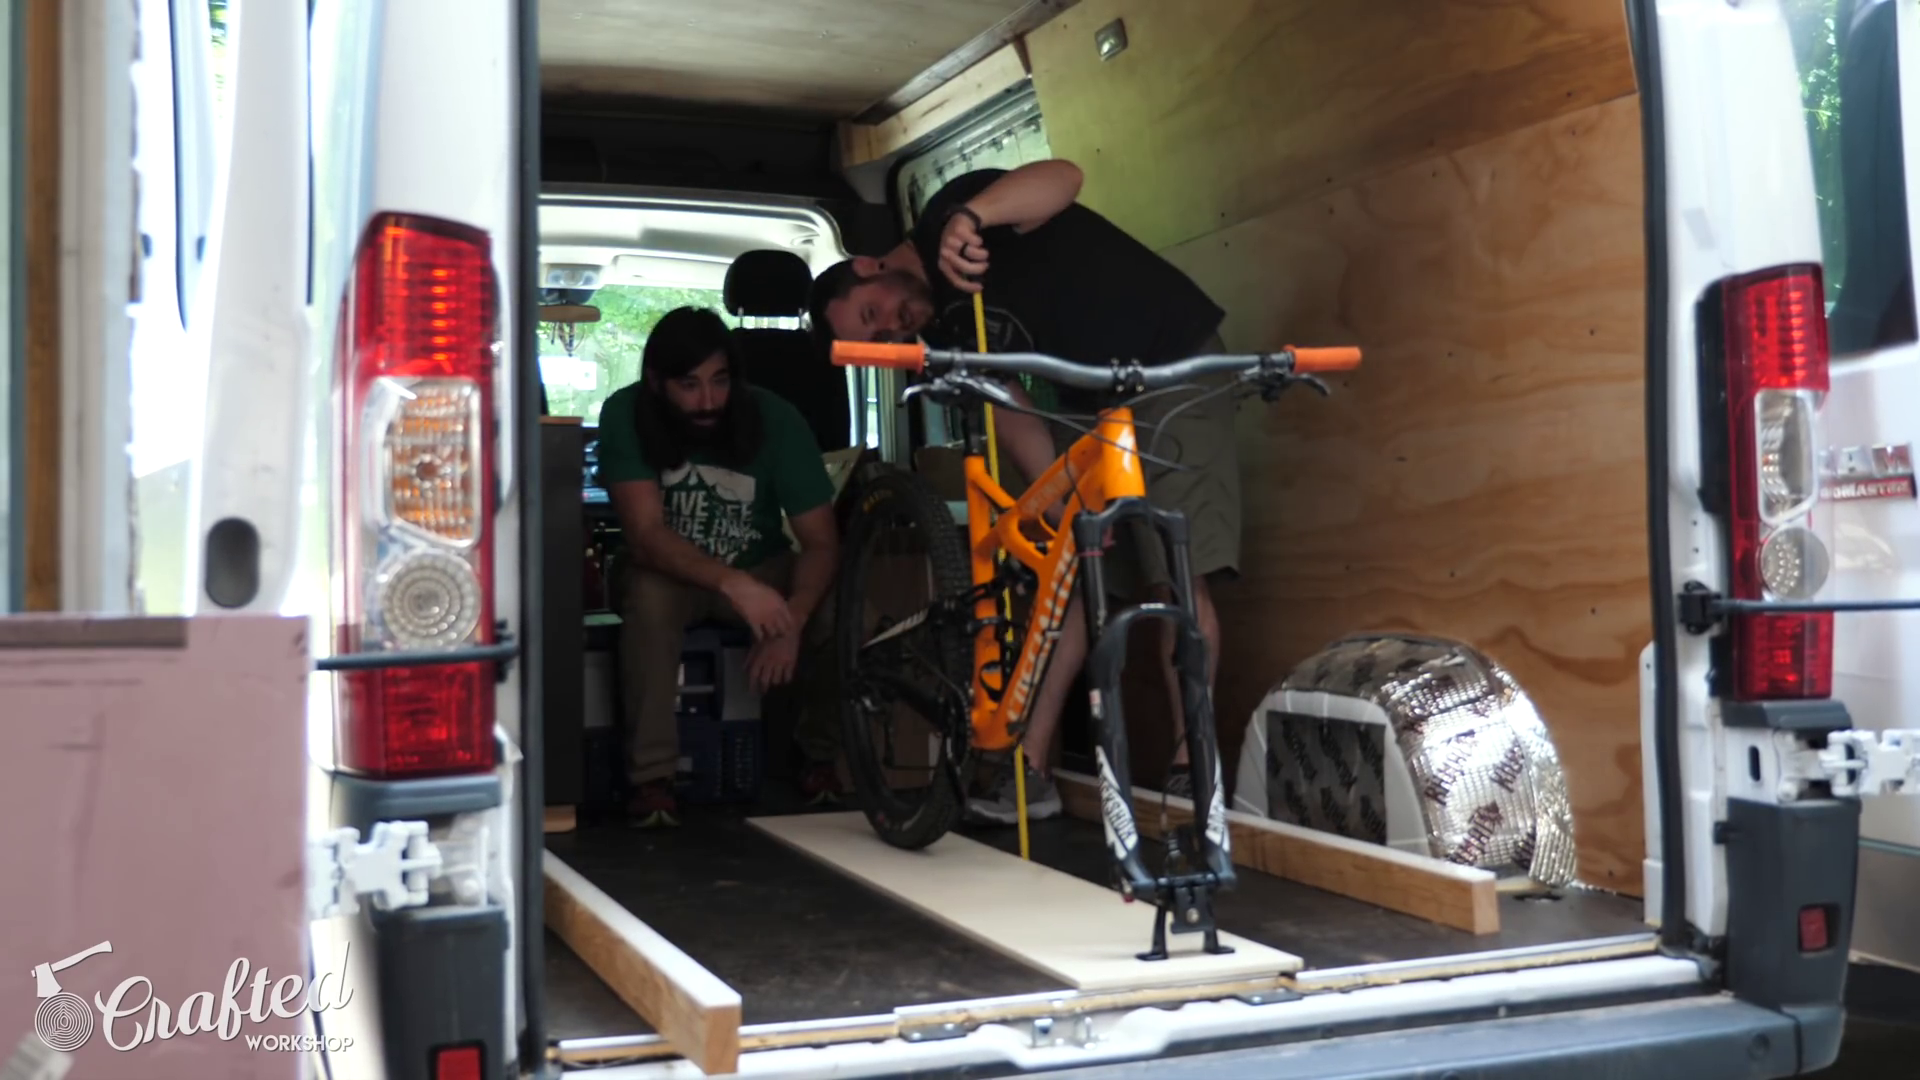
Before we did that, we needed to figure out the exact height we wanted for the rails. Alex is planning to use the area under the bed for bike storage, and the bikes will be on sliding trays for easy loading and unloading. Because of that, we had to make sure the highest point on Alex’s bike, the seat in this case, cleared the under side of the bed platform.
After figuring out this measurement, I could get the rails mounted to the walls. When building out the van, I had Alex add furring strips along the inside of the walls, which are attached directly to the metal of the van. These furring strips provide a perfect location for fastening load bearing items like the bed rails.
To install the rails, I first measured up from the floor and marked a line. It’s a little weird working in a van like this, because you can’t really check for level since the ground you’re parked on is almost never level. Instead, you have to reference other points in the van.
After marking the lines, I installed the rails using these massive 2 ¼” structural screws, adding two screws in each furring strip. These rails definitely weren’t going anywhere once all of the screws were added!
Step 4: Cross Support and End Stops

To help support the bed platform and keep it from sagging in the middle, we added a cross support rail using more of the Southern Yellow Pine. I drilled a few pocket holes on each end of the rail and then we attached the cross support to the rails, making sure it was behind where the back of Alex’s seat would be on the bike trays.
The final piece to add to the rails were some stops on the front of the rails, to keep the bed platform from sliding off when converting from couch mode to bed mode.
Step 5: Bed Platform

Speaking of the bed platform, next I could get to work on that. The platform is a simple framework of 2x2s covered in ½” plywood. If I were to build this again, I’d probably use 2x4s rather than 2x2s here, just for a little more rigidity, but the 2x2s are plenty strong and I already had a bunch on hand.
After cutting the 2x2s to size, I marked out the spacing of the 2x2s on the longer pieces and then attached them using 2” screws through each joint. These are basically the same construction as any stud wall, with the spacing between the studs a little more compact.
Since the bed platform needed to hinge in the middle, I had to create two individual frame sections.
Step 6: Bed Platform (Continued)

Once those were done, I ripped the ½” plywood to width to match the frames over at the table saw. I had the home center cut the panels to length, which made things a lot easier for me. If you don’t have a table saw, you could have the home center make both cuts for you.
With the panels cut to their final size, I could attach them to the frames using wood glue and 1” brad nails using my Arrow brad nailer.
After the glue dried, I broke the edges with a sander, just to make them a little less sharp, and then we could move the platforms into the van. We immediately noticed some flex in the back panel, which we fixed by adding another cross support rail at the back end of the rails.
To attach the two panels, I used two 30” long piano hinges. I used 1” screws to attach the hinges, rather than the screws included with the hinges, so that the screws went through the plywood and into the frame below.
After installing the hinges, we went to try out the platform and noticed we had a problem…
Step 7: Tapering the Couch Back

A few days later, I got back to work on the platform, first removing the screws from the area I’d be cutting so I didn’t hit them with my saw blade.
I marked in 4 ½” on each corner, which would give enough clearance for the platform to raise all the way up, and then drew a line to connect that measurement with the other corner of the panel.
I used my track saw to cut off this section, but a circular saw and straight edge would work the same way.
Next, I needed to cut a few pieces of 2x2 to replace the studs that were cut off, and I did this at the miter saw. We ended up with an angle of about 6 degrees, which I cut on one end of the 2x2 then marked the length at the other end, referencing the actual frame.
After cutting the 2x2 to fit, I attached it with more glue and brad nails, also making sure to reinstall the 2” screws through each end.
Step 8: Rope and Pulley System
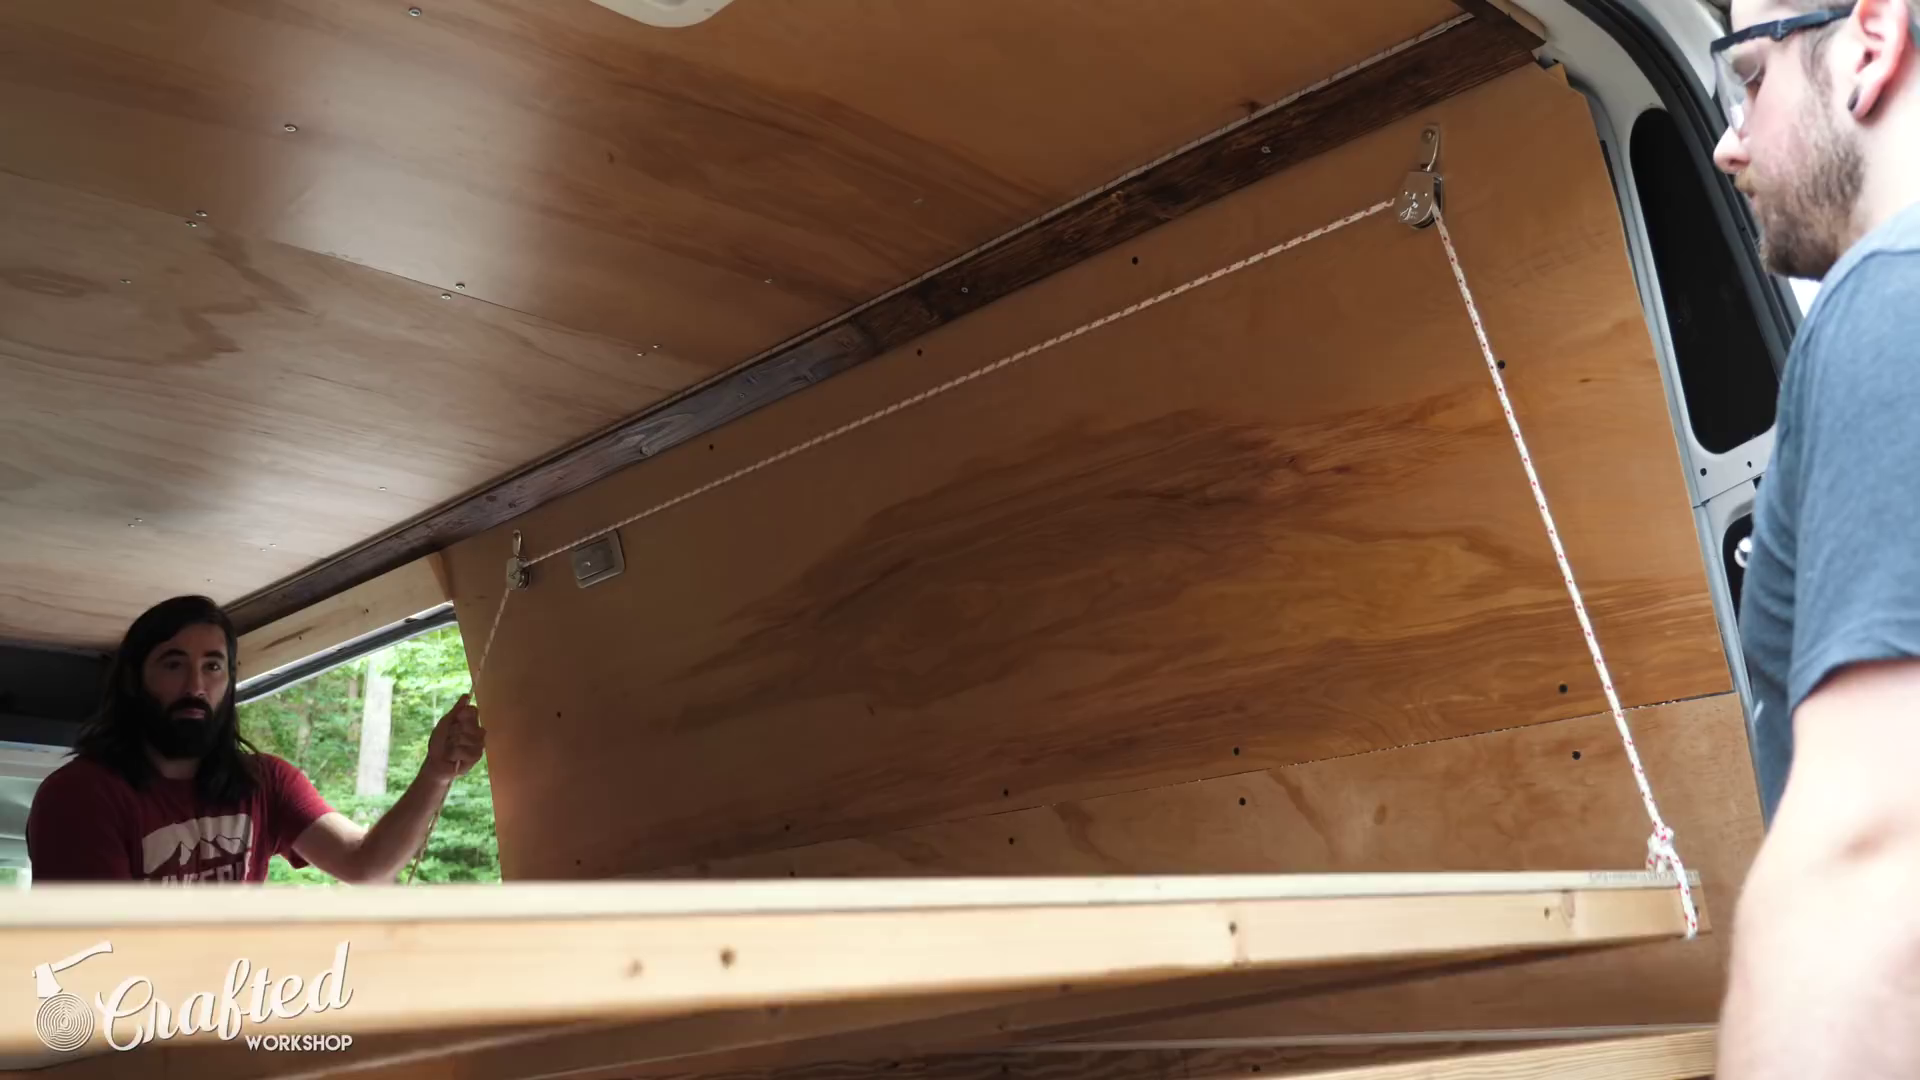
After test fitting and making sure the panel fit, which it did, I went ahead and drilled a hole through the back corner of the panel for some rope to run through. This rope is part of the pulley system which is used to convert the bed into couch mode.
Speaking of which, next we could get the pulleys installed on the wall of the van. The system uses two pulleys, each rated at something like 420lbs, and the pulleys are attached into the furring strips using 1 ¼” screws.
With the pulleys installed, we could test the system and it worked flawlessly. This was an idea that came to me at 3am one morning, it was one of those ideas that popped into my head after trying to come up with a solution for a few days. Gotta love it when that happens.
After verifying the system worked, I added some upright supports, which support the back of the platform when it’s in couch mode. I used the off cuts from the rails for this, and we’ll end up adding HDPE to these in the future to help reduce the wear.
Also, as you might have noticed, we had to move the back pulley forward to make room for the upright support, but this didn’t change the functionality of the pulley system at all.
I knocked out a quick handle to tie on the other end of the rope, to give something to pull on when converting the bed, and added it to the rope off camera.
Step 9: Couch and Bed Mode

Next, I needed to add some kind of locking functionality to keep the platform from moving around when its in either mode and while Alex is driving. To do this, I added a barrel bolt at each end of the front platform. I drilled one set of holes for the barrel bolt in the position where the platform would be when in bed mode, and then drilled another set of holes to lock the platform in place when it’s in couch mode.
After getting the barrel bolts set up, we could finally test out couch mode, and it turned out perfectly. The angle is just right for lounging and hanging out, and it’s really easy to get onto the platform using Alex’s fridge as a step.
Next, we could lower the platform back into bed mode and get the mattress added. Alex found an inexpensive 6” thick foam mattress and it was just thick enough to be comfy without sacrificing head room..
Once the mattress was added, we noticed that the mattress wanted to slide off the front of the platform when going from bed mode to couch mode, so I added a little cleat to the front of the rail to keep this from happening.
With that, the bed was basically done, and we could christen it with our stickers.
Step 10: Bike Storage Trays

There were a few other items I helped Alex with that went with the bed, the first of which was a set of bike storage trays. These are based on a design by FarOutRide, which I’ll link to in the video description, and these trays allow you to store two bikes plus a bunch of gear on each tray.
The trays are mounted to 48” locking drawer slides, which allow the trays to be slid out the back of the van for easy loading and unloading. The slides didn’t arrive in time for this video, but here’s the system in FarOutRide’s van, to give you an idea of how it works.
Step 11: Laser Cut Sign

The last piece for the van was a little surprise for Alex, a laser cut sign with Alex’s logo and slogan. I’ve had this Ikea bamboo cutting board hanging around, waiting for a use, and it happened to fit perfectly on the underside of the bed platform, which will be in the background when Alex does his weekly live streams.
After the Full Spectrum Muse was done engraving the sign, I sanded it to remove any burn marks and then applied a few coats of spray lacquer to seal it.
Step 12: Finishing Touches

With everything done, I loaded up and headed to downtown Asheville to finish up the van, get the final shots, and give Alex the sign.
To mount the sign, I used my Arrow hot glue gun to temporarily attach the sign, and then reinforced it with 1” screws.
After mounting the sign, we slid in the bike trays for a test fit, and they were perfect, actually a little wider than they even needed to be.
The final little piece to add was this bit of trim, which had to wait until the bed rails were in, which I installed using more hot glue. Hot glue is the perfect adhesive for the van, as it’s strong enough to hold but can easily be removed if things need to be changed.
And with that, I’m calling this van project complete. The van is still a work in progress, but this bed was the last big piece to add to get the van road worthy. All that was left to do was have an inaugural beer in the van with Alex.