
How To Build A Modern Adirondack Chair // Outdoor Woodworking Plans
Learn how to build a modern Adirondack or outdoor chair for your patio and add modern outdoor seating to your backyard!
Note: the links below are Amazon affiliate links
Materials Used On The Adirondack Chair:
Tools Used On The Adirondack Chair:

Modern Adirondack Chair Build Process:
I decided to experiment on this project with some wood I’d never worked with before, Thermally Modified Ash. After seeing it at my local lumber and woodworking store, Asheville Hardware, I knew I wanted to use it on a project and this Adirondack chair was the perfect choice.
Thermally modified woods are essentially cooked at a high temperature, around 400 degrees, and this process makes the wood pretty much impervious to rot and bug damage. The process also makes the wood more dimensionally stable. All of these factors make thermally modified woods a great choice for outdoor projects, and there are no chemicals involved like with pressure treated lumber.
Step 1: Milling Thermally Modified Ash

Anyway, after picking up the Ash, I broke the boards down into rough lengths at the miter saw and bandsaw, then jointed one face and one edge at the jointer. This probably wasn’t totally necessary, since these boards were already S3S, but I also wanted to bring the thickness down a bit.
After jointing the boards, I ran them through the planer to bring the other face into parallel and bring the boards down to their final thickness of 3/4”.
Step 2: Constructing Metal Chair Structure

Next, I started working on the metal framework that will add some support to the arms and back of the chair. I started with Aluminum but ended up running into some issues trying to braze the Aluminum, which you’ll see here in a second.
I cut the Aluminum to length at the miter saw and then beveled the edges and ends of the pieces with a file. This bevel will allow more of the brazing material to be added to the joint, which in theory should make the joint stronger.
Once the pieces were beveled, I cleaned them up with a wire brush and then I could get to brazing.
I was initially going to use this awesome Fireball square to hold the pieces in place, but thankfully remembered that these squares are also made of Aluminum, and I definitely didn’t want any of the brazing material ending up on the square.
I changed tactics and clamped the pieces together, applying clamping pressure right at the corner where I’d be brazing, which I quickly realized was a mistake.
Step 2b: Switching From Aluminum To Brass For ADK Chair Support

After picking up some 3/4” copper tubing, I got to work cutting the pieces to length. This process is super simple using one of these pipe cutters, and you can get surprisingly accurate results with one of these tools.
Basically, you mark the length of your piece, line up the cutting wheel with your mark, and then slowly add more pressure as you spin the tool around the pipe. Eventually, the cutter works its way through the pipe and you get a nice, clean cut. I just kept cutting my pieces down until I had all of my parts, and the pieces for this build came out pretty much perfectly from a 10 foot length of tubing.
Step 3: Soldering

Before getting to soldering, I needed to remove all of the barcode stickers from the elbows, which came off easily enough with a scrapper and some Goof Off.
To prep the parts for soldering, I first used this wire brush to abrade the surface of the ends of the tubing, as well as the inside of the elbows.
Next, I applied some flux to the end of the tubing, and you really don’t need a ton of flux here. After applying flux, I pushed the tubing into the elbow, making sure it seated fully, and then wiped off any excess flux.
To solder copper, you want to heat up the joint until the flux melts and then basically wipe the solder across the tubing until it melts and flows into the joint. The solder will go wherever the flux is, and it will also follow the heat. On this first joint, I was applying heat to the same face I was adding the solder to, but I really should have been heating up the other side of the joint so that the solder would have been pulled around the joint.

After applying the solder, I wiped away any excess with a wet paper towel and the joint was done.
You can see that I got better as I went and my last few joints were the cleanest, as is pretty much always the case with this kind of thing.
The Bernzomatic TS8000 I used on this project is perfect for use on soldering and brazing jobs and is great for bigger, larger jobs, and projects that require a bit more heat like this one. I’ve owned this particular torch for a few years now and have used it for everything from lighting my scrap wood burn bin, popping bubbles in epoxy, and even searing steaks after cooking them in my sous vide.
After finishing soldering, the dimensions on the support structure were set, so I could get back to working on the wooden portion of the chair.
Step 4: Constructing Adirondack Chair From Thermally Modified Ash
I started by ripping the arms and legs to final width at the table saw. After ripping the boards to width, I cut the boards to length using my crosscut table. I’ve got to say, this is one of the best things I’ve added to my workflow and I love the accuracy I get from it. If you can’t add a crosscut table, a crosscut sled with a stop block built in would be another great option.
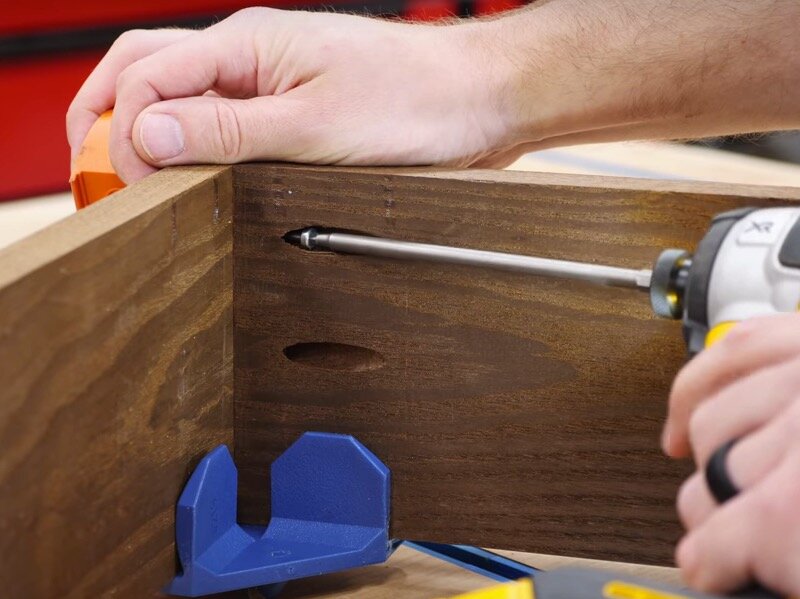
With the boards cut to final size, I could get to work on the joinery for the chair. I went with pocket holes but, if I had to make this project again, I wouldn’t go with pocket holes for these pieces. One negative of thermally modified wood is it tends to be brittle, so even when using the correct hardwood pocket screws, I still got some splitting at the ends of the boards. Something like dowel joinery or Dominos would have worked better on these joints.
To fix the splitting, I added some thin CA glue to the crack, clamped it together then added some activator.
To help prevent further cracking, I would clamp the joints together, drive the screws in slightly to mark the hole, then take the joint apart and pre-drill the holes. This was pretty tedious, but luckily I only had to do this at this joint where the arm connected to the front leg.
When driving the screws, I would also back them out, drive them in slightly, and repeat, to help ease the screws in. The pre-drilling and this easing in of the screws helped a ton.
The two arms are connected at the back with this piece that wraps around the back of the chair, and I again attached these with pocket holes but would again use another type of joinery. This joint ended up completely breaking off-camera and I had to fix it once again with CA glue.

And here you can see how that copper base will fit with the finished piece, providing support to the arms and back stretcher, which they clearly needed.
The next pieces to work on were the back legs, which have a parallel angle of 20 degrees cut on each end, and I made these cuts over at the miter saw.

Also, I do have plans available for this project in case you’re interested. The plans include a cut list and detailed, step by step instructions of the build process, along with a SketchUp model of the chair.
Next, I marked the location of the back leg on the front and back sides of the front leg, and also marked out locations for the screw holes. I used normal 2 1/2” screws here rather than pocket holes and it mitigated a lot of the splitting I had.
Before adding the screws, I pre-drilled and countersunk the holes, making sure to countersink the holes deep enough to allow me to plug the holes later. Also, these are my new favorite countersink bits, I get asked about these a lot. I love the tapered drill bit and depth stop, here is a link in case you’re interested.
After pre-drilling the holes through the front leg, I clamped the back leg in place using my t-track table, pre-drilled the holes into the back leg as well, and then drove the screws. As you can see, I started with 1 1/4” screws but ended up switched to 2 1/2” screws which provided a lot more strength.

You also might notice that I’m adding the back leg to the wrong edge of the front leg, and that’s because I figured it’d be easier to attach them in this orientation and then just swap the front legs, rather than trying to figure out a method of clamping them along the inside edge of the front legs.
After swapping the legs, I could mark out where I needed to cut a flat spot on the back legs to get the chair sitting level. I knew that the flat spot needed to be roughly 3/4” off the bottom of the back leg, based on my SketchUp model. To make this mark, I propped the front legs up on an offcut, bringing the front up 3/4” and making the front legs plumb, and then I marked a line on the back legs, using another offcut.
I could then cut to my line using the jigsaw, and I cleaned up the cut with my low angle block plane.
Step 5: Constructing Seat And Back Of Adirondack Chair

With that, the main structure of the chair was assembled, so I could attach the copper base. I originally used straps but ended up driving screws directly through the copper later, which ended up looking a lot better.
Next, I could get to work on the back panel. This is a simple assembly of four boards connected with two perpendicular cross supports at the top and bottom of the panels.
I ripped the boards to width and cut the boards to length at the table saw and then I could start assembling the back.
I clamped the boards together so they were square and then laid out the location of the cross support. I needed to have an 1/8” overhang on the bottom cross support, to allow room for wood movement, and I set this spacing with an 1/8” spacer then glued and nailed the piece in place.
I repeated the same process for the other cross support piece, and then I could start attaching the rest of the boards.
I used the same 1/8” spacers between each board, adding glue to the cross support and then attaching the boards with two screws. I made sure to mark the locations of the screws so that they looked nice and just worked my way across the back panel.
Next, I needed to get the back panel attached to the back legs. After marking the location of the back panel on the back legs, I lifted the panel into place and clamped it in place.
To attach the back panel to the back legs, I once again used 2 1/2” screws and pre-drilled and countersunk the holes before adding the screws.

With the back panel installed, I could work on attaching the last parts of the chair, the seat. I started by adding the front seat slat, which helps the seat transition smoothly around the acute angle, making the seat more comfortable on the backs of your legs.
Once again, I cut the board to size at the table saw, added pocket holes, and then clamped the board in place after checking for square. I wanted the top edge of the board to be flush with the top of the back leg.
After clamping the board in place, I drove in the pocket screws, and then I could start working on the rest of the seat slats.
I measured the distance between the back panel and the front seat slat, subtracted 5/8” to account for the gaps between the seat slats, and then divided that number by four. I cut three of the seat slats to final width and left the frontmost slat to be cut to size later.
I installed these seat slats with pocket holes and this was a little tricky, since I had to have the chair propped up on edge. I added that same 1/8” spacer between the slats when installing them and, after getting the third slat installed, I could measure for the final slat.
Once again, I subtracted 1/4” to account for the gap on each side of the board, and I also took my angle gauge and set the angle I’d need to cut on one edge of the slat.
I set my table saw blade to that angle, using the angle gauge as reference, and then set the fence to the correct width, erring on the side of too wide to start.
This is what the board looked like after ripping, with the angle on one edge and the other edge being square.

On the first test fit, the board fell through and chipped out the entire corner, once again due to the brittleness of this thermally modified Ash.
Anyway, after clamping the board in place and seeing it was slightly too wide, I shaved off a bit more at the table saw and then fit the board into place, with a spacer on each side, clamped it and added the pocket screws.
Step 6: Applying Finish To Copper Base Of Adirondack Chair

With that, all of the parts of the chair were assembled, so I could get the copper base removed for finishing. Before doing that, I added the 1 1/2” screws through the copper tubing, using a center punch to mark the hole location and a metal drill bit to drill the holes.
After getting all of the screws added, I removed the base and got it prepped for finish. I used a file to remove any excess solder around the joints, which is a surprisingly quick process.
After filing, I wiped the entire base down with synthetic steel wool, to remove any surface imperfections and to allow the paint to adhere better.
Before painting, I wiped the base down with acetone to remove any metal dust and surface contaminants.
I used a self-etching primer as the initial coat, to provide better adhesion for the paint, and then sprayed on a few coats of flat black paint.
Step 7: Finalizing ADK Chair

While the paint dried, I could finish up the wooden portion of the chair. Now that the base was out of the way, I could add pocket holes to attach the back panel to the back stretcher. I waited to do this until now so that I didn’t have to guess at the location of the pocket holes, as I wanted them roughly centered on each back slat to allow for wood movement.
After attaching the back panel, the structure of the chair was done, so now I could get everything cleaned up. First, I wanted to plug all of the screw holes and I tried a technique I’ve never actually tried before, using a plug cutter. The nice thing about a plug cutter is you can cut plugs from the exact wood you used on the project, so the plugs basically disappear once added.
This plug cutter is from Rockler and it worked great. After cutting the plugs, I popped them out with a flathead screwdriver and added the plugs to the holes with a little wood glue. I used Titebond III on this project, which is rated for outdoor use.
After driving in the plugs, I trimmed them flush with my Japanese pull saw, which I like to do while the glue is still wet. This allows the sawdust to work its way into any gaps around the plugs and, after a little sanding, you’re left with a basically seamless coverup. It’s really pretty amazing how well this worked, vs using something like a dowel like I’ve used in the past. The best part is that these plugs are free once you have the plug cutter.

The only holes I couldn’t plug with the plug cutter were the pocket holes. Now, Kreg makes a pocket hole plug cutter, which would have been perfect here, but I don’t have one. I tried to use Walnut dowels to plug the holes instead and the color match wasn’t great. Luckily, these are barely visible in the final piece, but I wish I would have just left the pocket holes visible.
With that, all that was left to do was get the chair sanded. I started by sanding a chamfer onto the bottom of the legs, which will help to keep the wood from splitting out when it’s dragged across the floor.
Step 8: Finishing Thermally Modified Ash

After that, I sanded the rest of the chair up to 180 grit, making sure to break all of the edges.
I also hand sanded between all of the slats, which was super tedious but should help people from getting butt splinters, which are never fun.
And with that, all that was left to do was reattach the metal base. Now, you might be asking, what about the finish on the wood? Well, since this thermally modified Ash is completely rot resistant, I want to use this chair as kind of an experiment. It should take on a beautiful grey patina over time, similar to Cedar, and since I’m terrible at maintaining outdoor finishes anyway, I think this should work out fine.
So, with the base attached, I could call this chair finished!