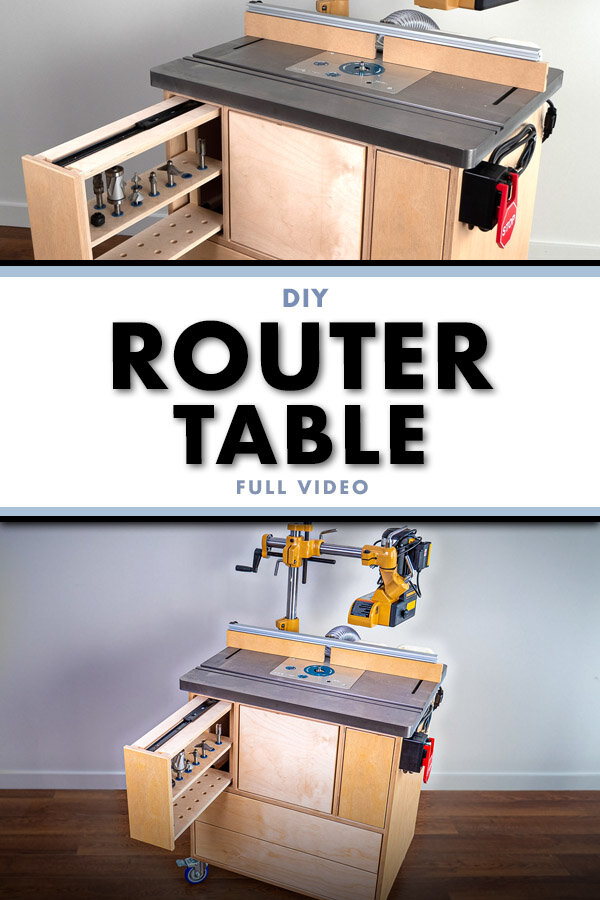
How To Build A Router Table with Bit Storage & Dust Collection
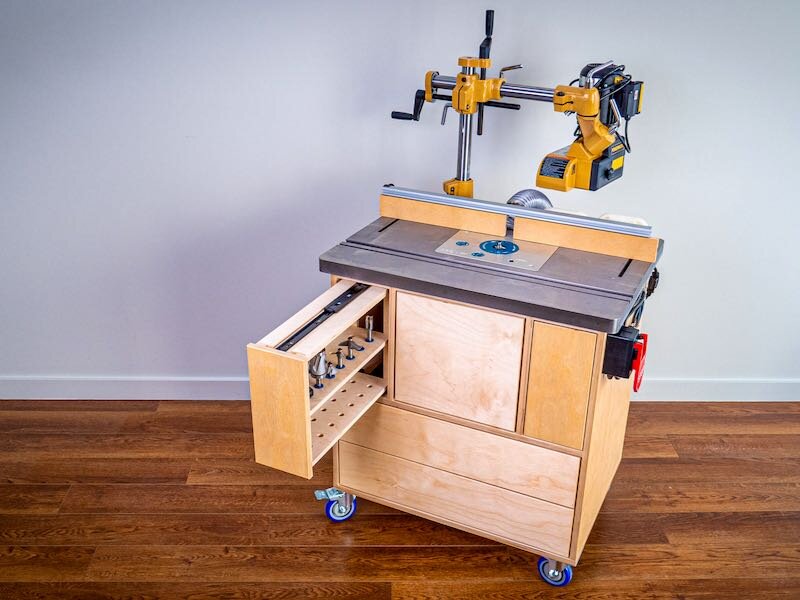
Learn how to build an awesome router table, complete with a custom cabinet with bit storage, cast iron top, dust collection, and a POWER FEEDER! This is an easy DIY project and will be one of the most used tools in your shop!
Note: All links are Amazon affiliate links
📦 Materials Used On The Router Table Build:
🛠 Tools Used On The Router Table Build:
Magnetic Screw Holder (for my impact driver)
Process For Building A Router Table:
Step 1: Determine What You’ll Include In Your Router Table Build
If you’ve followed my videos for awhile, you know that I use my router table on almost every furniture project I work on here in my shop. I think the router table is one of the most useful tools in a woodworking shop and it can be used for everything from cutting joinery to adding edge profiles to making your own molding.
My previous router table was never really set up with proper storage and it had a fairly underpowered router installed in it that was kind of starting to act up, so I felt like it was time to get a fresh start with a new, super beefy router table with some really cool features built into it.
Rather than use the kind of standard leg kit that comes with most router tables, I chose to instead just build my own cabinet for the base. I figured this would make fitting drawers and doors simpler and I could also get more useable storage space out of the same footprint.
Step 2: Break Down Plywood For Cabinet Below Router Table
Up until this point, you’ve seen me breaking down some pieces of ¾” Baltic Birch plywood, which is what I used for the cabinet, and the next step was drilling a bunch of pocket holes, which I used for the joinery on this cabinet.
Step 3: Establish Joinery (Pocket Holes)

I used my big pocket hole machine here, since it’s set up for ¾” plywood, but a standard pocket hole jig would have worked just as well, just a little slower.
Step 4: Assemble Router Table Cabinet

After getting the pocket holes drilled, I could get the cabinet assembled, starting by attaching the side panels to the bottom. I used the center divider to space the side panels and clamped everything together before driving in the screws.
It’s super important to clamp your parts really well when using pocket screws, as otherwise they’ll have the tendency to push the parts out of alignment when driving the screws.
Next, I flipped the cabinet over and repeated the same process to add the center divider, using the two vertical dividers to set the position of that center divider. This not only made for super quick cabinet assembly, but it also ensured that my cabinet would come together perfectly even if some of my parts were a little over or undersized.

I continued assembly by adding the vertical dividers, which will create the center area for the Rockler Dust Bucket, which will provide dust collection for this router table, and then I could finish the cabinet assembly with the two smaller top pieces.
Step 5: Confirm Fit With Router Table Top

Before moving on, I confirmed the fit on the router table top, making sure the cabinet fit around the Dust Bucket, and then I could add a few stretchers to finish off the cabinet.
Step 6: Construct And Assemble Drawers For Router Bits And Storage

Next, I cut the pieces for the the drawers, which I made from ½” Baltic Birch plywood, over at the table saw. I made sure to cut the pieces in a way that referenced the factory edges of the pieces initially, but I made sure to cut off that factory edge on the last cuts so that I was left with super clean edges on the parts.
To assemble the drawers, I first added a bead of glue around the perimeter of the drawer bottom, which I also cut from ½” plywood so that the drawer was nice and sturdy, and then I tacked the sides together with my Arrow PT18G brad nailer.
I referenced the drawer bottom when assembling the drawer sides and, as long as they lined up, the drawer box would end up square.
Finally, I flipped the drawer over and added more brad nails to hold the bottom panel in place while the glue dried.
Before the glue had a chance to set up, I used the straw trick to remove any squeeze out from the inside corners of the drawer box, running the straw along that inside corner.
The last step in the drawer box construction was to reinforce the corners with a few screws, since I didn’t add any glue there, and I used these 1 ½” self drilling screws, which have become a favorite of mine when working with plywood.

With that, the drawer box was finished, and I think this is the quickest and easiest method I know of for assembling drawers and this is my go-to for shop projects.
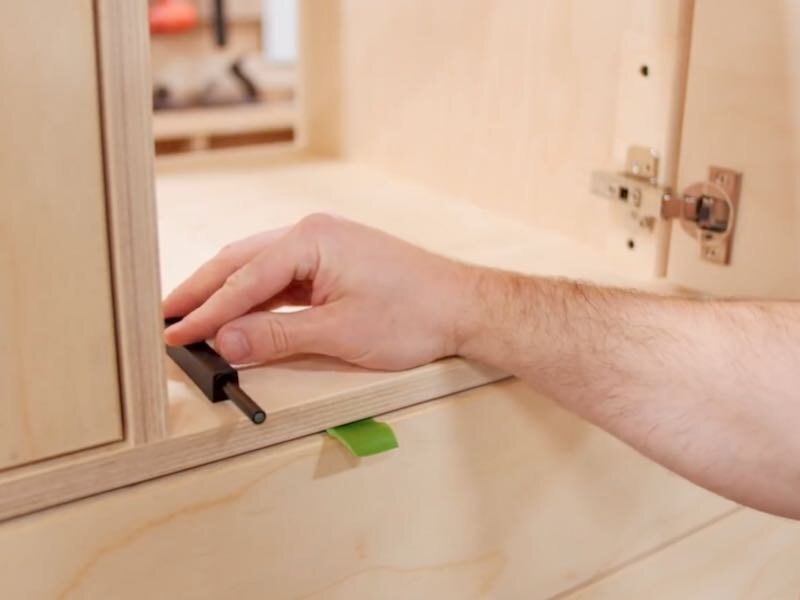
Next, I could work on the vertical slide-outs that will go in the areas to the left and the right of the Dust Bucket, and I started with a router bit storage slide out.
I first taped the two layers of the slide-out together with some painter’s tape, and then marked out locations for holes for these router bit storage inserts.
These inserts allow you to store either ¼” or ½” shank router bits, and they just friction fit into a ⅝” hole.

I drilled the holes using a Forstner bit over at the drill press, and man do I need to figure out some kind of dust collection solution for the drill press which allows me to have both hands free.
Anyway, after drilling the holes, I could get the first slide-out assembled, and I decided to make good use of the offcuts from the drawers and just used two strips of plywood at each end of the slide out.
This ended up being plenty strong, and assembly was super easy using more glue and brad nails. I also used a little spacer to ensure the spacing was even on both ends of the slide out.
Finally, I added one screw at each joint, just for a little more reinforcement.
The other slide out was assembled in pretty much the same way, except I decided to make these more of a slide out tray for storing things like wrenches and other frequently used accessories.

To keep these accessories from falling off the trays, I cut a few strips of ¼” plywood and then tacked them in place using my Arrow PT23G pin nailer. Pin nails were really perfect for this kind of application, as they provided plenty of holding power, keeping the sides in place while the few dabs of CA glue I added dried.
Next, I could get the drawer slides installed in the cabinet, and I used the same spacer method I’ve been using recently to help with this. These are over-extension slides, which I really like to use on shop projects so I can access everything in the drawer, and I think these black slides look particularly nice.

I installed the drawers using more spacers, using pieces of ¼” plywood below the bottom drawer. I slid out the drawer partially, added a few screws, and then finally removed the drawer entirely to add the last screw at the back of the drawer.
With that, the bottom drawer was in and I just repeated the same process, using the same spacer, to install the upper drawer.
The vertical slide outs were a little different, since the slides attach to the top and bottom of the slide out, but the process of installing the slides themselves was really the same.

I just installed the slide outs with the cabinet on its side initially, and they worked great even when flipped back into the vertical orientation.
You can see how the router bit storage slide out worked here, and I think this spacing worked out perfectly, even for the largest router bit I own.
Step 7: Sanding Router Table Cabinet Parts And Breaking Edges

Before adding the drawer fronts, I went ahead and sanded down all of the drawers, breaking all of the sharp edges. The last thing I want is to catch a knuckle on a sharp edge when grabbing something out of one of these drawers.
I repeated the same process on the cabinet, sanding all of the edges and breaking any sharp edges.
I also went ahead and added a chamfer to all of the drawer fronts and door, and I also added a heavy chamfer to the bottom edge of the drawer boxes, which just give them a nicer finished look.
Also, in case you’re wondering what I did with my old router table, which you can see in this shot, since it was definitely still useable, I actually donated it to a woodworking charity, so this router table did go to a good home.
Step 8: Install Drawer Fronts

Anyway, with the chamfering done, I could go ahead and get the drawer fronts installed. I used the playing card trick to get even spacing around the edges of the drawer fronts and, once they were spaced evenly, I used my Arrow hot glue gun to temporarily hold the drawer fronts in place.
Finally, I drilled countersunk holes and added screws from the inside of the drawers to permanently hold the drawer fronts in place.
I repeated the process for the rest of the drawers, and then I could get the door, which closes up the area with the Dust Bucket, installed. I used Euro hinges, which I’m a huge fan of, and used a jig to drill the holes, which makes the process super simple.

When I went to install the door, I realized that I only had one inset hinge on hand, which was leftover from a previous project, but I had a few sets of full overlay hinges lying around as well.
After some trial and error, and consulting my buddy Mike Farrington the cabinet wizard, I figured out that you can use a full overlay hinge as an inset hinge by simply adding a ¾” spacer between the hinge and the inside face of the cabinet. This is a pretty cool tip and is definitely good to know for future projects, in case I have the wrong type of hinge on hand.
Step 9: Install Drawer Push To Open Hardware
Now, you might have noticed that I haven’t shown any kind of drawer or door pull up until this point, and that’s because I decided to use these Blum Tip-On units, which are little push-to-open hardware pieces. In retrospect, I would have just purchased push-to-open drawers slides and only used these on the door, as these only work with self-closing hinges and slides, but I figured I’d show the process of installing them anyway.
I first whipped up a little drilling jig based on the Blum instructions, using a scrap piece of plywood, and then used a self-centering drill bit, in tandem with the jig, to drill the mounting holes on the inside of the cabinet.
To mount the Tip-On units, I first mounted the plastic mounting plate to the inside of the cabinet and then clipped the push-to-open mechanism onto the plate. This Tip-On unit has some built-in adjustability, and by screwing in or out the plunger, the final position of the door or drawer is adjusted in or out.
Unfortunately, my jig was a little bit off, so I needed to rework it but, once I did, the units were really easy to mount and get adjusted.
As you can see, once it’s positioned correctly, you just push on the door and the Tip-On unit pushes the door open about an inch and a half, giving you plenty of room to open the door.
As I mentioned, this worked great on the door, but it was a lot more fiddly on the drawers and slide-outs, as I needed to use two of the Tip-On units per drawer to provide enough force to push the drawer open.
I also had to dado out an area on the side of the drawers to provide clearance for the Tip-On units, since I didn’t really have a good spot to mount the units that would clear the drawers.
Eventually, after a lot of trial and error, I got them all working but, again, I’d just go with push-to-open slides in the future.
Step 10: Mount Casters To Router Table Base
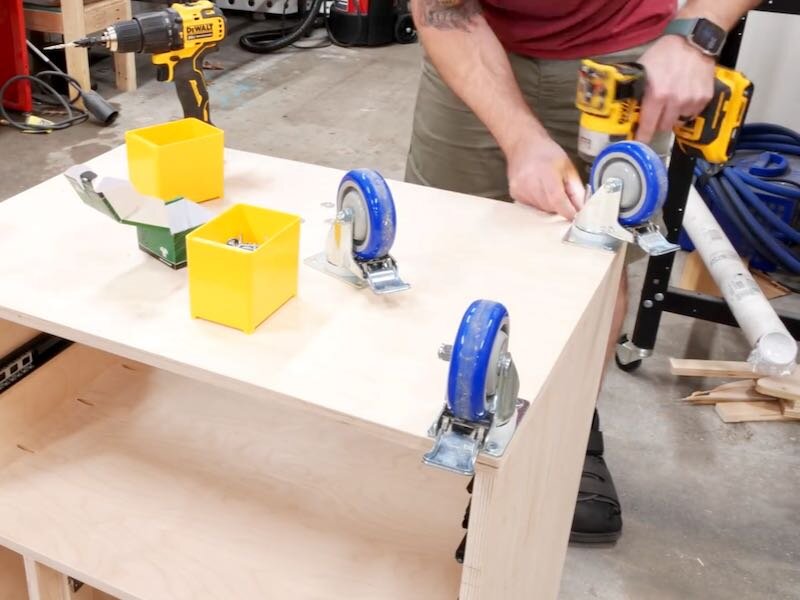
Next, since the cabinet was getting pretty darn heavy at this point, I decided to go ahead and mount these Rockler Total Lock casters, which lock not only the wheel itself but also the spinning mechanism, making for a super secure base.
Step 11: Mount Cast Iron Router Table To Base

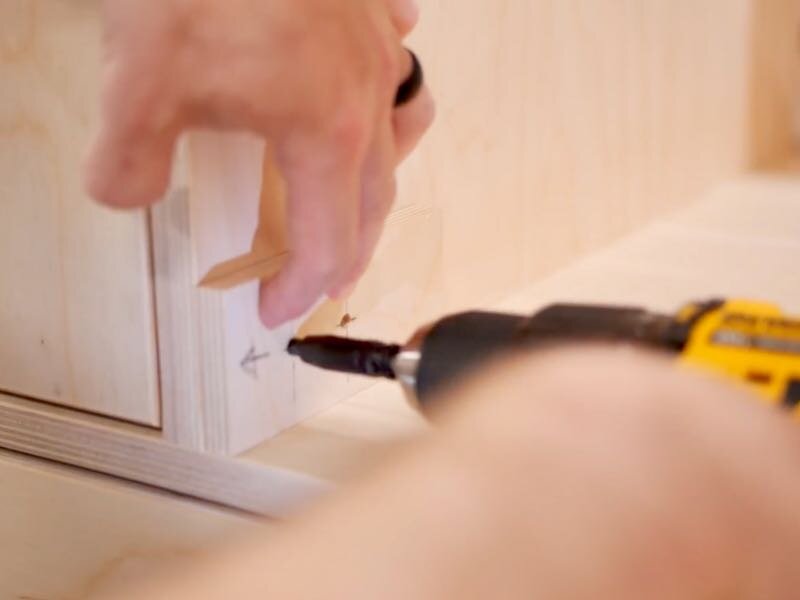
With the cabinet pretty much finished, it was finally time to get it mounted to the cast iron router table top. The top already had tapped holes for mounting a base, so I marked out matching locations on the top of the cabinet and then drilled a small locating hole to transfer the location to the inside of the cabinet.
I first drilled a large recessed hole, so that I could use a large washer to spread the holding power of the mounting bolts, and then I drilled a slightly-oversized through hole for the mounting bolts themselves.
After drilling the four holes for the mounting bolts, I made sure everything would come together nicely by test fitting the base on the top, and luckily everything lined up perfectly.

The last thing to do before attaching the top to the base was routing out a clearance area for the Dust Bucket mounting wings, which allow the Dust Bucket to be mounted to the underside of the cast iron top.
I marked out these locations when test fitting the bolts and I extended the lines using a combination square, giving myself plenty of extra wiggle room.

Since these areas didn’t need to be perfect and would never be seen, I just routed them freehand, and I also made sure to remove the pocket screws from these areas before routing.
After routing, I added the screws to the inside wall of the cabinet, rather than through the pocket holes, since they would have interfered.
Step 12: Mount Dust Bucket To The Underside Of Router Table

I got the Dust Bucket mounted to the underside of the table top using the included bolts and then I could finally get the cabinet added to the underside of the top. Or so I thought…
Unfortunately, I hadn’t accounted for those mounting bolts when cutting the clearance areas, so I had to repeat the process off camera and route those areas a little deeper before finally lifting the cabinet into place for the final time and getting the mounting bolts added.
With everything installed on the router table, I decided to go ahead and add the back panel as well, which really helps the cabinet resist racking forces over time.
I didn’t add this panel previously as I wanted access on both sides of the router table while things were being installed, but with all that done, I got the back panel cut out at the bandsaw, added glue to the back edges of the cabinet, and tacked the panel in place with more brad nails.
Finally, with the help of my buddy Eddie, I got the router table flipped over and we could admire this gorgeous Rockler cast iron top.
After cleaning off the packing grease, I added a little Boeshield T9 to prevent the top from rusting, and then I could get the router lift installed.
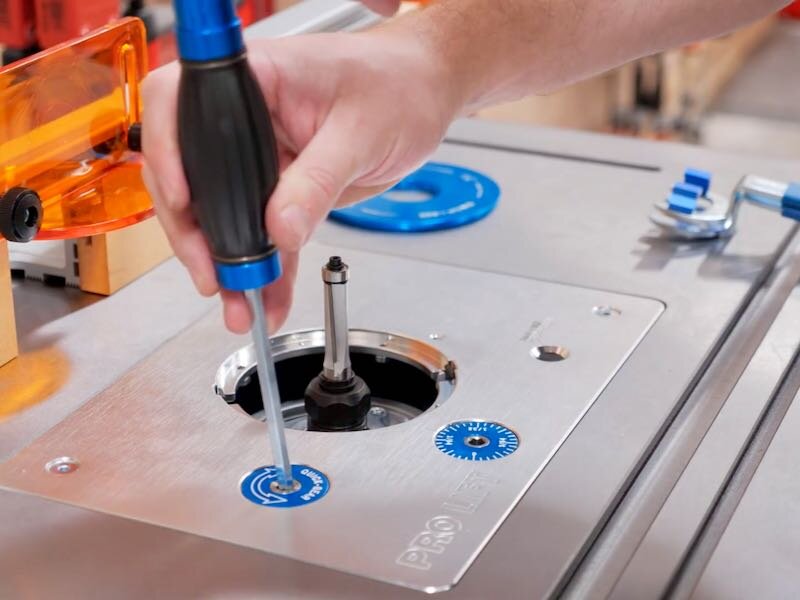
Step 13: Installing The Router Lift, Router, And Fence

First, I added the leveling set screws from the underside of the top and got them all set to pretty much the same height before dropping in the router lift. I continued adjusting the set screws until the lift was perfectly flush with the table top and, once they were adjusted, I locked them in place with the lock nut and dropped the lift into the top to admire my work.
That said, the lift didn’t stay in for long because I of course needed to get my router installed, and I went with this beast of a Porter Cable router, which is a massive upgrade from my previous router. This Rockler Pro Lift also accepts this Porter Cable unit with no additional adapters, so it was super easy to just drop it in and get it secured.

With the router in, I could get the lift reinstalled and try it out, and this thing works great. The plates can be removed and installed easily with no special tool required, and the height adjustment is super smooth with the crank arm.
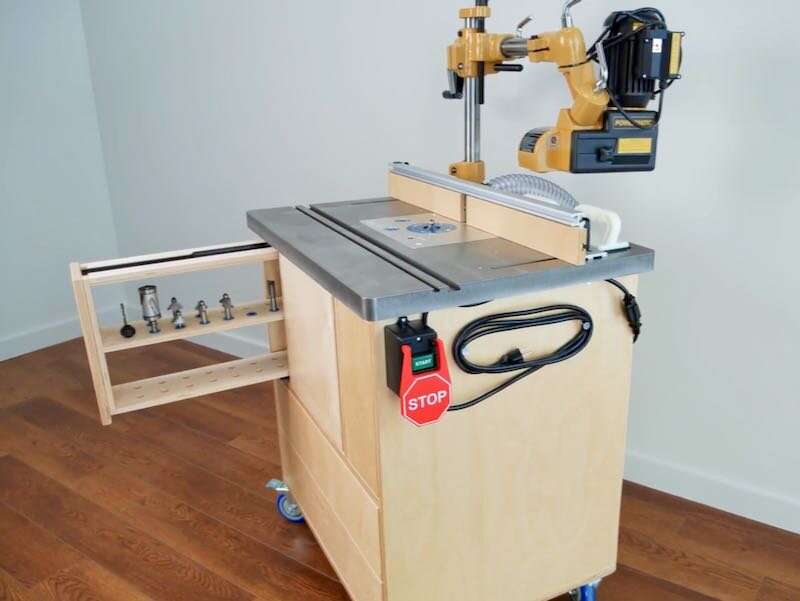
Next, I added the fence to the table, which attached through the built-in track in the top, and then I could attach a 2 ½” hose between the Dust Bucket and the fence. I really like this Dust Bucket system, as you can just connect one 4” hose and it will automatically split the airflow between the fence and the inner area of the Dust Bucket.
Step 14: Finishing With Halcyon Clear

Before getting too much further, I decided to go ahead and add a clear coat to the router table cabinet to help keep it looking nice, and I went with what is becoming one of my go-to clear finishes, TotalBoat’s Halcyon Clear.
Halycon Clear goes on really easily, and I’ve both sprayed it and rolled in on with great results. It also dries super quick and is extremely durable. I used it on the butcher block countertop I built for my home bar and, after about a year of service, it’s showing no signs of wear.
Once the finish dried, I got the drawers and door reinstalled and then I could start getting the router table ready for its maiden use.
Step 15: Final Details On Router Table And First Test

First, I mounted a paddle switch with a big emergency stop, which makes turning the router on and off super easy. I also did a little cable management to make things look tidy while I was at it.
I also went ahead and loaded up the slide out tray with the height adjustment handle and the collet wrenches, and then I could get a bit installed and try this router table out!
Changing bits is super easy with the combination of this router lift and these offset wrenches, and I decided to start things off with one of my most used bits, my ever trusty chamfer bit.
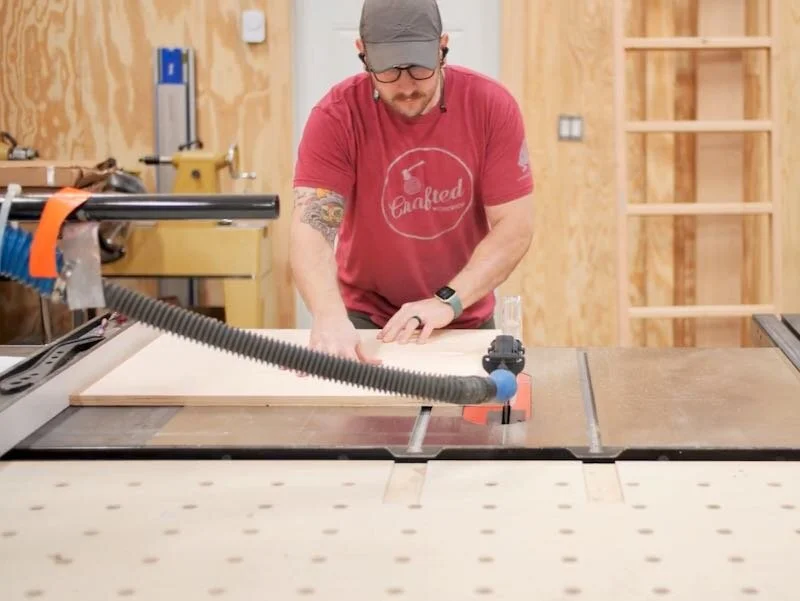
I got the fence aligned with the bearing on the bit using a combination square, adjusted the opening so it would provide the most focused dust collection airflow around the bit, and then ran a test board across. I was left with zero dust and the cut was super clean, this router table is definitely going to be a huge upgrade for me.
Next, I swapped over to a big spiral flush trim bit to do some flush trimming, and I checked out these cool corner radius templates here. The dust collection wasn’t as good initially, but it’s because I had the fence too far from the bit, but once I corrected that, the dust collection was spot on.
Finally, I threw in a big roundover bit and ran it on the same test piece, and this allowed me to try out the micro height adjustment feature on the router lift, which made dialing in the height of the roundover super easy.
The first pass was too high, as you can see by the fuzzy bits left, so I lowered the bit a hair and was left with a perfect roundover.
Step 16: Accessories - Power Feeder

With that, this router table was really finished, but I had one more accessory that arrived just as I was finishing this build that I had to go ahead and get installed.
This unfortunately required the slightly scary task of drilling and tapping four holes into my shiny new router table top, but luckily this went extremely smoothly with no broken taps, and I could get the new accessory installed.
This is a power feeder, for those of you who might not be familiar with this tool, and it does exactly what the name implies, it feeds material with power, in this case a small motor.

This is one of those accessories that I’ve never even really considered adding, but when I realized I could get a fairly inexpensive, fairly small power feeder for my shop, I decided to go for it.
The setup is pretty quick and easy, and I really just need to set the height for whatever material I’m using, now that everything else is positioned correctly, and as you can see, it makes things like adding a roundover a breeze.
This will be super useful anytime I need to add an edge profile to a lot of boards in the future, especially if those boards are particularly heavy or long, and the power feeder swings out of the way easily when I’m not using it. Pretty cool.
With that, besides getting some bits loaded up and the drawer organized, I could call this router table project complete!