
How To Build and Install DIY Frameless Kitchen Cabinets // Home Bar Pt. 1
Learn how to build DIY frameless kitchen cabinets using pocket holes and plywood! I'll also show you how to apply edge banding, add soft close doors, and install the upper and base cabinets.
Note: the links below are Amazon affiliate links
🛠 Tools Used On The Cabinet Build:

Process For Building Custom Cabinetry:
Step 1: Break Down Plywood Cabinet Parts

As with any cabinetry project, I started by breaking down my plywood. As you can see, it was a bit of a challenge getting this full sheet up onto the crosscut table, which was one of the main reasons I ended up installing this thing. I still think making rough cuts with a circular saw or track saw, to get the full sheet into more manageable chunks, makes things easier.
Anyway, when breaking down plywood for a project like this, I make sure to keep track of my factory edges, since making a cut on a full sheet will likely leave you with a slightly skewed cut. Because of this, I always cut the board oversized, then come back and recut that edge, using the factory edge again as reference, then, with the cut edge nice and straight, I rotate the board 180 degrees and trim the piece to final size, cutting off the factory edge.
It’s important to cut off all of the factory edges, as they won’t provide a clean edge, whether it’s for edge banding or just a good joint. The factory edges are usually also slightly damaged from moving the sheets around.
The one other tip I have is to try to set your fence to a measurement once. For example, I knew all of my base cabinet side panels were 23 ¾” wide, so I made sure to cut all of the cabinet sides to size while my fence was set to that measurement. That ensured that, even if my fence was off ever so slightly, it wouldn’t matter as the sides would still match up.
I did the same thing with my stretchers. If the stretchers aren’t the exact same length, the cabinets won’t end up square.
Anyway, the pieces you’ve seen me breaking down here are all for the base cabinets, and let’s hop into SketchUp to see how these cabinets come together.
Step 2: Design Cabinets In Sketch Up
This is pretty basic frameless cabinet construction, with two sides, a back, a bottom, and a few stretchers to create the top. Everything will be held together with pocket screws and glue, which makes for a strong and simple to assemble cabinet.
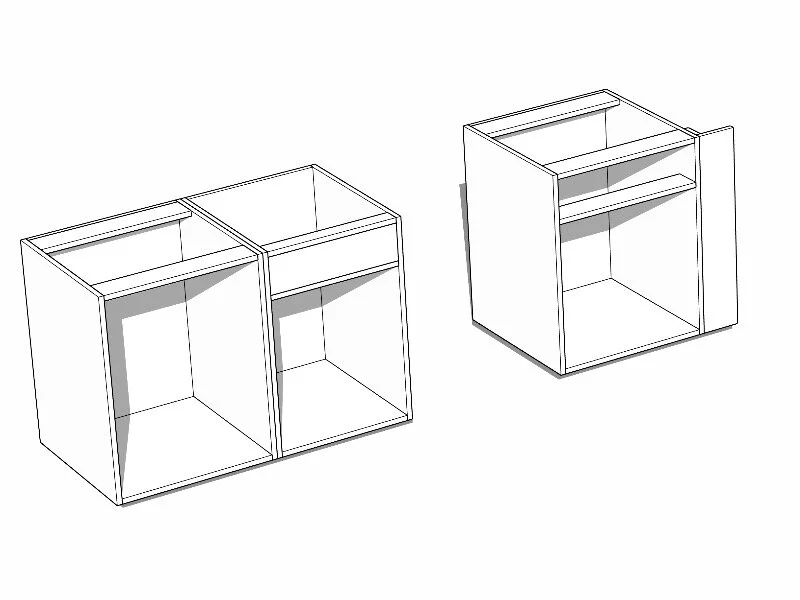
I decided to go with a full back panel on these cabinets, and there were a few reasons for this. First, it makes for a super strong cabinet. Second, it allows for easy assembly, since I can add pocket holes to the back panel which will be hidden in the final cabinet.
Third, if you go with something like a ¼” back panel with ¾” nailers at the top and bottom, you have a lot more work to do as far as cutting a groove for the back panel. You might save a few bucks worth of plywood, but I’d rather have a super strong cabinet that will last for years.
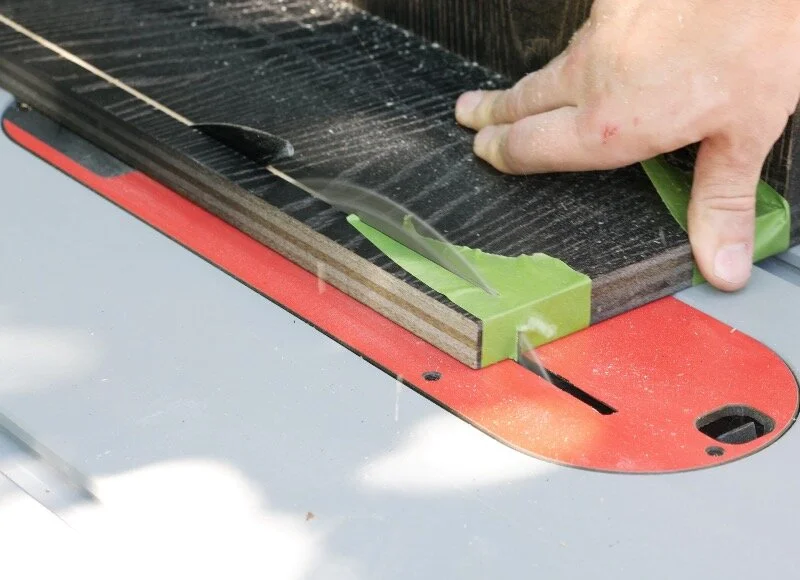
Step 3: Edge Banding On All Exposed Plywood Edges
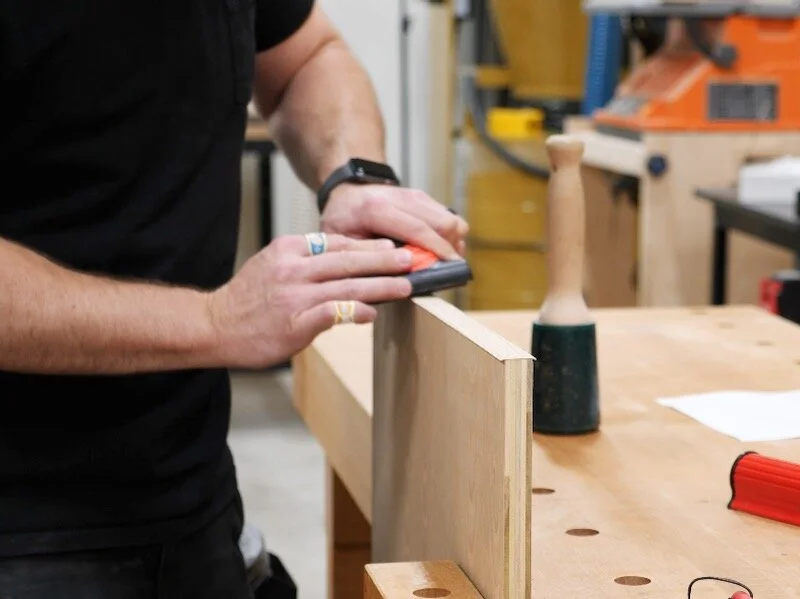
Back to the build, after getting all of the pieces for the base cabinets cut to final size, I could start edge banding the pieces. In case you’re not familiar, edge banding is a veneer with an adhesive on the back face which allows you to cover up the plywood edges and make the panels look more like solid wood. There are a few different types of edge banding, including iron-on and peel-and-stick, and I decided to go with FastCap’s FastEdge peel-and-stick edge banding on this project.
The process for applying this peel-and-stick edge banding is really simple, but it helps to have a few tools to make the process go more quickly.
First, I would cut a length of edge banding to rough size and then run it over the edge of my workbench to remove the curl from the edge banding being rolled up. Next, I would peel the backing off and then apply the edge banding, making sure to leave an overhang at both ends and on both faces.
Next, I used a pressure roller to apply pressure to the edge banding, which activates the adhesive and creates a super strong bond. Using these flush trimmers, I would then cut each end flush, making sure to pick up those little offcuts and throw them away so they didn’t stick to everything in my shop.
After cutting the ends flush, I would roll the surface again, focusing on the edges to make sure they were well adhered.
The next step was to cut the faces flush, which is super simple with one of these edge trimmers. One other thing I would have done if I had known about it would have been to take the trimmer apart, so that I was only trimming one face at a time. This would have meant that I could go with the grain on both edges, which would minimize any chip out. Oak is particularly stringy and I would sometimes get some tearing when trimming both faces at once, but overall still ended up with nice edges.
With the edges trimmed, the last step was to break the edges, and this Edge Break is another purpose built product for that, but you could definitely just use a sanding block. Since I was going to be doing a ton of edge banding on this project, I wanted to be as efficient as possible, so I picked up all of the tools I could.
That’s the basic edge banding process and, on the base cabinets, you really only need to edge band the front edges, so things went fairly quickly.
Step 4: Drilling Pocket Holes
Once the edge banding was done, I could start drilling the pocket holes, which, as I mentioned before, I used as the joinery on this project. For the pocket holes to be hidden in the final cabinet, I needed to add them to the each end of the stretchers, three of the sides of the bottom panel, and the two side edges of the back panel, which will make more sense when you see me assemble the cabinet.
Also, since I was going to be drilling a few hundred pocket holes on this project, I pulled out my Kreg Foreman pocket hole machine, but any pocket hole jig will work here. As a testament to that, I built that entire bank of cabinets for the miter saw station you see in the background with my Kreg K4, which is only about $100, and a jobsite table saw.
Step 5: Assembling Cabinet Base

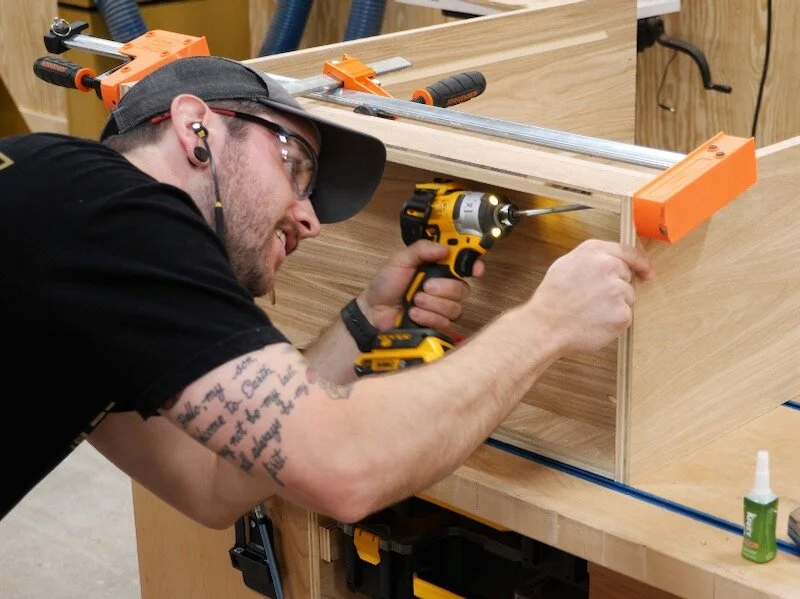
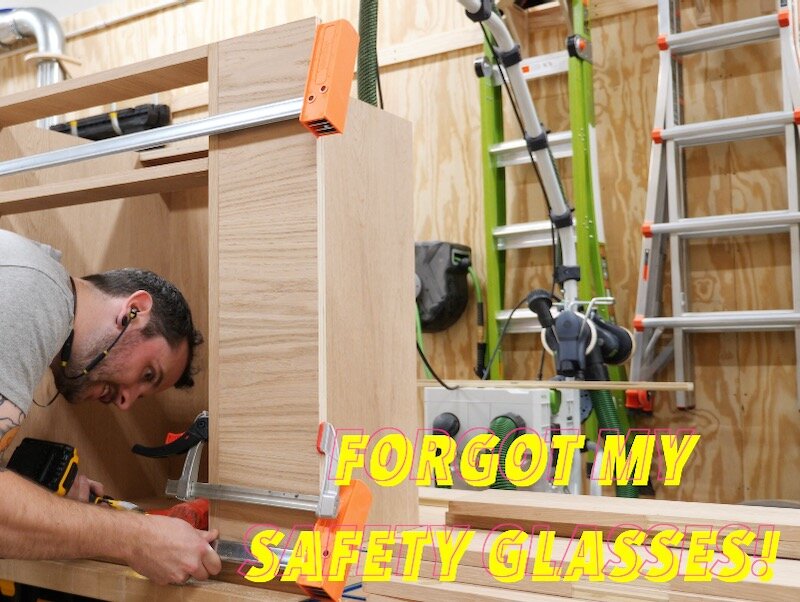
With all of the pocket holes drilled, I could move on to assembling the base cabinets. The first step was to attach the back panel to the two sides with 1 ¼” pocket screws and glue, and on this project, I used Krazy Glue’s new Fast Dry Wood Glue.
After adding the glue, I clamped the pieces in place then drove in the pocket screws. I was really careful about making sure everything was properly aligned before driving in the screws, as any misalignment here will cause lots of issues later on.
With the back attached to the sides, I could add the bottom panel, which was again attached with screws and glue. First, I applied glue and then slid the panel in place, with the cabinet sitting on my assembly table. Next, I clamped the bottom in place and then flipped the cabinet onto its back, so that I could add the pocket screws.
Once again, I was careful to make sure the edges were nicely aligned, and sometimes this meant moving the clamps around as I assembled everything.
The cabinet I’m working on here is actually the sink cabinet, and it’s a little unique in that it has this false drawer. This is a bit of a tweak on the regular stretchers and basically just provides a place to mount a faux drawer front in front of the sink.
I assembled this with glue and brad nails, which will be hidden in the final cabinet, and then attached the assembly to the cabinet using pocket screws.
And with that, the first base cabinet was done and I could move on to assembling the other two base cabinets. These were exactly the same, except they just had one standard stretcher at the front and back of the cabinet rather than the false front assembly like the sink cabinet.
Step 6: Constructing Upper Plywood Cabinets

Next, I could break down the boards for the upper cabinets, and let’s hop back into SketchUp to see how these come together. The back and sides are the same as the base cabinets, but the uppers have a full top, as you’ll be able to see it in the finished cabinets.
Also, both the top and bottom panels are inset 2 ½”, which will give me room to install undercabinet lighting without it being visible in the finished cabinets.
I added a 2 ½” strip to fill in this gap, which I could cut to length at the miter saw. I also wanted to illustrate that you don’t need a fancy stop block system to get repeatable cuts at the miter saw, I just clamped a board to my work surface and used it as my stop block, and all of my boards ended up at the exact same length.
With all of the boards cut to final size, I could edge band the front edges of the boards, which I was really getting the hang of at this point.
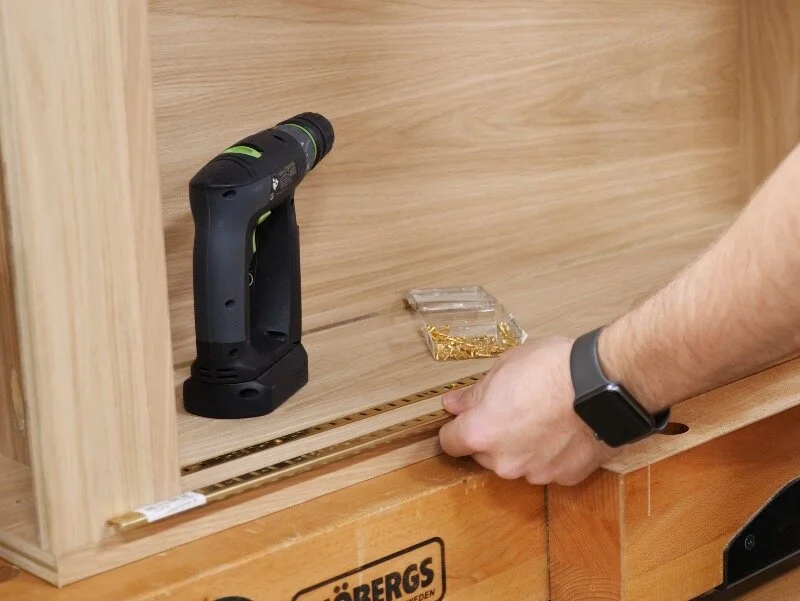
Before assembling the upper cabinets, I needed to route in a few grooves for these shelf standards, which I’ll use to mount the glass shelving in these upper cabinets. These shelf standards are incredibly strong, and that will be important considering the glass shelves themselves are already heavy, and then add to that about a dozen bottles per shelf.
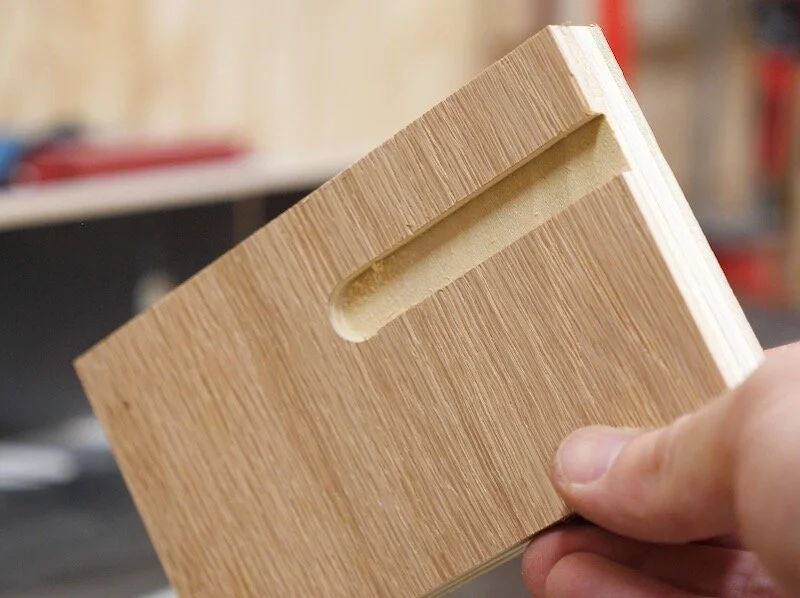
Anyway, I wanted to inset the shelf standards about two inches from each edge and route a groove deep enough so they would be flush with the surface of the plywood. I installed this ½” straight bit from Infinity Tools, and the nice thing about this particular bit is that it has a plunge point, so it can cut cleanly going straight into the face of a board.
I marked a start and stop line on the router table fence, so that the groove would end below and above the top and bottom panels, and then I cut a test piece to make sure my measurements were all correct, which they were.
As you can tell, the process of routing the grooves was pretty simple, I just started with the end of the panel lined up with my mark, lowered the panel onto the bit, and then ran the board along the fence until the other end hit the other mark.
After that, I would turn the panel 180 degrees and repeat the process.
I could then repeat the same process of the rest of the sides, and then I adjusted the fence to widen the groove to fit the shelf standards, which are about ⅝” wide.
With the grooves routed, I could move on to drilling the pocket holes, and unfortunately I ran into an issue here. The fence on the Foreman wasn’t tight enough, especially considering how big these pieces are, and it was slowly working its way backwards while I drilled all of these pocket holes.
I unfortunately didn’t notice this until I had already drilled all of the pocket holes in the back, top and bottom panels, so I had to drill all of those holes again. Just a word of warning there, really snug down the fence when you’re working on panels this big.
Anyway, with all of the pocket holes drilled correctly, I could move on to assembling the upper cabinets. Again, I used Krazy Glue and pocket screws, and this time I decided to clamp both sides in place and drive in the screws. This worked well, and I could also use this parallel clamp to align each area of the panels before driving in the screws. The plywood was slightly warped on the side panels since I got caught in a rain storm coming home from picking it up, so I really needed to use the clamps to help keep things aligned.
Next, I could install the bottom and top panels. I used the offcuts from the filler strips as spacers below the panel, clamped it in place, then laid the cabinet on its back to drive in the screws. Once again, this panel was slightly bowed, so I clamped the spacer in the center to make sure it was properly aligned and then drove in the screws.
To install the filler strip, I added glue to the top edge, clamped it in place, and then aligned all of the edges before driving in the screws. I unfortunately didn’t pay attention to which direction the pocket holes on the top edge of the board were facing and had to flip the piece around so that the pocket holes were in the right direction.
Anyway, after I did that, I could just drive in the rest of the screws and then repeat the process on the other filler strip.
And with that, the first upper cabinet was done and the other two were exactly the same, so I assembled them off camera and then I could move on to building the drawers.
Step 7: Building Soft Close Bank Of Drawers

And since I used these Blum undermount slides on these drawers, which are pretty tricky to install, I figured I’d do a separate video on the drawers, both to keep this video from getting any longer and to have that video as a separate resource for people building DIY cabinet drawers with the Blum slides. That video will be out next week and, I’ll link to it in the here.
After installing the one drawer on the other base cabinet using the same process, I could add this extra stretcher, which will just provide a stop for the door on this cabinet.
Next, I could get to work cutting all of the drawer fronts and doors to size. Once again, I made sure to trim off all of the factory edges and also maintained grain continuity where I could. I would have been more concerned with keeping a continuous grain pattern here, but I sprayed all of these pieces with black tinted polyurethane, so it won’t really matter much in the finished cabinets.
After cutting the pieces to size, I had a ton of edge banding ahead of me. See, I needed to edge band all four sides of all of the drawer fronts and doors, which is a lot of edges.
With all of the drawer fronts and doors edge banded, I could move on to getting them mounted.
I started with the bank of cabinets, mounting the bottommost drawer front first. I used some playing cards to space the drawer front off the bottom of the cabinet about 1/16”, clamped the drawer front in place, then pre-drilled a few holes and drove in some 1” screws from inside the drawer box.
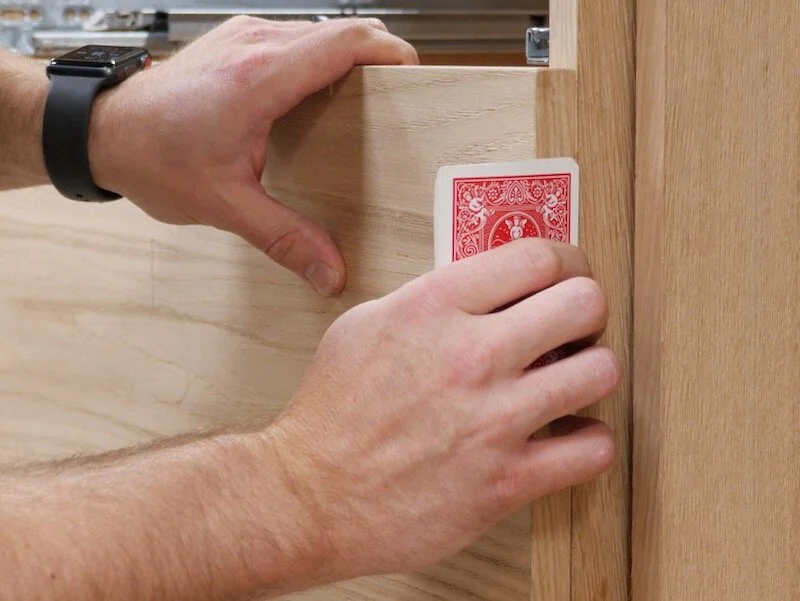
Next, I continued working my way up the drawer box, but I accidentally continued to space the drawer fronts 1/16” apart when I really wanted an ⅛” spacing.
Because of this, I had to go back and drill out the holes and swap over to screws with larger heads which gave me some room for adjustment.
To attach the uppermost drawer front, since I couldn’t get a clamp there, I used double sided tape to hold the drawer front in place while I added screws.
I repeated the same process on the second base cabinet, using the doors and an ⅛” spacer to get the correct placement, and once again removed the drawer to add screws from inside the drawer box.
Step 8: Installing Cabinet Doors And Hinge Hardware

Next, I could move on to installing the doors. I used Blum soft close hinges here, and used another set of jigs to help install the hinges. In case you haven’t picked up on it, jigs are an integral process of cabinet making and, whether you make them yourself or use commercial jigs, they make the process much more efficient and reduce the amount of measuring you have to do.
Anyway, this jig clamps onto the door, also setting the offset from the edge of the door, and then you can use the included Forstner bit and guide to drill your hole. This jig allows you to drill these holes to perfect depth without a drill press.
After drilling the hole for the hinge cup, I also pre-drilled the holes for the screws using a 1/16” drill bit.
To install the hinge, I just made sure the hinge was square and then drove in the screws into the pre-drilled holes.
I repeated the same process on the other doors and then I could install the other half of the hinges inside the cabinets.
To do this, I held the door in place and marked a line on each side where the hinge met the inside face of the cabinet. I then used yet another jig, this one from Rockler, to drill the holes. This jig has a centerline, which I centered between the two lines I marked, and it also has a stop that references off of the front edge of the cabinet, giving you the correct offset for the mounting plate.
I clamped the jig in place, pre-drilled the holes using a self-centering drill bit, and then installed the hinge plate.
After installing both plates, I could just clip the hinges in place and the door was pretty much ready to go with some minor tweaking.
I repeated the process on the other door and then adjusted the hinges until I got an even reveal. Once again, jigs made this whole process way easier, where I’ve struggled with this process in the past.
The last cabinet to work on was the sink cabinet, which has a faux drawer front. I first installed the door using the same method as we just went over, and then I installed the faux drawer front by adding a spacer, clamping it in place, and driving in screws from inside the cabinet.
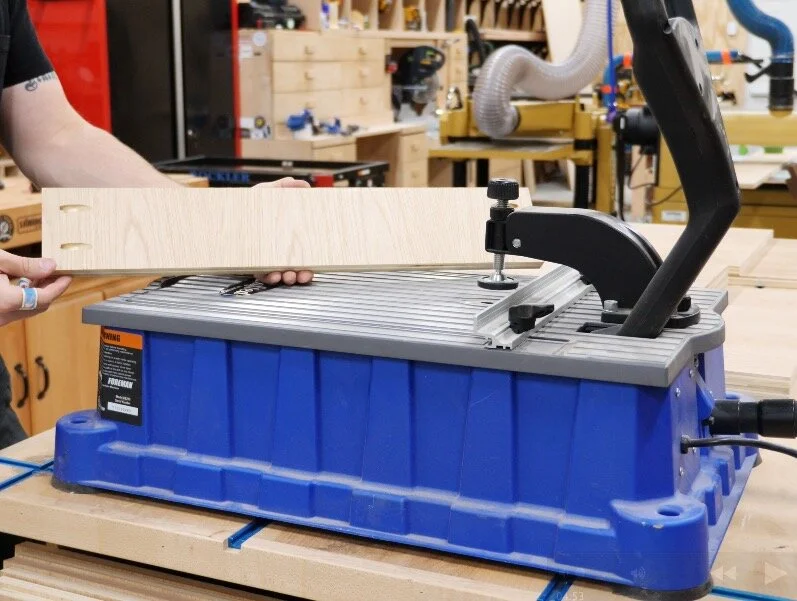
Step 9: Brass Drawer Pull Installation
The last thing to do on the drawers and doors was to cut a small recess on the top edges of the pieces to allow this edge pull to sit flush with the top of the pieces.
To do this, I set my blade height to the same height as the edge pull and then added a spacer block to my table saw fence to create a hard stop at each end of the recess.
Next, I could make a pass, establishing one end of the recess, then flip the board around and make a second pass. This would ensure the pulls were perfectly centered.
To clear out the material in the middle of the recess, I tried a technique that was new to me, sliding the board back and forth across the saw blade, using my miter gauge as support. This leaves you with a perfectly flat cut but can be a little bit sketchy, so don’t try this if you’re not comfortable with this technique. I was barely removing any material, so it was pretty easy, but I don’t think I’d try this with much of a higher cut.
Anyway, I repeated the process on the rest of the pieces, resetting my stop on the doors so that the pulls would be flush with the edges of the doors rather than centered, and then I could add the pulls.
The pulls sit perfectly flush with the top edge of the fronts and I just pre-drilled the holes with a self-centering bit and drove in the included screws. I repeated the process on the rest of the parts, but I was really just pre-drilling the holes here, so I didn’t leave the pulls installed, since I would have had to remove them for finishing anyway.
Step 10: Installing Leveling Feet To Lower Cabinets
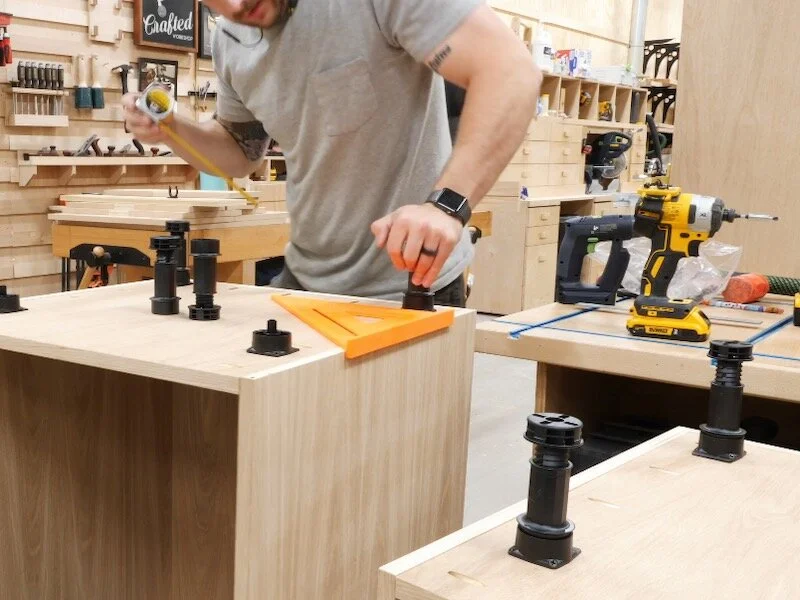
The last thing to install on the base cabinets were some leveling feet, which made installing and leveling the base cabinets much easier.
To install the feet, I first needed to drill a through hole through the bottom of the cabinets. I used a Forstner bit for this and made sure to clamp a block on the other side to reduce any blowout.
Next, I set the top of the leveling foot in the hole and then pre-drilled holes to attach the foot to the cabinet. I made sure the foot was square to the cabinet and used a self-centering bit to make this process easier.
The feet press fit into the base piece, and then you can turn the bottom of the foot to adjust the height. The through hole allows you to use a screwdriver from inside the cabinet to make adjustments as well.
I repeated the process for the other three feet and then installed the feet on the other cabinets. I set in the feet three inches from the sides of the sink cabinet and right cabinet, but the leftmost cabinet will have a toe kick on the side as well, so I set it in 2 ½” to have less of a recess for the toe kick on that side. All of the feet were set back 3 ¾” inches from the fronts of the cabinets, which set the toe kick back 3” from the front edge.
Step 11: Installing Toe Kicks
Next, I could cut the toe kicks as well as the filler strips to size, which were the last pieces I needed to cut.
The toe kick boards clip onto the leveling feet with these clips, which are located in a groove that needed to be cut on the backs of the toe kicks.
I set my blade height on the table saw and snuck up on the fit, and this groove needs to be a tight fit to hold the toe kick in place.
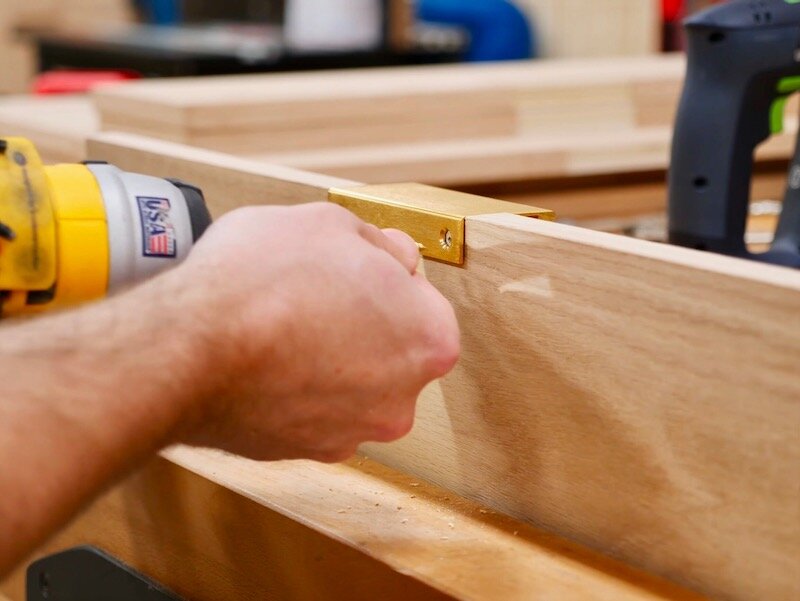
The left two cabinets needed an L-shaped toe kick to wrap around the corner, and I attached these pieces with pocket screws.
To attach the toe kick to the legs, I roughly placed the clips in the groove on the back of the toe kick, lining them up with the feet, and then slid the toe kick into place. The clips have some side-to-side play, which mades aligning the clips easy.
I had purposely left the toe kicks oversized, so once they were installed, I marked where I needed to cut this left toe kick and then cut it to length at the miter saw. I left the right toe kick oversized until I installed the cabinets, so I could cut it to length based on the fit with the wall.
The last pieces to assemble were the filler strips, which fill in the area between the right sides of the upper and lower cabinets and the wall. These fillers will allow me to open and close the doors of the cabinets without them running into the side wall.
Since they are fairly wide at about 6”, I made the fillers into right angle, to give me more surface area to screw the filler strip to the cabinets.
I connected the two pieces with glue and pocket screws and then I clamped the filler strip in place, on the right side of the base cabinet.
I pre-drilled and added a few screws at the top and bottom of the strip, as well as in the middle. Again, I left this filler oversized so I could trim it to width when I installed the cabinets.
I repeated the same process on the filler strip on the upper cabinets, clamping the strip so it was flush with the cabinets and screwing it in place.
This filler needed to be flushed up ever so slightly, which I did with my block plane.
Step 12: Installing Glass Shelf Pin Hardware
Now I could continue working on getting the rest of the hardware installed on the upper cabinets, which included the shelf standards and some lighting.
To install the shelf standards, I first needed to cut them to length, which I did at the portaband, but a hacksaw would work just as well.
Rather than using nails to attach the shelf standards, I decided to use these tiny brass screws. This allowed me to easily add and remove the shelf standards, whereas this wouldn’t have been possible with nails. I made sure to pre-drill the holes and switched to the fragile screw setting on my impact driver to drive the screws.
Next, I could clip on the brackets and then set the glass shelf in place. I had these shelves cut to spec at a local glass shop and they recommended ⅜” thick tempered glass with a polished edge, so that’s what I went with. Luckily, the shelves fit perfectly.
Also, I noticed when I was adding the brackets that a bit of the edge banding had lifted slightly. To fix this, I added a dab of Krazy Glue, wiped away the excess, and held it in place for about 30 seconds.
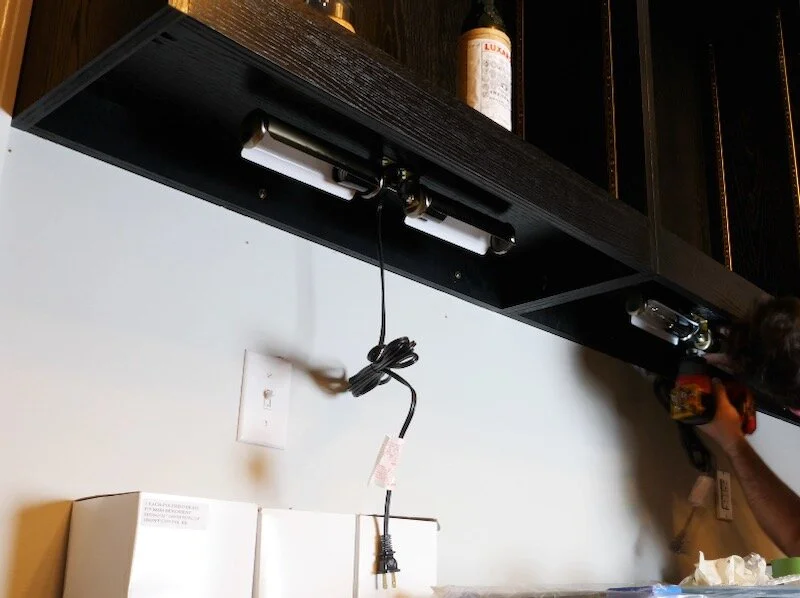
Next, I needed to drill the holes for the recessed lighting in the top of the upper cabinets. I needed to drill 3” holes for these lights and I drilled the holes with a hole saw. I picked up a new hole saw for this and it has a super cool feature of ejecting the cutoff without needing to pry it out.
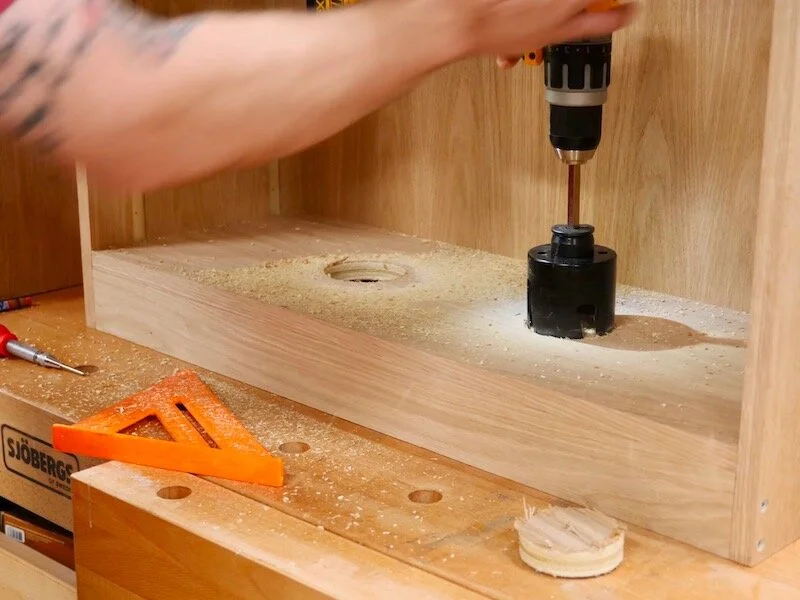
After drilling the hole, I cleaned up the rough edges, which will be covered by the light anyway, and then repeated the process for the rest of the holes.
Next, I set all three upper cabinets on my workbench, which is one of the flattest surfaces in my shop, upside down and clamped them together so the faces were flush. I then pre-drilled holes to connect the cabinets. This will still allow me some room for tweaking when I go to install the cabinets, but the holes will at least be black to match the rest of the cabinets.
While I had the cabinets clamped together, I could go ahead and drill holes for the power cables for the under cabinet lighting to run through the underside of the cabinets. I used a Forstner bit for this, and drilled the holes towards the back of the cabinets so they would be hidden in the final piece.
I also went ahead and pre-installed the lighting, which was much easier with the cabinets upside down. I just centered the lights and added a few screws. I replaced the bulbs with LEDS and I think they look great in the finished cabinets.
Step 13: Finish Prep And Spraying Black Polyurethane
And with that, I had done everything I could do in my shop, so next it was time for everyone’s favorite task, finish prep. The Oak plywood I used on this project is made by Columbia Forest Products and is part of their Touchwood collection. This plywood is really interesting, as it has an enhanced grain pattern, which I think gives the plywood a really striking look. To me, it looks much more like real wood rather than plywood, which is pretty cool.
Anyway, Columbia recommends not sanding the TouchWood as much as you can get away with, as it will reduce the enhanced grain effect, so I just hand sanded the faces of the pieces with 180 grit sandpaper and also broke the edges. This was really all I needed to get a smooth surface, and I was going to be spraying all of these pieces black anyway, so it didn’t really matter if a few of my pencil marks were left on the pieces.
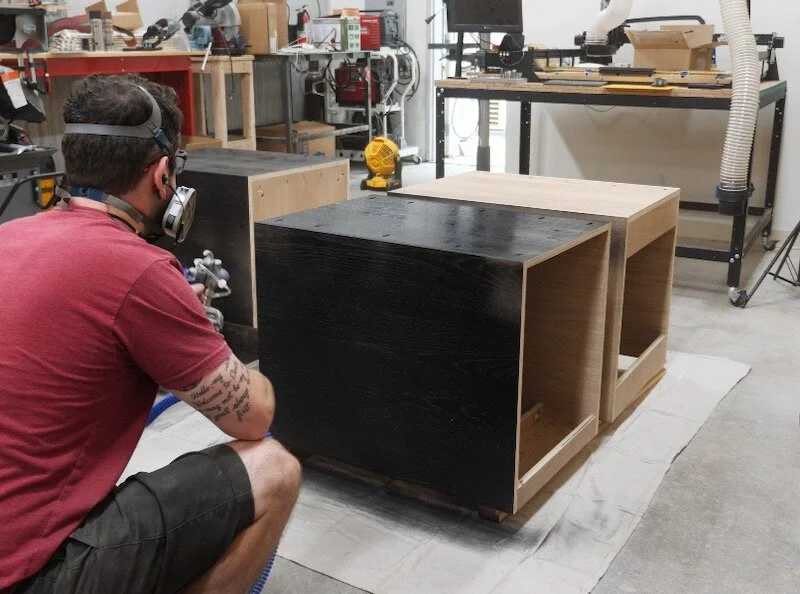
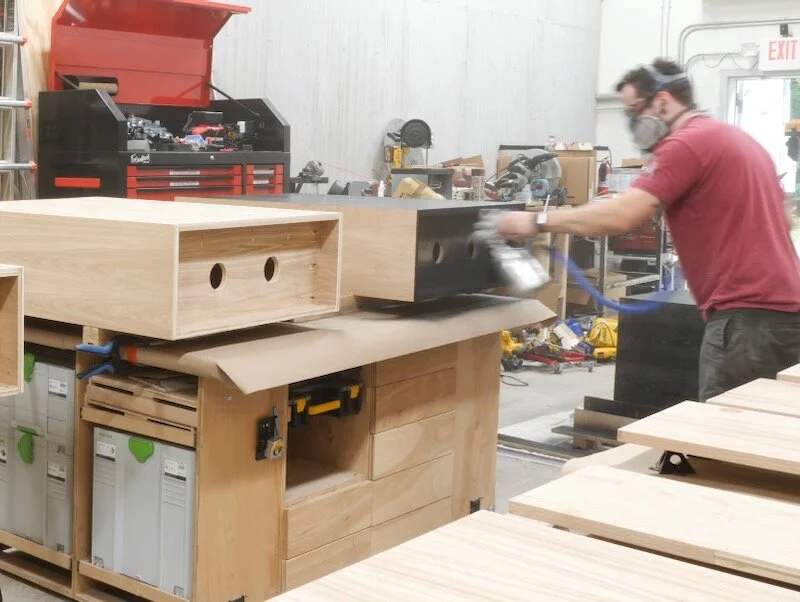
Once all of the sanding was done, I got all of the pieces set up for finishing and then got to spraying. I’m using General Finishes Enduro Black Poly here and I must say, it sprays like a dream. You can roll it on, but since I had a ridiculous amount of surface area to finish, I went with the spray option.
I applied three coats in total, knocking down the finish with 320 grit between coats. I also just sealed the cabinet backs and the sides that wouldn’t be seen in the final install with one coat, so that I didn’t waste time and finish.
While the finish dried on the cabinets, I went ahead and sanded the drawer boxes with 180 grit as well. Also, I’m doing a bit of an experiment here and leaving the drawer boxes unfinished. I was reading around online and saw that a ton of people just leave their drawer boxes unfinished, and I figured I would use this as an experiment. I typically add drawer organizers to any heavy use drawers anyway, but we’ll see how things hold up.
Also, the bottom of the bigger bottom drawer had a bit of flex to it and I wanted to stiffen it up, since it would likely be loaded down with heavier items. To do this, I added a strip of ½” plywood to the center of the drawer bottom and just attached it with Krazy Glue. I weighed it down with a few gallons of the black poly and it made a huge difference in the stiffness of the drawer bottom.
Once the finish dried, I reassembled as much as I could at the shop, getting the drawers and doors adjusted, and then I loaded up and headed back to the house for the install.
Step 14: Installing Home Bar Custom Cabinets
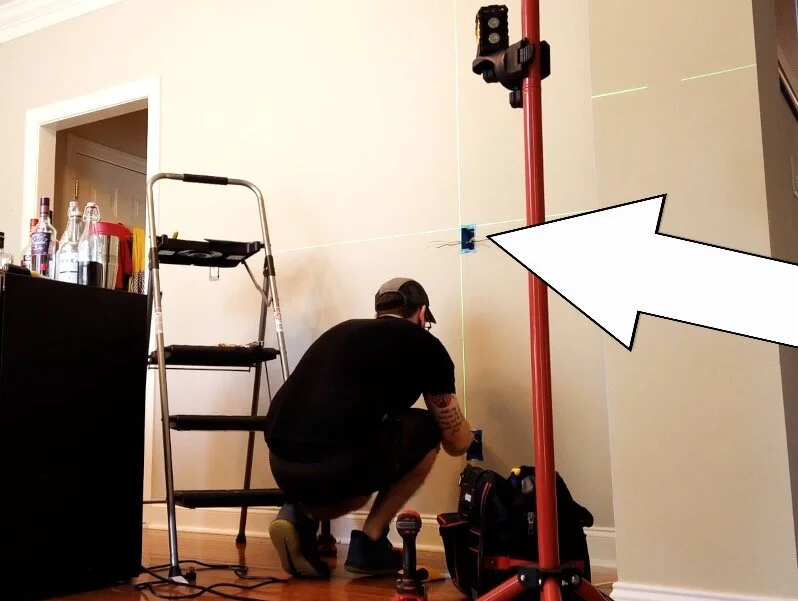
I actually had some work to do in the space before installing the cabinets. I needed to add two outlets, one above the future countertop and one above the future upper cabinets, and also added a GFCI to the outlet near the floor, which is before the other two outlets in the circuit, to meet code requirements.
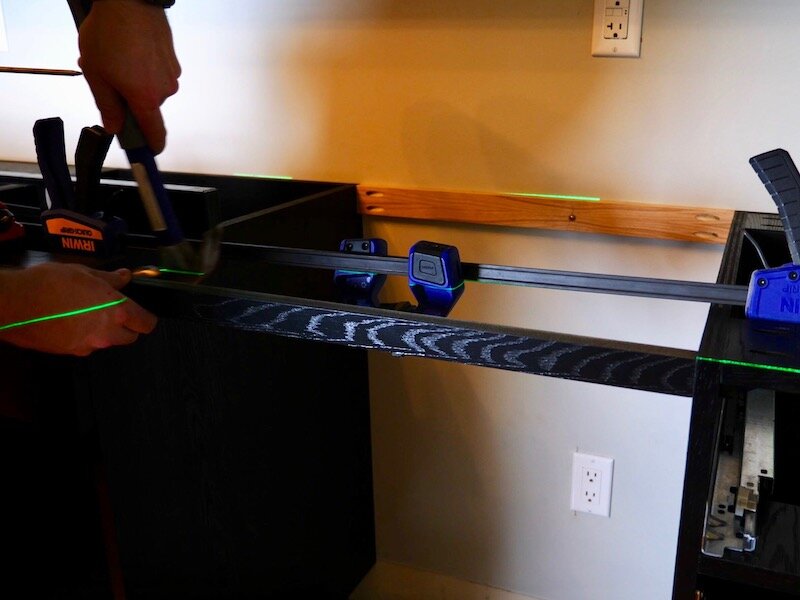
Once the outlets were installed, I could get to work installing the upper cabinets. I first set up a line laser at the height I wanted the bottom of the upper cabinets. I just picked up this new FastCap LaserJamb Pro, which makes setting the height of your line laser super simple, I highly recommend it.
After setting the laser to a height of 54”, which would set the upper cabinets 18” above the countertop, I mounted a cleat, which was just a strip of ¾” plywood, to the wall at that height. This cleat will allow me to set the cabinets in place and free up one hand to drive screws through the back of the cabinets into the studs.
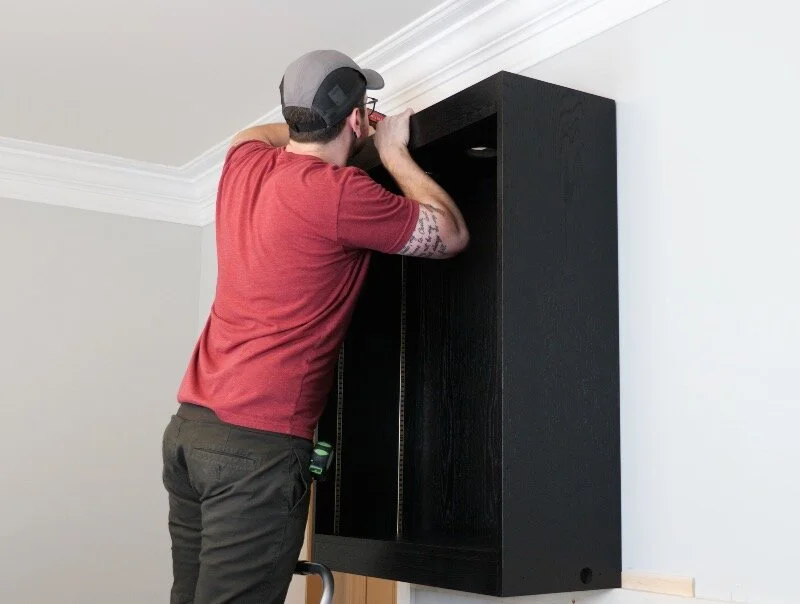
Speaking of the studs, next I measured where my stud locations were on the wall, transferred those marks to the backs of the cabinets, and pre-drilled holes in the cabinets at these locations. These cabinets absolutely have to be mounted to studs, as they will be holding a ton of weight. I added screw holes at the top of each cabinet to start and partially drove screws into the holes.
Next, I could lift the leftmost cabinet in place and attach it to the wall with 3” cabinet screws. I attached it loosely at first, to allow me to shim the cabinet to get it plumb. This first cabinet really dictates the rest of the cabinets, as the front edges of the cabinets need to line up, so I took my time making sure everything was plumb. After double checking everything, I screwed the cabinet tight to the wall and then added more screws along the bottom edge of the cabinet. Finally, I cut away the excess shims.
With the left cabinet in place, I could repeat the process for the next cabinet in the line. I pre-drilled holes for the screws to attach the cabinet to the wall, set it in place, and then loosely attached it to the wall. This time, I also clamped the front edge of the cabinets together so that they were flush and attached them to each other using screws. I then shimmed the back edge of the cabinet as needed and tightened it to the wall.
I repeated the same process for the third cabinet, and then I could add the filler strip.
First, I measured along the right side of the rightmost cabinet, checking to see if the distance to the wall changed at all. Luckily, my wall was dead straight, so I could just rip the filler strip to width at the table saw.
I first added painter’s tape along where I would be cutting, to reduce tearout, and added another strip to keep the finish from getting scratched up.
After making the cut, I could install the filler strip using the holes I drilled at the shop. and, with that, the upper cabinets were installed.
Next, I could work on installing the base cabinets. Again, I set up my line laser, this time at 34 ½”. My countertop will be 1 ½” thick, which will bring the countertop height to 36”, which is standard.
I moved the leftmost base cabinet into place and realized the baseboards were going to just barely interfere with the cabinets, so I needed to remove them along that wall.
To do this, I scored the caulk line at the top of the baseboard and then used this Trim Puller tool to pry away the baseboard. This tool is super handy and makes this task really simple.
Once the baseboard was removed, I could set the first base cabinet in place and get it level and plumb. The cabinet levelers I installed made this extremely easy, with no shimming required. I used the laser as reference for the back edge of the cabinet and just kept checking for level front to back to make sure the cabinet was plumb.
After getting the cabinet leveled, I added two cabinet screws through the back of the cabinet and then I could install the sink cabinet.
This was just more of the same process, but I also attached the cabinets to each other using 1 ¼” screws in addition to attaching the cabinet to the wall.
The third cabinet has a space to the left of it, for the built-in mini fridge, so I first marked where the left edge of the cabinet needed to be and then got it leveled.
Step 15: Installing Cabinet Stretchers
After getting the third cabinet leveled, I clamped the two stretchers between the cabinets, attached the right cabinet to the wall, and then attached the stretchers. I first attached the back stretcher to the wall, since it will also be supporting the back edge of the countertop, and then attached it to the cabinets using pocket screws.
I repeated the same process for the front stretcher, which I also finished to match the cabinets.
Next, I could slide the fridge in place and it was thankfully a perfect fit. This NewAir mini fridge is designed to be built into cabinetry and is front vented, so just make sure you get a similar fridge if you’re going to be building it into a bank of cabinets like this.
Next, I installed the filler strip for the base cabinets, which was the same process as the upper cabinet filler strip. It’s amazing how much of a finished look these strips give the cabinets.
Step 16: Toe Kick Installation
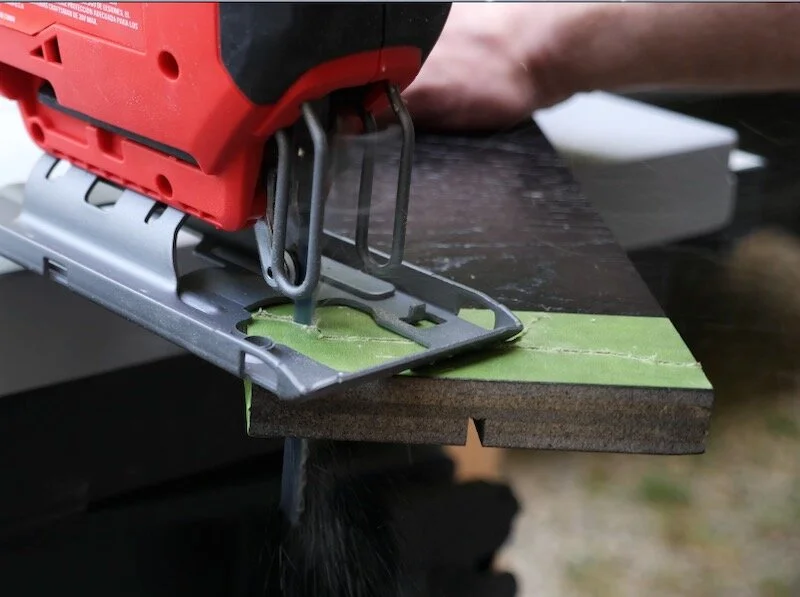
The last pieces to work on were the toe kicks. I wanted to scribe this right toe kick to the baseboard and used this scribing tool to mark a line on the right edge of the toe kick. I also added painter’s tape to the edge, both to make my mark easier to see and also reduce tearout when I cut to my line.
Speaking of which, next I could cut the toe kick with my jigsaw. I also undercut it slightly, adding a bevel to the back edge of the toe kick. This provides clearance and makes it easier to fit the toe kick.
After cutting the edge, I confirmed the fit and then marked and cut the other end to final length off camera, then I could install the toe kick.
Again, I just added those clips to the groove I cut earlier and then clipped the toe kick in place.
The left toe kick needed to be trimmed down slightly, since my floor slopes from left to right, and I just ripped about ⅛” off at the table saw.
After cutting it to width, I installed the clips and then clipped the toe kick in place.
With that, I could reinstall the drawers and doors and make any final adjustments. Of course, the cats, my wife, and my little dude had to come check out my work and I think they were all pretty impressed.
The final touches were to get the lighting installed, which unfortunately I’m still waiting on the LED bulbs, so we’ll have to wait to get the final shot with the lights for the next video.
All that was left after that was to get my collection organized….