
How To Build A DIY MFT-Style Outfeed Table, Assembly Table & Workbench
In this video, I'll show you how to build this simple but functional outfeed table, assembly table, or workbench (or all three!) with an MFT-style top full of dog holes! Thanks to Powermatic for sponsoring this project, check out Powermatic's awesome power tools.
🤖 Learn more about my Inventables X-Carve CNC! Try out Easel by checking out my Easel project for the template!
Download the Outfeed Table SketchUp File
If you’re looking to build this table for yourself, I’ve uploaded a free copy of the SketchUp file I created when designing this project. Since this design isn’t completely original but, if you are handy with SketchUp, you’ll be able to build this project easily.

Note: the links below are affiliate links.
📦 Materials Used On The Outfeed Table:
Outfeed Table Build Process :
As I mentioned in my shop tour video, I decided to move my t-track assembly table down by the workbench, which I think makes more sense in the workflow of my shop. That said, with the assembly table down there, I was left with no outfeed table for the table saw, so I decided to whip up a quick table with some cool features.
Step 1 : Break Down The Plywood Pieces
I wanted to avoid purchasing as much material as possible for this project, and shop projects are one of my favorite ways to use up those scraps of plywood that you’ve been hanging onto for too long. For example, I’ve had this offcut of Walnut plywood for probably over a year, waiting for the perfect project, which never really came along.
The design of this outfeed table is incredibly simple but also super sturdy. The legs are made up of two pieces of plywood, joined at 90 degrees, and then the stretchers are attached in the inside corners of the legs. All of the stretchers overlap, which creates an incredibly strong joint with tons of glue surface.
I have a SketchUp model of this outfeed table available for free if you want to download it.
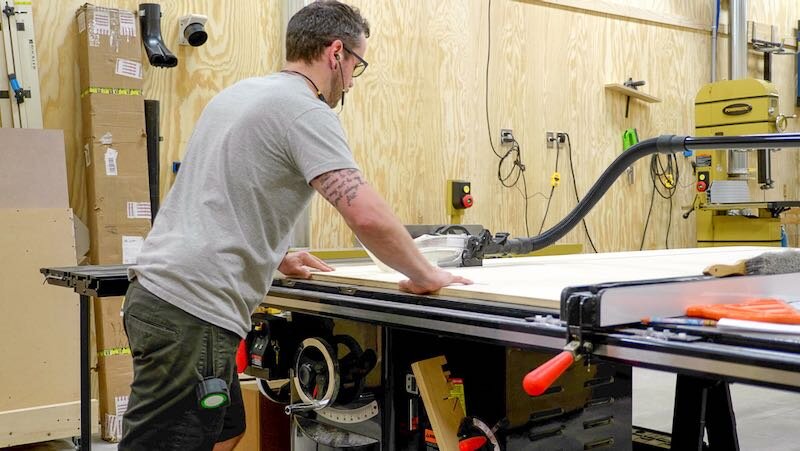
Back to the build, I kept ripping strips of plywood for the stretchers and legs, using up all of those random scraps, and then I could cut the top to size from the one full sheet of plywood I had on hand. I ripped it to width at the table saw then crosscut it to length with the track saw, making sure to cut off the factory edge to get a clean glue line between the edge of the plywood top and the trim I would be adding later.
To cut the legs and stretchers to length, it was back to the table saw. I used the crosscut table here, but a crosscut sled or miter saw would also work great. Preferably something with a stop block, as keeping these parts the same length is pretty important to make sure everything goes together square.
Step 2 : Cut and Mill Trim To Size
For the trim for the top, I pulled down a piece of rough Poplar I’ve had hanging around the shop since I built that changing table over a year ago and it ended up being the perfect size for this.
I ripped the piece into strips at the bandsaw, which is much safer than trying to rip rough lumber at the table saw. It also wastes less wood since the kerf on the bandsaw is smaller.
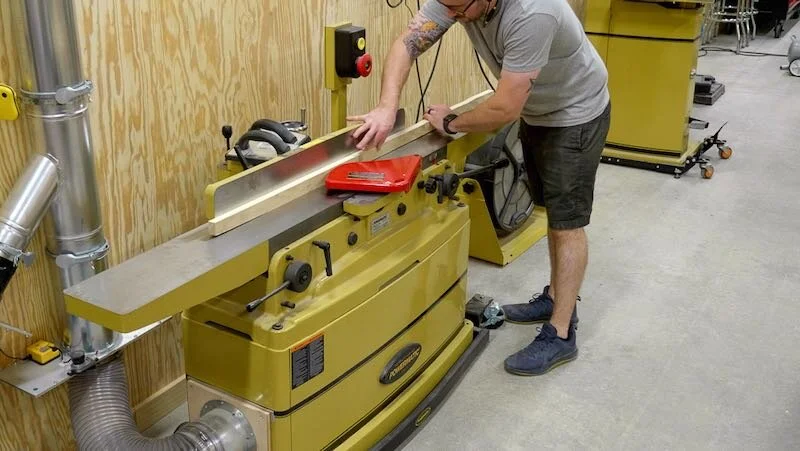
After ripping the board, I took the strips to the jointer and squared up one face and one edge. Now, I’m doing all of this because I already had this piece of lumber on hand, but you could just as easily buy a Poplar 1x2 and skip all of this. This is an extremely simple project and you could easily build the entire thing with a table saw or circular saw and a drill.
Once the boards had one square face and one square edge, I moved over to my sweet new 20” Powermatic planer and got the boards down to their final thickness of ¾”. This planer is an absolute beast and I can’t wait to send some massive pieces through it, obviously this 1 ½” wide Poplar wasn’t pushing it much, hah.
Finally, I ripped the boards to their final width of 1 ¼” at the table saw, then I could get the trim pieces attached to the top.
Step 3 : Attach Trim To Plywood Top
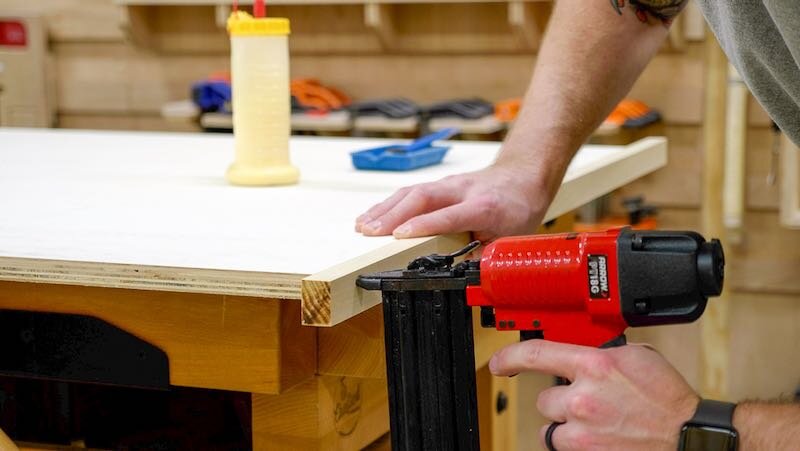
I used wood glue and 1 ½” brad nails for this and left the strips extra long so I could cut them flush after the glue dried.
Speaking of which, I cut the strips to final length with my Japanese pull saw and then cleaned up any roughness with my block plane.
I added the trim to the ends first, trimmed them flush, then added the trim to the front and back. This leaves you with a nice, clean corner without having to mess with mitering the corners.
Step 4 : Assemble The Legs For The Outfeed Table Base
With the trim attached, I could get to work on the base. First, I needed to build the legs, which I assembled using glue and brad nails than reinforced them with screws.
On these leg pieces, there is one wider piece and one narrow piece. The pieces need to be oriented so that the edge of the narrow piece is being attached to the face of the wide piece, so that the legs will have a matching measurement on both faces, if that makes sense. Basically, we’re trying to make the legs look like 4x4s.
I did mark my hole locations, since I was going to be plugging these holes and wanted them to have a clean look, and I used this countersink bit from Rockler, which has a stop collar, which allowed me to countersink the holes to a consistent depth.
Once the legs were assembled, I added pocket holes to the top edge of the stretchers before attaching them to the legs. These holes will be used to attach the top to the base, so that there aren’t any exposed screw heads on the top. I should have also added pocket holes to the lower stretchers but I didn’t think about it.
Before assembling the base, I measured the height of my table saw dust port, to make sure the lower stretchers cleared it, and then I could get to assembly.
Step 5 : Assemble The Outfeed Table Base
First, I assembled the sides of the table, attaching the shorter stretchers to the legs. I made sure to orient the legs so that the wider faces were facing the front and back of the base, or at least I did on this first assembly, before mixing it up on the second assembly.
I attached the stretchers with glue and brad nails and then reinforced them with 1 ¼” screws. Also, I get a ton of questions about the screws I use and these 1 ¼” screws with a square head are one of my new favorites. They drive easily, they look good, and best of all, they’re not Philips head, which I avoid like the plague, and again I’ll link to them in the description below.
After assembling the sides, I could get the base finished by attaching the long stretchers to the sides. Once again, I used glue, brad nails, and screws, and also made sure everything was square with a large speed square.
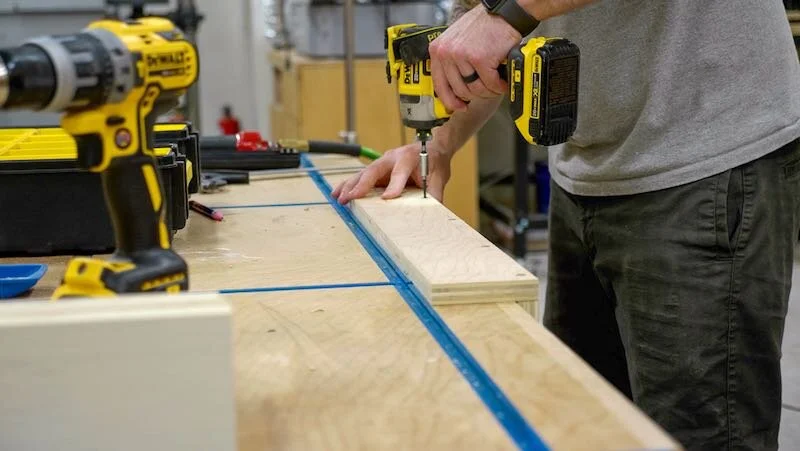
Once the stretchers were in, I could get the last pieces attached to the base, the center supports. These help to support the top and bottom shelves, and they also provide some more structure to keep the longer stretchers from bowing out.
I cut the board to length at the table saw, added pocket holes to the top edge as well as the ends, then clamped the board in place after marking the center point. Looking back at this footage, I actually clamped the board right over one of the pocket holes in the long stretchers, so I’d recommend not doing this, as that is probably a pretty weak connection.
I added two supports for the bottom shelf off camera and then cut some mounting blocks for the casters. These blocks attach to the bottom of the legs and provide a little more support for the casters and also set the outfeed table at the correct height to match the table saw.
I attached the blocks with brad nails and then added these Rockler Total Lock casters with some FastCap Powerhead screws, another one of my favorite screws. The large head is perfect for attaching things like casters.
Step 6 : Plug The Screw Holes (Optional)
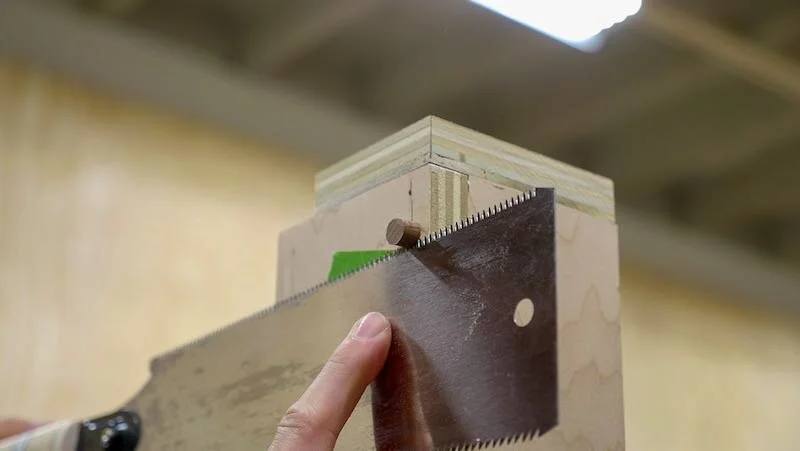
Next, I could get the screw holes on the legs plugged, and I decided to get a little fancy like Marc did in his video and use a Walnut dowel for this. I cut the plugs to length at the bandsaw, and one of my favorite features of this bandsaw is the brake, which allows you to stop the blade quickly so you can safely grab the pieces you’ve just cut.
I added glue to each of the plugs and then drove them in a hammer.
After letting the glue dry for a bit, I pulled out my Japanese pull saw again to flush up the plugs. I like to add a piece of painter’s tape where I’m going to be placing the saw, and this just helps to keep the saw’s teeth from digging into your workpiece. This is especially important on plywood like this with a thin veneer, as it’s really easy to eat through the veneer.
Once all of the plugs were flushed up, I came back and sanded down the whole outfeed table, getting all of the plugs nice and even and also breaking the bottom edges of the top stretchers.
Once I was done sanding, I could set the top on the base and do a quick test fit over at the table saw to make sure everything fit nicely.
Step 7 : Fix Your Mistakes (Also Optional 😂)

Unfortunately, it didn’t. Somehow, I had done my math wrong and the top of the outfeed table was sitting about an ⅛” above the top of the table saw, which was an easy enough fix by swapping the ¾” plywood mounting blocks for ½” plywood blocks.
Another issue I ran into was some interference between the overarm dust collection pipe and the trim pieces, which hung lower than the top.
To fix this, I marked where the interference was and then went back to the assembly table and pulled out some hand tools. I started by establishing a square cut where I wanted the cutout to end, using the Japanese pull saw and my Katz-Moses dovetail jig as a guide.
Next, I used a chisel to cut away the excess material, facing the bevel towards the piece to allow me to control the cut a little better, and kept removing material until I had an area wide enough to get my pull saw into.
Once I could get my saw into the space, I could move much quicker and saw away the excess, making sure I was using the rip teeth on the saw instead of the crosscut teeth. I removed some of the waste about halfway through the cut as it was creating a lot of drag on the saw and then finished up the cut.
With the bulk of the material removed, I cleaned up the cut with my block plane and, let me tell ya, Poplar planes like a dream. I finished everything off with a little sanding to break the edges and the cutout was done.
I went back for another test fit and now the height of the table was spot on, about ⅛” below the surface of the table saw, and the cutout section allowed the top to fit over the dust collection pipe.
Step 8 : Route Miter Slots In Outfeed Table Top
The next step was to route some channels to allow any jigs that have miter bars to move freely through where the outfeed table is located.
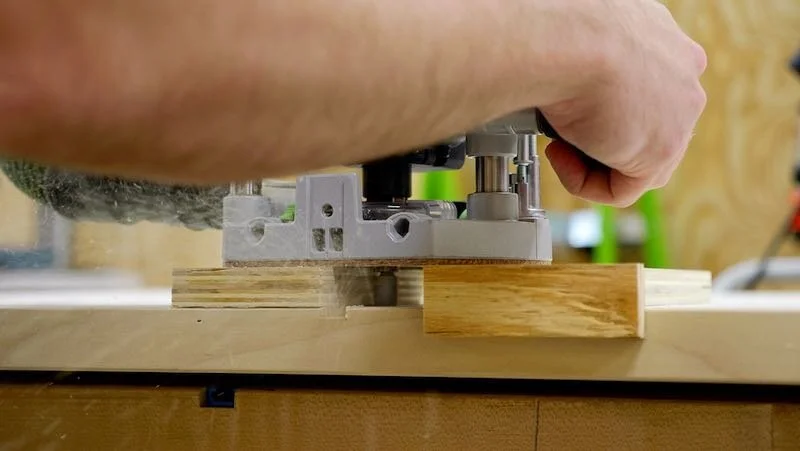
I marked the rough locations of the two miter slots, marked out some lines to indicate where I wanted to cut the miter slots in the outfeed table, then whipped up a quick jig to route the slots. I cut the slots oversized so I wouldn’t have to worry about precise alignment of the table, and I just assembled this jig with a little CA glue.
To cut the slot, I installed this Infinity Tools template bit in my router and then attached the jig to the table top with some double sided tape.
I set my depth stop off camera, so I lowered the router to the depth stop then routed out the slot. You just want to make sure you’re plunging deep enough so that the bearing on the bit is riding on your jig, otherwise you’ll be routing freehand. You also want to make sure to run your router clockwise along the jig.
After removing the jig, I cleaned things up with a sanding block and then I could move on to getting the bottom shelf installed.
Step 9 : Install The Bottom Shelf
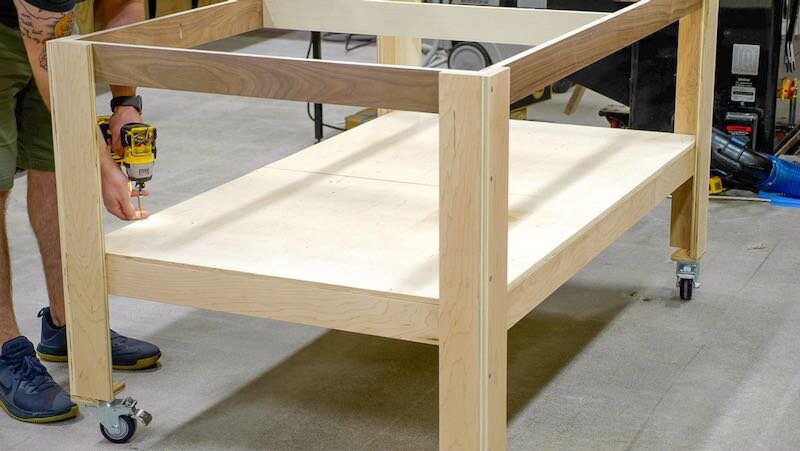
First, I measured for the piece and cut it to size over at the table saw. Due to the design of this base, the bottom piece had to be broken into two pieces.
I did have to buy one piece of plywood just for this shelf, and I ended up picking up a 5x5 sheet of ½” Baltic birch, which was the perfect size.
I cut the piece to size at the table saw, breaking it into two equally sized pieces, and then dropped the pieces into place on the bottom stretchers.
Because I forgot to drill pocket holes earlier and didn’t feel like getting out my pocket hole jig, I screwed down the pieces through the top of the shelf, but I really regret not just using pocket holes. Even though I used trim head screws, I had a lot of issues with the plys splitting apart since the screws were so close to the edges of the pieces.
I did remember to add pocket holes to the center supports, so after screwing the panels down, I flipped the base and attached those screws.
Step 10 : Add The Dog Holes To Make Your Outfeed Table Into An MFT Table
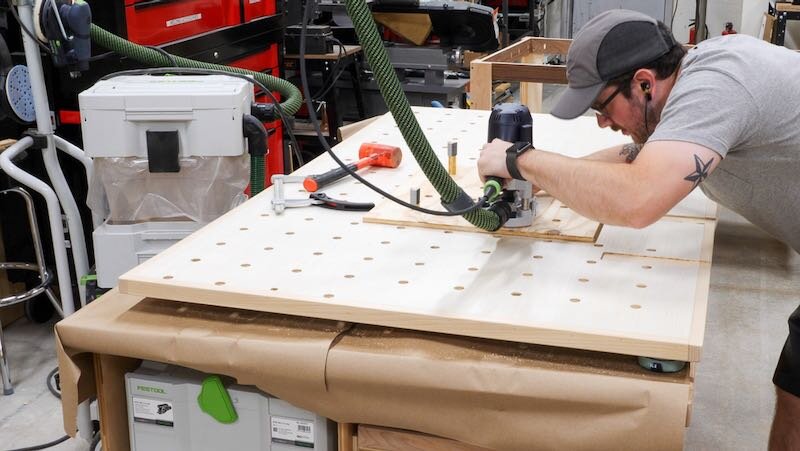
I decided to add dog holes to the top after talking to a furniture builder friend of mine, who uses his dog holes to support pieces when he’s cutting them down with his track saw. I’ve traditionally used foam panels, which can be a little awkward, and I figured that having these dog holes would allow me to use bench cookies, held solidly in place by the dog holes so they wouldn’t move around when cutting.
To cut the dog holes, I whipped up a quick template on my X-Carve. The table top was way bigger than the X-Carve so I couldn’t cut it directly on the machine, but by cutting the template with the X-Carve, I could be sure the hole spacing was perfect and I could use the dog holes as square reference points.
After the X-Carve cut the first dog hole, I stopped the operation to double check that my dogs would fit well, which they did, so I let the X-Carve cut the rest of the template.
I cut the dog holes with a 4” spacing, which is the same spacing Ron Paulk uses on his workbench, and this cut took less than 10 minutes. Here’s the Easel file I created, in case you want to cut a similar template on your X-Carve.
My clamps slipped on the final pass on the outline of the cut, so I stopped the operation and trimmed the excess away at the bandsaw, then flushed everything up with a flush trim bit, also from Infinity Tools, at the router table.
To allow the template to reference the corner of the table, I added some strips of plywood to the edges of the template with CA glue. Using a little activator made the CA glue bond pretty much instantly, and I could knock off these strips once I had the first set of holes routed.
Speaking of which, next I clamped the jig in place, referencing the front left corner of the top, and then I could get to routing. You could also use a large drill bit but a router leaves a cleaner hole and my router has dust collection.
I used the same template bit that I used for the miter slots here and made the cuts in two passes.
Next, I swapped over to a chamfer bit to lightly chamfer the holes. This not only allows you to add your bench dogs more easily, but it also keeps the veneer on plywood like this from tearing out due to repeated use. It also just looks nice.
Step 11 : Apply Finish To Your Outfeed Table
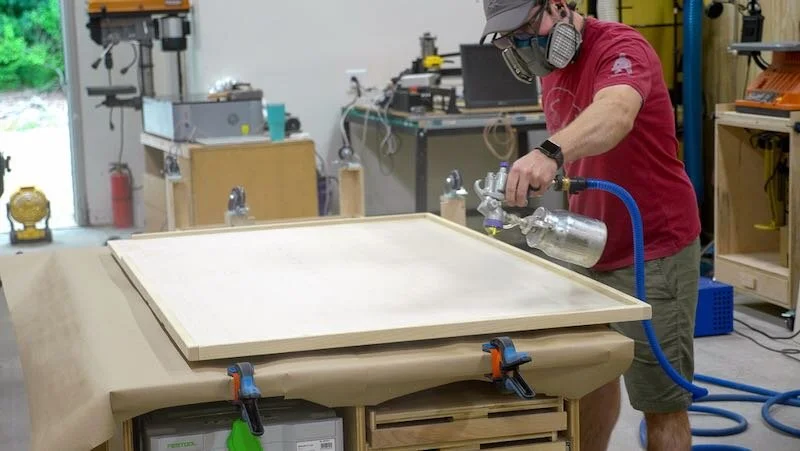
With all of the holes cut and chamfered, all that was left to do was apply finish. I sprayed on a few coats of water based polyurethane, which I find lays out a lot nicer if I thin it about 20% with water.
As you can see, I actually decided to add the dog holes after applying the first few coats of finish while thinking about it over the weekend, but either way, I applied three coats of finish in total, sanding the top between coats to make sure it was super smooth.
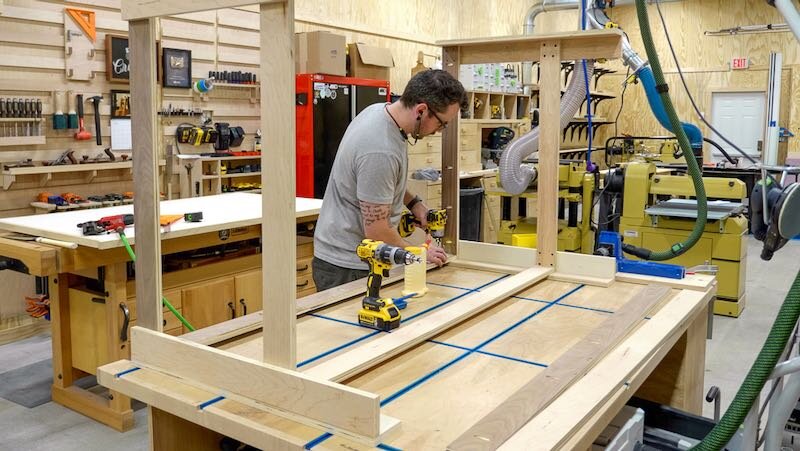
Step 12 : Attach Outfeed Table Top To Base

Finally, I could get the top attached to the base, which was a simple task with the pocket holes I had drilled earlier.
Unfortunately, the center support lined up perfectly with the center row of dog holes and, of course, my pocket holes lined up with the dog holes, so I’ll have to go back and add some angle brackets to attach the center support.
Otherwise, all that was left to do was flip the table back over, which was kind of difficult by myself, and get it set into place. I also got that bottom shelf loaded up, which just so happens to fit my extra Systainers pretty much perfectly.
With that, I could call this outfeed table finished!
My Finished Outfeed Table!


Thanks for reading this post! Remember, I have the SketchUp file available to download for free, in case you’re interested. Check out more of my shop projects, while you’re at it. If you’re good on shop projects, read more of my other woodworking projects. Thanks for reading and, until next time, happy building!