Building A Computer Desk / DIY Desk PC Part 1
In this video, I'll show YOU how to build your own custom DIY gaming computer desk or desk PC, as it's so aptly called. With a basic set of woodworking tools, you can turn a pile of plywood into a sweet custom gaming rig that will be the envy of your friends.
Computer Desk / Desk PC Plans
I have Desk PC plans available, if you'd like to build this exact desk for yourself. The plans include a detailed cutlist, cutting diagram for breaking down the sheet goods, and a SketchUp file.
Materials Used on Computer Desk / Desk PC Build
The links below are affiliate links, from which I get a cut of the sales. They don't cost you anything extra and help to support me!
- 3 sheets of ¾" Purebond plywood: http://bit.ly/purebond
- 1 sheet of ½" Purebond plywood: http://bit.ly/purebond
- 1 sheet of ¼" Purebond plywood: http://bit.ly/purebond
- 1 pound of 1 ¼" wood screws: http://amzn.to/2jqmkBc
- 1 box of 1 ¼" pocket screws: http://amzn.to/2jqkz6K
- 4 sets of 22-Inch Bottom Mount Drawer Slides: http://amzn.to/2j3Y5Mx
- 1 set of 16-Inch Bottom Mount Drawer Slides: http://amzn.to/2j3XHxH
- 1 set of 12-Inch Bottom Mount Drawer Slides (for keyboard tray): http://amzn.to/2iAO8mn
- 2 sets of 1-1/2" X 30" Continuous Hinges: http://amzn.to/2jqzC0p
- 1 set of 1-1/2" X 12" Continuous Hinges (for subwoofer access panel): http://amzn.to/2iAKQPT
- 1 pair of 100N/22.5lb Gas Springs/Gas Struts: http://amzn.to/2jqnJrs
- 1 x USB 3.0 x 4 Power/Reset Button: http://amzn.to/2ic7H3j
- 1 x High Speed USB Charger Receptacle: http://amzn.to/2iccFNg
- 2 x Fan System 8" with Speed Control: http://amzn.to/2iciISa
- 5 x Cable Pass Through Brush Plates: http://amzn.to/2j3QJZm
Tools Used on Computer Desk / Desk PC Build
- Dewalt 20V Max Impact Driver : http://amzn.to/1QxJD7w
- Bosch ROS65VC-6 Random Orbit Sander : http://amzn.to/2aWHSDR
- SawStop PCS 1.75-HP Professional Cabinet Saw : http://amzn.to/2aqqRyn
- DEWALT FLEXVOLT 120v MAX* 12" Double Bevel Compound Sliding Miter Saw : http://amzn.to/2ah20gS
- Kreg Jig K4 Pocket Hole System: http://amzn.to/2gcJ5LY
- DEWALT Biscuit Joiner: http://amzn.to/2j3PpG4
- Shapeoko XL CNC: http://bit.ly/shapeokoXL
Computer Desk / Desk PC Build Process
Step 1 : Break Down Materials
The first step in this project was breaking down the materials. To break down the sheets of plywood, I used a combination of a track saw, miter saw, and table saw. If you were hard pressed, you could certainly break down all of the pieces with a circular saw, but it would be tough to get everything perfectly square. In total, I used three sheets of ¾” plywood, one sheet of ½” plywood, and one sheet of ¼” plywood. The cost of the wood on this build was roughly $200, at least in my area.
For the plywood, I used Purebond hardwood plywood, which you might have heard about before on my channel. Purebond is the sponsor of this video, and I use their plywood for any of my indoor plywood projects. Purebond is made in North America, uses formaldehyde free glue, and is great quality.
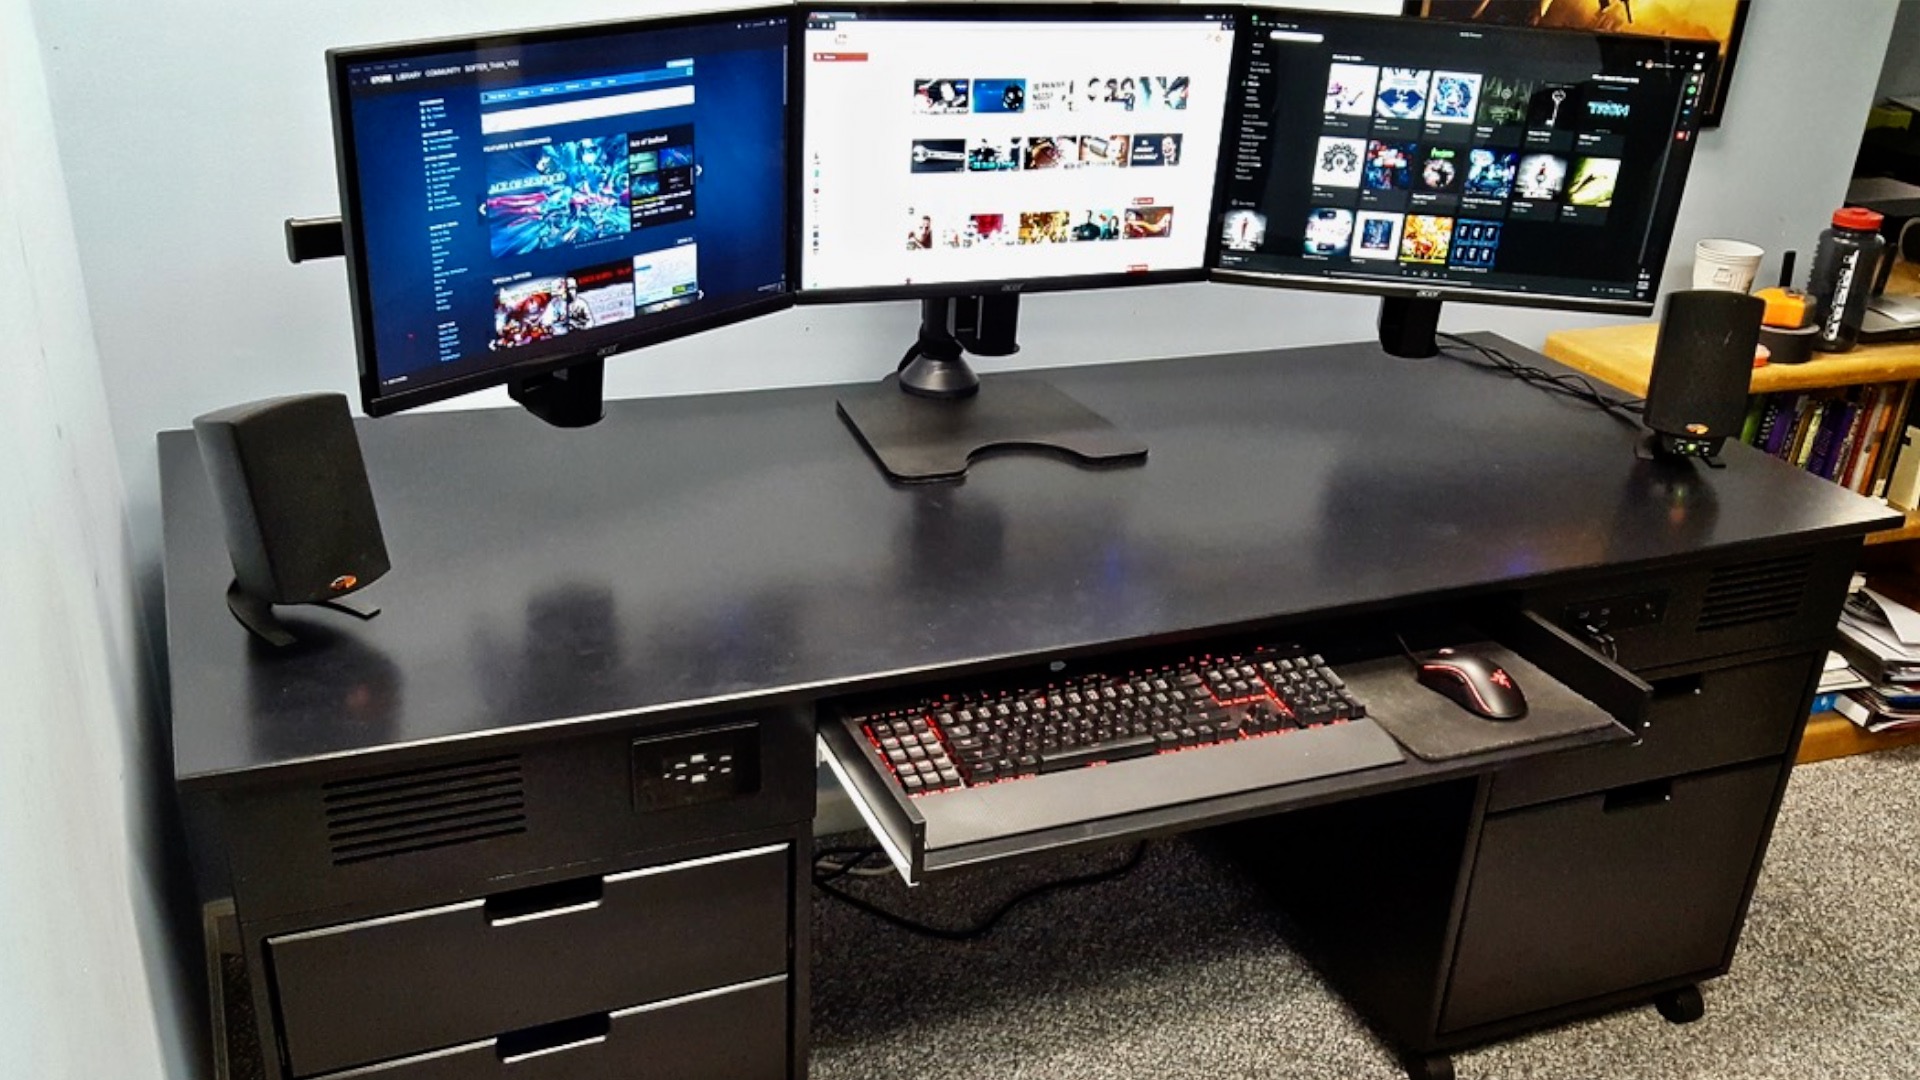
This desk is pretty big, and was designed to hold three 23” widescreen monitors on the desk top. The top is 74 inches by 31 inches and the total height of the desk is 30”, including the height of the casters I used. The desk is made up of three structures: the top and midsection, and the two cabinet legs. In Part 1, I’ll be covering the construction of the cabinet legs and then the midsection.
If you’d like to build one of these desks for yourself, I do have plans available with a detailed cutlist, a cutting diagram for breaking down your sheet goods, and SketchUp file. With the SketchUp file, you’ll be able to modify the size or layout of the desk to suit your needs. To purchase plans, click here.
Before moving onto Step 2...
Let’s take a look at the SketchUp model, just so you can get a better idea of how the final pieces come together. Here’s the complete Desk PC, and you might be able to tell that it’s made up of three distinct structures.

The Cabinet Legs

Let’s take a look at the cabinet legs first. They’re fairly basic except for a few unique features. First, there are these channels which are designed for routing cables down from the midsection, through the legs, and out the back of the cabinets.
Next, on the right cabinet, there is a compartment to house a subwoofer. The client I built this for planned to keep the subwoofer that goes along with his computer speakers in this compartment, and he lined the inside of the compartment with foam. There is a hole on the left side of the cabinet for the sound to come out of, and there is an access panel on the right side of the cabinet for accessing the controls as well as allowing the sub to be removed if needed.
The Midsection
Now, let’s take a look at the midsection. This center divider is really the heart of this desk, since this where the computer components will mount. Obviously, you’ll need to customize the hole placement based on your specific components. Behind this divider, there is a channel for the cables to route through. These front dividers house computer fans to assist with circulation, and they also have notches for cable routing.
On the back of the midsection, there are cable pass through brush plates for routing the cables from the monitors into the desk, to connect them to the video card. Last, there are holes in the back corner, where the cables will pass down into the cabinet legs into the cable channels we saw previously. Now that you’ve seen the basic design, let’s get to actually building the desk.
Step 2 : Cut Holes Needed In Cabinet Legs & Assemble Cabinet Carcasses
After breaking down all of the pieces, I cut the holes into the various pieces, starting with these holes for the cables to route through the back of the cabinet legs.
Next, I drilled pocket holes into the pieces of the cabinet carcasses, and spaced the holes roughly 6-10”. I also made sure to orient the holes so that they were facing the inside or the back of the cabinet, so that they’re not seen in the final piece.
For assembly, I used wood glue and pocket screws, checking for square along the way.
One tip: when using pocket screws, pieces can have a tendency to drift. If you use some clamps to hold your pieces in place, it is extremely helpful in keeping everything flush and square.
I assembled the cable channel using brad nails and glue and just glued and brad nailed it into place in the cabinet.
The cabinet stretchers are attached with pocket screws as well.
Next, I needed to cut the holes for the subwoofer compartment. This is the hole on the left side of the right cabinet. As you can see, I’m using a piece of MDF here. That’s because I didn’t pay attention to my cutting diagram and accidentally mis-cut my plywood, so I had to make due with a piece of MDF that I had on hand.
As you can see here, I also cut the other hole for the subwoofer access panel, but forget to get footage of this. I just used the table saw, and made sure to keep the off cut, as that will become the access panel for the subwoofer compartment.
This cabinet is assembled in the same way, using pocket screws and glue. Again, clamps really help here, especially on a piece this big. I also had to use 1 ¼” screws in a few spots where pocket holes weren’t an option.
I also unfortunately lost a little footage of assembling the subwoofer compartment, but this is fairly easy to figure out if you are looking at the SketchUp model. It’s basically just a compartment within the cabinet and is built using pocket holes.
Step 3 : Assemble the Desk PC Midsection
With the cabinets assembled, I moved on to assembling the midsection. First, I attached the back, using glue and 1 ¼” screws through the bottom. I made sure everything was nice and square here, as this piece will be what I reference the rest of the pieces off of during assembly.
Next, I attached the sides, first tacking them into place using brad nails and glue, then reinforcing them with screws through the bottom.
For the front of the midsection, I wanted to cut some vent holes into the pieces instead of just cutting one big hole and adding some plastic vents. Mainly, this was for aesthetics, but it also allowed me to practice a little more on my new CNC. I used a ¼” end mill to cut the vents and then also cut a hole for the USB hub and power button.
There are two of these front pieces on the midsection, each with a unique piece of electronics that needed to be mounted, so it was great practice for me to cut these both on the CNC.
Obviously, a CNC is not required for this build, and you could easily cut the holes with a jigsaw. These front pieces are attached with glue and screws, just like the rest of the side pieces.
Next, I assembled the inner side structure using pocket screws and then glued and screwed it into place.
The fans line up with the vents on the front of the midsection which I cut in the last step, and provide good circulation inside the desk. These dividers are attached with pocket screws.
Step 4 : Cut Away Excess Plywood from Desk PC Midsection
Next, I needed to cut away the excess plywood. First, I drilled some holes through the top to give me a point of reference when I flipped the midsection over. Then I added some screws from below to reinforce the inner side walls, and then I cut away the excess plywood with a jigsaw. I drew some reference lines with a square, just to make sure I didn’t accidentally cut into the side walls.
I flushed up the edges with a flush trim bit on the router, and this made a huge mess. Definitely make sure to wear your dust mask when doing this type of router work, even if you’re using dust collection on your router.
Step 5 : Cut Holes Into Desk PC Midsection
Next, I needed to cut the holes in the back of the midsection for the three cable pass through brush plates. I made a quick jig for this, since I needed to cut three of these holes on the back of the midsection and two of these holes behind the keyboard tray on the front of the midsection.
I initially tried to cut these using the jigsaw for the holes behind the keyboard tray, and they looked really sloppy, so I whipped up a quick template and then used a router and a template bit to cut the holes. This left me with a nice, clean hole, and it was much faster than the jigsaw method.
The final piece of the midsection was the center divider with all of the holes for mounting the computer components. This piece really intimidated me, and I was worried that, if I cut the holes by hand with the jigsaw, the spacing wouldn’t line up properly.
The piece is 70 ½” inches long, about twice the maximum length I can cut on my CNC, but I had the idea that I could run one file and cut half of the holes, flip the piece over lengthwise, and then run another file to cut the holes on the other half.
I only had one piece of plywood this long in the shop, so I either got this right or would have had to go to the store to buy more plywood but, luckily, it worked flawlessly. Before flipping the piece, I made some reference lines to make sure everything lined up properly, and it worked out great.
I attached the divider with pocket holes and didn’t glue the piece in, just in case any of the computer components are changed and the holes need to be adjusted.
Last, I cut the holes in the back corner of the midsection, which is where the cables will pass through down into the legs. With those cut, the first half of this project is done.
I hope you enjoyed Part 1 of this Desk PC build. This was a big one, so I thought it would be best to split it up into two parts. There was a lot to cover here, and Part 2 includes building the drawers, making the top, connecting the midsection and cabinets, installing hardware, and applying paint!