Installing Tile Floor for the First Time // How To Lay Tile Floor
I've completed my first tile floor installation and I put together this video to show you all of the tips and tricks I found along the way. Learn how to lay a tile floor from a beginner's perspective!
Note: The links below are affiliate links
📦 Materials Used On The Tile Floor Installation:

Pin it!
Process For Installing Tile:
Our laundry room was one of the spaces that was the most dated when we moved into our new house. It had crappy looking vinyl flooring, wire shelving, poor lighting, and even the carpet directly outside of the laundry room didn’t match the rest of the carpet in the hallway, leading me to believe there had been some kind of overflow in the past.
All that to say, my wife and I definitely wanted to make some changes to this laundry room area. In this video, I’ll be covering removing the old flooring and adding new tile flooring, and in the next video which will be out later this week, I’ll go over the rest of the changes I made to the room.
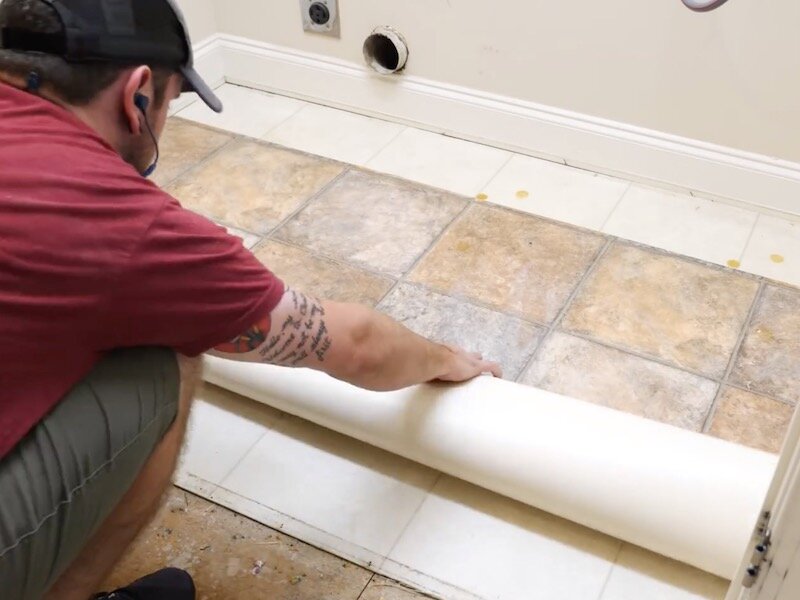
Step1: Remove Old Linoleum Flooring
So the first step in this project, as with any other room makeover, was to get everything out of the room. This included all of the random odds and ends that had collected on and around the washer and dryer, as well as the washer and dryer themselves, which were due for replacement anyway.
I picked out a new washer and dryer from Lowe’s and, when the new units were delivered, I had the delivery guys leave the new units in the hallway outside of the laundry room so I could work on the floor.
I vacuumed all of the lint and other crap off of the flooring and then I could get started removing it. And I thought this would be a super easy task but boy was I wrong.
First, I removed the quarter round by scoring the caulk between the quarter round and baseboard and then prying it off with a pry bar. I was planning to replace this anyway, so I wasn’t particularly careful here.
As you can see, the vinyl flooring actually started to peel back as I was removing part of the quarter round, so I thought I was in the clear, but then I saw more vinyl flooring underneath. We’ll get to that in a second.
Just a tip, after removing anything with nails in it, like this quarter round, I make sure to flatten all the nails so I don’t inadvertently stab myself later in the project.
Anyway, with the trim removed, I went to remove the transition between the vinyl and carpet and quickly realized that this transition strip was permanently attached to the carpet. Well, as I mentioned, this section of carpet was mismatched anyway, so I decided to just go ahead and rip it out. This hallway will be getting hardwood flooring at some point, so that wasn’t a huge deal.
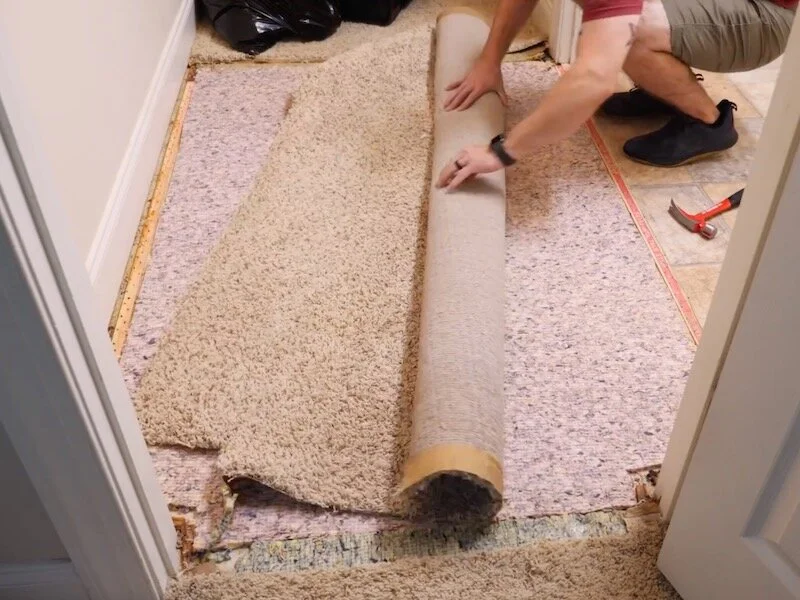
I cut the ends of this section of carpet, pulling it back from the tack strip, and then rolled it up and removed it. I repeated the process for the carpet pad, and then I could remove the tack strips.
The key when removing tack strips is to pry up on the nails holding them down, so that the tack strips don’t break into a bunch of pieces. This way, you can remove the strips all in one piece and it goes much quicker.

With the carpet out of the way, I could finally go about removing the flooring from the laundry room and, unfortunately, as I mentioned, there was another layer of flooring beneath that top layer. It looks like the previous owner had damaged the floor and just decided to cover it up rather than try and fix it.
No worries, I figured removing the bottom layer of flooring would be easy enough but that was not the case. For some reason, this vinyl flooring had been adhered to a layer of ⅛” plywood and that was attached to the subfloor with hundreds of narrow crown staples. I still don’t understand why they didn’t attach the flooring directly to the subfloor, but removing the plywood and vinyl was fairly straightforward once I got a larger pry bar.
Removing the staples, on the other hand, was a royal pain. I know there are scrapers out there that might have been able to remove these, but these staples weren’t your typical carpet pad staples. These were over an inch long narrow crown staples, like cabinet shops use for drawer box assembly.
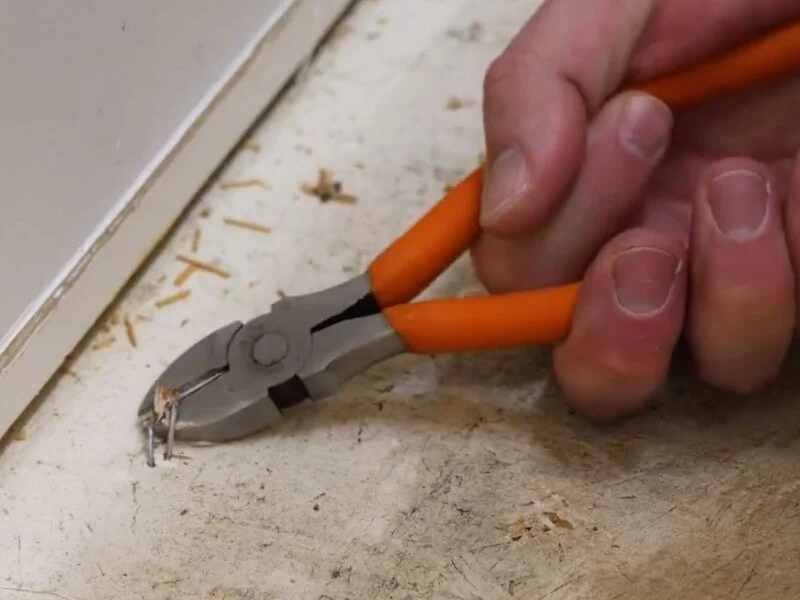
The best tool I found for removing these things was a pair of diagonal pliers. They were able to grip on the heads of the staples and then I could use leverage to pry the staples out. If I tried to just brute force the staples with vise grips, I ended up working a heck of a lot harder.
I also might have been able to pound the staples flush with a hammer, but I knew I was going to have to sand down some high spots and I didn’t want to be burning through sanding belts and sending sparks flying. Also, my little dude was sleeping in the neighboring room, so I was trying to be quiet.
Anyway, after getting all of those staples removed, I wanted to have a little fun, so I decided to try cleaning out our dryer vent using a method I had seen online, an electric leaf blower. This worked surprisingly well.
Step 2: Smoothing And Flattening Floor Before Tiling
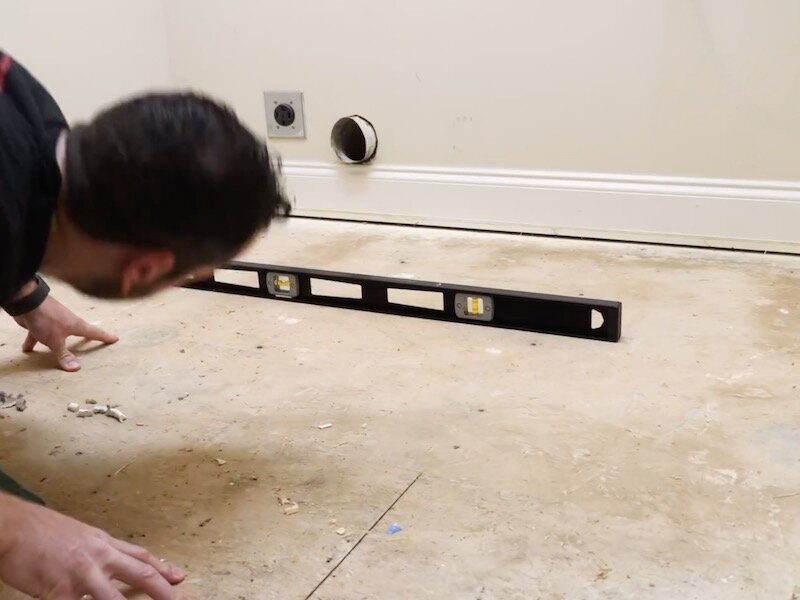
After cleaning out the dryer vent, I could check the subfloor for any high spots and, as I expected, there was a pretty decent hump right at the front of the room. I marked the high spots and then went at them with a belt sander. Getting your subfloor flat is especially important with large format tiles like the ones I used, since an uneven subfloor will tend to cause “lippage”, or unevenness between the edges of the tiles.
Step 3: Preparing Floor For Tile Installation
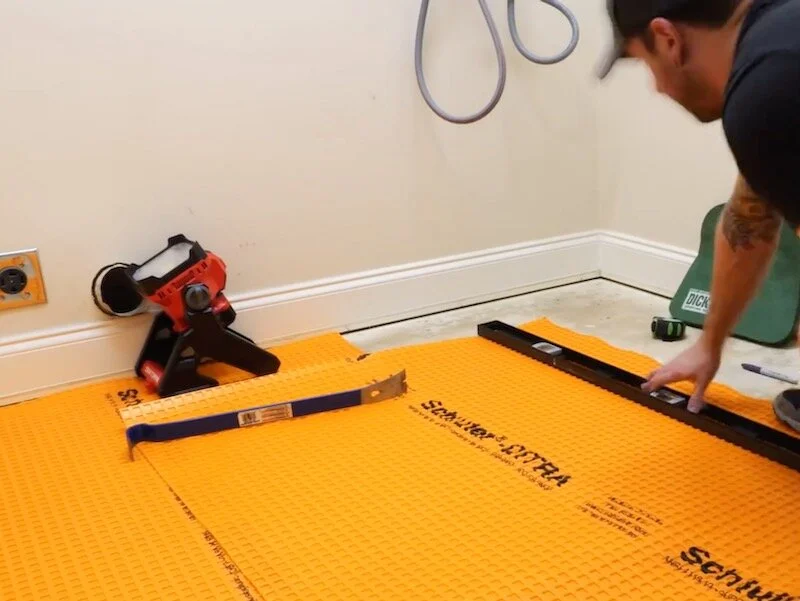
Once the subfloor was reasonably flat, I could move on to the actual tile work. First, I needed to prep the subfloor for tile. You don’t want to lay tile directly on an OSB subfloor, as the OSB will expand and contract at a different rate than the tile and you’ll end up with cracking.
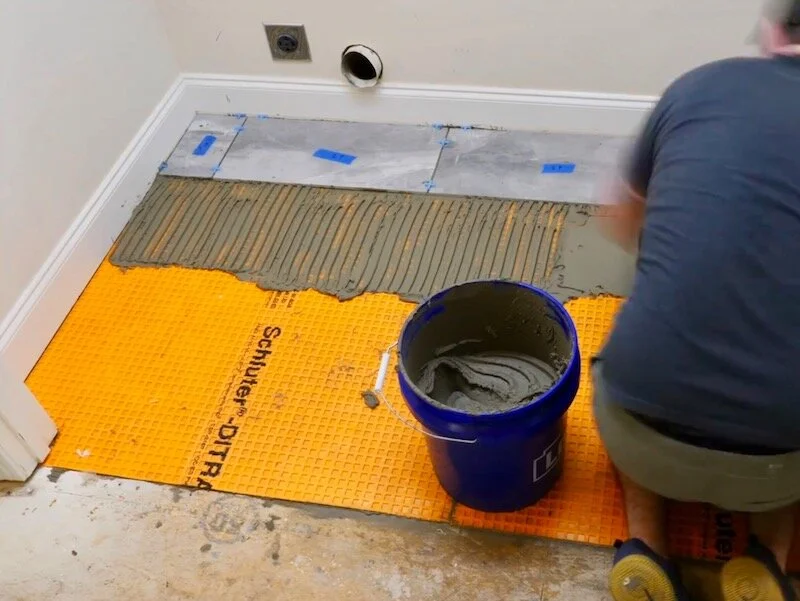
To deal with this, you need to cover the subfloor with either cement board or use an uncoupling membrane, which is what I went with. This orange plastic sheeting, called Ditra, is made by Schluter and is available in these smaller rolls that are great for a smaller space like this one.
The purpose of this product is to uncouple your tile from your subfloor, which allows the subfloor, whether that’s concrete or wood, to expand and contract while allowing the tile to stay put, which reduces cracking. This system can also provide really effective waterproofing if you tape the seams, which would be perfect in a bathroom but wasn’t something I really needed in this laundry room.
Anyway, to install this Schluter Ditra, I first needed to cut a few sections to size to fit in the space. Since this stuff is plastic, it cuts easily with a utility knife or scissors.
Step 4: Dry Fitting Mohawk Forever Style Tile
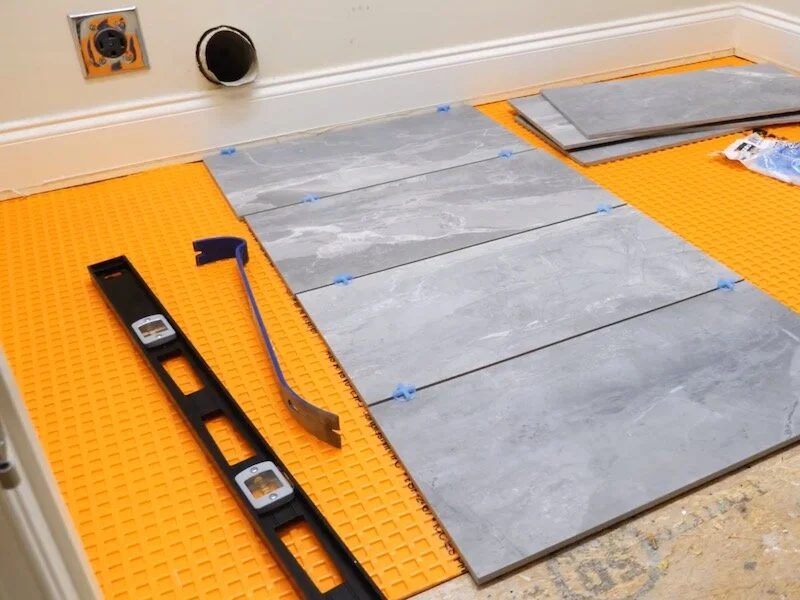
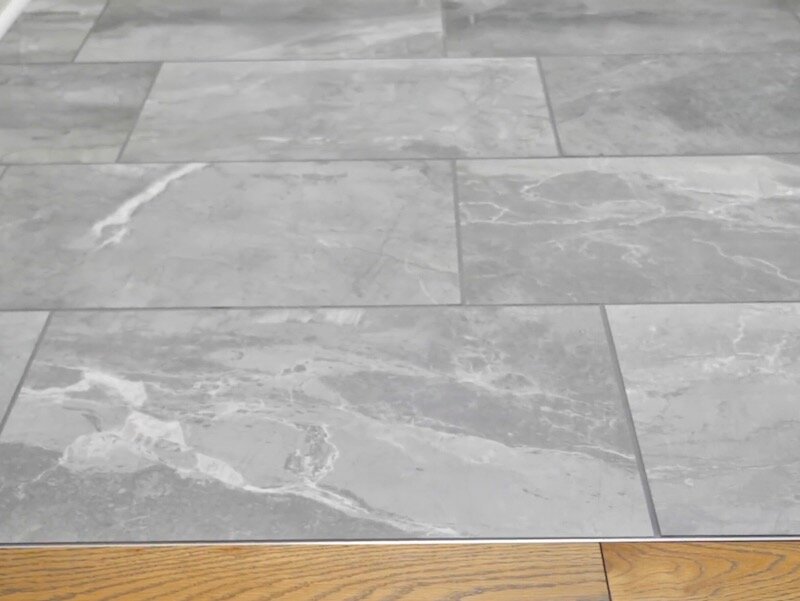
Once I had the pieces fit, I could go ahead and start dry fitting the tile. For this project, I went with this really nice looking 12 x 24 inch large format tile from the Mohawk ForeverStyle line from Lowe’s. This tile is waterproof, stain proof, and scratch resistant, so it’s great for high traffic areas, and Mohawk uses a proprietary Wearguard glaze to give it this added durability.
It also comes in a bunch of different styles that you can mix and match, but this grey marble pattern was my favorite and looks awesome in my opinion.
First, I needed to figure out how much I was going to need to rip off the first row of tile and, as it turned out, these tiles fit almost perfectly in this space. I added the tiles with a 3/16” spacer, which is the gap I was leaving for the grout, between each of them as well as between the first tile and the wall. Luckily, I only needed to remove a ⅞” strip from the first row to have the tile end where I wanted it.
Next, I removed the Ditra temporarily so I could mark out the center point of the room as well as the offset I was going with. On a larger room, you would mark these lines with a chalk line and also install your tile from the center of the room but, honestly, on a room this small, it was easier to just mark my lines with permanent marker and install them starting in the back of the room.
On large format tile like this, you don’t want an offset greater than 33%, otherwise you will end up with lippage. That means your typical brick pattern, with a 50% offset, will not work with large format tile. I went with a 6” offset, which worked out to about 25%, and I think this looked great and also meant I ended up with very little tile waste.
Step 5: Cutting Tile On Tile Saw
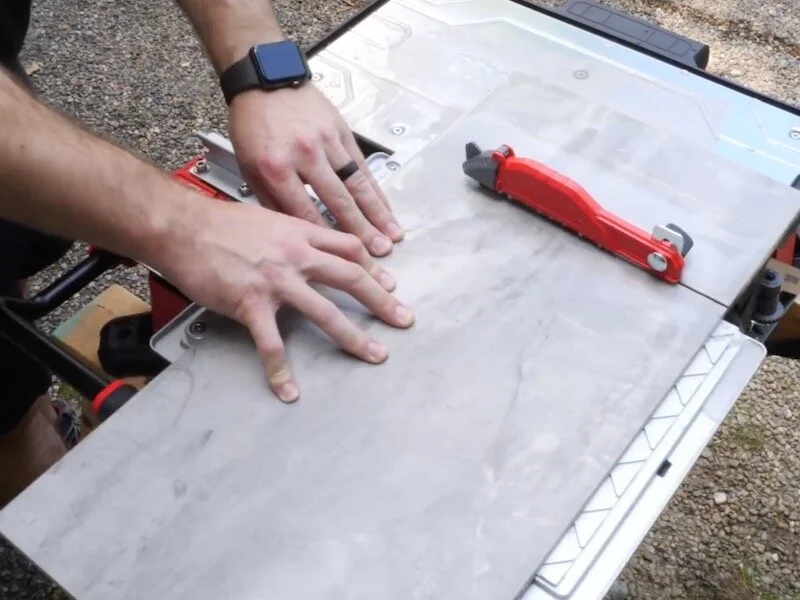
With my offset laid out, I could start marking tiles to be cut. If you’ve watched my flooring install videos, this is essentially the same process. To mark where to cut, I would flip the tiles around 180 degrees, place a set of spacers between the wall and the tile and then use another spacer at the end I could be cutting to know where to mark my line. This would ensure that I’d have the correct gap on both sides of the tile once it was cut.
I marked the tiles at each end of this first row and then headed downstairs to make my cuts. I used a tile saw here but, honestly a manual snap cutter would have worked fine for 90% of the cuts on this project. It would have also meant I could have made these cuts inside, rather than having to bring the tiles downstairs, through a gauntlet of three different baby gates.
Anyway, I first cut the two tiles on the ends to length and then I ripped all four of the tiles in this first row to width.
After making my cuts, I could go back and fit the tiles and somehow I had mismarked one of the tiles, so I had to trim off a sliver and then I could finally dry fit the first row.

With the first row in, I could just continue repeating the same process on the next two rows, adding spacers, marking for my cut, making my cuts, and then dry fitting the tiles.
When I got to the last row, I needed to undercut the door jam and trim before I could get the tile fit. To do this, I took a scrap piece of the Ditra and a tile and used that as a guide for my oscillating tool. In retrospect, I should have added more space here to account for the thinset, as I ran into issues with this gap being too tight later on. I think a second layer of Ditra would have done the trick.
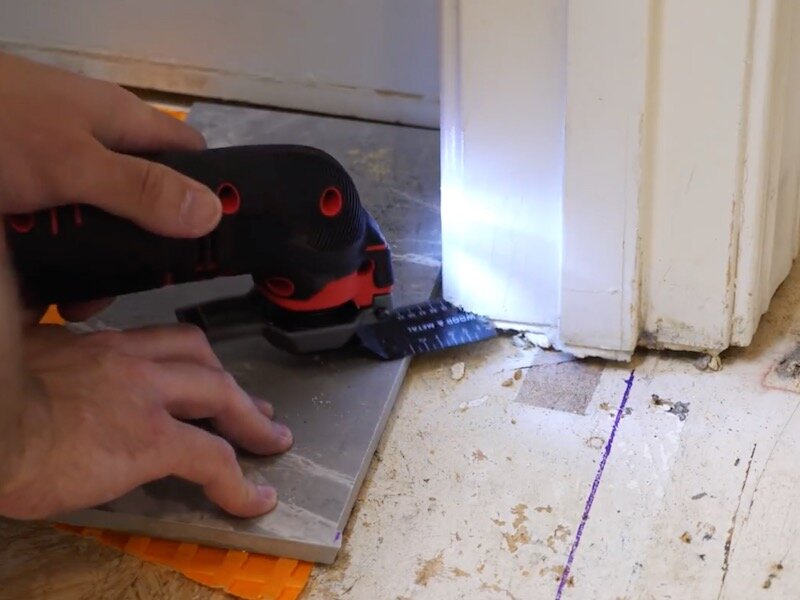
Once the door jamb was undercut, I marked where I needed to notch out the tile, making sure the cut edges would end up under the jamb and trim, and then made the cut with the tile saw. These notch cuts are really where the tile saw came in handy and, if you don’t own a tile saw, you could just rent one for a project like this.
Finally, with the last two tiles dry fit, all of my cuts were done and the floor was looking really good.
Step 6: Installing Transition Strip At Laundry Room Threshold

The last thing to cut before the actual tile install was this transition strip, called a Schluter strip. This gives the tile a nice, finished edge and, since it’s aluminum, cuts easily with a standard miter saw.
Before removing all of the tiles, I labeled them with some painter’s tape and permanent marker, so that I could easily put them back in the correct spot when it came time to install the tile. I also vacuumed the subfloor again, just to make sure nothing was going to interfere with the tile.
Step 7: Applying Thin Set And Laying Tile
With that, I could move on to actually laying the tile, which was something I was honestly pretty nervous about. As I mentioned, this was my first tile project ever so I didn’t have the experience to help me make sure the consistency of my thinset or mortar was correct.
By the way, in case you don’t know, the words “thinset” and “mortar” are used interchangeably when tiling, I just figured I’d point that out so you don’t get confused.
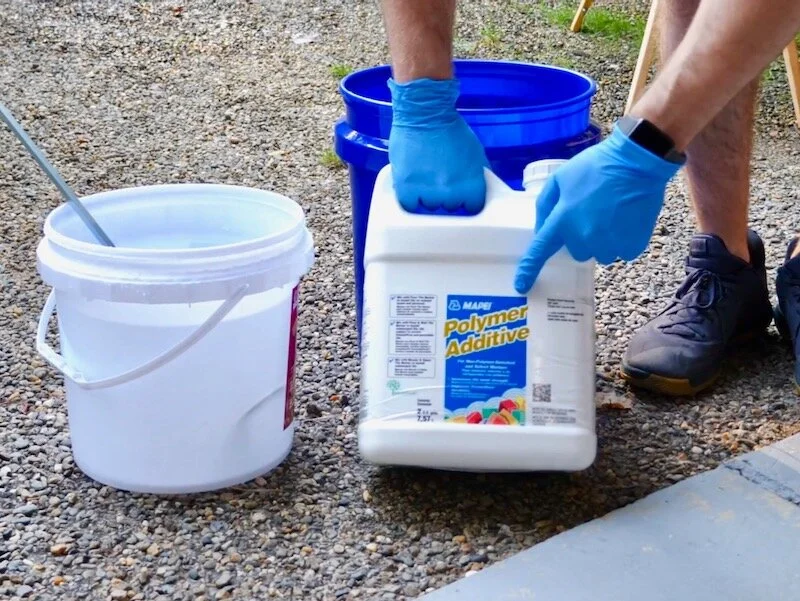
Anyway, to help me get the thinset consistency right, I decided to go with this thinset mortar system from Mapei, which I picked up at Lowe’s, and it clearly outlines the liquid to powder ratio.
In this case, I was using this polymer additive as my liquid, rather than water, as it helps the thinset bond to the subfloor better, so I used the entire 2 gallon container, and then I used this uncoupling membrane mortar, which again called for the entire bag to be used.
This made the mixing math easy but also meant I had a very full bucket. That first stir with the paddle made a bit of a mess…
Anyway, I mixed the thinset for a few minutes, making sure everything was nicely incorporated, and then let the thinset sit for about 5 minutes. This rest period gives the thinset time to absorb the moisture and smooth out, this called “slaking”, and is extremely important.
After slaking for 5 minutes, I mixed the thinset again and then it was ready to use. That was, of course, after bringing this 60 pound bucket of thinset upstairs…
Before applying the thinset, I wiped down my subfloor with a damp sponge. This both cleans any remaining dust off of the subfloor but also wets it slightly, to ensure the subfloor doesn’t suck too much moisture out of the thinset.
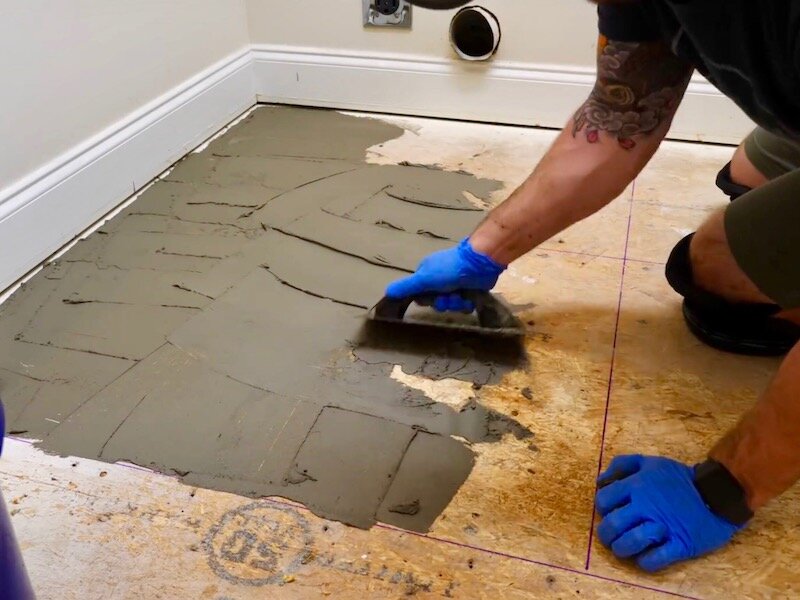
You might be thinking, but what about the uncoupling membrane, I thought we couldn’t attach the tile directly to the subfloor? And that is correct, this first layer of thinset is to adhere the membrane itself to the subfloor, not for the tile. As you can see, I really tried to work the thinset into the subfloor, to make sure I ended up with a good bond.
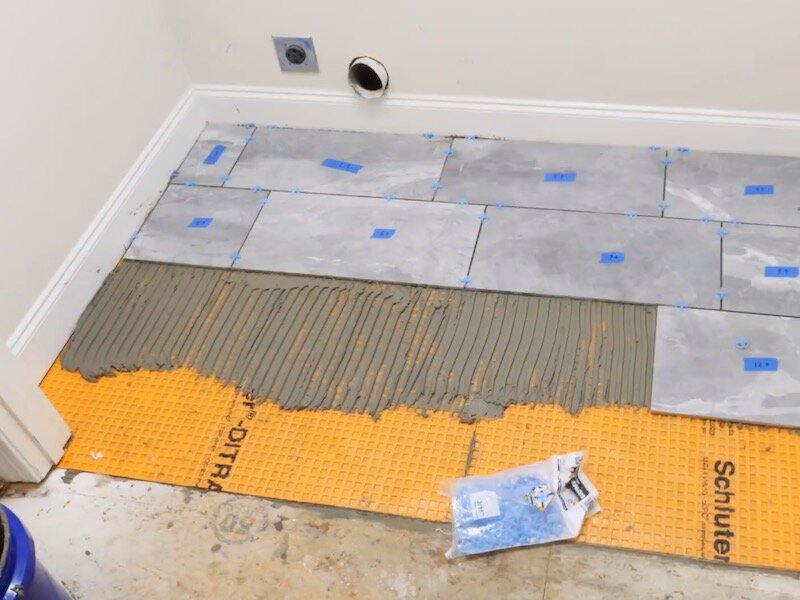
After working the thinset into the subfloor, I added a slightly thicker layer and then used the notched side of my trowel to comb the thinset. This Schluter system requires one of a few specific notch patterns, so make sure to follow the directions there.
Looking back at this, I probably needed a slightly thicker layer of thinset, but again, this was my first time ever laying down mortar.

With the thinset in place, I could add the first piece of the membrane. I laid it in place and then worked the membrane into the thinset with a rubber grout float. This membrane has a fleece backing that bonds with the thinset and it is extremely important that it’s worked into the thinset well.
After going over the membrane with my grout float, I peeled back an edge to see how even the coverage was, and I could see that I had some bare spots around the edges.
I went back and added more thinset then repeated that process. You can see that the front edge was peeling back when I didn’t have enough thinset but stayed flat once I added more.
After finishing the first section, I repeated the same process for the other section, which went a little smoother since I was getting more comfortable with the trowel.
Once the second section was in place, I removed any excess thinset and then I could start laying the tile.
This was essentially more of the same process, except that I needed to use a different trowel with a bigger notch pattern, since I was using large format tiles. The notches in the thinset allow the air to escape from beneath the tiles and these larger notches give that air more room to escape with the larger tiles.
Also, the notches should be running perpendicular to the longest edge of the tile, again to allow that air to escape. You don’t want to have your notches running in different directions and especially not in a swirling pattern, as air will get trapped, the tile won’t bond properly, and you’ll end up with weak tiles.
One other thing I needed to do here was fill in that waffle pattern on the membrane, to make sure there was enough thinset so that the tiles bonded well.
Between the layer of thinset below the membrane, along with filling in this waffle pattern, you’ll definitely use more thinset than you would if you used cement board, so plan accordingly. In total, I used about 75% of that 50 lb bag on this 6 foot by 4 foot section.
When spreading the thinset, I would only work in sections that I could get tile onto within about 15 minutes, as I didn’t want the thinset setting up before I could get the tiles set in place.
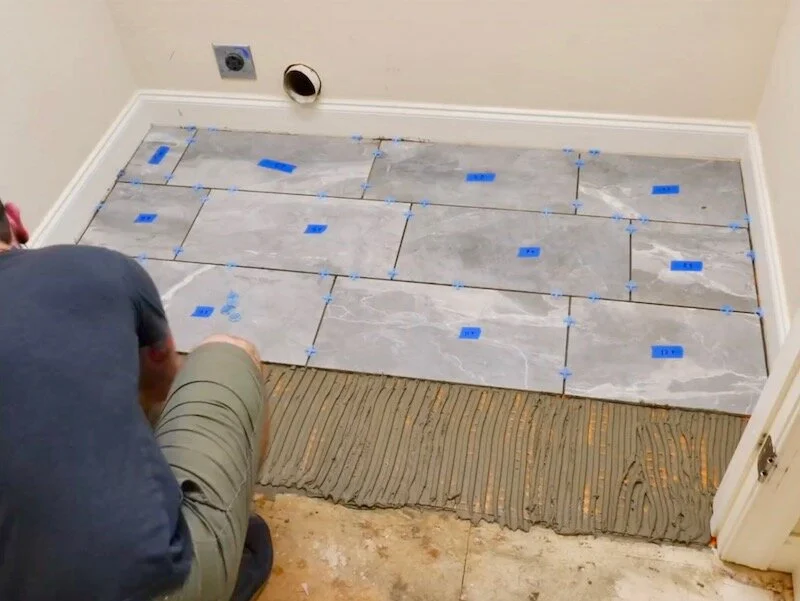
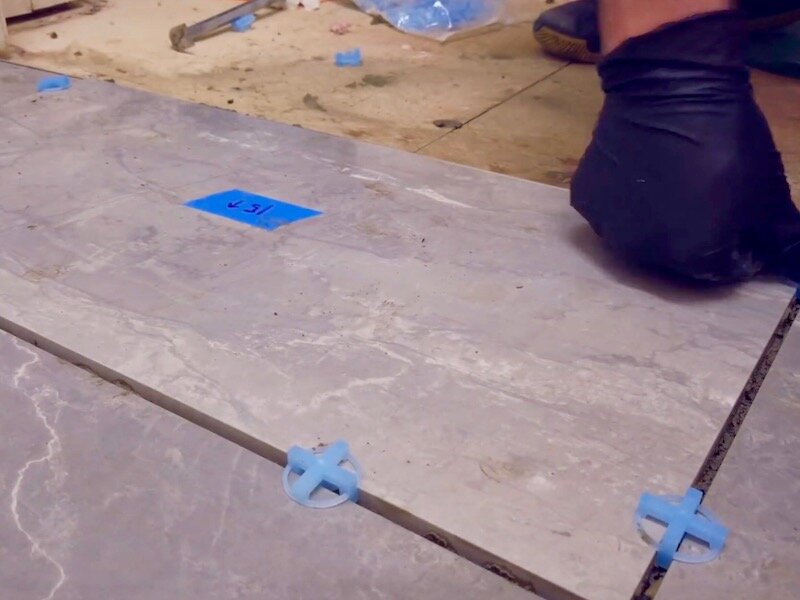
Setting the tiles was easy, I just put the tile in place, wiggled the tile side to side to set it in the thinset, and then added spacers around it to keep it from moving around when I added the next tile.
One tool I wish I had picked up was a suction cup, which would have really helped me set the tiles without getting thinset all over my hands. They make suction cups with handles specifically for this task and, if I work with large format tiles again, I’ll definitely be picking one up.
One other thing I probably should have done was what’s called “backbuttering”, where you spread a thin layer of thinset on the back of the tile before placing it. This is especially important on large format tiles so that you get even coverage and is something I honestly just completely forgot to do. It seems like my tiles bonded well and there will be no foot traffic in this space, but only time will tell.
I just kept working my way down the line, adding more tiles and spacers, until I got to the last row, which is where I ran into a little trouble.
As I mentioned earlier, I didn’t undercut the door jamb and trim enough, and this made sliding the tiles into place under the trim extremely difficult. The left side went in OK, but the right side wouldn’t go all the way in without some assistance. I had the bright idea to use a hammer using some of the Ditra as padding, and surprise, surprise, I ended up cracking the tile.
I had to recut the tile on the fly, while the thinset was setting up, and this made for a pretty stressful moment.
Luckily, I was able to get the tile cut quickly and got it in place with a little persuasion, and then I could place the last tile. Before I did that, I needed to also add the transition strip, which I should have done before laying the last row of tile. The strip goes between the tile and the membrane and is held in place by the thinset.
Once the strip was in place, I could lay the last tile, and you can see some lippage between that tile below the trim and the center tile. This was again because the trim was pushing down on the tile, causing it to lift slightly. I didn’t feel like there was much I could do at this point so I just left it, but in hindsight, I would have used a pull saw to cut away a little more of the trim if I had it. I was just worried the oscillating tool would send dust everywhere and it would end up in the thinset or I would somehow damage the tile.
After setting that last tile and breathing a sigh of relief, I cleaned up any excess thinset from the subfloor, between the tiles, and on the baseboards, and then I let it set up for about 24 hours.
The next day, I removed all of the spacers and painter’s tape, as well as any thinset that I might have missed. I found that the scouring pad on a kitchen sponge did a good job here, as well as a putty knife for any bits between the tiles.
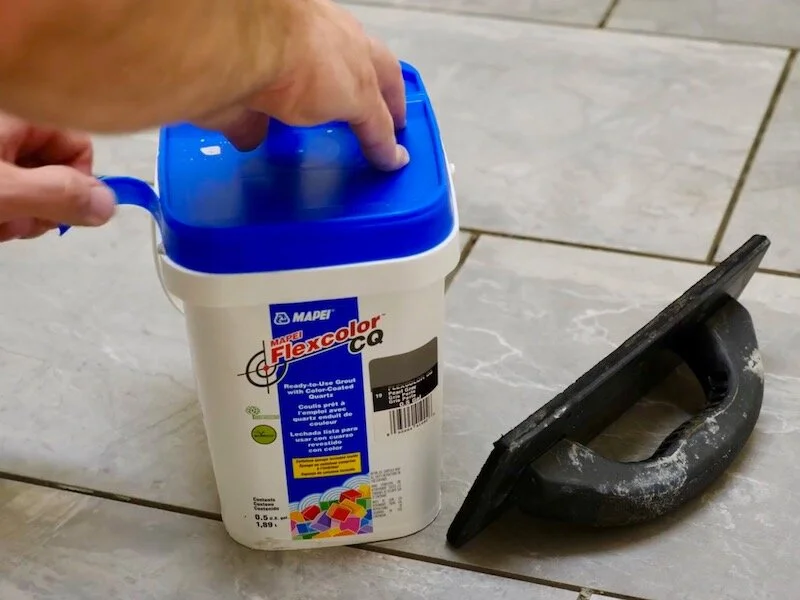
The next step in the tile process was grouting, which really gives the tile a finished look. I went with this pre-mixed grout, another Mapei product from Lowe’s, and the nice thing is that it doesn’t need to be sealed afterwards, since it already has a sealer mixed in.
Adding the grout was a pretty simple process. First, I wiped down a section with a damp sponge, to make sure no other debris was on the surface of the tile, and then I started working the grout into the seams between the tiles. You really want to work the grout in to make sure the joints are completely filled with grout, otherwise it might end up settling as it dries and leaving you with voids.
Step 8: Applying Grout Between Tiles
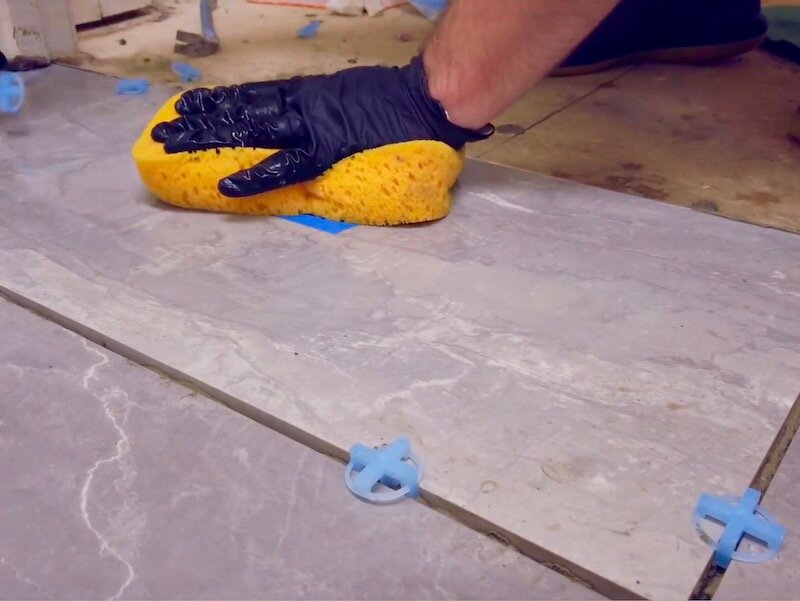
After working the grout into the joints, I scraped across the tile at a 45 degree angle from the grout lines to remove the excess grout.
After scraping off the excess, I gave the grout five to ten minutes to set up before cleaning the rest off with a sponge, and I actually grouted about ¾ of the entire floor before going back with the sponge. I think this ended up being a little too long, as the grout was a little difficult to remove with the sponge. In retrospect, I would have done two sections at a time.
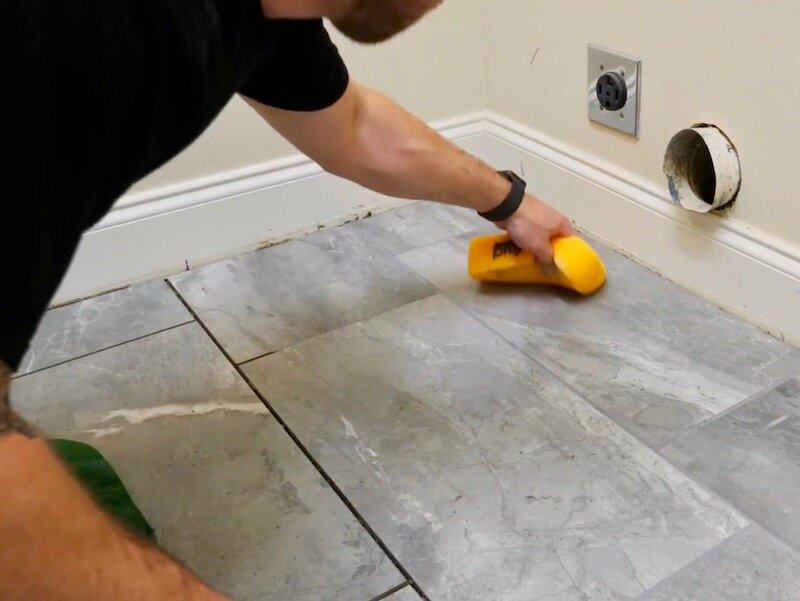
Once again, when removing the grout with the sponge, I wiped across the face of the tile at a 45 degree angle to the grout lines, and I didn’t need to use a ton of pressure.
Also, my sponge was damp but not dripping wet. If you add too much water, it’ll have the tendency to lift the color from the grout.
I just continued working my way around the floor, removing the excess grout and added grout to the last section, as well as in the gap the transition strip has built in, and then I could let the grout set up for another 24 hours.
As I mentioned, I think I let the grout set up for too long before wiping it off with the sponge, so I was left with some bits of excess grout on the surface of the tiles, along with a little bit of haze. This is pretty typical.

To remove the haze, I used this tile cleaner. I poured it on and spread it around with a sponge, let it sit for a few minutes, and then came back and scrubbed any problem areas with the scouring pad on the sponge. After scrubbing, I went over the entire floor with my grout sponge to remove any excess cleaner, and then dried off the floor with a towel.
And with that, the tile portion of this project was finished. It’s not perfect, but I think it did a decent job for my first tile project and, honestly, about 95% of this tile will be covered by the washer and dryer anyway.