
How To Build An Outdoor Dining Table From Pallet Wood
In this video, I'll show you how to build an outdoor dining table out of reclaimed pallet wood. The best part about this project was that the wood was all free! The only items I had to purchase were more deck screws and the spar urethane I'll be using for the finish.
Tools used in this project:
(Note: most of the links below are Amazon affiliate links which help support Crafted)
- Dewalt 20V Max Impact Driver
- Dewalt 20V Max Reciprocating Saw
- Ryobi Miter Saw
- FastCap Best Fence 3 Miter Saw Stand
- FastCap Sawhood Pro
- Black & Decker Circular Saw (Vintage)
- Dewalt Random Orbit Sander
- Titebond III Wood Glue
Pallet Table Cut List:
- 2x4, 72" (x3)
- 2x4, 37" (x2)
- 2x4, 16 ¼" (x2)
- 2x4, 35 ¼" (x2 in video, ideally x4)
- 2x4, 31" (x8)
- ½" thick pallet slats, 31" with 45 degree miters on each end in parallel (x~30 depending on size of pallet slats)

Pallet Table Build Summary:
My inspiration for this project was this pallet that I received as part of the shipping container for the FastCap Best Fence Pro 3 miter saw stand that you can see in the background of this shot. The pallet ended up being nearly the perfect size for an outdoor table at 72 x 32 inches?. The final table should seat 6 people comfortably.

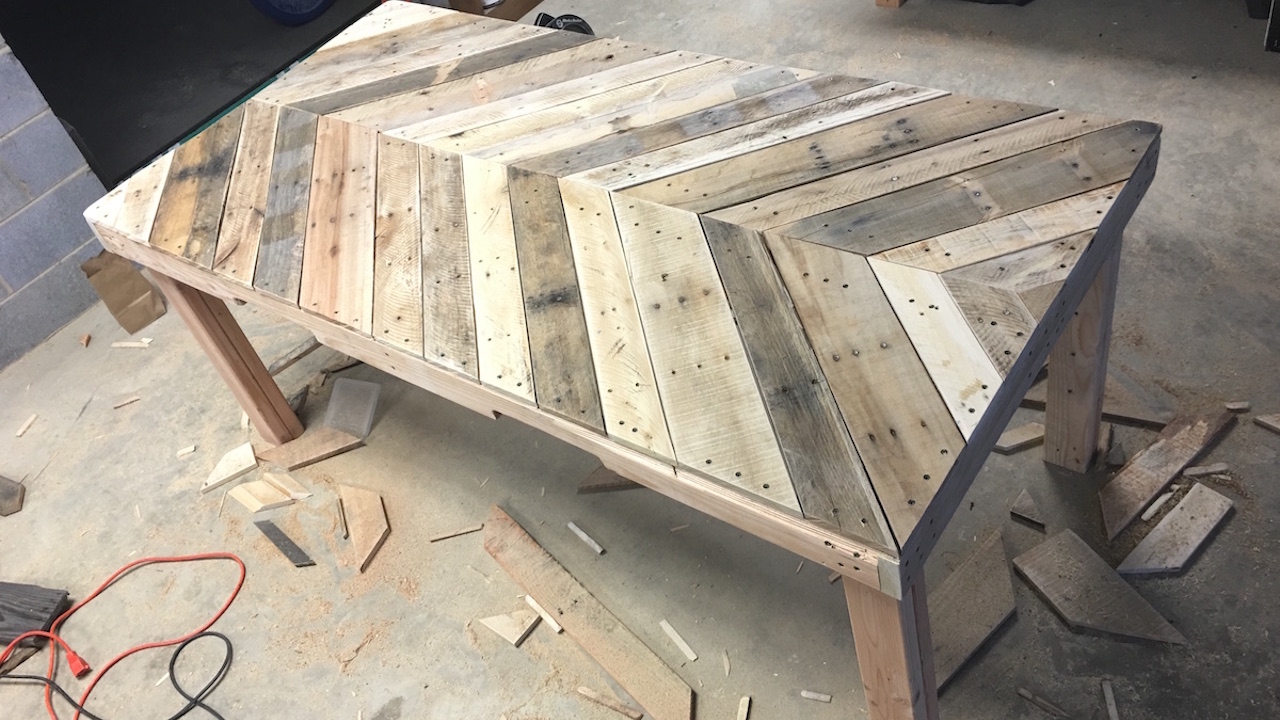
The first step in this project was disassembling four pallets, including the large pallet that would make up the frame of the table. As it was, the large pallet didn’t have enough structural integrity to serve as the table top. I also wanted to have the slats on the top of the table arranged in a chevron pattern, which meant I had to remove the existing slats anyway.


To remove the slats, I used my Dewalt 20V Max Cordless Reciprocating Saw with a 12 inch long Milwaukee The Axe blade. The reciprocating saw works with my other Dewalt cordless hammer drill and impact driver batteries, and it made quick work disassembling the pallets. The Milwaukee Axe blade is designed for wood with nails, so it was perfect for this job. I will add links to the saw and the blades in the description below.
One of the longer 2x4 segments from the large pallet had some cracks at both ends that needed to be repaired before moving forward. I added Titebond 3, spread the board a few times to distribute the glue, and added more glue on the other side. I clamped the two pieces together and let it dry. Off camera, I also added three 2 ½ inch deck screws vertically through the ends of the 2x4 to help secure them.

Once the pallets were disassembled, I began cutting the slats to rough length, which ended up being 31 inches long point to long point including the 45 degree miter. I went ahead and cut 45 degree miters on each end in parallel, mainly because I didn’t want to reset the angle of the miter saw for each cut just to cut off the excess from each slat. One thing to note is that pallet slats have tons of nails, so pay attention to where you’re cutting. You want to cut a bit off from each end of the slats, as the ends are usually where the nails and cracks are concentrated.

The FastCap Best Fence Pro 3 miter saw stand make this task super easy. I used the built in stop block on each cut, and it was very efficient to cut the slats to size. The FastCap Sawhood Pro was also extremely helpful in keeping the dust from the miter saw contained into one area. We will have a full review of both the Best Fence and Sawhood Pro coming soon, so stay tuned for that.
While I was cutting the pallet slats to size, my wife gave them a quick sanding with 120 grit paper using my random orbital sander. I didn’t want to remove too much of the rough look of the slats, I just wanted to avoid splinters becoming an issue in the final piece. She also removed any nails that were protruding.

For the legs, I kept it very simple, cutting scrap 2x4s down to 30” segments and gluing and screwing them together to form 4x4 legs. The legs ended up being extremely sturdy and worked out perfectly for the build.

The last piece that needed to be cut was another 2x4 which would complete the outer frame of the table top. These two pieces were cut to 37 inches, making the total dimensions of the final table top roughly 74 x 37 inches.
Once the last piece was cut, I began assembling the frame. I used two 2 ½ inch deck screws per corner, trying to keep the frame as square as possible. A few of the pieces were slightly warped, but I managed to get it close. I attached the center support in the same way as the corners, with two 2 ½ inch deck screws at each end.

To attach the legs, I glued and clamped the legs in place, then fastened them with four 4 inch deck screws on each side, for a total of 8 screws per corner. This created a very sturdy bond between the frame and the table.

I also wanted to add two smaller center support pieces to the structure, which I measured and cut on the miter saw. The pieces measured just a bit over 16 inches. I attached each piece with two deck screws on the outside and one deck screw toenailed in the center.

After completing the frame, I pounded in all of the cut off nails that were protruding from the surface of the piece. These nail pieces will tear up your sandpaper in an instant, so it will save you some money if you go ahead and do a thorough job to start.
I sanded the frame for what seemed like forever, using 80 grit then 120 grit paper. I flipped the table over several times and sunk the nails on all sides, sanding along the way. My main goal with the sanding was to keep my guests from getting splinters from sitting at the table, not to remove too much of the character from the wood. After all, this is supposed to be a rustic table.
After sanding thoroughly, I wiped the piece down with a wet rag to remove the dust. I then started laying out the slats on the table. I wanted to leave a small space in between each of the slats. This was for two reasons. First, it is winter now and, once summer arrives, these slats will expand. I don’t want them cracking from the pressure. Second, this piece will live on my back patio with no cover and I want water to be able to drain through the piece.

I fastened each slat with 2 ½ inch deck screws at both ends, but was having a lot of issues with cracking on the inside portion of the slat. I tried pre-drilling holes, which didn’t seem to make a difference. I also tried nails, which were just as bad. Once I was about halfway through fastening the slats, I had the idea to add 2x4s one inch on either side of the center 2x4 support, which would allow me to fasten the slats further from the inside edge.


I measured and cut the pieces on the miter saw and fastened them with 2 ½ inch deck screws. These additional pieces made a huge difference in the amount of splitting I was getting and also made the table top much sturdier feeling. If I was to do this over again, I would have added these pieces from the beginning, but I think the slats without the additional support will be fine.
I continued adding slats until I had completed the top. This required a good number of smaller cuts, but I had a lot of scrap pieces lying around that ended up working. One of the small triangular pieces kept splitting on me, and I eventually decided to just glue it into place. On the corners of the table, I had a lot of issues with the slats splitting right down the middle and ended up using some thicker, longer slats that I had already cut and sanded. These worked out well.

After covering the top of the table completely, it was time to trim off the excess. I used a circular saw and a straight edge for this. I purposely left about half an inch of excess on each side to make sure I didn’t cut into the frame of the table. This was a lucky choice, because the right side piece of the frame has a slight bow to it, meaning that after the first pass with the circular saw, it was ½ proud at the ends but flush in the center. The other sides didn’t have this problem, so I did a second pass and trimmed them flush.


I then sanded the edges of the slats as well as the top of the piece with 80 grit sandpaper on my random orbital sander. I might come back with a belt sander on the edges to get the slats a little more flush, but my belt sander is currently broken, so we’ll see.


Overall, this was a fun but challenging build. Pallet slats can be a real pain to work with, but I'm really happy with the final piece, especially since I didn't spend a dime on wood! Thanks for reading and please subscribe to my YouTube channel to be updated about our newest video content.